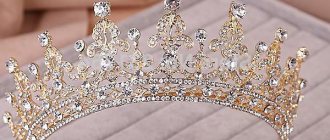
A headband with flowers adds femininity and tenderness to the look. A girl with such a headband will look natural and graceful.
A headband with flowers with your own hands is suitable for photography, because it can turn a girl into a forest nymph or fairy, or allow a girl to emphasize her individuality by decorating her hair with such a beautiful decoration.
A hairstyle with such a headband will add fabulousness and originality to the image.
You can also find models wearing such jewelry in fashion magazines.
Accessories made from artificial flowers
For such headbands, artificial flowers are often used because this is the most practical option, since real flowers cannot be used more than once.
A wreath of artificial flowers is not difficult to make yourself. All you need is glue and flowers. To create a wreath, you need to paste over the rim, taking into account the color scheme.
The most successful decoration is considered to be one made from large flowers, such as roses. This option is suitable for a wedding, birthday, and will create an original look for a long-awaited event, but it is unlikely that it is appropriate for daily wear.
If the buds on the headband are smaller, it is appropriate to wear it daily. This headband is also suitable for the bride.
Making such a wreath will not be difficult even for novice craftswomen. Using your imagination, you can easily make such a wreath at home.
Soft wire crowns
You will need: shiny soft wire, headband, scissors, glue.
Master Class
- Select the crown option and follow the step-by-step photo instructions.
- Crown with pompoms.
- Crown with stars.
- Crown with thorns.
Such crowns will definitely not go unnoticed, and most importantly, they are very easy to make!
Accessories made from fresh flowers
For a wedding arrangement, it is better to use real flowers, because live buds will be the best option for such an event. When choosing flowers, you must take into account the fact that they fade quickly, and this decoration will not last more than a few hours.
In order for the wreath to last at least one day, you need to choose flowers that do not dry quickly and spray them with a special solution. Then the accessory can last the entire event.
Large rosebuds will help create a memorable image, and wildflowers will surprise guests at the wedding and give the bride’s style an unusual look. Chamomiles, cornflowers or dandelions will add even more charm to the image, and will not spoil it in any way. Roses attached to a thin elastic band will create the image of a sophisticated and elegant bride. Such an accessory can only be limited by the color scheme and your imagination.
You can add beads and various types of berries to the headband. It is also simple to do: all the selected components are glued to the base, which will add a piquant look to the image.
Crown made of beads and wire
You will need: thick and thin wire, 8 large beads, beads of different colors and sizes, ruler, pliers.
Master Class
- Make the base of the crown from thick wire with a diameter of 12 cm.
- Wrap thick wire around the base of the crown.
- Attach 8 links of thick wire.
- Thread the bead and seed bead onto a thin wire, then attach it to the top of the link. Decorate all the links of the crown in the same way.
- String beads onto a thin wire and decorate the crown, wrapping each link in a chaotic manner.
The crown made of beads and wire is ready! I recommend watching this video!
CROWN made of BEADS and BEADS WITH YOUR OWN HANDS - master class
Trend of the season
The first place is occupied by long thick flowing hair and a headband with large flowers in addition. You can use this decoration for every day and combine it with bright accessories.
A braid braided on one side with a rim of large flowers will look beautiful. Or a retro hairstyle with an accessory of medium-sized flowers.
Crown from a plate
You will need: a paper plate, scissors, markers or pencils, a glue gun, multi-colored buttons.
Master Class
- Fold the plate in half.
- Make cuts as shown in the photo instructions.
- Color the crown to your liking.
- Bend over the crown links and glue buttons to the tops.
The plate crown is ready!
Selecting a base
It is better to choose classic shades (black or white) for the base-rim. These colors will harmoniously combine with this or that clothing. Decorating in classic shades is appropriate to go to a party or to work. For older women, wide, plain headbands are suitable.
Also, the color of the decoration depends on the choice of event or weather conditions. It is better that the color scheme matches the bag or shoes.
DIY headband
DIY hair jewelry is always attractive, unique, and original. You can independently make real masterpieces that will not only complement and complete the image, but also add a special twist to it and add individuality.
In addition, the manufacturing process itself gives craftswomen a lot of pleasure, distracting them from everyday worries and troubles.
What and how to make flowers for the headband? Any available and easy-to-process material is suitable for work, for example, felt, foamiran, satin ribbons, fabric, and so on. We present to your attention simple and understandable master classes on making hair accessories with your own hands.
Corrugated paper flowers
Corrugated paper is a budget-friendly material for creating jewelry.
It’s not difficult to create such an accessory; you will need:
- Paper of different shades.
- Headband.
- Toothpicks.
- Scissors.
- Threads.
- Glue.
Cut out rectangles from paper, then cut out petals from these rectangles. Wrap the petals around a toothpick and secure with thread. This is the fastest way to create buds. When you have the required number, you can start attaching them to the headband.
You can create beautiful headbands with available materials at home. Such decorations definitely have a right to exist.
Lace crown
You will need: wide lace ribbons, scissors, a centimeter, PVA glue, a glue gun, spray cream, gloves, wax paper or film, a glass, rhinestones and crystals, glitter.
Master Class
- Measure your head circumference and cut the lace.
- Put on gloves, pour glue into a container and wet the lace.
- Place the lace on wax paper and leave to dry for several hours.
- Paint the lace.
- Decorate the lace by attaching rhinestones and crystals using a glue gun.
- Hot glue the ends of the lace together to form a crown.
The lace crown is ready!
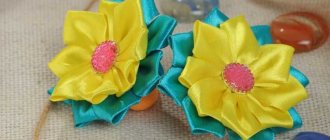
Satin ribbon accessories
To create such a decoration you will need:
- Satin ribbon.
- Headband.
- Threads.
- Matches.
- Glue.
Cut off part of the ribbon and singe the ends to prevent it from unraveling. Sew the ribbon along one of the edges using regular stitches and tighten the thread. One of the flowers is ready.
When you have the required number of flowers, you can start gluing them. You can cut out leaves from green ribbon and start gluing them.
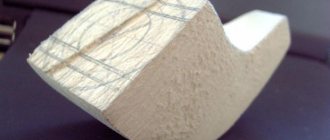
Wooden crown
You will need: a thin wooden board, a pencil, a knife, paper clips, a bucket and a saucepan, hot water, glue.
Master Class
- Mark the links (teeth) of the crown on the tree.
- Cut them out.
- Fill a bucket with hot water and soak the wood in it for 10 minutes.
- Fill a saucepan with hot water, remove the crown from the bucket and place it in the saucepan for 10 minutes.
- Drain the water and leave the crown in the pan overnight until completely dry.
- Glue the ends of the crown together, securing them temporarily with clamps.
- Remove the clips and decorate the crown to your liking.
The wooden crown is ready! I recommend watching this video!
DIY: handmade beaded