Options for tubes for alcohol
Champagne tubes
Champagne is a drink for special occasions. And champagne tubes with a logo are a special gift packaging. Champagne bottles are usually distinguished by their thickness (large diameter), which is why their packaging is wider than a regular bottle tube. Dimensions of a standard champagne tube:
- diameter 92 mm,
- height 350 mm.
Tubes for Asti Martini
More shaped bottles of Asti sparkling wine require packaging even wider than tubes for champagne:
- diameter 100 mm,
- height 350 mm.
Tubes for wine
Wine is distinguished by a variety of not only brands, grape varieties and regions of production, but also a huge number of bottle options, which sometimes complicates the choice of a tube for wine. Some wine bottles look like whimsical sculptures and require a custom tube design. But still, we can all easily imagine the standard bottle, tall and narrow, in which most wines are produced. A standard wine tube ranges in size:
- diameter 80.5 (for classic narrow bottles) or 92 (for thick ones, like champagne) mm,
- height 350 mm.
Vodka tube
The traditional vodka bottle is narrow and tall, but many brands offer non-standard options. Depending on the shape, typical vodka tubes have the following dimensions:
- diameter 73 or 92 mm,
- height 370 mm.
Tubes for cognac
Cognac is a favorite gift in our country, especially among men. But cognac bottles are almost always wide and curly, so if you want to give cognac in a tube, the packaging size will be designed individually within a diameter of 120 mm.
Tubes for bottles of other shapes
We produce branded tubes for all types of alcohol
. Tubes with a logo for whiskey, liqueurs, tinctures, the sizes depend solely on the shape of the bottle. Maximum possible sizes:
- diameter 120 mm,
- height 650 mm.
Garden mushrooms
Recently, it has become fashionable to decorate the courtyard of both a private and multi-story building with plaster sculptures. Crafts for the garden can be made with your own hands from plaster and scrap materials that can be found in any home.
For example, you can make funny mushrooms from a plastic bottle, deep bowl, cling film and plaster:- Dilute the gypsum solution;
- Cut off the neck of a plastic bottle;
- Pour the solution into the bottle and let it dry completely;
- Line the inside of the bowl with cling film;
- Pour the solution into a bowl;
- Remove the completely dried mushroom stem from the mold;
- When the solution in the bowl just sets, insert the stem in the center and leave until completely dry.
The finished mushroom can be painted and varnished.
Cleaning a smoking pipe
This should be done when the tube has completely cooled down. You must carefully disconnect the mouthpiece by unscrewing it clockwise. If you pull it out using extraordinary force, you can damage both parts of the tube. The mouthpiece is cleaned with special brushes, starting from the side of the mouthpiece. It is better to have several of them for a more convenient process.
It is necessary to clean the chibouk after each smoking session. The brush is started from the side where the mouthpiece was. After everything is cleaned, the brush is left inside the pipe until it is time to fill the pipe with tobacco. Cleaning of the product is completed by wiping all its external surfaces. The tube is then purged to remove any carbon or debris that may have remained inside.
For general cleaning of the tube, wax, alcohol, and various other liquids are used; it is carried out as it becomes dirty. And only the owner himself knows when simple maintenance is not enough.
Nowadays, a pipe is more of a decorative element; it is rarely smoked because it needs to be looked after. Now they are like fine wine, which is only savored from time to time. There are also many accessories for such a delicacy (stands for smoking pipes, for example), which can come in different shapes and sizes.
Plaster hands
You can use plaster palms to decorate your home and garden. To make this craft from plaster with your own hands, you will only need medical gloves, plaster, a funnel and a large round bowl.
- Dilute a thick plaster solution;
- Pour it into the gloves using a funnel. The more solution you pour, the larger your palms will be as a result;
- Place gloves with plaster of Paris in a bowl until palms are shaped like boats;
- When the plaster has hardened, cut off the gloves.
In the garden, you can place a small pot with a flower in the palm of your hand, and use it as a vase at home.
Candlesticks
From scrap materials you can make a DIY candlestick craft to decorate your home. To do this, prepare:
- Candles;
- Metal or ceramic muffin tins;
- Corrugated paper cupcake pans;
- Gypsum mortar;
- Cling film or tape.
Dilute the gypsum solution according to the instructions, then follow the instructions:
- Place the paper pan into a rigid pan;
- Pour 2-3 cm of gypsum into the mold and let it set a little;
- Wrap the bottom of the candle with film or tape;
- Place the candle in the center of the mold, press down slightly;
- Pour the remaining plaster into the mold.
When the plaster is dry, remove the candle and remove the paper form. The finished plaster craft that you made with your own hands can be colored as you wish. Such candlesticks look most impressive when combined. Make several copies of the same size at once.
Simple tying of an inflated foil balloon
The check valve, fixed in the neck of the structure, holds the gas very reliably. In this regard, the tape is fixed to the inflated products so that it does not fly away. However, if the tape is tied slightly above the inlet, the strength of the check valve will be compromised and the product will begin to deflate within a short period of time. The braid must be fixed below the inlet hole.
If the air temperature begins to decrease, the pressure from inside the foil structure can drop significantly. As a result, the check valve will begin to let gas through. At the same time, the protruding neck of the ball does not look very impressive. To securely close the structure and hide the neck of the product, it is recommended to use a professional tying method.
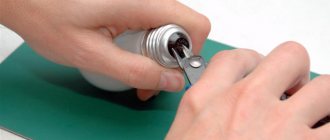
Position sensor
We saw off another 3-4 centimeter piece from the same handle.
Fill one side tightly with glue. Insert a ball of foil. Next, insert two small nails halfway and fill them with glue. While the glue has not cooled and hardened, distribute the nails evenly so that they do not touch. Now the ball inside can close the nails. A kind of switch. If you connect such a sensor to the open circuit between the LED strip and the battery, when the sensor is tilted, the ball will close the circuit and the LED strip will glow. Bouquet of flowers “Frozen Summer”.
Master class with step-by-step photos Author: Olga Nikolaevna Glotova, teacher at GBOU JSC “Kizemskaya SKOSHI”.
Arkhangelsk region, Ustyansky district. This master class is designed for children of middle and high school age, teachers and parents.
Description of work.
A bouquet of flowers made from food foil.
Purpose. The work can be used for interior decoration, as a gift, or for presentation at an exhibition. Goal:
Development of artistic and creative abilities.
Objectives:
- teach techniques for working with foil;
- develop fine motor skills of the hands; - to accustom children to meaningful, creative work - to instill aesthetic taste; Foil is an amazing and very affordable material for creativity; crafts made from it have a very attractive and mysterious appearance. A bouquet of flowers - what could be more wonderful, more tender, what could be more desirable!? A bouquet of flowers can only be compared with a song, With that song that you cannot forget. For work we will need:
Foil for baking Scissors Ruler Wire Empty jar We begin our work by making blanks, for this we cut strips 3-4 cm wide. Twist the flagella. To make a flower petal we need 4 flagella. We lay one flagellum horizontally and alternately scroll 3 flagella onto it, securing everything together. We make five such petals. For the stamens we take five flagella. We twist one side of the flagellum a little, connect it We form a flower We fasten it to the wire We weave the leaves in the same way and fasten them to the wire We wrap the stem of the flower with a strip of foil In the end we have such a wonderful flower We make other flowers in the same way For our bouquet we will make decorative grass for decoration Next Let's start making the vase. We make a circle from a foil flagellum, we wrap the rays to this circle. We measure the bottom of the prepared jar, bend the rays and decorate our vase. So, the finished vase. We decorate our bouquet, put it in a vase and admire our creation!
Foil crafts, combined with your own imagination, can become a real platform for creating a masterpiece!
You can’t even imagine how many interesting things you can make from foil for yourself or.
If you have children, activities with foil will benefit them; they will help develop imagination, creativity, attention, accuracy, and will also keep adults from getting bored.
What can be made from foil:
- postcards;
- crafts made from foil flowers;
- candlesticks;
- New Year's toys;
- volumetric figures of berries, fruits, animals, etc.
Foil dress - master class
To make it, take:
- existing dress;
- foil;
- a piece of soft material;
- scissors.
Take enough foil to cover the front of the dress. Now carefully wipe the top with a soft cloth to get an impression of the seams. Cut with seam allowance. Fill all parts of the robe in the same way. Now you need to place the two shelf parts next to each other so that you get a one-piece part. Fold the seams so that the two parts of the shelf become one. Now, using the same technology, connect the front of the dress with the back, and then connect the bodice of this product with the bottom.
Wrap each seam several times so that the parts are well connected in this place and do not come apart. You can additionally glue the seams.
If you have a beautiful dress of the desired style or even just a combination, you can turn each such item into a charming evening outfit.
To do this, you need to place foil parts on top of this base and firmly connect them with glue. You can make the petticoat by attaching a foil frill to double-sided tape.
And the next new thing is created even faster. Wear a dress with thin straps and decorate one of them with a foil bow. You will wrap the rest of the foil around your body and secure the pieces by twisting them. Just make naughty bows in these places.
There are other tricks that will tell you what can be made from foil. If you like to weave with this material, then the next master class will be just perfect for you.