How to make a teddy bear from a towel
Such a wonderful teddy bear will be a beautiful and practical addition to a gift for a newborn baby.
You needed: a medium-sized terry towel (approximately 50x80 cm), a ribbon 2.5 cm wide, two narrow ribbons, a thin elastic band.
1. Lay out the towel on the table and fold one edge along the short side to the middle (photo 1).
2. Rolled the long edges of the towel up to the center transverse line (photo 2). I pressed them with my palm so that the structure did not fall apart.
EVERYTHING YOU NEED FOR THIS ARTICLE IS HERE >>>
3. Visually divided the resulting workpiece crosswise in half. I took it by the thinnest edge (without a fold), turned it around once and laid it on top of the other part of the rolled towel. Carefully straightened the fold and slightly turned the top rolls from the center (photo 3).
Articles on the topic (click to view)
- Chintz: what kind of fabric is it, pros and cons, application
- Textiles in the interior
- Photo curtain for the kitchen
- Kitchen interior with black and white curtains
- Photos of beautiful curtains with eyelets
- Photo of voile curtains for the kitchen or living room
- Photo of a bedroom interior with beige curtains
4. Placed an elastic band on the small top of the towel to create the bear's head. I formed the ears and secured them with thin ribbons (you can use small rubber bands) (photo 4)
5. I tied a bow from a wide ribbon around the bear’s neck, hiding the elastic band.
What figures can be made from towels?
How to fold towels into diagram figures
In fact, all of these products, no matter how many there are, can be used for absolutely different conditions, that is, as a birthday gift, as a decoration for the bath, as a surprise for a child, as an option, you can use simple figures in order to store towels in the bathroom in this way for future use for their intended purpose.
For example, as the last one, you can place a stack of round multi-colored cakes. Moreover, if the product is made with high quality and all elements of the figure are securely fastened, then children can play with them, like with ordinary soft toys, but they will be much softer.
Bear made from a towel: photo
© Author: Natalya Telnova, Moscow. Photo by the author
TOOLS FOR CRAFTSMAN AND CRAFTSMAN, AND HOUSEHOLD GOODS VERY CHEAP. FREE SHIPPING. RECOMMENDED - 100% CHECKED WITH REVIEWS.
Below are other entries on the topic “How to do it yourself - for a homeowner!”
Subscribe to updates in our groups and share.
Let's be friends!
1 Comment
DIY balloon crumble This favorite cartoon character is easy to make and even a child can make it. 1.
We inflate 4 balls of the same size with a pump and tie them together - these will be the paws of the crumb (photo 1) 2. For the body, inflate one balloon larger than the previous ones and tie it to the paw blank.
3. Two narrow long balls - for the ears (photo 2).
We bend them in half and glue them with Rubber Moment glue to the top of the body. We hide the place of gluing by wrapping the workpiece around the ears with the same long ball. 4.
Expert opinion
Smirnova Ekaterina Anatolevna
7 years of experience in interior design, professional architect
We form legs from two inflated small balls and glue them to the body. 5.
We cut out eyes and a mouth from colored paper and fix it to the workpiece with glue. 6.
Instead of a nose, glue a small red ball. Smart Krosh is ready!
Terry towel toy
The cat can be sewn in different ways, in different positions. A terry towel toy is also made from various materials; it is important to choose them well. It is recommended to use fleecy fabric for such a cat, so today we will make a cat from a terry towel.
It is advisable to make an accurate pattern, then the result will definitely not disappoint you. To decorate the face, just beads, buttons or eyes and a nose from old toys are enough.
It’s not difficult to sew a cat from a simple homemade terry towel. Towels come in different colors, and therefore the cat can turn out to be any kind; these can be sewn in several different colors.
To sew such a cat you will need:
- terry towel (color optional)
- fiber filler, polyester
- for button eyes or beads
- for the nose, beads or thick threads, floss or others
- pattern
- sewing machine
- threads to match the fabric
Pattern
We transfer the pattern to paper and adjust the size of the cat ourselves. You can enlarge the pattern using a photocopier or printer.
We lay out the towel and fold it into two parts, transfer the paper pattern onto the towel. Our body turns out to be one-piece with legs.
Carefully cut out each detail and in the end we should get:
- for the body 3 parts, 2 backs and tummy
- one piece for the ponytail
- there are four parts for the head, so the cat will be voluminous
We take the parts for the head, first fold two parts with the front side and sew them together, do the same with the other two parts. Now we sew them together, leaving room for stuffing. The ears need to be stitched on the wrong side to make triangles; we will not stuff them.
Now we sew the torso from the wrong side, first the tummy to the backs, and then all sides together, leaving the hole at the neck unsewn. Fold the tail in half and sew it on the wrong side, leaving a hole at the bottom, turn it inside out. If there is a desire, the tail can be made flexible, then you will need a piece of wire; it must be inserted into the tail, having previously been wrapped with polyester. You can simply stuff the tail with padding polyester. We turn out the already sewn parts of the head and body, straightening all the seams. We sew the tail, already stuffed, to the body. We fill the body and head with filler, controlling the softness of the toy and stability. We sew up the holes on both the head and body.
Now we decorate the cat’s face, embroider the nose, antennae, and mouth with floss threads. If you wish, you can glue a ready-made plastic nose and stitch the antennae with thread. We sew on the eyes from buttons or beads. At the end we sew the head to the body and get a beautiful cat.
(2 votes. 3.00 out of 5)
koteko.ru
What will you need?
Only at first glance it seems that for a towel bear cub you will need only one thing - in fact, the towel itself, but this is not so.
- You need a ribbon or ribbon. You can choose any of them to suit your taste. They must be at least 1 meter long and reach 2.5-3 cm in width. The color is selected depending on the color of the towel. It is best to take a contrasting one, but compatible with the color of the towel.
- Scissors.
- Rubber bands. It is best to purchase stationery erasers for this “master class”. They are invisible and at the same time durable.
- Double-sided tape or glue.
- Any decorations at your discretion - buttons, decorative doll eyes, a toy bear nose, stickers in the form of eyebrows.
- Finally, the towel itself. The aspect ratio of the towel should be 2:3. A small towel 40 x 60 cm is best suited, but you can choose another one with similar parameters. The color of the towel can be any. It can be multi-colored with polka dots, the color of a pleasant cappuccino, white, blue and pink.
Bear
You can make beautiful crafts from towels not only with your own hands. Invite your child to make himself a beautiful and soft toy made from a towel of his favorite color. From the materials, take the towel itself, a ribbon, decorative eyes and nose, as well as three elastic bands used to wrap money.
Everything is done very simply. A rectangular towel is placed on a flat surface, the middle is determined, and then the edges of the towel are tightly curled towards the center. Once the edges are rolled into rolls, you need to flip one side over the other so that the face of one roller faces you and the other faces the floor.
Next, the product is folded in such a way that one part of it should be slightly longer than the other. Spread the upper rollers a little, and to give the bear a head, tie the elastic band tightly around the intended area.
Instructions
Below are step-by-step instructions on how to quickly and easily make a bear from a regular towel.
- We lay out the towel on a flat surface, it can be a table or a bed.
- Visually divide the towel into three parts and fold one part lengthwise so that its edge is in the middle of the product.
- Now turn the towel over so that the wrapped part is on the right. We begin to twist the towel to the middle and temporarily secure it with a heavy object.
- We do the same with the other part of the towel - we roll it into a tube. We fix it in this position (you can do it manually).
- Next, you need to turn out the free edges and twist them. At this stage, it is important to roll the product carefully so as not to spoil the rolled “legs” of the teddy bear.
- The middle area is straightened out.
- The upper part – the bear’s head – is immediately visible. We fix it with an elastic band.
- Afterwards, you need to fold the towel on your “head” in the form of two ears. We secure them with an elastic band, just like the made head.
- To make the elastic band invisible, tie a ribbon or braid around the bear's neck. The ends must first be treated with a lighter so that the ribbon does not unravel.
- Decorate the product to your taste.
- The teddy bear is ready.
Jacket and tie
Here is a step-by-step description for beginners on how to create such a product. The first step is to lay a black towel and a white one on it so that they lie edge to edge, corner to corner. The next step is to take a ruler and strongly press the top towel along its entire length so that a mark remains.
Next, fold the top towel with its ends towards the middle, which was just pressed with a ruler. You will end up with a rectangle that needs to be folded in half again. Next, carefully turn the corners of the towel so that you get two triangles, one of which will be the collar, which is what you need to pin with a pin so that it doesn’t move anywhere.
After that, it is important to turn back the edges of the jacket, insert the sharp end of the tie there, and then fold the jacket again. Unscrew the tie, secure everything with pins and the craft will be considered complete.
How to decorate?
First, of course, you will have to glue the eyes. They can be made from large decorative buttons, or they can simply be cut out of paper.
Another original option is to buy artificial eyes at a sewing store just for such crafts. Paper eyes can be glued with weak-hold adhesive (so that they can be easily removed afterwards) or with double-sided tape.
An artificial nose can also be purchased at a sewing store or replaced with a small black button.
The bear's mouth, as strange as it may sound, can be neglected. For a towel bear, this is not such an important detail, unlike the eyes. In extreme cases, it can be made from two light stitches of thread.
In addition, originality of design is also welcome. This can be either clothes for the bear or various hats. For a “bear-boy” you can sew a small bow tie, and for a “bear-girl” you can sew a felt hat or veil.
Small knitted scarves look great on these bears.
By the way, such a towel toy can be presented along with a hygiene product in a gift box. The set will look neat and beautiful.
The gift does not oblige both parties to anything, but will only bring pleasure.
Crafts of this kind are perfect for beginners in this business, since the process is carried out step by step, step by step, quickly and easily. To do this, you don’t need to have any special skills and it’s quite possible to make a bear in one evening.
Some of the most obvious advantages of such a craft are the low price and availability of materials. It's easy to do it yourself.
A visual master class awaits you in the next video.
A simple recipe for slime made from water
This recipe will help you make a slime that, in its consistency and characteristics, will be as close as possible to store-bought toys.
Ingredients and equipment
- 2.5 g of boric acid powder (you can buy the component at the pharmacy);
- 30 ml of regular transparent glue;
- 5 g of any dye. You can use both regular food and natural vegetable juice (beetroot or carrot juice);
- 200 ml purified water;
- 2 deep cups.
Process of creation
- Pour warm water (100 ml) into one of the bowls. Send boric acid powder there and mix thoroughly until the component is completely dissolved.
- In a second container, dilute the remaining water with glue and a few drops of dye.
- Now pour the solution from the first bowl into a container with dye and glue. Mix all the collected ingredients thoroughly.
The end result will be a stretchy slurry that all the kids will love. Since sodium tetraborate was used in the process of making the slime, you need to warn children that it is strictly forbidden to taste the toy!
Materials
To wrap a gift in an original way or make a cute surprise in the form of a teddy bear, you will need the following:
- A terry towel measuring 40 by 60 cm. The color can be any, but white, brown or cappuccino are better for cubs.
- Satin ribbon 1 m long and approximately 2.5 cm wide.
- Stationery erasers in the color of the towel or transparent.
- Scissors.
- Double sided tape.
- Buttons or ready-made eyes and nose from a craft store.
The second way to fold a towel in the shape of a Mouse
In general, this is the method used to make bears, but I saw a real MOUSE in this craft! :))) You just need to make the ears bigger. This method is widely known on the Internet. Just look, why not a mouse? Here's what I got.
Stage 1: Place the towel in front of you in the form of a rectangle. The label is facing us again so we can hide it inside.
Stage 9: The mouse turns out to be so dense that it can even stand. A complete toy made from a simple towel!
Stage 10: Decorate the figurine with accessories. I advise you to cover all the rubber bands to make it look more aesthetically pleasing. I covered the elastic bands on the ears with a lace braid, and on the neck with a satin ribbon.
The White Mouse - the symbol of the year 2022 - is ready! You can pack it in a transparent bag and give it to a loved one!
Decorating the figurine
Now you know how to make a bear out of a towel. You can decorate the figurine as you wish. The nose and eyes can simply be cut out of paper and glued to double-sided tape.
If you want to make a gift for a child, it is better to use buttons. Sew buttons of matching color and size instead of the eyes and nose. For the bear, you can sew a tulle skirt or pajamas. Instead of a towel, you can use pieces of felt or faux fur. The child will certainly like this toy very much.
How to make Huggy Waggy with your own hands from scrap materials
Amateur craftsmen on the Internet come up with different methods to create a blue monster. The author of Medialeaks analyzed the three most original and budget methods.
Magnit clamps come to the rescue
Rubber clips from the Magnit chain of stores, which Medialeaks talked about, became a good basis for creating a mini-version of Huggy Waggy. They can be received as a gift with a large purchase or purchased for 49 rubles. To make a monster, you need to choose a staple of a suitable shape - with a triangular head, as shown by TikTok user @nochevkini.
The first step is to erase the existing drawing. Now you need to paint the figure blue and wait until it dries. Then, using a thin brush, paint on Huggy Wagga's famous face with big eyes and a red, toothy mouth.
Stages of creating Huggy Wagga from scrap paper
It is best to choose durable acrylic paint. If you don’t have one at home, then you should take regular gouache and then coat the dried product with varnish.
Congratulations, little Huggy Waggy is ready.
Making a bear's face out of a towel
The second option is to make not the entire figurine, but only the face of the bear cub. This option is suitable if the towel is very small.
- Lay the towel with the pattern on the table, with the wrong side facing you. Mentally divide the fabric into three parts in width and 4 in length. We place gifts inside, closer to the center.
- We fold the towel overlapping first from the right to two-thirds, then from the left.
- Fold one quarter of the towel towards the center. And then fold it in half again. The bear's head is almost ready.
- We fix the nose and ears on both sides with an elastic band and glue the nose and eyes. When you fix the ears, you need to grab both the front and back of the figure so that the face does not fall apart. The result is a charming bear with a wonderful surprise inside.
You know two options for how to make a bear from a towel. Choose the one you like best and get creative! And after the bear, you can move on to more complex figures. Swans and cakes made from towels look very beautiful.
Decoration crafts
You can make beautiful crafts from towels not only with your own hands. Invite your child to make himself a beautiful and soft toy made from a towel of his favorite color. From the materials, take the towel itself, a ribbon, decorative eyes and nose, as well as three elastic bands used to wrap money.
Everything is done very simply. A rectangular towel is placed on a flat surface, the middle is determined, and then the edges of the towel are tightly curled towards the center. Once the edges are rolled into rolls, you need to flip one side over the other so that the face of one roller faces you and the other faces the floor.
Next, the product is folded in such a way that one part of it should be slightly longer than the other. Spread the upper rollers a little, and to give the bear a head, tie the elastic band tightly around the intended area.
The main advantages of crafts of this kind include low cost and availability of materials.
To make a bear figurine from such material, you need to prepare the following:
- A towel whose aspect ratio should be 2:3. The best choice for this purpose would be a product 40 x 60 cm.
- Ribbon or decorative braid at least 1 meter long, reaching a width of 2.5 - 3 cm.
- Thin elastic bands. The best option is stationery ones, since they are quite durable and at the same time almost invisible. You can also use those rubber bands from which children love to weave bracelets.
- Glue or double-sided tape.
- Scissors.
- Buttons or pieces of felt to decorate the nose and eyes.
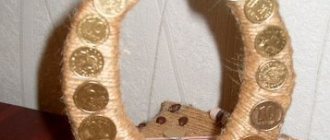
You can “revive” this towel figurine a little (photo). To do this, you need to glue button eyes and a felt nose to the face of the made bear using double-sided tape. If desired, the eyes and nose can be made from colored cardboard.
To disguise the elastic band in the bear's neck area, you can make him a beautiful bow from the prepared ribbon. If desired, the head of the figurine can be decorated with a small hat, which can be easily made from felt.
For a girl teddy bear, you can sew a tulle skirt.
You can make a lot of different original figures from ordinary terry towels.
Many needlewomen also make hares, ducklings, swans, owls, snakes and elephants from them.
You can creatively decorate a gift for February 23rd.
Sometimes you really want to diversify the usual symbolic souvenirs and give something that is so simple at first glance, but at the same time quite spectacular.
It’s always a pleasure to visit them, regardless of the occasion, and going to them with sweets and nice little gifts is doubly pleasant. You can surprise your hospitable hosts with anything, but what will definitely amaze and delight them is a miniature bear made from a towel.
Making a terry bear cub is quite simple. Auxiliary materials will include rubber bands, ribbons, a foam ball, ready-made eyes for a toy, pieces of felt or foamiran. It is better to take soft, velor or terry towels for a funny animal, then the bear will cause even more affection. We've done an extensive search online and found three different options for you on how to make a bear out of a towel.
a small white pompom and a small black spout for toys. The eyes, like the nose, can be fixed to the surface of the towel using double-sided tape or a glue gun. Tie a decorative ribbon just below the nose, thereby defining the head even more clearly, and the bear will be ready to be wrapped in holiday packaging.
The second option is also interesting. Here the bear is obtained without any special anatomical details, but it is very easy to fold. The master class is in Spanish, but the movements are understandable in any language. To hold the towel in the right places, you will also need elastic bands and beautiful ribbons. The nose is made from a piece of felt, add eyes to taste