Everyone loves to decorate a Christmas tree for the New Year, but there are situations when it is impossible to install a regular Christmas tree with garlands inside. In this case, you can resort to imagination and ingenuity and build a Christmas tree with decorations on the table. In this article we will look at how you can make a Christmas tree with your own hands from threads.
Everyone loves to decorate a Christmas tree for the New Year, but there are situations when it is impossible to install a regular Christmas tree with garlands inside. In this case, you can resort to imagination and ingenuity and build a Christmas tree with decorations on the table. In this article we will look at how you can make a Christmas tree with your own hands from threads.
Items needed to make a Christmas tree
You can make a Christmas tree out of threads. In this case, it is better to choose a traditional green color. To create a New Year's attribute we will need:
- Thick paper or cardboard
- Discussions
- Pencil
- Scissors
- Transparencies
- Vinyl glue
Snowflake made of money
Making a simple DIY money craft in the shape of a snowflake is perfect for kids. They will complete the task very quickly and a wonderful decoration for the New Year 2022 will be ready for the house.
To do this you will need:
- Souvenir money;
- Scissors;
- Glue;
- Ribbon.
Progress:
- From a banknote you need to cut a quadrangle with sides of 5 cm.
- Various shapes need to be formed on its surface. If you need a larger snowflake, you can glue two bills together and then cut them out. This DIY money craft for the New Year 2022, created quickly and simply in the shape of a snowflake, will look great on a Christmas tree.
You can make a wonderful decoration for the New Year 2022 from old coins with your own hands. This money craft is perfect for a gift to a loved one.
To do this you will need:
- Coins;
- Cardboard;
- Acrylic paint;
- Glue.
Progress:
- For the New Year 2022, you can make your own decoration for the room, as well as an incomparable gift for loved ones. Such a product will definitely bring good luck. You need to cut out the base for the horseshoe from thick cardboard. To make the money craft more durable, it is advisable to use cardboard from the box.
- Then you need to glue the coins onto the base. After this, the product is coated with acrylic gold paint. It is better to place a horseshoe above the entrance to the house. She, as has long been believed, will certainly bring good luck and prosperity to the family.
How to make a Christmas tree from paper and cardboard
To begin, take thick paper or cardboard and draw a circle on it. Then cut out this circle and cut out the radius of the circle on one side.
Pull a cone out of the circle and glue the edges of the knitting needle. The base for the Christmas tree is ready. Now you need to wrap the cardboard base with cling film. This must be done tightly and carefully so that pieces of cellophane do not stick out.
Now you need to take the threads and dip them in PVA glue. Those craftsmen who already have a full hand take a bottle of glue, fold the threads inside, fill it with glue, then thread the end of the thread with a needle through a cone-shaped cap. So, after watching the master class, you will see that the thread can be tied with glue, which significantly saves time.
Now you need to start wrapping the base with glue-soaked thread. Start wrapping from the wide side of the base, gradually working your way up. The threads must be crossed with each other, forming a Christmas tree with a pattern in the form of a cobweb.
When you decide the wrap is enough, let the wood dry. In a day our New Year's craft will be ready. You need to take out the cardboard or paper cone and carefully remove the cling film from our Christmas tree.
You can decorate the Christmas tree with beads, unnecessary chains, and “souls” made of shiny threads. You can also make Christmas balls from threads. If you want your tree to sparkle and sparkle, you can attach wreaths with small lights inside.
Materials and tools
What threads, glue and decorations can you use to create a thread Christmas tree? The following raw materials and tools may be needed here:
- cardboard or whatman paper - not too thick, so that it is easier to make bends, otherwise the shape will be incorrect;
- scissors (for children it is better to take ones with rounded edges for safety);
- yarn of any type and color, sewing threads;
- tape, foil, cling film;
- a compass or round object (for example, a jar) for drawing circles;
- decorative decorations: gold sprinkles, beads, buttons, sequins, bugles;
- water-based glue (PVA in a tube or bottle, do not forget to shake before use), or you can take wallpaper glue - leftovers after repairs.
The number and color of decorations are chosen according to your taste or depending on your goals. The composition looks interesting, combining different types of threads - in color, texture and thickness.
Note. If the tree is planned to be large, then it is better to take threads that are strong and thick, even with pile. For a small, compact Christmas tree you need thin spool threads.
How to make a Christmas tree from scrap materials
For those who do not trust cardboard and film, we can offer a more reliable option. For this we need:
- Scissors
- Scotch
- Christmas tree decorations
- Glue container
- Discussions
- Durable plastic folder
- Vinyl glue
Step-by-step master class
You need to cut a circle out of a folder, make a cone out of it, as in the first method, and secure it with tape. Then, following the instructions, wrap the base with threads. To make the tree more interesting and beautiful, you can use threads of different shades of green and wrap them in turn.
After our Christmas tree has dried, you can free it from the conical base and start decorating. Cut out paper snowflakes can also serve as decoration. They can be glued to wood with the same glue. You can make small New Year's balls from pearl beads, and also attach them to the New Year's beauty.
The main thing is not to overload the product, otherwise it may become unstable and fall off. Try to match all decorations to the size and weight of the tree.
Such a Christmas tree can be placed on the table in the office to give the business interior a New Year's atmosphere, or at home in the kitchen so that voluminous decorations do not interfere with cooking.
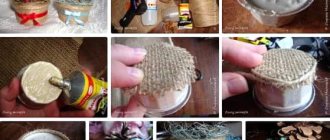
How to felt a Christmas tree from wool using the wet felting technique
If you have never done felting before, don’t be afraid - it’s not the gods who burn the pots. The main thing is to start, and then everything will go like clockwork. There are two felting techniques - dry and wet. When dry, they are felted with special needles with notches, hooking the fibers one after another.
When wet, use hot water and soap. Having felted wool using the wet felting technique, it needs to be given enough time to dry, and only then proceed to the next stages of work.
What you will need
Before starting work, you should thoroughly prepare so that you have everything you need at hand:
- 100 g of green wool for felting;
- multi-colored pieces of wool for Christmas tree decorations;
- wire for the barrel;
- film with bubbles;
- liquid soap;
- net;
- clay.
a towel, rubber bands, rolling pin, awl, and scissors - large and manicure-sized - within reach Also prepare a ruler, dry soap, a medium needle for felting the top, and a tube of Moment glue.
On cardboard, draw an isosceles triangle with an edge side of 10 cm and draw it with lines at a distance of 5 mm from one another.
detailed instructions
When all the necessary materials and tools are assembled, you can begin to work. Lay out the bubble wrap so that the bubbles are on top. Tear off pieces of wool, preferably of the same size, and lay out one row lengthwise and the second across. Lay out the wool, taking into account that it will shrink a couple of centimeters on both sides.
Add liquid soap to the water and wet the wool with the resulting solution . You can use a spray bottle, but you can simply add water little by little, wetting the material. To ensure that the wool is thoroughly saturated with soapy moisture, press it with your hands.
Cover the workpiece with a mesh and rub through it with your palms . Make light movements at first, and then press harder. Remove any fur that sticks to the mesh. Fold the edges of the wool inward and press them through the mesh again.
Cover the sheet with bubble wrap and roll it onto a rolling pin. Secure with rubber bands and wrap the towel as tightly as possible on top. Then apply the elastic bands again. You will have to roll the rolling pin for an hour - no less. Increase the intensity of the pressure all the time.
Unroll the woolen fabric. As you can see, it is dense and does not show through. Straighten it, align it around the perimeter and leave it to dry until the morning, maybe even on a radiator.
The next day, choose which side the wrong side will be on, and draw a straight line on it with a dry bar of soap. From this line, using a cardboard template, draw triangles: three pieces with a side of 10 cm. Then cut the template along the line by 5 mm and cut out three triangles of 9.5 cm each, then three pieces of 9 cm each, etc. If you reach the end template, you still have fabric left, you can add three triangles with a side of 10.5 cm and then in the direction of increase.
After cutting out the triangular parts, start assembling the Christmas tree. Using an awl, make holes in the center of each triangle and string them one after another onto the wire. Start working with the largest parts, and then move towards smaller triangles.
Form a stand from a piece of clay soaked in water and insert a wire-trunk into it. If the wire is too thin, double or triple it. The trunk should be a couple of centimeters longer than the Christmas tree blank. The clay hardens quickly. Once dry, paint it with brown nail polish.
String each triangle onto the resulting trunk in the required order, coating the wire with glue and pressing the wool blank. If there are soapy streaks on the branches, wipe them off with wet fingers. The green beauty is ready. All that remains is to decorate it.
Lush Christmas tree made of yarn
If such Christmas trees seem too fragile and brittle to you, you can make the tree from a denser material. In addition, such a tree will not shine; it will look more like a real New Year's beauty.
For a more “plausible” option we will need:
- Whatman paper or cardboard
- Grass yarn (or ruffle yarn)
- Transparencies
- Scissors
- White gouache
- Vinyl glue
Master class on making
Cut out a circle from whatman paper or cardboard. Also, the larger the circle you draw and cut out, the larger the cone will be. Therefore, the tree will be larger.
Secure the cone well with glue or tape and wrap it in cling film. Next, you need to dip the “bristly” thread into glue and wind it around the cone. You should know that these threads cannot be wrapped randomly, otherwise the tree will lose its shape. The thread must be wound strictly horizontally from bottom to top. Thus, we have a beautiful, clean and fluffy Christmas tree.
Let the wrapped thread dry for a day or two, then remove the cone. To depict snow dust on a tree, you can paint its threads sticking out like needles with white gouache. This must be done carefully so that the “needles” do not stick together. You will have a wonderful Christmas tree in the snow.
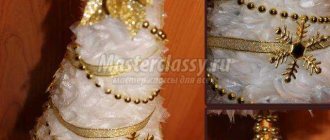
Now you can start decorating the Christmas tree. New Year's "rain", beads of different colors, snowflakes cut out of paper are also suitable for decorations. You can put a little cotton wool or padding polyester at the bottom of the tree, which perfectly imitates snowdrifts.
Christmas tree made of thread spirals - step-by-step master class
Do you need an unusual Christmas tree craft? We recommend that you pay attention to this master class. For work you need: knitting threads, glue, cone, scissors.
Apply glue to the cone and wind the yarn in a spiral circle. Fill the entire cone in this way, moving from bottom to top. For crafts, you can use threads of one color or several.
Help us improve: if you notice an error, select a fragment and press Ctrl+Enter.
Christmas tree made of threads - method 3
If these trees seem too boring to you, you can make another tree. For this you will need:
- Vinyl glue
- Warp from a large skein of thread
- Small vase with flowers
- Balloons
- Scissors
- Thick cardboard
- Yarn of different densities
- Hot glue
- Glue gun
Manufacturing instructions
- Make a cone, as in previous cases, and on the wide side glue a circle with a diameter equal to the diameter of its largest base. Thus, we get a closed cone on all sides. Let's put it aside.
- Now we need to make balls of the same size from the threads. To do this, wrap threads around slightly inflated balloons and dip them in vinyl glue. You will end up with small balls of yarn.
- You must let them dry. After drying, you need to glue all the finished balls of thread to the cone, forming a Christmas tree. You can glue cones between the balls.
- The resulting tree must be glued with hot glue to a base made from a skein of thread. This will be the tree trunk. The finished tree can be planted in a flowerpot, decorated with snowflakes, “rain” and placed on a shelf.
As you can see, it’s not difficult to make a Christmas tree from improvised materials, the main thing is that you are in the New Year’s mood!
Making a gift “money tree”
On the eve of the New Year, I decided to get together with the girls and create a “New Year's mood”.
For work we needed:
- Money (not real money, of course).
- Foam cone.
- A piece of wire.
- Jute rope.
- A jar (from under the plant, agusha or similar, small container).
- Gypsum.
- Bamboo stick
- From tools.
- Scissors.
- Spoke.
- Glue gun (or Moment transparent glue).
- Double sided tape.
That is, in principle, everything that most even beginning craftswomen have at home. We take our cone and insert a stick from below. Then we dilute plaster in a jar and strengthen a stick with a cone in it. We are waiting for it to harden.
As soon as everything is ready, we begin decorating our impromptu pot. First, glue double-sided tape crosswise. We do this in order to then glue the jute rope. To do this, we start laying it out from the middle in a circle, clinging to the tape, it lies flat and neat.
When our “pot” is ready, we begin decorating the Christmas tree.
To do this, cut the money into 2 halves, and twist the beautiful edge onto a knitting needle.
When we have a certain number of “leaves” ready, we begin gluing them to the base using hot glue (or instant glue, whichever you prefer).
Little by little we are approaching the top in a checkerboard pattern. The most “ideal” money for Christmas trees is dollars - both green and, most importantly, narrow. But as practice shows, Christmas trees made from other currencies look no less beautiful. When we have reached the top of the head and the last bill has been glued, and the entire Christmas tree is closed, we proceed to the final stage.
We take our piece of wire, bend it with a hook, and insert it into the center of our Christmas tree, wrap the wire with double-sided tape.
On top of the tape we begin to wind a jute rope onto the wire. We wind it further onto the “top” of the Christmas tree.
After winding the centimeter, carefully cut off the tail. We take 1 more bill and fold it across it like a bowl; the smaller the folds, the more beautiful the effect. We tie the folded fan with a string and glue it to our wire.
The Christmas tree is ready