Today I will tell you how to make a DIY coconut microphone that records studio-quality sound. This microphone has an audio card and MEMS microphones, so when connected to a computer or laptop, the sound recording is studio-quality.
The reason I made this desktop microphone was cost; mine turned out to be 12.5 times cheaper than the store-bought one.
What tools and materials will be needed for the job?
To make a simple electret mono microphone for a PC without a preamp, you will need the following materials:
- Electret capsule. This part can be pulled out of an old tape recorder with recording capabilities. It can also be purchased separately. It costs only 40-50 rubles.
- Thin wire with two cores. Needed to connect a microphone to a computer.
- Audio plug with a diameter of 3.5 mm. Required to connect the device to the audio input of a PC.
- Frame. A hollow plastic cylinder will do. It can be made from an old thick marker.
- Small office clip. Needed to attach the device to the buttonhole.
Tools and consumables you will need:
- soldering iron;
- rosin and solder;
- insulating tape;
- screw with a wide head.
Repair
Self-repairing a microphone purchased in a store may lead to an increase in the cost of repairs or even to the impossibility of further use of the device.
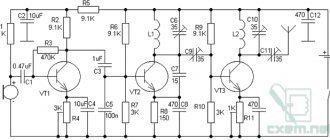
Scheme
The basis can be a microphone from a failed tape recorder or cell phone. It is better to take two copies, this will greatly improve the sound.
A do-it-yourself microphone amplifier is made as follows: the signal from the device is amplified by transistor VT1 and sent to amplifier DA1.
The amplifier can be connected to simple headphones, a computer, laptop, etc.
Photos of a self-made microphone circuit with an amplifier are presented in the text of our article.
What can a microphone be made from?
To make a microphone for a computer at home, use a regular loudspeaker. The electrodynamic microphone and speaker have the same design, where a coil with a certain number of turns moves in the gap of a permanent magnet, so the dynamic head can be used as a micro. The device is not suitable for high-quality recording, but, if necessary, it can be used for communication on social networks. To make your home microphone, it is better to use miniature loudspeakers used in transistor receivers, but you can take any low-power speaker.
The computer sound card input is designed to connect a voice device with a resistance of 100-200 Ohms, and the resistance of the electrodynamic head does not exceed 8 Ohms, so a transistor cascade connected to a common base is used for matching. Instead of BC109 transistors, you can use KT3102 with any letter index. Resistor R5 is supplied with plus power from 6 to 9 volts. A shielded wire core is soldered to the negative terminal of capacitor C2. The braid is connected to the ground. A mini-jack plug is soldered onto the other end of the cable.
A good blank for making a micro at home is an old headset with headphones. The central box with the Answer button contains a miniature electret capsule that can be used if it is working. To do this, you need to carefully open the box to gain access to the capsule.
Next, you need to unsolder the wires from the board, remove the button and printed tracks, and use the plate to mount a pre-amplifier on it. If there is a board with an amplifier, then the capsule is carefully desoldered and installed on a new structure.
How to make a microphone at home
Despite all their advantages, electret capsules have one serious drawback - the output voltage is too low. By connecting an unmodified device to the microphone input of a computer, it will be difficult to achieve a good volume level. A homemade microphone for a computer must be connected through a pre-amplifier. There are many preamp circuits that are easy to make at home. The simplest ones are made on a single transistor or integrated circuit. This circuit contains two capacitors, two resistors and one reverse conduction transistor. Instead of KT3102, you can use BC547 or any other similar type.
To make a microphone for a PC, you need to solder a mini-jack connector to pins “A” and “B”, which is inserted into the microphone input of a personal computer or laptop. Contact “A” is the central or signal contact, and contact “B” is the housing. There is an electrical voltage of about 3-4 volts at the signal contact of the computer microphone jack. It comes from the sound card. This voltage, limited by resistors, is used as phantom power for the microphone capsule. To make a pre-amplifier, you can use a ready-made breadboard with holes or get by with wall-mounted installation. In this case, the circuit must be filled with compound. The amplification stage should be located close to the capsule. This will avoid spurious interference and background. To assemble the microphone, you can use a thin-walled metal tube of the appropriate diameter. The board is connected to the mini-jack plug using a shielded cable.
What will you need?
Before starting work, it is important to decide on the basic material and prepare everything necessary for creation. We suggest you use the list of suitable things:
- For the base, you can use a paper towel roll, narrow tin cans or soda cans. We will tell you about the method of making paper.
- A can or bushing with a larger radius is also suitable for the top.
- The body can be wrapped with rope or covered with foil.
- Additionally, you can attach a wire to the bottom edge.
- If you want to decorate the microphone, purchase decoration elements (beads, rhinestones, flowers, stickers...).
- Tools: scissors, ruler, glue, pencil, felt-tip pen.
TIP: This is just a rough plan; you can make changes to it according to your child’s personal preferences and desires.
Nuances of making a holder
The simplest holder is a buttonhole. It can be made from a small office clip, which is screwed to the body with a screw with a wide head in the right place.
The second holder option is a stand. Not only an old table lamp is suitable for making it. The accessory can be made from chipboard and aluminum tube.
For this:
- a rectangle is cut out of chipboard;
- a hole is made in it equal to the diameter of the tube;
- the tube is wrapped with electrical tape and inserted into the hole;
- A clamp is attached to the end of the tube.
Characteristics
In many cases, sound sources in laptops are not satisfactory for use. The weak point of microphones is sensitivity. Also, the high price characterizes them negatively.
Let's look at how you can avoid these two problems, at a fairly low price, and if you have the elements mentioned below, you can make a fairly sensitive device for free.
Remaking a budget microphone for professional use
Improvement of a cheap microphone
When conducting webinars on programming, my listeners once complained about poor sound quality.
I had never thought about how important quality sound is before. After a quick google, I realized that getting high-quality sound, for example, for podcasts, is a very difficult task that requires good, expensive equipment and good sound processing skills.
The question arose: is it possible to get acceptable sound from a budget microphone for webinars? As it turned out, yes. Below is a detailed guide on how this was done. As they say: every programmer is a bit of a carpenter at heart.
.
Formulation of the problem
I had a classic budget microphone called Genius. Here it is.
I believe many of us have such a device. The microphone is normal for its price and tasks. Connected to Sound Blaster Audigy sound card. But there are a number of serious disadvantages:
1.
When the microphone is on the table, you can hear all the keystrokes while typing on the keyboard. And also any table sounds are transmitted through the base.
2.
If you hold the microphone not near your mouth, but as it should be on the table, the sound is as if the webinar is being held in the toilet or a “toilet” sound. Again, holding the microphone in your hands is uncomfortable and you need to somehow secure it near your mouth. If you pick up the microphone and then put it down, the volume of the sound will vary. You will see this in the video below.
3.
If you are not lazy and take the microphone in your hands, then all the explosive consonants (for example, “B” and “P”) will directly hit your ears.
How to solve these problems for a modest cheap microphone? Let's start looking.
If you look at how professionals solve these problems, it looks like this:
1.
The transmission of sounds and vibrations to the microphone from the base is solved by suspending the microphone on various springs and suspensions. In general, if you search for “microphone suspension”, there are countless options. But in the simplest case it looks like this:
This is a classic vintage radio microphone.
2.
To avoid having to hold the microphone in your hands, there is such a thing as a pantograph. Essentially, it’s a lamp rod with a microphone at the end.
3.
The third problem is solved by the so-called pop filter. Essentially, this is a hoop in which dense fabric, for example, from tights, is stretched. There are also factory solutions.
This rag cuts plosive consonants, and the sound is softer.
All of the above products, incl. You can buy a professional microphone, but it’s more pleasant to do everything yourself. So let's show what we can do.
Sources
As a pantograph, it was decided to use a classic lamp from IKEA, which has served me faithfully for many, many years. The main goal was not to affect the main functionality - to shine!
Experimental lamp
As a pop filter, we bought a hoop with an outer diameter of 90 mm from a sewing store. It was very funny when an unshaven, two-meter man in camouflage, combat boots, and a windbreaker bought hoops in a sewing store.
Hoop
And it was decided to make the microphone suspension itself using springs from a clamshell, which were purchased at the nearest hardware store.
10 and 20 mm plywood was chosen as the material for production. All production was carried out on a Corvette 88
.
Jigsaw "Corvette 88".
Honestly, I don’t understand why everyone doesn’t have this thing in their home. An irreplaceable thing in the household. Starting from little things around the house to teaching a child.
Plus we will need two more M6 bolts 40-50 mm long + two washers and a wing for them, two M8x35 bolts, one wing.
Result
Unfortunately, there will be no photo guide for production. Therefore, I will show you the result, and then we will analyze the finished product and look at its drawings. The photographs were taken in the workshop, but there is exactly the same lamp, and there is more light than in the room.
Front view
Assembly type
Top view
Among other things, it provides the possibility of installation on a table as a stationary microphone.
Desktop option
Rear view
It so happened that I did it impromptu, practically coming up with a design on the fly. Therefore, most of the drawings are made after production.
Disassembly. Blueprints
Suddenly someone has access to a laser or milling machine and wants to repeat this design. Drawings with dimensions were made especially for such a person. All that remains is to add them to your favorite drawing program.
Main stand
Stand with base and pop filter removed Rear view
Base-stand
As you can see from the photo, the microphone had to be trimmed. To do this, you need to disassemble it, unsolder the microphone itself, insert it into the drilled hole, and only then solder and assemble it. The drawing of the three parts is very simple. The base is held simply by friction (the hole is made smaller than the protruding tenon). Hit it with a hammer.
Pop filter
The fabric used is a women's stocking in a hoop. The fingers are simply inserted into the product due to friction. Attached to an outrigger so that the length can be adjusted.
The drawing is simple. But the inner diameter is determined by the hoop found.
Attachment to lamp
The most interesting detail is the attachment to the lamp. It is made of 20 mm plywood. The dimensions are chosen so that the wings can rotate freely. I had to think about this detail.
With one
And the other side
As you can see, the bolt is pressed into a 10 mm piece of plywood, which is already glued to the base.
Fastener assembly
It is curious that the diameter of the lamp is 63mm. Not a very convenient size. So I took the inner radius to 32mm.
One more nuance: it is necessary that the jaws do not fit tightly against each other in order to grip the lamp. Therefore, after the product was made, 1-2 mm was removed from each sponge (size “1-2” in the drawing).
Table base
It's so simple that I didn't even take measurements. To make it heavier, a 20 mm plywood disc left over from mounting the lamp is glued on top. A bolt is pressed into the bottom.
Bottom
Top
For convenience, I present all the drawings on one sheet.
Total
Answering the question: why did I do this? Yes, it was stupidly interesting, and because I can! I thought for a long time about how to attach a microphone to a lamp. And then it came apart, and it turned out like parsley.
Product in a working interior
I specially shot a video showing how this microphone sounded and now sounds.
In this video you can evaluate the positive changes for yourself. I didn’t demonstrate the sound of plosive consonants, let that be homework. As for me, this is an excellent budget solution for direct hands and a couple of free evenings.
Schemes for tangram for February 23
Which boy doesn't like to play soldiers and war games? Especially on such a holiday - Defender's Day.
Let's combine this game with development!
I know from experience that it is not so easy to persuade children to solve logic problems. This is both useful and necessary... but they are bored(((
Therefore, at one time I had to show miracles of ingenuity during classes with my son. He adored cars and soldiers, but was indifferent to other topics. And in order to interest him, I “translated” everything into the language of war and technology.
For example, he would never assemble bunnies and houses from a tangram. And most of the diagrams in this puzzle are exactly like this(((So I specially for him remade the standard diagrams into pictures from a military theme.
And lo and behold, things worked out!
Now I have converted the diagrams for the Tangram, which I drew by hand, for the computer and am sharing them with you.
The file at the link below contains 14 diagrams of figures of soldiers, weapons and military equipment, which must be assembled from Tangram parts.
6 soldiers, 3 pistols, 5 pieces of equipment.
The complexity varies - there are some that are quite simple, and there are some that are complex that you will have to think about.
Peculiarities
A hand-made microphone can have great sensitivity and the ability to operate at a distance of up to several meters. It also makes it possible to record high-quality sound using a computer.
The quality of the recorded sound depends entirely on the characteristics of the sound card in the PC.
Barbie paper microphone
Making a Barbie-style microphone with your own hands: printable diagram. The pattern needs to be printed, cut and then glued. Everything is very simple, but you will have your own microphone, like Barbie! The finished microphone looks like this.
- cut parts along solid lines
- fold the pieces along the dotted lines
- fold and glue the parts as numbered
- when each piece is dry, glue them together so that they match the colors
- let dry
- You can have concerts!
If you are printing details on thin paper (not cardboard), it is better to glue them onto the paper more tightly first so that the microphone is strong.
You only need to print two sheets - they are below in the gallery. It will turn out no worse than if you make a craft using the appendix of some magazine.
DIY microphone
To make a homemade microphone of high quality, you need to use a modified pre-amplifier design. To operate the circuit using the K140UD6 operational amplifier, an additional power source will be required. The device contains a minimum of parts, but has very high sensitivity. To eliminate the influence of sound interference, a foam cap must be provided for the electret capsule. The voice channel is connected to the computer via a mini-jack connector, which is soldered to a shielded wire.
Assembly steps
To assemble the device, you will need to perform the following steps:
- cut off the ends of the marker body so that you get a hollow tube;
- solder a two-wire wire to the capsule;
- wrap the capsule with 2-3 turns of electrical tape (this is needed for better fixation in the case) and insert it into the tube so that the wire comes out on the other side;
- Solder the opposite end of the wire to the 3.5 mm plug.
What can you decorate with?
In this direction, everything depends only on your imagination, creativity and capabilities. Don’t be afraid to come up with something unusual and interesting, consult with your child and ask what he would like to add with his own hands. The most common options are:
- Painting in different colors using watercolors or aerosol cans.
- Attaching various sparkles, rhinestones, beads or artificial stones using glue.
- Decoration with crumpled foil in the form of flowers.
- Adding fur balls.
- You can use multi-colored threads to wrap the microphone handle.
- Sign the microphone in an unusual way.
IMPORTANT: At the same time, the microphone must retain its appearance and look like real equipment. The decor should not cover the base too much and push it into the background.
Subscribe to our Social networks
: A little about MEMS microphones
Reasons why I used MEMS microphones rather than electret microphones (ECM):
- MEMS is an acronym that stands for Micro-Electro-Mechanical Systems. MEMS deliver studio-quality sound that was previously only available to professionals. They are used where small size and high sound quality are important. MEMS microphones are ultra-compact and consume very little power.
- They greatly simplify the device circuit
- very good sound density compared to electret microphones.
Master class on making a microphone for the role-playing game “Journalists” from waste material
Larisa Kudryavtseva
Master class on making a microphone for the role-playing game “Journalists” from waste material
It is necessary to begin introducing children to different types of professional work from preschool age. This helps expand their understanding of the adult world, awaken interest in their professional activities, develop respect for work and a caring attitude towards things, and enrich their vocabulary. the role-playing game “ Journalists ” will help in shaping all this.
.
But what journalist can do without a microphone ? I offer one of the options for its manufacture .