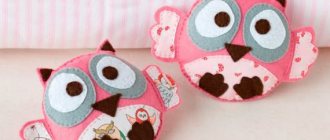
Master class “Carrot”
Tatyana Ponamareva
Master class “Carrot”
I bring to your attention another master class on making vegetables. Today I want to teach you how to sew carrots from felt .
For work we will need:
— templates for carrot parts made of cardboard ;
- felt in orange and green colors;
Let's start making carrots .
carrots from felt according to the templates .
2) Sew the carrot by hand or on a sewing machine.
3) Turn out the resulting cone.
4) We sew a line with a thread, using small stitches, so that the assembly is uniform.
5) Fill the blank with holofiber.
6) Having filled the cone with filler, we tighten its edge and tie it tightly into a knot.
7) Next, we decorate the carrot with embroidery . I used yellow thread for this.
 The carrots are decorated , all that remains is to sew on the tops. We take a detail of the tops, try to move the petals so that the tail is thicker. And carefully, using threads in the color of green, we sew the tops to the carrots .
This is the carrot I got . I hope you enjoy my master class .
Enjoy your creativity and good mood!
Abstract of the educational activity for modeling “Carrots for a bunny” with children of primary preschool age Age group: junior mixed-age group Venue: MKDOU No. 8 village. Vostretsovo "Teremok" Type of lesson: integrated Duration.
Summary of the modeling lesson “Carrots for the Bunny” (first junior group) Goals: expand children’s understanding of vegetables (carrots). Develop a friendly attitude towards others. Learn to roll plasticine.
Modeling in the first junior group on the topic “Carrots” Purpose of the lesson: Continue to teach children how to roll sausages out of plasticine, develop an interest in working with plasticine, and develop fine motor skills. Master class “Butterflies” Master class “Butterflies using origami technique” The art of origami came to us from distant Japan. We have all known small paper ones since childhood. Master class “Maslenitsa” On February 26, a competition for the best scarecrow of Maslenitsa was held in our city. Burning an effigy is an ancient Russian tradition when it was required to carry out. Master class “Flip Flops” Dear colleagues, I would like to offer you a master class on making a souvenir for our mothers “flip flops”. We will need: colored cardboard,...
Modeling lesson in the second junior group “Carrots for little bunnies” (drawing with plasticine) Modeling lesson in the second junior group “Carrot for little bunnies” (drawing with plasticine) Program tasks O: form a holistic picture.
Source
We sew a fleece carrot for a hare in 7 steps
To start making carrots with green tops we will need:
2. Green fleece for tops.
5. Holofiber or synthetic fluff.
6. Pattern paper.
Cut out a triangle-shaped pattern from paper. I made it the right size for my bunny. Apply, trace and cut out. Step by step description.
Cut out and leave seam allowance.
We connect the edges of the carrots using a sewing machine.
Turn it inside out. I use sushi chopsticks.
We sew along the edge with threads and pull the top of the carrot together. Leave room for the tops to be inserted there.
Let's leave the carrots alone for now.
The next step is to cut the tops from green fleece. For clarity and convenience, I drew a pattern with dimensions on paper. Height 7 cm, width 8 cm. Each branch is 1.5 cm wide.
On the cut out square we cut strips 1.5 cm wide.
I drew an axis in the center of the strips. Now it will be convenient to cut each strip.
Roll it into a tube, insert it into a carrot and sew it up.
Sew bright carrots
In this master class I will tell you how to sew a carrot. I received an order from a kindergarten; I needed 14 pieces for boy bunnies. I'll tell you how to sew one.
We will need: orange fabric, green fabric (in this case with polka dots) and filler (I took padding polyester).
Also threads, thin cord and a sewing machine. You can, of course, do it with your hands, but it’s very difficult.
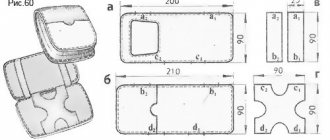
So, the first step: we make a pattern from cardboard. A triangle of the desired shape and size of carrot. I have it 20x9 cm. And two “fingers” 9.5x4 and 6.5x4 cm, for making green carrot branches.
On the orange fabric, on the wrong side, we trace a triangle and apply the same triangle to its long side again and trace it. It turns out to be a quadrangle.
We cut out this part taking into account the fabric at the hem, approximately 1 cm.
To make the carrot more realistic, I painted brown stripes on the fabric. To do this, I took fabric paint.
I drew it and ironed it. If you don’t have fabric paint, you can do it with regular paints or felt-tip pens, but keep in mind that such a product cannot be wetted or washed. You can embroider stripes with brown thread. But for a large number of products, this technique is not suitable, as it is too labor-intensive.
Sew the fabric from the nose of the carrot to the base. The result is a cone.
Then we prepare the carrot tails.
Take the green fabric and trace the pattern. We will need to circle the small part once, then place it next to it and circle it again.
Then for the second tail again. And circle the second, larger detail twice.
Then cut, taking into account the hem.
And sew along the contour.
Then the products must be turned out and ironed.
They turned out like these - similar to the fingers of gloves.
Next, we connect all the parts: in the orange part, in the place of the hem, we put the cord and start stitching, placing our leaves in the inside.
The result is that all the parts are connected.
Then, we stuff our beautiful carrots with padding polyester. And tighten it with a string. It turned out to be an excellent bond. And there was no need to manually connect and tighten the product.
Source
How to make carrots
In order for your child to understand how to make a carrot out of paper, you should first analyze all the work step by step and watch the video.
Required materials and tools
For a fruitful creative process, you should prepare in advance all the necessary materials and tools:
Ribbons, ribbons or frames, stands may be required when decorating the finished work - for hanging or installation (stationary).
Step-by-step assembly of a voluminous carrot
When making a craft with your own hands, you should assemble it strictly in stages to avoid mistakes, then the voluminous paper carrot will turn out neat and “natural.” The work is carried out step by step:
A very beautiful craft is ready.
Bulk carrots can be made in another way:
You can use felt-tip pens to apply additional elements for maximum similarity.
This option is suitable for packing surprises inside if the foliage is tied.
Video master class
To make a carrot out of paper on the first try, you should definitely familiarize yourself with the video material on this topic. Usually after this there are no incomprehensible moments left, the children get to work with enthusiasm.
Source
Procedure for making carrots
1. First, let's make a carrot pattern. It will consist of the following parts - carrot leaves and the carrot itself. Draw these two parts of the carrot on a piece of paper and cut them out.
2. To cut out the carrots, we need a sheet of orange felt. Let's redraw the outlines of the carrot pattern onto it and cut it out without adding seam allowances.
3. To cut out the leaves for the carrots we will need bright green felt. Let's redraw the outlines of the leaves onto it, and then cut it out.
4. Fold the orange carrot piece so that the sides of the piece are aligned. Sew these sides together using orange thread using a blanket stitch.
5. Sew the narrow end of the carrot with the same orange threads using a basting stitch, and then pull this thread so that the narrow end of the carrot is gathered. Secure the thread by making a knot.
6. Turn this part of the carrot right side out and straighten it well.
7. Stuff the carrots with padding polyester toy filler. You can use other fillers, for example, synthetic fluff or holofiber.
8. Now you need to sew along the edge of the wide end of the carrot. For this we will also use orange threads. Sew the edge of the carrot with a basting stitch, tighten the thread and make a securing knot.
9. The next stage of making carrots is making a bunch of leaves to decorate the top of the carrot. Let's take a green piece of leaves and a needle with a green thread threaded into it. We sew green threads along the bottom edge of the leaves and tighten them - we will get a bunch of green leaves.
Tools and materials Time: 6 hours Difficulty: 5/10
- felt fabric of different colors (depending on what vegetables are supposed to be sewn);
- regular threads - for internal seams and floss for external seams;
- Velcro for fabric;
- artificial greenery;
- floral wire (or regular thin wire);
- filler;
- scissors.
Why vegetables made from felt? - you ask. The answer is simple: this is a very pliable and obedient material, even a novice craftswoman can handle it, and felt toys are pleasant to the touch, safe for babies and children like them
So, let's get to work - create a whole garden for the baby at home!
How to sew a carrot from felt, master class
In order to make such a soft “harvest” with your own hands, you need to prepare a few simple materials, namely:
Step-by-step production of carrots from fabric:
Every housewife tries to decorate her home - she puts things in order, selects beautiful accessories, and lovers of handicrafts can complement the interior with decorations of their own making. Nowadays all kinds of felt products are very popular. For example, you can make a bright orange carrot to decorate your kitchen.
Carrots made of cardboard and paper: vegetable crafts using different techniques
Making crafts with your own hands is always interesting, the creative process is fascinating, and its end result is an original work of authorship. It will definitely please not only its creator, but also loved ones. Vegetable crafts are especially popular, as they have a bright appearance and interesting shapes, for example, paper carrots - children of all ages love to make them. We offer you the most popular and useful materials for creating such crafts - diagrams, videos, step-by-step assembly, both for kids and for older children.
Step-by-step instructions with patterns and photos
In our master class we will look at how to sew such voluminous vegetables from felt as: cabbage, carrots, beets, eggplant, strawberries and tomatoes.
Step 1: patterns
We enlarge the patterns to the desired size and print them out; you can simply trace them from the monitor onto a sheet of paper, just like when you were a child you would transfer pictures through a window.
From fabric of the appropriate color, we cut out the parts, taking into account the seam allowance.
Step 2: Tomato
Step 3: Strawberries
Glue artificial greens to tomatoes and strawberries:
Step 4: Beets
Step 5: Carrots
We sew the edges of the main part, fill it with filler, gather the top together, and sew on the leaves.
Step 6: Eggplant
We sew the eggplant in the same way as described in Steps 2-4. We try not to lose the pear shape. We sew the leaves in such a way (photos 5 and 6) that they remain slightly gathered.
Step 7: Cabbage
Step 8: "bed"
If you haven’t run out of patience yet, then to complete the collection, we’ll make a vegetable bed. For this we need brown felt and a box or small drawer.
We measure and cut out a rectangle of the required size from felt fabric, fold the fabric in half and sew its bottom and side sides, and then stuff it with synthetic padding, sew up the side and place the “beds” in a box in several rows:
Our mini-garden is ready!
Today we made such wonderful, beautiful, appetizing vegetables from felt with our own hands. Did you like it?
Making toys with your own hands is a special skill, but not everyone is given it. Making felt products is attractive because it does not require special skills. It is enough to show a little imagination and attentiveness, as a result of which you will get wonderful things, for example, felt carrots.
Hand-sewn vegetables and fruits can play the role of educational material, decorative element and toy all at once. And if you sew a whole basket of vegetables, you can easily play with your child in the store or garden, learning along the way the shape, color and vegetables themselves, because their assortment is quite large.
Features of paper vegetables
In kindergartens and elementary schools, educators and teachers often offer children the opportunity to create crafts of any vegetables, and rightly so. Such creativity allows children not only to get acquainted with vegetables, but also to remember their shape and color. You can make a whole “bed” with pockets for different vegetables.
While most vegetables are round in shape, some stand out in particular. To make colored paper carrots as similar to the original as possible, you must give them a cylindrical or conical shape, and do not forget about the “luxurious”, sophisticated tops.
Where can crafts on this topic come in handy?
Usually, crafts on this topic are very desirable for children, since they can be used in play - as doll food. You can put a small surprise in a voluminous carrot made by yourself - a candy, a toy, a badge, or another thing “meaningful” to the child to give to family or friends.
Bright applications are perfect for decorating a children's room; the child will be proud of his craft, which is extremely important for his self-esteem. Also, any of these crafts can be used to decorate a children's themed party.
Bulk paper vegetables are perfect for use in a puppet show, which the children themselves can perform, both at home for their relatives and in kindergarten or school for their peers.
Examples of ready-made crafts made from paper and cardboard
There are many different options for making carrots from colored paper or cardboard, both in simple versions for kids, and in more complex assemblies for older children and adults.
Where to get ideas?
The source of inspiration will be the carrot itself. You can take a vegetable and examine it with your baby. By bringing the child into contact, the mother will be able to consolidate his knowledge about the taste and benefits of carrots.
You can also prepare delicious dishes, bake a carrot cake, so that the child will surely understand that the carrot is a real hero worthy of attending the New Year's party.
The idea of the preparatory stage is an interactive conversation about carrots and their benefits. Let the child describe the vegetable, what color it is, its shape, what its components are, and how it differs from other vegetables. And the main question is how he imagines the carrot costume.
Source