is based on typical associative series associated with the main city of England. What evokes indispensable associations with London? Red telephone box, British flag, London policeman, Big Ben, London double-decker (double-decker bus), Tower Bridge. Proper use of these symbols of London will definitely help you create a memorable and vibrant interior in London style. I’ll say right away that the traditional English style in the interior is a much more conservative direction, which practically does not overlap with what is commonly called the London style.
Interior design depends on many little things, and only a few manage to make it the way they intended it without the help of professionals. Most people should still turn to those for whom creating unique residential interiors is not just a hobby. If you are a fan of England, then the legendary red telephone booth in the interior will certainly tell your guests about it. There are a variety of home decorations designed to look like phone booths, such as bookends, clocks and mugs, but there are many other ways, including examples using stylized doors, sofas, and wall decals.
Examples of London style vinyl wall decals
We can say that the legendary double-decker bus is a win-win option for interior design in London style. A wall sticker with his image will enliven and diversify the design of a living or office room. A huge selection of sticker colors will allow you to choose it to suit any interior. Price: 620 rubles for a sticker of size 492 X 600 mm. You can buy it.
Big Ben is another well-known symbol of London. A vinyl wall sticker with his image will be appropriate when decorating the interior of a living space in London style. Price: 1689 rubles. You can order.
This red phone booth door doesn't need much introduction. Price: 771 rubles. A variety of colors are available to order. You can buy it.
In addition to walls, you can also decorate the door with a sticker. It is possible to choose from 24 different colors. Price: 2237 rubles. Order .
In addition to living rooms, you can also decorate the kitchen in London style. Stunning refrigerator stickers with images of the British flag, the famous telephone booth or the silhouette of London will help transform your interior beyond recognition! A large selection of magnetic and vinyl refrigerator stickers, including those with the image of London, can be found on the website - stickerdecor.ru.
Examples of magnetic and vinyl refrigerator stickers in London style
Stylish magnetic panel sticker for the refrigerator “British flag”. Can be placed on the front door of the refrigerator or on the side walls. Price: 1500 rubles. For sale.
Telephone booth and London streets. An excellent solution for decorating a modern kitchen. Magnetic panels for refrigerators are quite durable, because their thickness is 0.5 mm. Price: 1500 rubles. You can buy it.
Magnetic sticker panel for the refrigerator with the image of London and a red double-decker bus. Especially suitable for high-tech kitchens. Price: 1500 rubles. You can order.
Another interesting design option for a refrigerator. Price: 1500 rubles. You can order.
But this London telephone box is no longer a magnetic panel, but a vinyl sticker. Its advantage is the large selection of available colors for ordering. Depending on the design of your kitchen, you can choose not just a red booth, but, for example, green, purple, yellow or any other. Due to the fact that the picture of the booth itself is made very accurately and the picture itself is easily recognizable, any color of this sticker will be appropriate. Price: 1960 rubles. You can buy it.
Stylish interior items in the London style can be found here, and.
Newspaper "British Flag". Size 34 x 17 x 32 cm. For sale.
Wardrobe system "Red telephone booth". Height 156 cm.
Pouf-box made of artificial leather for storage. Maximum load up to 200 kg. Dimensions: 38 x 38 x 38. .
A piggy bank in the shape of a red telephone booth. . Material: rubber.
Stylish, practical and inexpensive quartz wall clock "England". Body material: wood. Price: .
An elegant newspaper rack with a British flag on light wood legs. Elegant and functional.
Or the same one, but with a London style print.
Bar-office in the form of a red legendary telephone booth from the Maitland Smith brand. Manufacture: France. Price: 573,300 rubles.
Royal mahogany CHAIR. Brand: Deco-Home. Price: 29.472 rubles.
An interesting life-size mirror in the shape of a London booth door. Brand: Kare. Manufacture: Germany. Product height: 210.5 cm. Price: 25,740 rubles.
An absolutely charming chest of drawers made of wood with a Union Jack paint job. Although this is not a booth, such a chest of drawers really helps create the right British atmosphere. Brand: Charleroi, France.
Red telephone boxes (public telephone kiosks) designed by Sir Giles Gilbert Scott can be seen in many places throughout the UK, and in current or former British colonies around the world. But traditionally, it is a symbol of London. The red color was not chosen by chance; it is the color that is easy to spot at night and in the almost constant London fog. London style in the interior is unthinkable without this booth.
Red K6 Telephone Kiosk Replicas come in the form of TVs, bookcases, teapots, teapots, doors, sofas and many other items, and are popular around the world for installation in places such as bars, restaurants and offices. Many people order vinyl ones with the British flag and other symbols of England and London.
There are a few quintessentially British looks that seem to be instantly recognizable around the world. Queen, The Beatles, London Double Decker Bus, London Taxi, London Map and Red telephone box are part of British heritage and are universally loved by Britons and visitors to the city.
I sometimes go to the Business Youth website for interesting stories about who does business with what in Russia.
And I recently found an interesting story (molodost.bz/casses/211/) of a girl (Elena Glukhova from Moscow), who has been making money selling red telephone booths from the UK for a year now:
And, according to her, she earns a net 450 thousand rubles a month.
She needed almost no money to start a business (except for 300 rubles for niche analysis through Yandex.Direct).
When she posted an advertisement through Yandex.Direct for the sale of red telephone booths from the UK, she began to receive many applications.
And rightly so, look at the demand for them (apparently, having a red telephone booth at home has become a fashionable trend):
After that, Elena simply found a supplier of such telephone booths, who restores and transports them from the UK to Russia.
It's a small matter - take money from the client, bring him a telephone booth, and keep the difference for yourself. (As I understood from Elena’s text, a telephone booth from the supplier cost her 400 thousand rubles, but for the client it costs 500 thousand rubles; that is, the profit is 100 thousand rubles for 1 telephone booth).
Then the clients hinted to her that they did not need the original phone booth, just a copy.
And Elena went to search on the Internet for those who could make such a telephone booth (entry on her wall dated July 17, 2012):
That is, Elena first found clients, and then began to look for manufacturers.
And she acted according to the principle: “Money in the evening, chairs in the morning” (therefore, initial investments in the business are not needed).
Elena created one of the pages for selling telephone booths on the free service pen.io (I wrote about it in the article How to create an Internet page in 10 seconds) - redphone.pen.io.
By the way, this page is very well indexed and for the query “English telephone booth” it is on the 1st page in the Yandex search results.
That is, it is once again confirmed that it is easy and profitable to be an intermediary.
Benefits of Mediation
1. You don't need money to start a business.
2. You can always change one niche for another (just close one Internet page and start another).
3. If there is high demand (even if there are competitors), you can always make money.
By analogy with the red English telephone booths, you can create thousands of similar niches to create cash flow.
Technology for finding profitable niches
1. From your head or by selection method, make a list of several niches.
2. Check demand using search query statistics (for example, wordstat.yandex.ru).
4. Looking for suppliers of goods.
5. Collect money from your first customers and deliver the goods to them.
6. After this (when the niche has already been verified, suppliers have been found, the interaction technology has been worked out), you can already create a serious page (even on pen.io) and increase your cash flow by expanding your advertising campaign.
When the fashion for English telephone booths passes, you can find another niche (including developing several niches in parallel).
For example, in the West it has now become fashionable to make housing and retail outlets from sea containers:
I checked the Russian demand for sea containers:
It's even higher than phone booths!
And although there are proposals, it is quite possible for an ordinary person to get involved here, as another Business Youth participant, Konstantin Ryabushinsky (from Ufa) did - molodost.bz/casses/209/. Starting from scratch, I managed to earn 200 thousand rubles in the first month.
You can do the same. No risk, decent income, business flexibility.
You just need to first decide, then move a little and finally bring the matter to a streamlined procedure.
We are unlikely to be wrong if we assume that the mention of London makes your imagination draw a gloomy landscape, covered in gray haze, through which the spire of the Elizabeth Tower peeks through. The general bleak picture is enlivened only by the bright red double-decker omnibuses scurrying through the streets. Apparently, it was precisely because of the increased “nebula” of Albion that the British, acting contrary to their love for restrained tones, always tried to give expressive colors to the key objects of their capital: simply so that they could be easily seen. Along with the bus, another element of the urban environment of London was destined to “dress” in scarlet: it became the English telephone booth, which subsequently turned from an ordinary utilitarian thing into a recognizable symbol of England.
So, the red booth, intended for private telephone conversations, now displaced from the London streets by mobile communications, has migrated to interiors, coming under the close attention of craftsmen. And no wonder - such an exclusive item is difficult to manufacture; you cannot put it into series: furniture manufacturers rarely include this interior attribute in their “price list”. The popularity of the London rarity is consistently high, especially among restaurateurs and adherents of design with elements of kitsch. What can we recommend to those who have decided to make an English telephone booth with their own hands?
How to make a London telephone box out of cardboard
Today is the second day since I finished my London telephone box.
The link to start making the booth will be at the end of this article. I glazed all the walls of the booth and installed the front door. I glued a cute little handle to the door and glued little crowns on the dome.
I wanted to cut out the word “Telephone”, but the letters were so small that it was impossible to cut them out; the cardboard would delaminate and tear.
Overall, the booth turned out interesting and seemed a little dented, this is due to the fact that I cut the parts by hand. My uncle looked at this and said that next time he would bring me a metal ruler so that I could cut out clear, straight parts.
Of course, I started painting the booth red, with gouache. It was necessary to paint very carefully so as not to stain the windows, otherwise it would be very difficult to clean them later.
In the end, I ended up with this London phone booth!
Now I realized that I could write the word “Telephone” with black paint, only this requires a very thin brush, and my uncle will definitely bring it to me, because I will probably have other projects in which I will need to sign something.
I have an idea. For now, I’m just talking about how I make my own products. But I can share the drawings with you so that you can also make the same toy huts, houses, etc. at home. To do this, you can simply write in the comments that you want to make the same telephone booth or house.
Source
“Reincarnation” of the English telephone booth in interior design
Created in the distant 20s for clearly defined purposes, the red telephone booth in most cases continues to be used in the same way: it is installed in offices, restaurants, bars and other public places, setting up an intimate meeting area.
The only difference is that previously the London payphone was an exterior detail, but now it demonstrates its worth as an interior accessory. However, introducing such an accent spot into the interior space as a scarlet booth requires a certain delicacy - only a few styles will match it. In its “native” shade, the London kiosk harmoniously interacts with design in the style of Retro, Vintage, Pop Art and Steampunk, in brownish wood - with Neoclassicism and Modernism. Despite the operating model that was once set, creative thought has found many more uses for the English telephone booth. Shower cubicles and columns for built-in refrigerators, bookcases and wardrobes, buffets, bars and display cases - the lattice structure of the cubicle looks impressive in any interpretation. By turning the red telephone box over onto one of the side faces, you can build an extravagant chest of drawers, a cabinet, or even a frame for upholstered furniture. The most affordable way to organically incorporate a London replica into the interior is to install a red interior door with a frame typical of an English payphone.
Another well-known technique, widely used in interior design to achieve expression, is changing the usual scale of objects for decorative purposes. Agree, a lamp in the form of a telephone booth will look quite unusual - a miniature analogue of a carmine payphone can take the form of a night light, sconce or ceiling pendant. The significant mass of glazing built into the London kiosk serves as a good basis for the chandelier’s shade to work well as a light source, scattering the rays emanating from the electric lamp.
Crafts on the theme of England - how to make an English telephone booth?
An English telephone booth made of paper is a rectangular parallelepiped. The diagram for an English telephone booth is simple and you just need to draw four regular rectangles on paper.
Craft for school on the theme of England:
English telephone booth made of paper
- Now let's draw a semicircular roof of the booth using a compass. If you don't have one on hand, take a cup of the appropriate size and draw a semicircle.
Paper phone booth diagram
- So that the booth has a roof, we will make another circle and cut its edges. All that remains is to cut out a rectangle from paper, which will be the roof of the booth.
English telephone booth made of paper with a semicircular roof. Classic English telephone booth in red. Its doors and walls are glass. How to make an English telephone booth from colored paper?
- On thick white paper, draw a drawing of the booth.
- Cut strips of red construction paper.
- Glue it onto a white one in the form of a lattice - we get an imitation of windows.
- Now, along the perimeter of the door and walls, on top of the grille, we will paste thicker strips of red paper.
- Let's bend the booth and glue its bottom and roof.
- To make the booth door open, we cut the paper.
That's all! The booth is ready
English telephone booth made of paper
For those who are ready to experiment, you can try making a booth with transparent windows.
- Make a booth according to the scheme described above.
- Cut out the windows around the perimeter and glue a lattice of red paper.
- Attach transparent film or paper for wrapping bouquets to the back side and glue it with a frame larger than the film. This will create a pocket for transparent film.
How to make an English telephone booth with transparent windows
DIY English telephone booth: difficult aspects of detailing and assembly
To form a connection, grooves are selected at the inner ends of the vertical strapping parts, and the jumpers are equipped with elongated tenons (ridges). Flat combs, which are traditionally used for assembling cabinet furniture, can be replaced with insertable cylindrical tenons - dowels. The most difficult thing in the procedure for manufacturing a “groove-ridge” interface is to achieve an exact match of the mating parts, that is, so that the ridge fits tightly into the groove, without play. Perfect grinding of connecting elements at the time of product assembly is possible only if a professional tool is used at the stage of turning them - a double-sided cutter.
Another difficulty in the process of assembling the sides of a telephone booth is making recesses for installing the panel in the strapping jumpers. The ridge of the panel should not rest against the bottom of the groove, for which the ends and edges of the panel itself undergo lengthy processing with a special cutter. It is also not easy to carefully tuck the glass into the frame of the box: the glazing element is inserted into a quarter, which is made with a manual milling cutter on the inner edge of the slats after assembling and gluing all the structural parts.
As a rule, to fasten glass in quarters, figured layouts are used - glazing beads - which are nailed to the side frame with small nails; This is not an easy task, since you can split the bar itself and ruin the strapping. It is also important to fit the layout to the quarter exactly, without gaps. If you glue a lattice structure of slats directly onto the glass - to create the appearance of an internal binding - then on the back side of the side panel you will need exactly the same part, otherwise the glue spots visible through the glass will not look entirely aesthetically pleasing.
Source
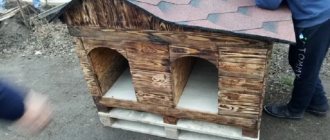
Dog house dimensions
At the first stage of building a home for a dog, you need to decide on its size. They depend on the size of the pet. An animal can belong to one of 3 types. Practice has shown that the following parameters are suitable for each type of dog:
Three options for removing paint from a concrete wall -...
How to build a house from timber on a summer cottage yourself
BACK FORWARD 1 of 11
- The size of the kennel for small dogs such as a pug, terrier or spaniel is 55 cm wide, 70 cm long and 60 cm high. The opening size is 30 by 40 cm.
- For medium-sized animals, such as Shar Pei, Foxhound or Basset Hound, the dimensions of the booth are 75 cm wide, 120 cm long and 80 cm high. The opening size is 35 by 50 cm.
- A booth for dogs of large breeds, which include Alabai, Mountain Dog or Dalmatian, width 100 cm, length 140 cm and height 95 cm; The size of the hole is 40-50 by 60 cm.
The actual dimensions of the animal and the table do not always coincide. If the booth is being made for a puppy who is still growing, you can use the table measurements.
The dimensions of the booth vary depending on the actual dimensions of the animal. Some animals have non-standard dimensions, in such cases it is better to take individual measurements. The pet's chest should fit freely into the hole. The Alabai breed is distinguished by its large dimensions. The dimensions and drawing of the Alabai booth are determined only after taking measurements from the animal.
What is important for a dog's home
You don't need to be a dog breeder to understand the difference between a decorative lap dog and a large guard dog.
Factory booth with creative design
There are subtleties that are important for both animals:
- The dog should be comfortable and safe in the house. It should not be too cramped, at the same time, too much space will cause discomfort in the animal;
A dog house is both a home and a kitchen
- An outdoor booth should at least not spoil the landscape around the house; an indoor one (for example, for a Chihuahua) should be easy to clean;
- The booth can be designed for not one, but two or even three dogs. They are often placed in the yard. The structure must be permanent, protected from freezing and wind blowing;
DIY dog kennels - “multi-apartment” kennel
- It’s good when the dog can hide inside the booth and lie down at its entrance under the roof;
A small vestibule at the entrance will make the dog house more comfortable
- The location for the kennel should be chosen wisely. If the dog is a guard dog, while in his house, he must see the protected space.
No stranger will pass by the watchman
The principle of calculating the size of the booth
All dogs are divided into three categories. The classification was based on the size of the animals at the withers. Average parameters of a dog kennel:
| Category | Which dogs are | Booth size (cm) – width, depth, height | Manhole size (cm) – width, height |
| Small (at the withers up to 50 cm) Kennel for a small dog | This category includes:
Note: Dwarf breeds do not count as they are not kept outside. | 70*55*60 | 30*40 |
| Medium (at the withers up to 70 cm) Labrador is a medium sized dog | This category includes:
| 115*75*80 | 35*50 |
| Large (more than 75 cm at the withers) A big dog needs a big kennel | Large dogs are considered:
| 135*100*95 | 40*60 |
DIY dog house - drawings
The table above shows the average values for the kennel format, but sometimes even a mongrel puppy can grow into an unexpectedly large animal.
Kennel with an “exploitable” pitched roof for a small dog
The same thing, but with a gable roof
Therefore, the scheme for building a dog house is calculated depending on the specific size of the dog at the withers - with a small margin so that it does not feel cramped.
Diagram of a dog house with dimensions
Drawing of a dog house with dimensions - option with a vestibule with a total length of just over 100 cm
Before selecting material for building a booth, you can choose an option from ready-made drawings.
Drawing of a dog house - factory version
Pug house diagram
The proportions of the building and its aesthetics require special attention.
Kennel proportions
Diagram of a booth for a large dog, with a canopy
Watch the video: a finished drawing of a wooden dog kennel.
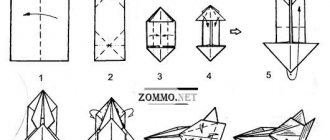
Crafts for school on the theme of England - how to make a double-decker bus out of paper?
If your child was asked to make crafts for school on the theme of England, do not despair, but roll up your sleeves and tell him how to make a double-decker bus out of paper. The work will not be difficult, and it consists of several steps.
- Draw the outline of your bus on paper
How to make a double-decker bus out of paper
- Paint the walls of the bus and glue the four sides together. Instead of coloring, you can use colored paper. Then all the elements will need to be done in appliqué style.
Paper bus parts After the glue has dried, glue half of the second floor and the roof to the bus.
If desired, you can make seats for passengers and the driver. How to make a paper seat for a bus?
- Cut out blanks for chairs from waste cardboard
Cardboard blank for a bus seat
- Wrap the cardboard blank in fabric, glue or sew with a few stitches.
How to make a bus out of paper
- Glue the seats to the bottom of the bus.
How to make a double-decker bus from paper A bus can also be made from cardboard. The video below shows more details of the bus. This craft is for those who like to work with paper and cardboard with children.
Construction of a drawing
A dog house is built according to a diagram with dimensions. A design with many parts is not made. Various partitions, ladders, openings and ledges make the house more interesting, but they disturb the pet and do not provide any practical value. Choose a simple rectangular shape with a pitched roof so that your pet can climb on it. If there is not enough space, they design an option with two slopes. There is an entrance on the side. The roof or one of the walls is made removable for ease of cleaning and disinfection. An example of a simple drawing is shown in the photo below.
Crafts on the theme of England - how to make Big Ben out of paper?
You can make your own English clock tower Big Ben from thick paper or cardboard. The easiest way is to draw its details and clocks on paper. Here's how children make Big Ben out of cardboard, simplifying the tower's design a little.
How to make a big ben out of paper
It was very difficult to complete all the small parts of the tower, since this clock tower consists of a large number of small parts.
Craft for school on the theme of England:
- How to make Big Ben out of paper? Take thick paper or cardboard and make a simple drawing.
Big Ben made of paper
- You will need to draw stripes and a clock on the tower. It will be more difficult to make the top of the tower, which has the shape of a cut pyramid. First make a pyramid that will be on the tower above the clock, then glue the base to it, on which the upper pyramid will be.
Diagram for the truncated lower pyramid of the tower and the base for the upper pyramid
- All that remains is to make the upper pyramid. Its sides must match the size of the base to which it will be glued.
Diagram of the upper pyramid of the tower and assembled view of the tower To avoid disappointment, check whether you cut out the pyramids correctly. Before painting, make test pyramids and fold the structure. If everything turned out well, cut out new ones according to your drawings. Now you can paint the blanks and glue small parts, if any. Glue the tower parts together.
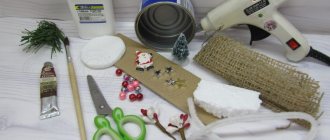
Master class on creating a notebook “London telephone box”
I've been planning for a long time and finally I decided to make this master class for you. I want to make it clear right away that the idea for the notebook itself is not mine, it was taken from the Internet. I just tried to show you the process of creating it by me personally. Perhaps someone will want to do the same.
So, we will need the following tools:
- A dummy cutting mat (if you don’t have one, it doesn’t matter, you can put a piece of linoleum, smooth plywood or a stack of newspapers or magazines on it).
- Stationery knife.
- Metal ruler.
- Pencil.
- Creasing stick (can be replaced with a non-writing pen, knitting needle, etc.).
- Printer (optional).
- Stationery clips.
- Scissors.
- Needle file.
We will also need materials:
- Office paper or any other paper from which you plan to make a notebook (I have Snegurochka 80 g/m).
- Binding or beer cardboard 1.5 mm thick, 4 sheets 8.2 x 15.4 cm and 2 pieces 14.8 cm high.
- Glue Moment Crystal and Moment Joiner Super PVA.
- Any fabric (linen, cotton, whatever you mind!) 25x20 cm.
- Red acrylic paint.
- Acrylic varnish (optional).
- Scrappaper or other paper with a density of at least 130 g/m for endpapers - 1 sheet.
- Metal fittings (brads, crown-shaped pendant, etc.)
And, of course, a good mood!
Well, shall we get started?
First we need to prepare the paper. According to my idea, this notebook will be 8.2x15.4 cm in size, so A4 paper (21x29.7 cm) needs to be cut. To do this, I use a stationery knife along the long side of the sheet and, using the markings on the mat, measure and cut off 16 cm. This is how I cut the required number of sheets. Then I cut these sheets in half and get leaves 14.8 x 16 cm.
This is the stack I got!
Now you can use a printer and print out pages for a future notebook, as I did. If you don't have a printer, you can leave it like that. These pieces of paper have even more room for creativity. You can take some notes or leave sketches.
I used only white paper, but you can alternate it with red, for example.
Creating a block for the future notepad.
To create a block, you need to fold the notebooks. My notebooks consist of sheets of paper measuring 14.8x16 cm. You decide how many sheets you will have in your notebook. Usually they do at least 3. I have 6 sheets in each notebook (I don’t recommend doing more.) If this is your first notebook, start with 4. We push the selected number of sheets together and fold them in half, and be sure to fix the fold with a creasing stick, a ruler or any other flat object. Like this.
The number of notebooks in a block is also at your discretion. I got confused when cutting the paper, so I ended up with a stack like this.
I got 14 notebooks of 12 sheets each. That is, the notebook will contain 168 sheets of slightly smaller than A5 format.
Next you need to let the block rest. To do this, I secure the block with office clips. To prevent any dents left on the paper from the clamps, place pieces of thick cardboard. You can pre-cut 2 pieces of binding cardboard with a height of 14.8 cm, the width is arbitrary. They will be useful to us in the future.
It is advisable to leave the block in this position for several hours, or better yet, overnight.
Let's move on to the cover for now.
On a piece of paper I draw a sketch of the future cover. If any of you have the skills to work in Coral and so on, you can and should draw there. I don’t own it, so I draw by hand on paper, this also applies to the pages of the notebook, I type them in Word.
Next, I transfer the same layout onto cardboard measuring 8.2 x 15.4 cm and cut it out with a breadboard or stationery knife. Remember to change your blades as often as possible. The quality of the cut depends on this. Be careful when working with the knife, the blades are very sharp! If some of the cuts are not very even, you can file them a little with a regular file from a manicure set. For such work, it is better to use binding cardboard, it is gray cardboard, it is denser, it comes in different thicknesses, but in this work I use beer cardboard - it is lighter and looser, it is easier to cut with a knife. Here's what I got.
We find a beautiful picture of Big Ben on the Internet, print it out, and adjust it to the size of our window. Mine is 4x9 cm. This time I decided not to cover the window grille with fabric, but simply paint it with acrylic paint. We paint, carefully painting everywhere. Let it dry.
Glue the lattice onto the picture using Moment PVA or Crystal glue, whichever is more convenient for you. I covered the entire picture, printed on whatman paper, with a thick layer of PVA glue and placed a lattice on top. After drying, the glue will become completely transparent and create a thin moisture-proof film on the paper.
In the meantime, our unit has rested and is ready for work.
We remove the clamps from the block and straighten the spine by tapping it on the table. We fix the perfectly even spine again using the same cardboard and office clips, like this:
Next we need to cut 6 holes at an equal distance from each other. I use a prepared template (left over from making other notebooks), but you can calculate these distances yourself. I indent 1 cm along the edges, and then divide the remaining distance by 5. That is, with a block height of 14.8 cm minus 2 cm indentations along the edges, we divide the remaining distance of 12.8 by 5 and get approximately 2.5 cm. Like this it's simple. If you plan to cut the block of the future notebook in the future, retreat at least 1.5 cm along the edges, but keep in mind that we are making the cover for a block of 8x14.8 cm. For convenience, you can put marks on the block itself. So, arm yourself with a file and saw:
This is not the only way to make holes in the leaves, but in my opinion it is the easiest and fastest (just dusty!). Now we can sew our block.
You can see and read about how to sew a block in my previous master class. There I show a slightly different binding method than in this master class, but believe me, it is a little simpler to perform, but no less durable and of high quality.
And we have time to do the endpapers. For this particular notebook, we only need one A4 sheet. I use Folia paper, 160 g/m2 red. You can use the same or scrap paper of a suitable color and design. We cut 2 pieces of paper 16x14.8 cm and crease it in the middle and fold it. Next, glue the endpapers using Crystal Moment glue. I apply glue to both surfaces to be glued, to the endpaper and to the block itself in thin strips. We do this with both endpapers.
Our block is almost ready 
Now you need (or you may not need to) trim the block. To do this, you can use a guillotine cutter, if you have one, cut the block manually, but this requires experience, take it to a printing house or leave it like that. I left it as is.
Next is another interesting point - captal! You can weave the captal yourself, or you can buy it ready-made at a sewing store. I’ll say right away that of all the notebooks I’ve made, there isn’t a single one with a purchased capital. I like the process itself and I like what comes out in the end.
There is a lot of information on this subject on the Internet, so I’ll probably omit this process. If you are interested in seeing how I do this, let me know, I will definitely show you. All that remains is to strengthen the block. To do this, cut off a piece of gauze or bandage, coat the spine with glue and glue the bandage, gauze, and so on. Like this:
In the meantime, we are moving on to the next stage. Cover.
All cover details have been cut out.
We glue the parts that will create the texture of our cover onto rectangular solid cardboard blanks using Moment. This is what you should get:
We leave the blanks to dry well, in the meantime we will make the spine for the cover frame. To do this, take a small piece of paper, with a density of 200-300 g/m2, as high as our cover, and 8 cm wide, mark the middle along the long side and crease it. The width of my block is 2 cm, but I would like the spine to be slightly rounded, so I need to punch a strip 2.5 cm wide. To do this, I measure 1.25 cm from the punch line in opposite directions and punch it.
In order for the spine to bend beautifully when opening the notebook, you need to make additional scoring lines between the main ones. Use your fingers to form a bend in the spine. As shown here:
Glue the spine to cardboard blanks. Be sure to try on the block.
After we are convinced that we have done everything correctly, the cover fits the block, we can proceed to the most difficult part - covering it with fabric!
We arm ourselves with a cloth, a brush and PVA glue. There is a small nuance here if you are confident in the quality of the beer cardboard and glue, but you can get started right away; if not, then it is best to cover the cardboard blanks with acrylic primer. This will protect the cardboard from deformation. I have good cardboard and excellent (even too much) glue, so I skipped this process.
We cut the fabric, not forgetting to leave a hem allowance of 1.5-2 cm. I advise you to leave an allowance of 3-5 cm in width. Next, we apply glue to the workpiece in small parts, thoroughly coating all the depressions with glue, apply the fabric, straightening and smoothing it, thereby creating the texture of the future notebook. Start gluing from one part, the front or back of the cover.
In this way we glue the entire part of the cover.
In order to make the spine as textured as mine, you need to take 2 pieces of twine or some kind of cord, about 16 cm long, and glue it on the spine, placing it in the middle. Trim off the excess.
Make sure the spine is completely dry before continuing with the second cover.
So, the cover is glued.
Turn the cover over to face you with the inside and glue the seam allowances. To do this, apply glue along the long side of the cover, spread it with a brush and wrap the fabric over itself. This is what you should get:
To create neat corners, excess fabric in the corners needs to be cut off, like mine. Next, apply glue to the corners and glue the fabric at an angle of 45 degrees, like this:
We repeat this procedure with all corners. We glue the short sides and get these corners:
(Sorry for the quality of the photo, I took it at night).
The cover is almost ready!
All that remains is to paint it with acrylic paint. Take paint, brush and paint
My pattern on the fabric categorically did not want to be painted over. I had to cover it in several layers.
Now we glue the window, I did it with Moment Crystal glue. We install brads. I sewed on the crown with color-matched threads. We also print out “Telephone” and glue it.
The inscription on top can be covered with acrylic varnish or Glossy, if available.
All that remains is to glue the block. Let's try the block on the cover. Let's remember the allowances. Apply glue only to the endpaper and the inside of the cover, let the glue sit for a couple of minutes and glue it as evenly as possible. We press down. You can put cardboard on both sides of the cover and secure it with clamps for a while. We do the same with the back cover.
Our “Red Telephone Booth” notebook is ready! We admire the result.
Thank you for reading to the end :) I hope this master class was useful and interesting to you.
I would be grateful for comments and photos of your work.
Dog house with canopy
A kennel with a canopy is suitable for large watchdogs.
The canopy protects the animal from rain and snow, but at the same time allows it to calmly guard the area. The area under the canopy should be the same size as the kennel itself or a little larger so that the entire body of the animal can fit on it. Housing with a canopy will definitely appeal to the following dog breeds:
When making a drawing of a doghouse for a shepherd or any other large breed, be sure to take into account the canopy.
How to build a dog house for the winter
There are different opinions about insulating a dog kennel for the winter.
Some pet owners believe that only smooth-haired dogs need a warm kennel. It is worth remembering that a harsh winter involves severe frosts and an animal even with long hair will be cold. Therefore, for the comfort of the pet, the booth is insulated. The winter dog house is insulated inside and out. The floor is insulated and curtains are used for the crawl space. To make the pet's housing warmer, it is installed on logs. For internal insulation of walls and floors, felt or batting is used. For external insulation, foam is used. The curtain for the manhole is made of dense and durable fabric or silicone.
The manhole is the main source of cold air entering the dog’s house; it must be protected with a curtain.
If you decide to make a doghouse for your husky with your own hands, it is better to make it larger. The animal loves space and enjoys spending time in the snow in winter; it will be too hot for him in a cramped kennel. No bedding is used on the floor or very thin bedding is laid. A not very dense fabric that allows air to pass through is hung on the hole.
Just like huskies, husky dogs prefer coolness. To make a doghouse for a husky with your own hands, you can use the same drawings and dimensions as for a husky. Straw bedding in a kennel is quite suitable for this breed. It is better to choose insulation for the booth that allows air to pass through; pets of this breed cannot tolerate stuffiness.
Malamutes also enjoy fresh, cool air during the winter. The dimensions of the box for Malamute are the same as for the box for Husky and Husky; all three breeds belong to the middle group.
A booth for a heat-loving Labrador should be well insulated. The animal will not refuse warm bedding either. The dimensions of the booth for a Labrador retriever must be selected optimally. In a kennel that is too large, the dog will freeze; in a small kennel it will be cramped and uncomfortable. For heat-loving breeds such as the Golden Retriever, Dalmatian, Beagle and Drahthaar, the size of the kennel is also very important.
What can you build from?
The most common and comfortable material for animals is wood. In addition, the choice is very diverse. Exactly the same material can be used as for building a house for a person.
Dog house made of decking boards with a flat roof
The asymmetrical wooden structure with bright colors is pleasing to the eye
These can be logs, beams in the form of a log house or frame, covered with plywood or boards, or even parts from some old cabinet.
Kennel made of clapboard block house
Making a dog house from plywood
You can also use polymer wood, because WPC lasts much longer compared to natural wood.
However, given the harsh climatic conditions of some regions, many owners prefer to build a permanent house for their dog from brick, concrete blocks, and even stone.
Insulation can be placed under the siding sheathing
A creative approach to the design of a house, which is not only built in the form of a castle, but also plastered
These materials are cooler than wood, but the masonry will not be blown through. You can make the walls warmer by using hollow masonry material. For comfort, the walls are insulated from the outside and boards are laid on the floor.
Warm winter house made of OSB with siding
In summer, in such a kennel it will be easier for the dog to escape the heat, which is very important for the southern regions.
Read on our website: how to choose a booth and house for a dog.
Crafts on the theme of England: a hobbit house made from natural materials
Hobbits are not as ancient characters as leprechauns. They are a figment of the imagination of the British writer John Ronald Tolkien, and the world only learned about them in the 20th century. But hobbits are so popular all over the world that they have already become another new symbol of Britain. And from natural materials you can make a hobbit house, which will be an excellent craft on the theme of England for school.
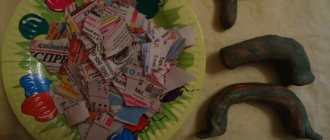
To do something similar, you will need:
- Flower pot.
- Earth and moss.
- Green and dry twigs.
- Plasticine or salt dough, which should then be decorated with paints.
Crafts on the theme of England: Hobbit's house You may find more ideas for crafts for school in our following articles:
- Paper houses
- Easy crafts in 5 minutes
- Children's crafts for kindergarten
We build a simple booth with our own hands
If you try, you can make a dog house yourself in two hours. Let's look at what needs to be taken into account during construction.
Drawing of the future house
You shouldn’t build even such a simple structure without a sketch. A drawing of a booth is easy to make and can be done anywhere, even on checkered paper. If you are planning a more sophisticated kennel design, it is better to find ready-made drawings.
Even using your own sketches, you need to consider the following parameters:
- The base of the kennel should be square or approximately square. Let your pet fit comfortably both along and across the home.
- If the kennel is intended for a mother with puppies, it is better to nail small slats at a distance from the floor and walls. This way the dog will not crush the offspring.
We will consider detailed recommendations regarding each stage of construction below.
Tools and materials needed for construction
To make the simplest dog house with your own hands, you will need:
- metal scissors;
- wooden blocks;
- wood screws;
- insulation;
- sandpaper for cleaning boards;
- special antiseptic impregnation for home treatment and paint and varnish materials.
The best material for walls is OSB or chipboard sheets. There are no cracks in them, which will provide protection from drafts and precipitation.
Making a frame
The bars for the entire frame and fastening the walls must be strong and free of knots; the wood should not contain strong odors or foreign impurities.
- Before erecting the frame, the site is cleared and, if necessary, leveled.
- Assemble the base. The perimeter is made of beams, fastened with self-tapping screws.
- They install vertical posts made of beams and connect them to the base with metal corners. The racks are fastened on top with crossbars along the entire perimeter - this creates the main frame.
- To add rigidity, additional crossbars are made in the middle of the racks.
Important! It is best to take the beams for the booth from coniferous trees.
Making the floor and roof
Floor boards are treated with sandpaper and antiseptic. They are strengthened on the lower perimeter of the frame.
The outside of the booth wall is covered with boards, and the inside with sheets of the selected material. Insulation is laid in each wall between the outer and inner parts.
The roof can be made single-pitch or gable. But in any case, folding, providing supports. This makes it more convenient to clean the dog’s home and carry out timely disinfection.
We insulate the dog house
Now let's talk about insulation. Dogs tolerate cold better than heat, but they are just as susceptible to colds and can freeze. It is worth remembering that the thickest layer of insulation will not protect a smooth-haired dog from the cold, so such breeds cannot be kept outside.
Important! During production, metal should be used to a minimum, otherwise the animal may freeze in winter. Hypoallergenic, odorless materials are suitable for insulation.
It is recommended to use natural bedding in the booth. It is better to abandon the tradition of giving your dog an old sweater and other warm clothes. The best bedding for a doghouse is not wool or sawdust, but barley hay.
Mineral wool
Mineral wool is the most reliable and most popular material, serving as an excellent insulation. Mineral wool has soundproofing properties.
The material is hygroscopic, which means it needs to be isolated as much as possible from any moisture, and also prevent the material from coming into contact with the pet’s skin.
Of the four types - glass wool, slag wool, stone wool, and basalt - preference is given to the first material.
Polystyrene foam or polystyrene foam
For insulation, non-pressed polystyrene foam is suitable, which is used to protect packages with household appliances. The material is not subject to rotting, biological effects, and weighs little.
If in the area where you plan to build a kennel, the weather changes sharply and unexpectedly, the material will cope with any temperature changes.
London style in the interior
Let's start with the famous booth. I had a chance to visit a house in Khimki, in which the kitchen was made in the English style, and the refrigerator was disguised as a booth. Very unusual, and most importantly - easy to execute. For the owner of this house, the idea was realized by artists (we also saw craftsmen ready to take on this).
A lampshade, a key holder and a charming lamp, which for some reason reminded us of our cartoon “Cheburashka” (maybe because inside it is furnished like a house?).
As we like to repeat, textiles are the easiest way to transform your interior. It’s worth changing the pillowcases on the pillows carelessly thrown on the sofa, and now fresh accents have appeared in the room. A whole set of English pillows combined both a telephone booth and the famous tourist bus.
A few more fun sets with pillows: with a princess and with a bridge.
If you leave the recognizable outlines of the flag, but change the color scheme, you will get a real stylish challenge to the generally accepted perception. This is what the designers did, creating turquoise, red and green Union Jack pillows.
It would seem that what could be easier than changing the pillows? But there is a way. Your favorite mug can transport you to the city of rain and good music every morning. One, two, three, and you're there.
You can rarely find screens in Moscow apartments, but they can be truly stylish and functional. If you wanted, you demarcated the space, if you wanted, you made it unified again. A godsend for a small space. With a double-sided screen, you don't have to choose which side of the room to make the most spectacular.
A heavy figurine depicting a London bus can turn into a book holder, just place a couple of English textbooks across the toy transport.
A charming night light that will delight both adults and children.
Stylish watches: vintage, as if they have been around for a hundred years, vinyl with images of the main attractions and leather, ideal for a loft style or a study.
An important thing is a rug at the entrance to a house or apartment. This is an assistant for the housewife, capable of preventing the spread of street dirt indoors. A chic handmade rug from designer Paul Smith.
We looked at decorative items, and in the next publication we will focus on furniture that was inspired by British landmarks.
Red telephone boxes in Great Britain are street kiosks with a public telephone that have become a symbol of the country. They can be found not only in Great Britain - especially in London or somewhere in the outback - but also in the “sponsored” territories of the kingdom, in former colonies - in Malta, Bermuda, Gibraltar. Since 1926, telephone boxes have been decorated with the Tudor crown, symbolizing the British Raj. It was first executed in the version Kiosk No.2, or simply K2, designed by the architect Giles Gilbert Scott.
Giles Gilbert Scott belonged to the Scott architectural dynasty and was the grandson of the major Victorian architect Sir George Gilbert Scott (Albert Memorial, St Pancras Station, Foreign Office Building). Giles Scott became famous for buildings that were not as famous as his grandfather, but still implemented several landmark projects: the Battersea Power Station in London, the Cambridge University Library, Clare College, and the Liverpool Anglican Cathedral. Perhaps his worldwide fame was brought to him by two small buildings, replicated throughout the 20th century - telephone booths K2 (first place in a competition organized in 1924; the results were summed up in 1926) and K6 (project of 1935).
The telephone booths are painted a bright, “currant red” color to make them easy to spot on the street. The kiosk dome, a distinctive feature of Scott's designs, is a direct reminiscence of the family crypt of Sir John Soane, the most prominent Palladian architect of the Georgian and Regency periods (who built the massive Bank of England in London). Scott was an admirer of Soane and a trustee of his museum in London.
The traditional style kiosks were modern and functional for their time. A sophisticated ventilation system was installed in the dome (perforated holes). The glass was divided into small parts (18 glasses on three sides) for quick replacement if they were broken. Initially, Scott proposed making the K2 kiosk a lightweight structure made of mild steel, painted duck egg blue, but the client for the project, the British Post Office, insisted on cast iron and red. It is noteworthy that residents of rural areas asked to repaint the red kiosks, like a scarecrow in a field, green - and somewhere this demand was fulfilled (nowadays it is a great success to find such options).
Kiosk K6 is a modernized version commissioned by Scott in 1935 to celebrate King George V's Silver Jubilee - his 25th year on the throne. In this regard, the K6 is sometimes called the “anniversary” booth. This kiosk is smaller and lighter than its “big brother” K2 (height 2.51 m versus 2.82 m; width 0.9 m versus 1.07 m; weight 0.69 tons versus 1.27 tons) and is cheaper to manufacture. The cup-handled doors are made of teak, the base is made of concrete, and the main structures are made of cast iron. In addition, here the Tudor crown on the dome is not a metal plate with ventilation holes, as in the K2 project, but is designed in the form of a bas-relief without holes. The ventilation is hidden under a matte illuminated sign. The distribution of windows has been changed: instead of 6 glass rows in K2 there are already 8, the central windows have been enlarged for better lighting. In general, the project corresponds to the spirit of the times, when Art Deco was popular in England (modernism had difficulty taking root in the Islands in the 1930s): the appearance of the kiosk is laconic, simple and with a minimal set of classical details.
The K6 is the most widely produced version of telephone boxes in the UK, with around 60,000 units installed between 1935 and 1968 (compared to around 1,700 K2 units). These red kiosks were widely used outside London and became symbols of the country. In London, the working original, for example, can be found near the Royal Academy of Arts, but for the most part the booths are no longer used for their intended purpose.
Red Kiosk at the Royal Academy of Arts
We are unlikely to be wrong if we assume that the mention of London makes your imagination draw a gloomy landscape, covered in gray haze, through which the spire of the Elizabeth Tower peeks through. The general bleak picture is enlivened only by the bright red double-decker omnibuses scurrying through the streets. Apparently, it was precisely because of the increased “nebula” of Albion that the British, acting contrary to their love for restrained tones, always tried to give expressive colors to the key objects of their capital: simply so that they could be easily seen. Along with the bus, another element of the urban environment of London was destined to “dress” in scarlet: it became the English telephone booth, which subsequently turned from an ordinary utilitarian thing into a recognizable symbol of England.
So, the red booth, intended for private telephone conversations, now displaced from the London streets by mobile communications, has migrated to interiors, coming under the close attention of craftsmen. And no wonder - such an exclusive item is difficult to manufacture; you cannot put it into series: furniture manufacturers rarely include this interior attribute in their “price list”. The popularity of the London rarity is consistently high, especially among restaurateurs and adherents of design with elements of kitsch. What can we recommend to those who have decided to make an English telephone booth with their own hands?