DIY paper cracker
Among the numerous paper crafts that we were all fond of at school, crackers occupied not the least place. Perhaps these simple crafts can be classified as the art of origami, since to make a paper cracker with your own hands , you don’t need glue or scissors. All you need is a sheet of almost any paper.
This article is just for those who have forgotten how to make paper crackers . And it’s worth remembering, because this is a great way to cheer yourself up anywhere and at any time, to create an atmosphere of celebration and fun out of almost nothing. Teach your children how to make origami paper crackers , this will definitely arouse their sincere enthusiasm, because learning something new and interesting is exactly what children need. In addition, you will learn how to make a paper cracker with confetti and funny cracker crackers.
In this article you will learn how to do:
- DIY paper crackers
- Loud paper cracker
- Origami paper cracker
- Paper crackers with confetti
- Cracker poppers
A little bit of history
This product is traditionally classified as fireworks. They are associated with the New Year. At the same time, there are many varieties of them, completely different. A common feature is the ability to create noise and attract attention without calling out, whistling, or clapping your hands.
The movie firecracker is a subspecies, although it has nothing in common with fireworks. It helps perform the same functions in fact, although they are completely different.
A do-it-yourself movie clapper can be made from plywood, and in this case it will be exactly the same as the one held in the hands of the assistant director. And if you choose cardboard as a material, you will get a beautiful decoration.
This variety appeared at the time of the creation of full-length films with sound, “The Jazz Singer” (USA 1927), “Start in Life” (USSR 1930s). From that moment on, the usual signs with inscriptions, suitable only for recording frames, were no longer used on the set.
New solutions were needed and they were found. The new picture clapper made a loud sound thanks to two movable bars connected together at the top, helping to keep track of the audio series.
Director's flapper. Work order:
- We prepare the necessary materials in the required quantity and size.
- We sand the plywood and slats.
- We drill holes in the upper parts of the metal corners with a 6.5 mm drill for attaching the moving part. Please note that the corner details must be in a mirror image.
- Then we paint the metal parts black with spray paint.
- At the stationary part of the firecracker, we cut out a hole for attaching plywood along the entire length (they helped me in this matter, they cut it out with a grinder). We insert the plywood, having previously lubricated the gutter with glue. Be careful not to let excess glue come out.
- On the moving part, mark the place where the bolt is attached and drill an 8 mm through hole so that the part rotates freely around the bolt.
- We saw off the lower corner of the moving part at an angle of 45 *, then grind the corners so that it is rounded.
- Paint the parts black in 2-3 layers.
- We mark the stripes with masking tape and paint them with white paint.
- We collect the firecracker. We insert the bolt into the drilled hole in the angle and into the prepared hole in the top rail, place the angle on the lower part, and fasten it with 2 self-tapping screws. Then we put the corner on the back side and secure it with a steering wheel. We also fasten it with 2 self-tapping screws. Be careful, the screws may “meet”. It is for this reason that we fasten with only 2 self-tapping screws, so that only one “intersecting” hole is created.
- If desired, decorate the canvas of the firecracker. In my case, the inscription “Film, film, film...” was needed:
- prepared the inscription on the computer,
- printed in the required size,
- attached the firecracker to the canvas with masking tape,
- I traced the letters with a pencil,
- took down the layout,
- painted over with white acrylic paint.
The director's clapperboard is ready, let's admire the result.
The first holiday copies
The world's first New Year's cracker was invented in England. Its author is Thomas Smith, a pastry chef from London. This happened in 1860. To present sweets in Paris, craftsmen often wrapped them in foil.
Thomas Smith knew this and was fascinated by his colleagues’ original approach. He followed their example and began to design his masterpieces in this way, in the hope of greater demand.
The idea once exhausted itself, and he decided that it was important to create a holiday toy, give it as a gift at presentations, when opening stores, and sell it separately. His firecrackers consisted of foil and cardboard.
Inside there were gifts - a handkerchief, pictures, puzzles, puzzles. When the toy opened, there was a loud click and sparks flew. The pastry chef still couldn’t figure out how to make a confetti cracker. But his invention contributed to the further popularization of the idea. Soon a classic version appeared.
DIY New Year's cracker: all the pros and cons
New Year's firecrackers are quite important, as are all pyrotechnics. They can be easily found on any counter, and they cost mere pennies, but they have big disadvantages. Firstly, the factory product has a small supply of gunpowder, which can be harmful to your health. Yes, there is a negligible amount of it there, but the fact that it is there makes this pyrotechnics prohibited for children (who, however, regularly violate safety rules). Secondly, the same gunpowder produces a very loud sound when it explodes, so the product should not be exploded in a room where there are small children (otherwise it could end in severe fright). Thirdly, the gunpowder may become damp and simply not explode, which will greatly disappoint you. There is a fourth reason why you should abandon factory-made pyrotechnics - increased fire hazard, although if you make a home product incorrectly, it can also turn out to be dangerous.
You can easily make a real holiday cracker with your own hands at home, and it will be relatively safe and environmentally friendly. Today we will discuss how to make such a craft at home using improvised materials. The most creative life hacks for making New Year's pyrotechnics, which you can take to the garden or place in the children's room, are already waiting for you in our article, but remember that these products also have a drawback - you will have to clean them up not only after using them, but also after creating them .
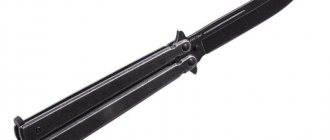
Unique handmade firecracker for cinema and scenery
The idea came from TeX, who has recently become very interested in cinema. I decided to give him a gift :)
There are probably many people who have always been interested in the question: why is a person with a so-called “clapper board” needed in a movie? Admit it, were you really interested in this?
It turns out that the sound of a firecracker and the funny woman from the cartoon “film, film, film” are one of the most important participants in the filming process. Of course, I don’t mean this particular woman, but the man with the firecracker himself.
As you know, in the process of filming a film, many takes and scenes are made, from which the director must subsequently select the best ones, and, as they say, glue it all together into a high-quality product, which you will then see on television or movie screens. This whole process is called the fashionable word “post production”.
So, imagine from what volume of material the editing directors and the director himself must choose their optimal shots! In order to facilitate the post-processing process, each frame and scene is numbered during filming. And the name of the scene, take, frame and cassette number are written on the clapperboard. The clap itself is needed for the so-called synchronization of image and sound. So that later in the frame the hero’s remarks and the movements of his lips do not diverge in the time curve.
A standard clapperboard consists of two parts - a board to indicate the name of the scene being filmed and a clapper bar attached to a hinge. Interestingly, in the past, in movies, a tablet with the name of a scene and a clapperboard were two different objects. One person was holding a sign with the names of the scenes, and the second was clapping two sticks connected to each other. Then these two devices were combined, thus leaving many professionals without work...
Another quite important question is the color of the firecracker. Since the beginning of the last century, the “body” of the cracker was made black, and the chalk with which all data was written was, accordingly, white. This was due to the fact that they used to shoot in negative, i.e. During editing, the clapperboard appeared white and was much easier to see on film.
The firecracker stick itself is usually painted with black and white diagonal stripes - this is done for optimal visibility of the firecracker in any lighting.
As you can imagine, the filming process has become much easier now. Of course, many new electronic gadgets have appeared, and the process itself has become faster and more optimized. For example, I think everyone knows that after filming, films are now digitized from film or immediately shot digitally. Nobody develops film anymore or glues it piece by piece in the editing room. Now all this is done on a computer using special editing programs. That is why white “crackers” have now begun to be used. Chalk as a means of applying information is also a thing of the past - now special markers are more often used, the inscriptions of which can be easily removed with a sponge. The only drawback is that it is not recommended to leave the inscription for more than 12 hours - it can dry out, and then it will be much more difficult to wipe it off... (https://eatmeet.com.ua/cinema/full/298)
Here are several options for ready-made firecrackers:
Let's start making a gift with our own hands.
- plexiglass (I still have a piece from the article about a homemade underwater photo box)
- hinge (we’ll make it ourselves)
— neodymium magnet (I’ll take it from a disassembled hard one. If you haven’t disassembled one yet, then here’s a great opportunity)
- marker (I think you already understand that the cracker will be a modern type)
— paints (black + white)
- stencils (you can download ready-made ones or draw your own)
I decided to add a twist in the form of fingerprints)
I drew the stencil in Microsoft Visio (the simplest drawing program in my opinion).
I think the assembly principle is clear, I won’t go into details, but will show a photo of the finished work
I pre-painted the frame with a primer coat.
Nuances of the work of a firecracker. It will not work if one part of the block is not rounded.
Let's draw all possible deviations.
You could saw off a piece by eye... But I like meticulousness)
I took the fasteners from a Soviet designer.
I made the backlight using LED strip. At that moment, the piece of the required length was only from green waterproof tape