Home › Cosmonautics Day ›
Is there life on Mars? And on the Moon? Humanity is still looking for an answer to this question. Every time, from year to year, astronauts go on a spaceship into mysterious outer space. There is even a holiday in their honor - Cosmonautics Day. And this memorable date is April 12, the date of the first manned flight into space.
But who really lives in space, people, animals, are there plants there, or maybe so-called lunatics who fly on flying saucers live on the Moon. And why on plates, and not on forks or spoons.
No one knows this yet. But people themselves have already created the image of this very flying saucer.
And since it also relates to space, below I will show you how to make a flying saucer for Cosmonautics Day, with your own hands from disposable tableware.
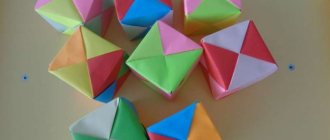
In addition, with school-aged children, you can make a rocket using the modular origami technique.
In order to make a flying saucer, we need:
- disposable cardboard plates
- disposable cardboard cup
- silver spray paint
- toilet paper roll
- hot glue
- scissors
- newspaper
- multi-colored sequins
- brown gouache paints
- art brush
Winner takes all
From 1943 to 1945, Zimmerman's team addressed stability problems (caused by engine instability and the inability to accurately control thrust) and designed a larger model of the disk.
By the spring of 1945, the project was almost ready; all that remained was to implement it in hardware. But this was prevented by Germany's defeat in the war. To prevent the developments from falling into the hands of the Allies, the SS ordered all papers to be destroyed and the engineers to be shot. However, the designers managed to escape (only Zimmerman himself did not). This is what it was supposed to be: a 50-meter, heavily armed disk, designed for attacks on allied naval convoys and squadrons.
After the defeat of Germany, the Allies did not find any documents confirming the existence of this device, and concluded that it was just another “duck”. Soviet search teams were much more fortunate. The Soviet Union not only got all the documentation for this project - they discovered Irman Mayer and his entire team of engineers hiding in a wine cellar on the outskirts of Berlin (where control mechanisms for the Panthers were produced some time ago). “A complete set of materials” (including designers) was taken to the USSR to continue work.
DIY UFO
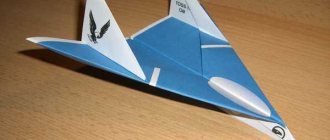
How to make a paper airplane
- Would you like me to show you ordinary cardboard magic? - No, no, no, David Blaine, don't! - Do you see this sheet of cardboard? - Now he has turned into a flying saucer! - She is flying! Feet in my mouth! Demon, how did you do it?
After these words, the famous magician and wizard thought for a second and said, “okay, guys, only this time I’ll tell you the secret of my trick. Look carefully!”...
This thing is actually called “My mystery ufo”, and today we will show you how to assemble it at home in a few tens of minutes.
Manufacturing:
1) Download templates and instructions (link to files) 2) Print on a printer. To begin with, you can print on plain paper, cut out (make templates), and then transfer to cardboard. Well, if your printer takes cardboard, you can print right away. 3) Cut out the parts 4) Glue as shown in the instructions 5) Pierce a thin hole in the center and secure the fishing line. 6) We fasten the second end of the fishing line, for example, behind the ear.
Next, I recommend watching a training video that shows you step by step how to properly operate My Mistery Ufo.
That's it, a fairly simple and at the same time effective toy is ready. You can surprise all the guests at the New Year's party, and I am sure it will not leave absolutely anyone indifferent!
Source
Flying saucer
How to make a controllable airplane. do-it-yourself radio-controlled training aircraft
The flying saucer craft is also very easy to do. It will require a minimum of materials:
- Several plates;
- Paints;
- Glue;
- Old newspapers;
- Plastic disposable cup.
Progress:
- You need to twist a rope from the newspaper, and then form a snail from it. It then needs to be glued to the front side of the plate;
- Another plate is glued on top of this snail. This makes the design more voluminous;
- You need to cut off the top of about 5 centimeters from a disposable transparent cup. The cabin will be made from this section;
- Now you need to make small cuts around the perimeter of the cup and bend them to make it easier to glue it to the plate;
- The glass is glued in the middle of the plate;
- The plate design is almost ready. All that remains is to glue the legs on the bottom. You can make them from cardboard or just take a toilet paper roll and cut off a few small pieces for the legs;
- All that remains is to paint the plate to your taste, decorating it with a pattern or even some voluminous decor.
Sunflower
The photo of crafts made from plates shows that the idea of a sunflower for implementation is quite popular. Moreover, it will take little time and materials to make the craft:
- Plate;
- Dye;
- Glue;
- Seeds for decoration.
Progress:
- To make a sunflower craft from a plastic plate, you need to trim the edges in the same way as a real flower;
- Now you need to paint the base yellow. If you take a plastic plate, then it is better to use gouache, it will fit better on the plastic. If you have paint in a can, you can use it;
- You can glue real seeds to the middle of the flower if you have the desire and opportunity. You can also draw them;
- All that remains is to cut and glue the green stem to the color or leave it without it.
Craft “Cosmonaut”
How to make a paper airplane with your own hands
Outer space always attracts attention and arouses interest among adults and children. Explorers of interplanetary spaces - astronauts - become characters in children's games and role models
Nothing will please a child delirious about space adventures more than an offer to make an astronaut craft or part of his equipment with his own hands from scrap materials: paper or plasticine. This craft could be a good option for a themed assignment for Cosmonautics Day.
How to make an astronaut from plasticine?
A plasticine astronaut can be made in several ways. For any of them we will need multi-colored plasticine and a little imagination.
Craft astronaut from plasticine - method 1
- For the helmet, we’ll roll a ball out of red plasticine, and we’ll make a spacesuit by rolling up a spring from a long blue sausage. We will also roll up the arms and legs from spirals.
- Let's make a porthole for the helmet from yellow or white plasticine, and draw a face on it.
- We will attach shoes and gloves made of red plasticine to the spacesuit.
- We will make space equipment from small strips of red plasticine and attach it to the spacesuit.
Craft astronaut from plasticine - method 2
- For the head, roll two balls: a larger one made of gray plasticine for the helmet, and a smaller one made of pink plasticine for the face. We flatten the pink ball into a cake and attach it to the helmet. Let's create a face.
- For the body, roll up a roller of orange plasticine, cut the stack to the middle, and form the legs. Let's roll the arms out of small rolls. We make gloves and shoes from green plasticine.
- Let's connect all the details of our astronaut.
- We will outfit the astronaut for the trip, attaching equipment and oxygen cylinders to the spacesuit.
Craft astronaut from plasticine - method 3
- Let's form the head and torso of the astronaut by rolling two large balls.
- For each hand, roll five small multi-colored balls, and three slightly larger balls for each leg.
- Let's make an overlay for the spacesuit from orange plasticine, attach it to the body, and attach a control panel from three multi-colored small balls to the top.
- We will make a porthole from white plasticine, edging it with a thin red stripe.
- We will make headphones from black plasticine and attach them to the helmet.
How to make an astronaut out of paper?
One of the ways to make an astronaut out of paper is to print out the details of the craft using a printer and glue them together with PVA glue.
Paper craft “Astronaut Helmet”
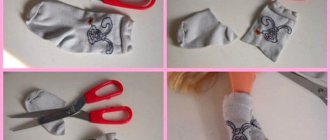
A real astronaut cannot do without a helmet, so let’s start making it. For the craft we will need:
- paper;
- PVA glue;
- threads;
- scissors;
- balloon;
- caps from plastic bottles.
Manufacturing
- Let's make the base of the helmet. To do this, tear the paper into small pieces, moisten it with water and place it in one layer on the ball.
- Lay out another three or four layers of paper, moistening it in PVA glue diluted 1:1.
- Set aside the craft until it dries completely (12-24 hours), then pierce the ball and cut out a hole for the head and for the porthole. Let's make the edging of the porthole and the holes for the head from cardboard circles.
- Glue caps from plastic bottles to the helmet, simulating headphones.
Application "Cosmonaut"
We will need:
- thick blue paper - two sheets measuring 22*11 cm;
- thick white paper measuring 6*6 cm;
- scissors;
- glue;
- markers.
Manufacturing
- Fold one sheet of blue paper in half so that the edges match. Measure 4 cm from the bottom and top, make marks with a pencil. Draw 4 cm long lines from each pencil mark at an angle of 900 to the folded edge. Let's make cuts and bend the rectangle forward between the slits.
- Carefully push the rectangle down and close the craft. When opened, the inside will be a folding box. On white paper, draw the figure of an astronaut and color it with felt-tip pens.
- Glue two sheets of blue paper together, placing one inside the other. We will glue the astronaut to the folding box. Decorate the blue background with stars by drawing them with a silver felt-tip pen or cutting them out of foil.
The best craft ideas for Cosmonautics Day
Almost all educational institutions host various exhibitions of student handicrafts on Cosmonautics Day. Naturally, on the eve of this peak, the question arises in many people’s minds about what kind of crafts to make for Cosmonautics Day from waste material. And we have prepared the best ideas especially for you.
Ideas for crafts from handy materials for Cosmonautics Day
Flying saucer made of plastic plates.
Plastic plates are an excellent material for creativity. It is worth noting that people make a wide variety of crafts from it. If you decide to make a flying saucer, then prepare:
- Three plastic bottle caps,
- A jar of dairy product,
- Scraps of colored paper, PVA glue,
- Sparkles, sequins.
Progress:
- Take a couple of plates. Plastic bottle caps are glued to the back of one plate. Glue the jar to another plate. Pre-paint plastic plates with gouache paints.
- Lubricate the edges of the plates with glue, and then connect them together. You can also fasten the craft with a stapler for reliability.
- Now the plate can be decorated. In this case, use your imagination.
Here are a few more options for space plates.
Craft from a CD.
To surprise everyone without exception at some event, try making crafts for Cosmonautics Day from disks. A space dish made from this material looks quite interesting. To create it, prepare:
- Disc and hemispheres made of foam plastic,
- Self-adhesive colored paper and decorative carnations,
- Flat plastic stars, bamboo skewers and toothpicks,
- Sequins and large beads,
- Chenille wire, glue and acrylic paint.
Progress:
- Take self-adhesive colored paper, attach a disk to it and trace it around. Cut out a circle and glue it to the non-shiny side of the disk.
- Paint one hemisphere with acrylic paint. Let it dry.
- We decorate the second polystyrene hemisphere with decorative carnations and sequins. In this case, the sequin is placed on a year and attached to the ball.
- Stick a couple of pieces of chenille wire into the hemisphere, which is decorated with sequins. They will act as an antenna.
- Now it's time to assemble the plate body. We glue the hemispheres between the disk. Glue the hemisphere with sequins to the shiny side of the disk. The painted part is glued to the part of the disk that is covered with paper.
- Then make the “legs” for the flying saucer. In this case, place beads on the blunt edge of a toothpick. In this case, the opposite edge of the stick should be inside the beads.
- Now insert the support legs into the painted part of the ship, which should be located at the bottom. The legs should be located at the same distance from each other. They should allow the craft to stand flat on the table surface.
- Plastic stars are glued to the shiny side of the disk.
Space world.
Discs can be used for more than just flying saucers. If you don't dream a lot, you might end up with something interesting. To create you need to prepare:
- The discs themselves, the glue, the tips of the sticks,
- Plasticine, paints.
Progress:
- Colorful sticks are attached to one disk using plasticine.
- Make a rocket out of plasticine. Attach it to the disk. Then you can paint the disk with paints.
- Using one large piece of plasticine, one disk is attached to the other.
- Now all that remains is to seal the hole in the disk with a piece of blue plasticine.
Space helmet.
Crafts for Cosmonautics Day look very fascinating. And making them is a pleasure. In order to make a helmet you will need not only the help of your parents, but also the following materials:
Adsense
- 5 liter plastic bottles,
- colored paper,
- Paint and tape.
Progress:
- The bottom part of the bottle is cut off at - cm above the bottom.
- The place where the label is located is also cut out. In this case, the edges need to be rounded.
- You need to attach adhesive tape or braid to the edges where the hole is cut.
- Now make a hole in the bottom of the bottle where you need to insert the neck that was cut off earlier. Everything needs to be secured with tape.
- At the next stage, you can start decorating the helmet. Use self-adhesive paper or paint.
Balloon.
A bright ball is a great craft for everyone. To make it you will need: glue, colored paper, and cardboard.
Progress:
- Take sheets of paper of two colors and cut out about 6 blanks according to the template.
- Then fold each piece in half.
- Coat the left halves with glue and glue them together, alternating colors.
- After this, the resulting ball is glued to the cardboard base.
- Then clouds are cut out of colored paper and folded in half.
- A structure is assembled from them and glued to cardboard.
- Next, take a couple of pieces of wool thread. They are glued to the ball on both sides. Cut out a basket from brown paper. It is glued on top of the wool threads.
- At the end of the work, the craft itself can be decorated at your discretion.
Cup rockets.
Ordinary disposable cups are also suitable for making crafts with the little ones. And if you decide to make crafts for Cosmonautics Day with your own hands for kindergarten, then you need to pay attention to the following products. For production you will need:
- Several plastic cups
- Colored paper, white gouache and glue.
Progress:
- A circle is drawn on each cup with white paint.
- A cone is made from colored paper. It sticks to the bottom of the cup.
- It is also worth making small cones for the wings. They are glued along the cups.
- Picture from cereals.
- In order to make a craft you should prepare:
- Gaush paints,
- Cereals at your discretion. This could be: peas, buckwheat, beans or rice.
- Plasticine of various colors,
- Cardboard,
- Glue with brush and scissors,
- Clear varnish and saucer.
Progress:
- First of all, you need to pre-color the cereals with paints. The paints are diluted with water and used to color the cereals. Dry the grains.
- Draw the outlines of any suitable design onto a sheet of cardboard. It could be: any planet or rocket. Then take the plasticine and knead it. Fashion the moon and cosmic stars out of it.
- Fill the space of the rocket with the cereal you painted in advance. Let the craft dry, and then shake off the excess.
Plasticine panel.
In order to make the next craft you will need plasticine. You will also need: cardboard and a board for modeling plasticine.
Progress:
- First, the sun is made. To do this, roll out a large circle of orange, red or yellow plasticine. Attach this ball to the cardboard, which is the base. At the moment of attaching the sun, it is slightly flattened onto the cardboard.
- At the next stage, several colors of plasticine are mixed together and a long sausage is rolled out of them, which needs to be wrapped around the sun.
- Now all that remains is to stick all the planets of the solar system from different colors and attach them to the orbit, which was formed from plasticine.
Let's sum it up
If you decide to spend your time having fun, then creating space-themed crafts in this case will be a great way to spend your time. Be inspired by our ideas and get only a good mood from the creation of these products.
Adsense
Source: https://www.svoimi-rukamy.com/samie-luchie-idei-podelok-ko-dnyu-kosmonavtiki.html
Children's crafts on the theme of space: photos
Crafts on the theme of space for children are chosen according to age. For kids, these should be simple products in the form of pictures, applications, postcards or plasticine figures. Children in the middle groups of kindergarten are able to independently cut out parts for making crafts and glue them to the drawn contours. Preschoolers are able to independently design a product using origami techniques, improvised and natural materials. What options can be considered relevant:
- rockets;
- astronauts;
- starry sky;
- aircraft;
- aliens and flying saucers;
- planets.
You can find and complete these children's crafts on the theme of space from the photos on our website.
With the little ones you can make appliques or a rocket for Cosmonautics Day. The simplest option is a rocket made from a plastic bottle or sleeve. Rockets made from cereals look beautiful. All you have to do is print the picture, apply glue and cereal. It is advisable that the grains be of different sizes; such work will help develop fine motor skills.
From the age of four years, the cosmos through the eyes of children can be captured on paper using cut out figures. This could be a picture in the form of a rocket flying in the vastness of space or in the form of planets. A flying saucer made from a disk or plastic dish will look beautiful; we looked at similar examples on Megamaster.info.
Plasticine is often used for work. With its help you can make a spaceship, astronauts or decorate applications with stars or planets. At this age, it is better to use soft plasticine; it is more comfortable for children to work with.
Crafts on the theme of Cosmonautics Day at school
Schools must hold exhibitions and events dedicated to Cosmonautics Day. Crafts on the theme of astronautics at school include the following materials:
- unnecessary CDs;
- waste material;
- colored paper;
- cardboard;
- paints;
- textile;
- corrugated paper.
If this is a competitive exhibition, you can make a wall newspaper with interesting pictures and support them with historical facts. The theme of space, like itself, is immense
To convey it in crafts, it is important to use your imagination and creativity.
In elementary school, it is easier to come up with a craft on this topic than in kindergarten, because here children already have many skills. Of particular interest when creating crafts on the theme of space is the use of puff pastry. In addition to this, you can use:
- beads;
- buttons;
- alien eyes (purchased at craft stores).
When preparing, you can invite your child to choose a craft from ready-made examples, but it is better for him to show his imagination. What can be made from salt dough:
- figures in the form of stars, they can be decorated with sparkles or rhinestones;
- aliens;
- astronauts;
- rockets;
- planet Earth made from blue dough.
Crafts on the theme of space fantasy
And in high school, they often organize competitions where they exhibit crafts on the theme of space fantasies. And the more original the craft looks, the greater the chance of winning the competition. In such crafts you can use:
- colored paper;
- foil;
- cardboard;
- plasticine;
- waste material.
Various techniques can help in production, from modeling to origami and quilling. What crafts for Cosmonautics Day we offer you in master classes:
- You can make a rocket with stars out of cardboard. An astronaut made from plasticine can complete this craft. If you wish, you can decorate the craft with a blue background and tennis balls decorated to resemble a row of planets. All parts can be secured with tape, glue or a stapler.
- A moon-shaped platform on which the astronauts landed. A lunar rover can be placed near them. It can be constructed from a Kinder shell. All figures can be placed in an open box. Paint the background blue and decorate with plasticine stars or rhinestones.
- Fans of extraterrestrial civilizations may like crafts with flying saucers and aliens. Space flying vehicles can be made from plastic plates, disks, and cardboard.
Products that use plastic containers will look beautiful. Products made using the plastinography technique look original. All this can allow schoolchildren to unleash their creativity and imagination.
What can be made from paper plates
Stock up on disposable paper plates, paints, colored paper and glue. We will create magic.
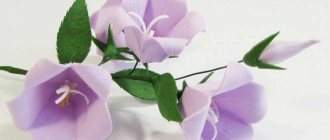
DIY paper plate flowers
Making flowers from paper plates with your own hands is not at all difficult. Depending on the age of the child, you can choose a craft that he can do.
Photo www.redtedart.com
Photo: www.aboutamom.com, www.theresourcefulmama.com
Paper plate rainbow
There are several options for making your own paper plate rainbow.
First: cut the plate in half, paint it with yellow paint, glue triangles cut out of yellow paper along the rim - you’ll get the sun. Then glue colored threads to the cut.
The second version of the craft: cut a paper plate in half, cut out the middle, paint the remaining part in the colors of the rainbow, glue clouds cut from white paper and several blue threads (rain) to the base of the arc.
Photo www.artycraftykids.com
Here is a video in which you will see how you can make a puppet out of a paper plate in the shape of a rainbow.
https://player.vimeo.com/video/280601162
Vegetables and fruits from paper plates
These crafts will help children learn vegetables and fruits, how they differ from each other and where they grow. Just spend some time with the kids and explain the difference between a vegetable garden and a garden, or play gardeners.
Photo: nontoygifts.com
Bags for children made from paper plates
From paper plates you can make not only toys, but also quite useful things. For example, a handbag for small items.
In the first photo: the handbag is made from two halves of one plate, glued together using rectangular felt or cardboard.
On the second, half of the second is glued to one paper plate (and sewn with decorative stitching).
Photo: www.handmadecharlotte.com, mollymoocrafts.com
Paper plate animals
Children who love animals will love these paper plate crafts. After all, they can make a hedgehog, elephant, llama, tiger, jaguar with their own hands.
Photo gluedtomycraftsblog.com, www.handmadecharlotte.com
Paper plate dinosaurs
We cut the disposable plate in half - this is the body. Cut out the head, legs, tail and spikes from colored cardboard. And glue it to the body. That's it, the dinosaur is ready.
Crafts about space from paper plates
Such crafts from paper plates will be relevant not only for little space lovers, but also for children who will be given the task of making something with their own hands for Cosmonautics Day.
Photo: 3dinosaurs.com
Let's play chefs
This game doesn't require anything special: colored paper, scissors, glue and paint. Invite children to use paper plates as the base for a donut or pizza craft. And let them come up with the frosting and sprinkles or filling themselves.
Photo: www.makefilmplay.com, www.shesaved.com
Crafts from paper plates on a marine theme
Kids can make anything from disposable plates. It is enough to give them a little paint, glue and colored paper, and a number of sea-themed crafts will immediately line up: fish, crabs, jellyfish and octopuses, turtles and fairy-tale mermaids.
Photo wir-testen-und-berichten.de
Photo: www.naturalbeachliving.com, www.handmadecharlotte.com
Paper plate masks
The main thing here is imagination. You can make masks for a carnival, theatrical performance, or just for play. Use cocktail straws as a holder.
Paper plate clock
This craft will help children learn how to use a watch. There are two ways to make a clock from disposable plates.
The first is a sundial: draw a dial and stick a pencil in the center of the plate. His shadow will show the time.
And the second option: draw a dial and attach arrows and cardboard to the plate so that you can move them.
Embroidery on paper plates
If you wanted to teach your child to embroider, but didn’t know where to start, we offer you this idea. Embroidery on paper plates. Using a hole punch or other sharp object, punch holes in the plate along the contour of the pattern. And give your child a thicker thread if it is too early for him to use a real needle.
Photo www.artcampla.com
Hairdresser game
This is not just a craft, it's a great way to teach kids how to use scissors.
Now you have ideas for DIY paper plate crafts and crafts for kids.
READ ALSO: Children's crafts from paper plates for Easter
READ ALSO: DIY paper plate maze game
READ ALSO: Crafts from cardboard tubes for children
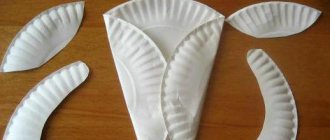
Step-by-step instruction
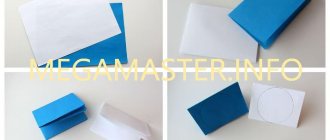
First of all, you need to glue two plates together and glue a plastic salad bowl on top.
The base of the craft is ready, all that remains is to decorate it with decorative elements that can be found at hand. Moreover, the plates can be painted silver, and then they will definitely look like an alien device.
When thinking about how to make a flying saucer at home, you should not discard the most original ideas. The basis for a wonderful craft can be an old CD or DVD. In addition, you will need a foam ball cut in half, toothpicks and various decorative elements.
The foam ball should be cut into two equal parts, one of them should be painted, the other should be decorated with sequins and a wire antenna should be inserted.
The hemispheres are glued on both sides of the disk. You can make “legs” from toothpicks. Additionally, the craft is decorated with plastic stars or sparkles.
Templates and stencils for applications
In order to make a picture on the UFO theme, you just need to print out a flying saucer, color it (you can decorate it with foil or three-dimensional elements) and insert it into a frame.
The application of the flying saucer is carried out according to the same patterns, for this:
- cut the printed picture into individual elements;
- trace them on colored paper;
- cut out blanks;
- paste them onto a new sheet in the correct order.
You can use alien templates to cut out, color, and place them in the cabin of a 3D paper plate UFO.
A home-made flying saucer toy will be unlike any store-bought toy and will not bore your child for a long time.
How to make a spaceship
Do you want to please your children with something unusual? Are you attracted to stars and space? Other civilizations?
In this case, a flying saucer or spaceship craft will surely delight your kids.
To do this you will need:
- Disposable plastic plate;
- Glue gun;
- Small plastic salad bowl;
- Two disposable cups.
In order to implement the idea it is necessary:
- Turn the salad bowl upside down;
- Glue a plate to it;
- Attach the legs in the form of cups.
To implement an unusual idea, you can use buttons, CDs, plastic bottles, and foil. In a word, everything that the imagination extends to.
Santa Claus mask
You will need:
- 2 paper plates
- red paper
- cotton wool
- scissors
- PVA glue
How to make a craft:
- Cut out the bottom of 2 paper plates. We glue the edges together.
- Cut out 2 large triangles from red paper. Lubricate each of them with glue along the contour, except for the bottom part, and glue them together. We should get a red cap.
- We insert the circle of plates into the hat by 4-5 cm and coat it with glue. Glue both sides of the hat to the base.
- We form many white balls from cotton wool and glue them at the bottom of the white circle. We also lay them out in a row at the junction of the hat and the circle of plates.
- We make a large ball of cotton wool and glue it to the top of the hat. The Santa Claus mask is ready!
Face mask ideas
Crafts for Cosmonautics Day in kindergarten
Masks made from paper plates work great. This is a way to save on workpieces, as well as an opportunity to quickly make a product from improvised materials. If a child is involved in the work, it is better to check with him what kind of mask he wants to make. If this is a very small child who wants to work independently, you can stick to simple options.
If you need to make special masks for a matinee, it is recommended to use special plates of certain colors. Then the craft will look more attractive.
When a mask is made slowly and for a specific holiday, you should choose a more complex design. As an example, a cow is given, for the production of which not only cardboard bases were used, but also colored paper with a colored red ribbon.
Chocolate Flying Saucer Cake
Surely, the child will want to try a sweet craft on this topic. This is where the “Chocolate Flying Saucer” cake comes in handy.
Its surface is shiny, as if a distant planet or piece of space is reflected in it.
This cake can be baked in a slow cooker and in the oven too. For the test you will need:
- 6 eggs;
- 1 cup - 180 g flour;
- 200 g granulated sugar;
- 4 tbsp. l. cocoa powder;
- salt - on the tip of the knife;
- 2 g vanillin.
For cream:
- 3 tbsp. l. Sahara;
- 4 tbsp. l. cocoa;
- 2 tbsp. l. flour;
- 260 ml milk;
- 2 g vanillin;
- 1 egg.
For impregnation:
- 3 tsp. granulated sugar;
- 50 ml of squeaky water.
For the glaze:
- 3 tbsp. l. Sahara;
- 60 ml water;
- 1 tbsp. l. butter;
- 1 tbsp. l. cocoa.
For the layer - 1 can of boiled condensed milk.
Separate the whites from the yolks. Place the whites in the refrigerator for now. Beat the yolks with sugar and vanilla. When they become lighter, add 2/3 of the flour, cocoa, and mix. Add a little salt to the whites and beat until they form a stable foam.
Carefully combine them with the egg mixture, gradually adding the remaining flour. To ensure that the sponge cake rises well, do not grease the springform pan with oil, but line it with baking paper. Place the dough in the pan, gently twist it so that it is distributed evenly and does not rise in the center. Here's how to make a flying saucer, delicious, chocolate next. If you want to bake a cake in a slow cooker, then set the “Baking” mode for 50 minutes
If using an oven, bake at 180 degrees until done - about 40 minutes. It is checked with a wooden stick. Pierce the center of the cake with it, if it remains dry, then the sponge cake is ready. But to prevent it from falling off, you should not immediately remove it from the oven. Cool gradually. At first, just opening the door slightly. A few minutes later, a little more. So, gradually opening it wider and wider, keep the biscuit in the switched off oven for 15 minutes. Then take it out, cover with a towel, and while it cools completely, prepare the cream. Mix all the ingredients for it. Put it on fire. Cook, stirring frequently. When it starts to thicken, stir more intensely; when boiling, remove from heat. Place the container with the cream in a bowl of cold water. Stir it occasionally to prevent a film from appearing on the surface. To make the impregnation, mix sugar with boiling water, pour this mixture into a plastic bottle, close with a lid in which holes are made with a needle. Cut the cake into 3 layers and it’s time to make the chocolate flying saucer next. Place the first cake on the dish, sprinkle it with impregnation, and spread the contents of half a can of condensed milk on top. Place the second cake layer on it, also moisten it with impregnation, and then brush it with cream. Place the third cake layer on top, sprinkle it with impregnation, brush with the remaining condensed milk and smooth the surface with a long knife. Melt the ingredients for the glaze, let it cool slightly, pour it over the condensed milk in a thin stream. After hardening it will shine. Then the “Chocolate Flying Saucer” cake needs to be put in the refrigerator for at least 3 hours, or better yet overnight, so that the cakes are soaked.
If you want to create another unusual craft on this topic, check out the next section.
Making a craft from cardboard
Have you ever received surprises in attractive boxes? You open it, and there is a delicious cake or an interesting book. The time has come to arrange such gifts. We will make a space robot from cardboard boxes.
Here are step-by-step instructions on how to make a beautiful robot from space;
- take the boxes and wrap them in foil;
- neck and leg blanks are made from ordinary toilet paper rolls, they need to be cut to size;
- paste it over, then paint the blanks in the desired colors;
- we make two forms of springs out of paper, they will serve as hands;
- the edges of the robot’s arms need to be covered with foil;
- We paste a large box with small parts of different shapes so that they look like buttons;
- glue eyes and mouth onto the head;
- we assemble the robot;
- Glue wire antennas onto your head.
Your craft is ready!
Wedding stencils
DIY paper bunny craft
Stencils and templates are widely used to make various wedding attributes and details. They are used for the design of cards and invitations, for the design of champagne bottles, room decoration, etc.
Decor for wedding champagne
To work you will need:
- Two bottles of champagne.
- Paint of any color in a can.
- Soap.
- Printable template of bride and groom silhouettes, hearts.
- Wide satin ribbon.
- Scissors.
- It is necessary to rid the champagne of all papers and labels, except for the top packaging of the cork. It is not recommended to heat the bottle with a hairdryer or steam it in hot water.
- Cut out the desired image and glue it to the bottle with soap. Shake the paint in the can thoroughly and evenly cover the bottle on all sides, including the lid and bottom. Let the paint dry. Remove the template glued to the soap and, if necessary, wipe the glass with a sponge.
- Tie the neck just below the cork with a satin ribbon and tie a beautiful bow. Champagne is ready for the newlyweds' table.
From fantasies to knowledge: how does the world work?
Among other tasks, it is desirable to create such crafts in which space is not just a beautiful fantasy, works based on the study of the structure of the Universe and methods of exploring it. The task needs to be formulated in such a way that the student, when assembling a model rocket, turns to the history of flights, not only understands how to make a comet, but inquires about what it consists of.
Visually depicting the Solar System is not technically difficult: select a dark background, draw eight orbits using a compass, attach planets made of plasticine or plastic, paper. It is unlikely that it will be possible to accurately reflect on the sheet the relationship in distance between the Sun and the planets, but it is necessary to show the relative sizes of all objects (Jupiter is the largest planet, Mercury is the smallest). When choosing colors, keep in mind that Mars is red, Earth and Venus are blue, hot Mercury can be painted bright orange. A well-executed space model will be a worthy addition to the school’s teaching aid fund.
A child cannot create a sample of complex technology, for example, a small copy of the Soviet lunar rover, but getting to know its structure, while admiring the skill of the teacher, is interesting and useful. Therefore, at a themed school exhibition, space crafts for children made by adults are appropriate.
Volumetric craft with a rocket
For children's crafts, space, you can use plain paper. If you don’t want to make an applique and want to diversify the finished product, you can try the following option.
For it you will need:
- Colored paper or cardboard. It's better to take cardboard, it's denser. Or take colored paper and glue it onto some kind of base to increase the density;
- Sushi chopsticks or long skewers;
- Glue;
- A container where you can place the composition;
- Filling for the container. Plasticine or polyurethane foam will do - anything that can be used to fix the skewers so that they stand.
Progress:
- Using the stencil you need to cut out several stars, a rocket and a planet. It is better to cut out two parts for each figure, so that later you can glue them together by inserting a base between them;
- If desired, the rocket can be decorated by gluing additional elements on it or drawing something;
- Then you need to glue the cut out parts onto a stick;
- Now all that remains is to install the figures in the container and fix them there.
Carnival masks and crowns
Stencil of tulips for cutting out paper templates. DIY paper tulip craft. how can you use them
Every child wants to be special, and most of all at children's parties and New Year's parties. Let him choose his own character, and then it’s just a matter of imagination.
Lion mask
Paint the mask orange, cut out holes for the eyes and add a muzzle. The mane can be red knitting threads or unnecessary decorative fur.
For princess girls, a paper plate crown is perfect.
For creativity we need:
- scissors;
- paints, pencils, felt-tip pens;
- sparkles, beads and other elements at your discretion.
Fold the plate in half and make three even cuts along the fold. It turns out to be a plate with cuts in the middle.
The crown model is ready, and further decoration is a matter of the imagination of the little princesses.
Funny animals made from paper plates
Rabbits, frogs, birds and even jellyfish. It's amazing what you can come up with from an ordinary paper plate. Does your child love the animal world? Why not keep him busy with an interesting homemade project.
Owl
For creativity, prepare:
- brown paint;
- a set of colored paper;
- glue;
- scissors.
First of all, paint two plates brown and let them dry thoroughly. At this time, cut out two yellow circles, two smaller white ones and two small black ones from colored paper. These will be the eyes of our future owl.
The beak can be cut out of orange paper; just take a small triangle.
Glue the beak and eyes onto a dried plate, and cut the second one in half. Glue the wings on the back side (two parts of the cut plate).
Our owl is ready and can safely decorate your child's bedroom wall!
Frog
We will need:
- scissors;
- glue;
- a set of colored paper;
- paints;
- two molds from an egg carton.
We paint a plate and two molds for chicken eggs green. While the elements are drying, cut out a tongue from red paper, two white and two black circles for the eyes. Glue the tongue to the unpainted side and fold the plate in half. All you have to do is glue on the eyes and the funny frog is ready!
Cute bunny
Prepare:
- two plates;
- colored pencils, felt-tip pens;
- a set of colored paper;
- glue;
- scissors.
We will need one white paper plate whole - this will be the muzzle, and cut the second in half - you will get ears.
The middle of the ears can be colored pink with pencils or felt-tip pens and glued to the back of the whole plate. When the ears are ready, we proceed to the muzzle. The eyes and nose can also be drawn or cut out of colored paper and glued.
Then we cut out six thin strips from black paper and glue them like mustaches. If you have small pom poms, they can be used instead of a mustache or nose. So the bunny will also be fluffy!
Don’t worry if your imagination has run out and you don’t know how to surprise your child. Creative kids will come up with what kind of animal they want to make!
Easy DIYs
Cut the plate into a spiral, leave an oval in the middle as a head, glue on a double tongue, eyes and let your child decorate a real cobra!
And if you stick ribbons or knitting threads onto a multi-colored plate, you will get a beautiful jellyfish.
Appetizing fruits
You'll need:
- colored paper;
- markers;
- glue;
- scissors.
If you have colorful plates of green, red, yellow or orange at home, then your fruit platter is already half ready. But it doesn’t matter if there are none. They can always be decorated with colored paper or decorated with felt-tip pens.
Cut the green plate in half, glue a smaller half of pink colored paper onto each half. Draw the seeds with a black felt-tip pen and your watermelon slices are ready!
The yellow one makes a real lemon. To do this, cut out four strips of yellow or orange from colored paper. Glue them crosswise onto a plate to create a lemon slice.
Thanks to your imagination, your mother’s kitchen can be decorated with a delicious assortment of fruits!
Space in a jar
If you don’t know what you can make a space out of with your own hands, then one of the most popular space crafts will come to the rescue. Space in a jar is very simple and incredibly beautiful; this craft is best done with children over three years old. Instead of a jar, you can take a small bottle, attach a string to it and carry the space with you.
The following materials must be prepared:
- Decorative jar or small bottle for making pendants;
- Food coloring and paints;
- Glycerol;
- Star-shaped glitter, gold and silver;
- Cotton wool and glue gun;
Detailed instructions on how to make a beautiful space in a jar include different stages.
- Glycerin is poured into the jar; it should cover the bottom. Cotton wool is placed at the bottom, it should absorb glycerin.
- Sparkles are poured into the jar, which need to be distributed with a wooden stick.
- Add paint: you can take purple, blue, light blue and pink.
- We put cotton wool on top and make a new layer of space.
- Each subsequent layer is glycerin, glitter, cotton wool and paint. Thus, you need to fill the jar to the very top.
- Apply glue to the lid using a glue gun and close it tightly.
This craft turns out so beautiful that it can be made as a gift. Paint colors can be chosen to suit your taste; space can be pink-violet, red-pink, green-blue, and so on.
Space in miniature
Schoolchildren can be asked to make a three-dimensional craft about space. To do this, you will need the following materials: scissors, cardboard box, cardboard, plasticine, colored paper or paints, glue pencil, shiny paper.
We start with a box, you can take a shoe box, cover it with blue colored paper from the inside or paint the “walls” of the box with paints. Then we “adjust” our sheet of cardboard to the dimensions of the box bottom. The resulting blank must be covered with black or dark blue colored paper, or painted with paints of the above colors.
After the “painting” work is completed, we begin to make space. In the corner of our endless space we sculpt a three-dimensional one or make an applique of the sun from yellow-red plasticine. Next, you need to roll the thinnest flagella from light plasticine, these are the future orbits of our planets, a total of eight such flagella are needed.
At this stage, it is necessary to mold eight planets from plasticine. An interesting experience would be to search the Internet and imitate the appearance of the planets. Let's add stars made of shiny paper for authenticity.
We put our space into boxes and put it on edge so that we get the effect of a TV. Additionally, a children's space craft can be decorated with a homemade plasticine spaceship, an astronaut, or even a “green” man.
At a school exhibition, such a handicraft, space, will probably take first place.