Isn't it easier to buy?
In fact, one of the main questions that I ask myself is why do you need to do everything yourself? Okay, there were times when computer hardware was very expensive or non-existent. But do you know how much the simplest USB adapter costs now? I show the example of a local store:
Is 350 rubles for a ready-made beautiful solution a lot? Understand. What if you look at the same thing from the Chinese brothers?
I immediately found such a solution. But, most likely, if you dig deeper, you can find something even cheaper. Wait a little longer, and everything works fine for you. But for some reason people are drawn to do everything by hand, and fortunately only for personal educational purposes.
Problems with the router
You also need to check whether other devices can connect to the router. For example, using a smartphone or tablet. If another device successfully establishes a connection and maintains it stably, it means that the router itself is working correctly. Also try rebooting your router.
Otherwise, you need to check the configuration of the access point: is it using a compatible standard, is the same radio channel selected (if automatic configuration is disabled), is the correct password specified. As a last resort, you can reset the router to factory settings and then configure it again, checking each step.
It is also possible that the router firmware needs to be updated. In this case, you will need to download it from the manufacturer’s website and then update it through the router control panel. Detailed instructions for your specific model are usually found in your owner's manual.
If all of the above measures do not help, check that the device is operating normally. For example, contact the manufacturer's service center to check.
Hard homemade
I honestly tried to dissuade you! You’ll save time and won’t lose on aesthetics. And also avoid possible problems with drivers. Now to the point.
The most common thing adapters are made from are boards from phones and tablets (especially tablets). What's the trick:
- All you need to do is carefully cut out the Wi-Fi module directly on the board.
- The USB connector is soldered according to the pinout.
- Because The chipsets of the modules are mostly the same, and a Windows computer usually recognizes such a module out of the box. In very extreme cases, an additional manual search for drivers is done.
- All this is put into some kind of home-made case. Well, and most importantly, you can safely brag to your colleagues, because... I don't see any other use here.
An example of such an act can be seen in the following videos (I don’t see the point in explaining it in pictures, smart people in this topic already understand everything):
Pinout diagram for a standard USB (usually the same markings on the board):
I dare not detain you any longer. Everything basic and useful that can be honestly expressed on this topic is relevantly stated above. You can leave the rest of your achievements and ideas in the comments below, this can really save another equally interested person from possible problems. See you soon on our WiFiGid portal, helping people!
WLAN module K30345. Build yourself a WiFi adapter
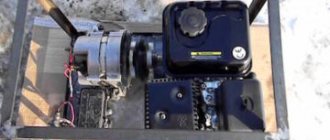
Hi all! We continue the theme of collecting WiFi adapters from trash and sticks. Today we will assemble it from the remains of an inkjet printer and a cash register. It would seem, what could go wrong? Welcome to the cat! So, today we have the K30345 module on the operating table. These were installed in Canon inkjet printers - for example, in the Pixma MG4250 IP7250.
The board has dimensions of 35x25 mm, broken together with a piece of the chassis. Part of the front side is covered with a tin screen. The PCB has a printed antenna and a coaxial socket for connecting a pigtail.
The data bus connector is designed for a ribbon cable, which no longer exists... Using a soldering iron and Rose alloy, carefully remove the screen and connector for the ribbon cable.
Below it is the 88W8786U chip from Marvell. I didn’t find a clear technical description for it, but at Marvell this is generally in the order of things. Embedded modules are usually powered by 3.3V, so we need to take care of the correct power supply. We find in the box the fiscal memory block from the cash register (on the right).
There is a real ATMega48 microcontroller, but now it will not be used - for us, the presence of the 7803 chip on the board is more important. To connect the future device to the PC, we use a cable from a Chinese iPhone. There's nowhere else to use it anyway.
The color standard of ChZBK, the manufacturer of this hellish machine... saw it somewhere, yes.
Therefore, we have a side mini-quest to test the cable to determine which is which. WLAN module pinout:
Simply unsoldering 4 wires of a USB cable is not enough here - the ENABLE input must be pulled up to the supply voltage for the module to work, so we solder a 4.7-10 kOhm SMD resistor between these pads.
There is also a READY signal output. I hung an LED from an electronic cigarette on it, but it seems that the load capacity of this output is not enough - the LED barely glows. Just wasted my time. Solder the wires of the data and power lines.
We insulate the back side of the power board with Kapton tape...
We put the boards together.
And glue it with the same tape.
We connect the assembled product to the PC. Windows 7 tries to install the driver automatically, but it fails:
In principle, this was expected, so we are trying to find the driver and install it manually. But we also break down. Why? Because the last versions of Windows that supported this thing were XP and 2003. Conclusion:
Despite solving problems with the hardware, as a result, the operation of a homemade wireless network adapter in the current version of Windows is not guaranteed. However, when assembling a retro PC, the module may come in handy.
What is this device
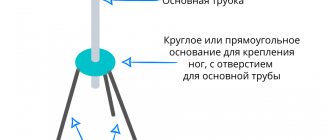
Many people are faced with the problem of weak Wi-Fi signal reception. A special Wi-Fi gun will help improve wireless network reception. With the help of this homemade device, it will be possible to receive a signal even at a distance of 1-2 km from the transmitting device. It is because of this that this device is very popular.
Some people are trying to make a Wi-Fi gun with their own hands from scrap materials.
Additional Information! This signal amplifier looks very unusual. Its appearance resembles a futuristic laser weapon with a long barrel.
Settings
Setting up a homemade Wi-Fi antenna comes down, first of all, to installing it in the right direction. In this case, the following conditions must be observed:
- take into account the signal propagation vector of the Wi-Fi signal receiver/transmitter;
- take into account the presence of barriers between transmitting and receiving devices;
- take into account that hard surfaces reflect the signal, while soft surfaces, on the contrary, absorb it;
- If possible, install the antenna within line of sight relative to the receiver/transmitter.
For greater efficiency, the antenna should be directed towards the access point.
At the setup stage, the cable length should be reduced as much as possible, this way you will get rid of unnecessary signal losses and improve its quality.
How to strengthen the signal of a Wi-Fi router with your own hands
Introduction
Nowadays, the computer has become an integral attribute of progressive life. It is used to perform a variety of tasks, not least to access the Internet. Since almost everyone has several devices at home with this capability, a router is used to meet the interests and needs of each family member.
Network via Wi-Fi router
But when several users simultaneously use the same access point, problems with Wi-Fi reception may occur. In order not to suffer from poor communication and not to run around the apartment looking for a signal, you can carry out some equipment upgrades. We would like to show you how you can increase the quality of reception with your own hands.
Reasons for a weak signal
Typically, a router with a built-in antenna has a coverage radius of a maximum of several tens of meters, and often even less. This is due to the fact that a cheap router has a low-power transmitter that is unable to provide high-quality Wi-Fi reception over the entire coverage radius. Also, when installing the router near sockets to which other devices are connected, radio signal interference may occur, which will affect the quality of reception and the wave propagation range will deteriorate.
Correct placement of the router indoors
To ensure uninterrupted reception of the wireless signal, you need to position the Wi-Fi router correctly. The operation of the network is affected by the walls located in the apartment and their thickness, the location of the computer, and the operation of electrical appliances.
The router should be placed as high as possible and close to the center of the apartment or house
The router should be installed in such a way as to minimize the number of walls the radio signal can overcome, because each of them significantly reduces the coverage radius. It is better when the signal passes perpendicular to the wall, and not at an angle.
Routers operate at a frequency of 2.4 GHz, which is also used by almost all other household appliances - refrigerators, microwaves, televisions. Therefore, try to place Wi-Fi equipment a few meters away from other equipment.
In addition, the following may cause interference:
- glass and mirrors;
- aquariums;
- soundproofing of walls;
- metal constructions.
Selecting a communication channel
To transmit the signal from the router to other devices, 11 communication channels are used. The router automatically changes the channel, choosing the optimal one. But sometimes the channels are not selected quite correctly, which is why they overlap each other and the signal weakens. You can change the channel manually.
- Enter the router settings mode. To do this, enter the router's IP address (usually 192.168.0.1 or 192.168.1.1), login (usually admin) and password (usually admin or password) in the browser.
- Go to the Wireless Network - Settings tab. In the Channel line, select one of the 11 available channels.
But which channel should you choose? You can use special utilities, for example, Free Wi-Fi Scanner on a laptop or WiFi Analyzer on Android. They will show which channels are free and which are busy.
Selecting a channel on a TP-LINK router
Launch the utility on your laptop. Its task is to scan all available networks and show which channel each of them operates on. Information about each connection is displayed in chart form. Please note that some channels may overlap, which may impair reception. Connect to a completely free channel, then don’t forget to click the Save button.
Selecting a broadcast standard
All Wi-Fi equipment operates in one of four standards: 802.11a, 802.11b, 802.11g, 802.11n. The most common of them are b, g, n. The latter provides better gain and stability. In the router settings you can determine which standard your device will operate in.
- Enter your router settings.
- Go to the Wireless network - Settings section, in the Mode line select 802.11n.
Wi-Fi wireless network parameter “Mode” - allows you to select the broadcast standard
Attention! Not all devices support this standard, so it is better to choose automatic standard selection.
Reboot the router
During continuous operation, the router may malfunction due to heating of the board or software errors, for this reason Wi-Fi begins to work worse. It is best to reboot through the router’s web interface, for which you need to go to the settings mode, the System settings section, where you will find the corresponding button.
Making a booster antenna
Option 1. Parabolic antenna. We will need a metal beer or drink can, or food foil. We cut out a piece of foil as wide as the height of the router antenna, or we cut out the bottom and top from the can and cut it on one side to make a rectangle. The jar is already curved, but if we use foil, bend it so that it becomes parabolic. Now we need to attach our creation to the antenna. This way you can increase the coverage range, and Wi-Fi will be less scattered.
Parabolic antenna for router made from aluminum can
Option 2. Focusing attachment. You will need copper wire with a diameter of 0.8–1 mm and a piece of cardboard or plastic. We cut the wire into lengths of 48 mm (2), 50 mm (2), 52 mm (1) and 59 mm (1). They are attached to the cardboard exactly in the middle at a distance, as indicated in the diagram. We cut out the cardboard and attach the structure to the antenna. It will help to significantly enhance signal reception and coverage range. If the router has two antennas, we make an amplifier for each.
This method is suitable if the router has a weak translator or if the router is located at a sufficiently distant distance from the devices, due to which the connection is not stable and the network is constantly interrupted
Signal repeater
If no method brings the desired result, you should try a scheme with two routers, one of which will act as an amplifier. To improve reception in this way, you can buy a special device, but if you have an old router lying around, you can use it.
- Enter the router setup mode.
- In the Wireless network section, find the Operating mode item.
- Select the “Universal Repeater” mode.
- Click the "Search" button to find the network of your main router. Connect to it and reboot your device.
- Select an encryption algorithm and reboot again.
Conclusion
There are really many ways to strengthen your home Wi-Fi signal. To increase the coverage radius of your home network, a specific method is suitable for each user. For some, it will be enough to rearrange the router, while others will have to make an amplifier. But the truth is that you don’t have to resort to the services of specialists to do this.
How do you improve the signal quality of your wireless connection? Share your ideas in the comments.
Wi-Fi signal amplifier for laptop
How to strengthen the signal of a WiFi router: 9 DIY methods.
A wireless modem usually has a range of 30 meters. Many reasons can lower the range and lower the signal. Interference can occur due to the following factors: metal, thick walls, signals from other devices that use wireless frequencies (mobile phones, microwave ovens). Let's look at simple ways to strengthen the WiFi signal.
9 Ways to Strengthen a WiFi Router Signal with Your Own Hands
Minimize the use of devices on the 2.4 GHz frequency
Most often, household appliances interfere: Radio telephones, microwave ovens, security systems, television remote control. You will have to replace devices or turn them off when using wifi. To check which devices are interfering with our network traffic, you can turn off the devices one by one and look at the signal level. In this case, we will roughly know what is stopping us.
Move your router
Sometimes the solution is very simple. You just need to find the highest and most comfortable point for the modem.
- Select a high point on your modem to maximize the effective broadcast range. The higher the better.
- Try placing it in the center of your living space for more area coverage. In the center and high.
- Bring your devices closer to the network if possible.
- Find a place where your neighbor's wifi reception is poor, try placing the modem at that point.
- Move away from any metal: iron shelves, drawers and similar things. (If you use a laptop for example)
- Move away from cordless phones and microwaves.
- Try applying all the above points into one.
Change the router broadcast mode
Select the new 802.11 N standard in the modem settings, if supported. 802.11 N offers much greater range and signal strength than 802.11 a/b/g devices. (Setting up the HG532e Huawei modem with hidden functions. In order for the 802.11N broadcast changing function to appear, you need to log in with super admin rights.)
Switch the router channel to a free one
Modems operate on channels from 1 to 11. Changing the channel will allow the router to create a clear signal between other wireless devices. To test indoors what channel the wifi network is on, you can use the Acrylic program:
- 1. Our network.
- 2. What channel is it on and the 802.11-n broadcast mode.
- 3. Pink is our coverage on channel 10.
- 4. We see that two networks (pink, blue) are on the same channel 1, they interfere with each other.
- 5. You can check the rating status of the setting.
What do we have? Exactly that my neighbors’ two wifi networks are on the same channel, thereby interfering with each other. Choose a channel on which there are fewer wifi networks connected or not connected at all.
Strengthen the router's transmission power
Read the instructions for the probability of the xmit option, the power of your modem: the amount of energy it uses to transmit a signal. You can increase this number to 45 (mW). Be aware that you risk overheating or damaging your router.
An example of two modems. Look for the Transmit power setting and increase it. In the first picture, select High. On the second, specify the maximum value of 20.
Change the router's standard antenna
Find another antenna from the old router, if it is more powerful, and replace it, which will provide more power. Not all routers allow you to unscrew the antenna as usual. It is attached completely, many do it as in the video.
Make a directional wave Wi-Fi
Direct your wifi network not 360 degrees, but less, thereby the remaining waves will be reflected and directed in one direction, which will give a small effect. Cut from beer cans like in the picture. It is best suited when you need to connect two routers operating in the mode: wds, repeater. You must understand that wifi will not work well behind the closed part of the can. This method is how to give a greater coefficient of targeted wave.
Install repeater
Also called “Repeater”. Expands the network of the received signal. The repeater receives the signal from the modem and amplifies it to increase the range. Sold as a unit that needs to be plugged into an outlet after a quick setup. Many routers have a “Repeater” option.
Installing a wifi amplifier (Booster)
Connect an amplifier, called a booster, specifically to the modem. A booster is better than a repeater. A repeater only amplifies the strength of the existing signal, and not the strength of the range, which cannot be said about a booster. Use the bi-directional Booster to increase speed.
comments powered by HyperComments