Nowadays, many have already forgotten about two such legendary board games as chess or checkers, but they allow you to pass the evenings well, relax and at the same time flex your brains a little. Of course, this is not surprising, because today most people spend their free time in front of the TV or computer. But it happens that the electricity goes out, and then we don’t know what to do with ourselves? Then you can play checkers or chess, and to make it even more interesting, you can make them yourself.
Available materials
In order to make board games at the right time, when there is no light or the moment comes when you want to do something interesting, you need to acquire the necessary materials in advance. Actually, they are very cheap, so the main thing here is to remember what we need to create games, so as not to throw away a good thing. And we will need:
- two cardboards, and the size of one of them should be 17 x 17 cm, and the second - 6 x 17 cm, although of course, they can be larger, because in order not to think about where to get them, you can simply use a cardboard pizza package ;
- scissors;
- felt-tip pen and simple pencil;
- compass;
- a printed stencil with chess pieces, although you can do without it and just paint checkers and chess by hand.
History of origin
In general, the term saber is tightly linked to the Abkhaz-Adyghe word “sashkho”, which literally means “big knife”. The first examples of sabers date back to the 12th-13th centuries, and these were large combat knives, which, along with daggers, complemented the warrior’s weapons. The first literary mention of checkers dates back to 1625.
The blade of the so-called “Caucasian type” was chosen as the basis for the new model.
The arguments for replacing the saber with a saber were:
The checker handle was held with 5 main grips:
Structurally, the checker consists of the following elements:
Creating a chessboard
The most important thing in creating games is the process of making a board for it. To do this, you need to take the largest cardboard and draw it into squares. True, you will first need to outline its boundaries, stepping back on all sides by 0.5 cm and drawing a square with sides 16 x 16 cm.
You can make a pet bed with your own hands. It is soft and very comfortable
On March 20 they launched a burning wheel: rituals on the day of the spring equinox
Why hysteria is a stage of development, and how to help your child survive it
And inside it, using a pencil and a ruler, you will need to draw seven vertical and the same number of horizontal stripes, the distance between which should be 2 cm. Thus, we will get a grid of many squares, each side of which will be two centimeters. After this, you should pick up a felt-tip pen (it can be of any color, but it’s still best to choose black) and use it to paint the board in a checkerboard pattern so that black and white squares alternate.
They also need to shade the half-millimeter fields of the board, outlining its boundaries, and at this point the first stage of making games will be ready.
Review of the best samples
This sample is a classic tired saber, the blade of which is made of 65G spring steel. Due to the low level of chromium content, it is susceptible to corrosion. The blade is hardened by 20-24 units. according to Rockwell, which classifies the saber as a souvenir weapon, as a result of which it is allowed to be freely purchased. Of course, it is not recommended to chop anything with it; such actions can lead to damage to the blade.
The main difference of this model is the presence of a protective bow on the hilt, which protects the cavalryman’s hand from injury in battle. Similar checkers were in service with privates and non-commissioned officers, which led to minimalism in the design of the sheath device.
How do checkers move and hit?
Checkers move one square per move and only on black cells that are adjacent diagonally and checkers move only forward, checkers do not move backward. The image below shows that the white checker has two options for where to go.
In Russian checkers, checkers can be hit both forward and backward.
The checker can hit forward and backward
In one move, a checker can defeat as many enemy pieces as possible. For example, the bottom image shows how a checker hits two enemy pieces at once in one move.
Is it necessary to hit checkers?
Yes, it is mandatory to hit an enemy checker; if there are several options for taking enemy checkers, the player himself determines which checker to hit. It happens that a player did not see that he needs to hit, then the opponent must show him where he should hit.
Real Cossack checkers
Willingness to defend the Fatherland and stand in the way of the enemy is a sign of masculinity. The combat saber is just that symbol of the Cossack love of freedom, devotion to Russia and his family.
History of origin
The first documentary mention of a military saber appeared at the turn of the sixteenth and seventeenth centuries. This edged weapon got its name from the Kabardian-Circassian word “sash-ho” (long knife).
Historians are sure that people invented such long-bladed cutting and piercing equipment much earlier. Archaeologists have come across parts of this type of weapon, which date back to the twelfth century. Cossack checkers of the Circassian type initially became the most popular. Later, the Don Cossacks created their own distinctive type of weapon and began to wear it constantly.
Triumphant spread
The nineteenth century brought changes in the position of edged weapons. Cossack sabers were officially put into service in the Russian army. According to the regulations, every soldier of a cavalry regiment had such a military weapon as part of his mandatory equipment. Policemen and gendarmes, by statutory order, were also obliged to carry checkers.
The Cossack combat saber was used in cavalry until the mid-twentieth century. But the twenty-first century has not abandoned the veneration of this symbol of masculinity. To this day, the ceremonial uniform of the Cossacks is unthinkable without the attribute of military pride.
The saber and the Cossack saber are very similar to each other. A distinctive feature of a checker is a wooden sheath, covered with leather, with one or two rings for sword belts on the convex side. This weapon was worn on a shoulder belt with the blade facing backwards. The saber was worn on the belt, with the blade forward.
Caucasian checkers had a two-edged, slightly curved blade with a combat end and a handle with a forked head. Such a hilt is considered a distinctive feature of a checker. Russian Cossack sabers differed from Caucasian ones in their scabbard and hilt. The first army samples looked more like sabers and were slightly more curved.
Types of weapons
1881 Lieutenant General A.P. Gorlov is unifying bladed weapons for all branches of the military. The model for the army blade was the Caucasian “top”, which has proven itself in cutting.
As a result of the reform, two types of checkers appeared: dragoon and Cossack. Each type had varieties for soldiers and officers. A shortened dragoon saber was offered for artillerymen.
Finally, Cossack checkers as distinctive signs of the lower ranks of the Cossack armaments were regulated in 1904.
There are not many differences between the 1881 and 1904 models. The earlier model is 6 millimeters longer (966 and 960 mm, respectively), the blade length is 20 mm longer (825 and 795), and the blade width, on the contrary, is 3 mm smaller (32 and 35). The total weight of the product remained unchanged - no more than 1.2 kilograms.
Mastering the skill of handling military weapons required time and perseverance. The boys trained from an early age, trying to replicate the skills of their fathers and older brothers.
At first they used sticks of similar sizes. From the age of ten they were given children's models of blades. Real Cossack teenagers could get hold of checkers at the age of sixteen or seventeen.
Such a saber was bought, made to order, or inherited from a grandfather.
Methods of teaching mastery became more complex from training to training. For this purpose, improvised means were used. First I had to learn how to cut a stream of water without splashing. Then it was allowed to cut down grapevines and cabbage heads. Training was carried out gradually moving from hitting stationary targets to cutting down targets at full gallop.
A young Cossack dreamed of having three checkers in his life. The first - combat - he received when going to serve. Then he tried to get an officer's saber. And the ultimate dream was a personalized checker, which was a symbol of services to the Motherland and recognition by society.
There are frequent cases of creating “charmed” checkers. They brought good luck, victory in all life's troubles. The Cossacks firmly believed this. Such checkers were passed down from generation to generation. If there was no one to pass it on to, the weapon was broken over the coffin of the deceased last representative of the clan.
Award checkers
Rewarding military achievements with weapons became a tradition in Russia in the 18th century. Award weapons were divided into two types: edged weapons for generals and officers and granted weapons for the Cossacks. Such weapons were decorated with gold or diamonds, complementing the image with an engraved inscription. A place was allocated for the inscription on the hilt. The most common expression: “For courage.”
Before the First World War, golden weapons were abolished, equating them with the Order of St. George. The decorated Cossack saber began to be called the St. George weapon. The photo with the award received became a family heirloom. In addition to the St. George's weapon, they were awarded Annin's sabers. They were dedicated to Saint Anna, daughter of Peter the Great, and were considered lower in ranking.
Symbolism and meaning
An unusual weapon - a Cossack saber. It symbolizes fearlessness and strength, valor and fortitude. Firearms could not supplant the pride of the Cossack freemen.
Finding himself in a seemingly hopeless situation, the Cossack relied on his strength and ingenuity. Meeting the enemy face to face provided the opportunity to use real military weapons. With one finger, take your faithful friend out of the sheath and decide the outcome of the battle with one blow. A real Cossack was sure that with a sword, all the strength of his family, of the entire Russian Land, would come to his aid.
The checker demanded close attention and respect from its owner. Care and cleaning of weapons was mandatory. The Cossacks were allowed to attend the church service along with their integral friend. It was even allowed to remove the blade from its sheath a little so that the weapon could be cleaned along with the owner.
How to choose the right checker
In today's Russia, interest in the history of one's family is increasing. Traditions are being revived. The descendants of the Cossacks want to have their own military saber. If before you had to earn it, now you can buy it. You just need to take this matter seriously and choose a weapon that suits you.
The checker must be suitable for the person in size and weight. Fits like a glove in your hand. Withstand an enemy's blow and strike back. You need to hold the presented samples of Cossack checkers in your hand and hear the response.
Check for mutual attraction. The gunsmith will customize the selected model to suit the future owner of the item. Additionally, it is possible to age the blade and handle.
Carry out engraving in full accordance with the desired original.
It is important to understand: a weapon is not a toy. It should be used only for good purposes.
How to make a board game with your own hands
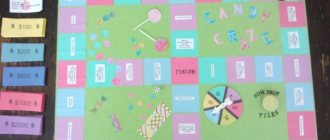
If you have a large family that often spends time playing board games, then you have probably already encountered the fact that chips and figures scatter everywhere, and this makes it so difficult to take games with you on the road. But why not make them from something soft and light, such as felt, and then all the problems will be solved by themselves. You can take this board game with you always and everywhere!
You can play this board game with your children on the car seat, on the bed, or on a picnic rug.
Fold your felt game into a bag and tighten it with a cord, you will get an easy-to-carry item or a wonderful hand-made gift for one of your loved ones and friends.
Today we will be making a checkers game, but in fact, there are many games that can be designed in a similar way. These are tic-tac-toe, chess, dominoes and so on.
Well, let's begin... We advise you to choose felt in bright colors to make your game look more fun. First, let's cut out a chessboard from felt. You will probably want it to be thicker, so we recommend using two layers of fabric. If on the reverse side you come up with the idea of making another game, for example, tic-tac-toe, then its playing field will serve as your second layer. And if you choose a light felt color (as in our example, white), you will have to take two layers of light so that the second game does not show through.
So, cut out: * 2 white chessboards measuring 17x17 inches (43.2x43.2 cm); * 32 blue squares 2x2 inches (5.08x5.08 cm); * 4 yellow sheathing strips 17.5 x 1.25 inches (44.5 x 3.2 cm).
Next: * Set aside one of the large white squares for the second layer. * Place the blue squares on your checker board, starting diagonally, and be sure to leave some space around the edges for plating. * Pin the squares in place, although this is not necessary, the felt will stick well anyway. * Start sewing the squares from the upper right corner of the playing field. It will be much faster if you move along the lines, attaching the right sides of some squares and the left sides of others, and then move on to the next line, and so on. Try to get the corners of the squares to touch, but if you can’t do it, don’t be discouraged! The good thing about handmade gifts is that they don't look perfect, this gives them charm.* When the top side of the checkerboard is ready, fold it together with the other side, pin both squares and stitch them together at a distance of about 0.6 - 0.8 cm from the edge. Then trim off any excess.
Your next task will be to choose which game to make on the reverse side. In our example, these are tic-tac-toe. It’s very easy to make a playing field for them, just by sewing 4 white stripes onto any bright background. Then you connect both playing fields together. Next, we move on to processing the edges.
* Wrap the piping strip around one side and pin the strip in place. Do the same with the opposite side.
* Sew the strips and trim off the excess. * Wrap piping strips around the other two sides and stitch them too. * When you get to the corners, stitch all the way to the end and also remove any excess. Now that your game board is ready, it's time to make checkers.
* Find something round to outline, as long as its size matches the size of the checkerboard square. * You will need 12 double-layer checkers for each player, so in total you need to outline and cut out 24 circles of one color and 24 of another. Let's add originality to our checkers and sew hearts on one side of each checker for one player and stars for the other to turn over checker on this side if it hits the kings. By the way, you can choose your own version of stripes; hearts and stars are completely optional. So:
* Draw and cut out little stars and hearts from brightly colored felt.
* Sew them to one side of each checker, and then sew a second layer-circle to all checkers.
That's it, the colorful checkers are ready! All you have to do is sew a bag for them with a cord stretched inside, and another one, a little larger, to store the board itself.
Now you are ready to play anywhere, anytime!
Idea from danamadeit.com
- Knitted cardigan coat with floral jacquard
Read