Make interesting dolls out of cardboard with your child: dress-up toys, twitchers, marionettes, on joints, for a puppet theater.
Even today, when toy stores are filled with dolls and baby dolls of various modifications, toys made of paper and cardboard continue to be popular. It is difficult to say what gives a child more pleasure, making homemade dolls with clothes, puppets and characters for a finger theater together with their parents, or playing with them. Take an hour or two and get creative with your child. In our article you will find templates, diagrams and instructions that will help you.
How to make a doll with clothes from cardboard with your own hands: diagrams, stencils, photos
Dolls and baby dolls made of paper and cardboard with a change of clothes appeared in the 18th century; they were especially popular among girls during the Soviet Union. Perhaps the shortage of toys had an impact, perhaps, in the absence of a computer and the Internet, children needed somewhere to spend their time and fantasize. Modern spoiled children are also not averse to playing with cardboard crafts. They can come up with the design of the dolls themselves, “dress” them to their liking, at their discretion, in clothes of various styles and even eras.
Cardboard dolls with changeable clothes were played with back in the 18th century.
In book and stationery stores you can buy ready-made cardboard dolls with clothes, accessories, furniture and even houses. But isn't it more fun to do something like this yourself?
IMPORTANT: Making dolls from cardboard with clothes is a very economical activity. You already have most of the tools and materials for this type of craft at home. At the same time, you and your child will be able to bring even the most unexpected ideas to life.
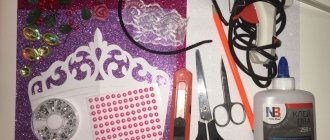
For creativity you will need:
- a few pieces of cardboard
- simple pencil
- ruler
- eraser
- stationery and manicure scissors
- PVA glue
- colored pencils, felt-tip pens, markers and pens with glitter, everything that is suitable for the design of doll clothes and accessories
Cardboard dress up doll from the store.
So, you can make a dress-up doll out of cardboard in several ways:
- Buy a paper doll with clothes that you and your child like in the store. Reinforce it with cardboard. To do this, you need to cut out the doll, which usually consists of two halves, front and back. First cut out the doll that faces you. Cut with a margin, retreating slightly from the contour. Glue the paper blank onto a sheet of cardboard, then cut along the contour. Carefully, also along the contour, cut out the back of the doll and glue it onto cardboard. Where necessary, trim with small nail scissors. The result is a toy with a dense frame.
- Select the doll template you like in our article or on the Internet, print it on a color or black and white (then you will have to color it) printer, then do everything as described in step 1.
- Draw the doll yourself. The one you or your child likes. It will turn out unique, you yourself will create the entire image from scratch.
IMPORTANT: A cardboard dress-up doll can be absolutely any character: your daughter’s favorite cartoon or fairy tale character, a famous actress, singer or model (then you will need to find a full-length image of her, preferably in a swimsuit or tight-fitting clothes, in a magazine or on the Internet), as well as the girl herself and her family members (then you will need a full-length photo). And who said that it should only be a person? From cardboard with clothes you can make a Mini Mouse, one of the Little Ponies, etc.
Cardboard Mini Mouse with clothes.
Cardboard Lalaloopsy with clothes. Will the child draw the doll or will you draw it yourself? You can do this directly on cardboard if it is white, or on a piece of office paper.
- Divide the sheet in half horizontally.
- Also divide one of the halves in half with a vertical line.
- Look at the picture how to make the body of a child, teenager, and adult proportional to the head.
- Accordingly, divide the vertical line into 4, 6 or 8 identical segments. If you are drawing a girl from Monster High or another cartoon, it is not necessary to maintain the proportions.
- Draw horizontal rays from each point on the vertical line so that the doll’s body is proportional on the left and right. Remember that all these lines are auxiliary, they will be removed later. Therefore, draw them thinly, barely touching the paper.
- Draw a doll - front view. Carefully cut out and attach to the second half of the sheet. Trace and draw the doll - back view. Cut it out.
- Glue both halves of the doll together and make a stand if desired.
Proportions of the human body.
Scheme for drawing a doll from cardboard.
You might like one of the designs below.
Template for cardboard dolls: boy and girl. Template for a cardboard doll: girl.
Template for a cardboard doll: boy. Template for a cardboard doll: a guy and a girl.
Template for a cardboard doll: man and woman.
Template for cardboard dolls: Monster High girls.
Other interesting patterns for cutting
Each age will have its own doll that will be interesting. For very young children, these are baby dolls and baby dolls; for older people, it is better to find teenage dolls or the same Bratz or Winx. The peculiarity of such dolls is that they are quite cheap for parents, so if a girl doesn’t like the doll or is torn, replacing it will not be difficult.
Paper dolls from the Soviet past
“Getting” a bright magazine in Soviet times was a great rarity and luck. Well, if it also printed dolls with clothes for cutting out, the girls were simply happy. Toy dolls were cut out, and new outfits were invented for them.
The first Soviet paper doll was released in 1972 and her name, of course, was Mashenka. The game was released in the city of Perm and was called “Dress Mashenka”.
Well, unfortunately, we don’t have Mashenka, but we will provide you with other paper beauties from that time. By the way, all their outfits are in the style of the 70s and 80s:
Soviet paper dolls were not as colorful as they are now. And the quality of the paper on which they were printed left much to be desired.
Paper animal dolls
You can cut out not only girl dolls from paper (although such toys are more common), but also all kinds of animals - cats, bears, dogs. Such animals in the game can talk, make friends, get to know each other, and dress up. In general, they can be played with in the same way as paper dolls.
You can download an additional archive with animal dolls here (size 5.5 MB, 18 sheets)Dresses for dolls made of cardboard. Costumes for dolls made of cardboard
It is better to make dresses and costumes for cardboard dolls using paper. Then the valves will bend better, not break, and hold better.
- Take your doll, attach it to a sheet of paper and trace it along the contour with thin lines. You will have to circle as many times as you plan to make clothes for her.
- Draw the clothes. It can be in any style, for any season. Imagine!
- Draw valves on the clothes on the shoulders, forearms, waist, hips, and shins. Dresses and suits should stick well to the doll.
- Color and decorate your clothes.
- Carefully cut out the dresses and suits you have.
You can also use templates.
Clothes for a girl doll made of cardboard. Clothes for a guy doll made of cardboard.
Clothes for a boy doll made of cardboard. Clothes for a girl doll made of cardboard. Clothes for a female doll made of cardboard. Clothes for a male doll made of cardboard.
Guitar for dolls made of cardboard
Having cardboard on hand, you can make a three-dimensional guitar from cardboard, which will suit not only paper dolls, but also baby dolls, dolls like Barbie or Monster High. Prepare:
- guitar cutting template
- white office paper or landscape sheets
- white cardboard
- pencil
- ruler
- marker
- scissors
- glue
- floss or silver threads
- beads
Template for a guitar made of cardboard.
- Download or draw a guitar template. You will need to break it down into parts.
- Transfer the guitar soundboard onto the cardboard. You need to do this four times: twice without the rosette (the round shaped hole on the guitar), twice with the rosette.
- The guitar neck requires two parts.
- Draw three or four parallel lines on the cardboard. The distance between them is about 0.7 cm. Draw the teeth between the two outermost ones. This detail is needed to make the deck voluminous.
- Carefully cut out the parts of the guitar. Start assembling the musical instrument as shown in the picture.
- Glue the part with the teeth between the two parts of the deck - with and without a rosette.
- Glue two more deck parts on top.
- Glue the guitar neck together and attach it to the soundboard.
- Paint the guitar with paint or nail polish in the colors you want.
- When the paint dries, draw horizontal stripes on the fretboard - frets.
- Using thread, beads and glue, make strings for the guitar.
- Decorate your guitar with stickers, patterns, glitter at your discretion.
Guitar made of cardboard: materials, tools and blanks. Assembling a guitar from cardboard. Cardboard guitar decor. Cardboard guitars for dolls.
Volumetric model
To make a three-dimensional paper doll, you need colored and white paper sheets, glue, toothpicks, a small hollow plastic ball, a ruler, scissors, and multi-colored markers.
First, they make a fluffy dress - the base. To do this, cut out a square 18x18 cm from a sheet of colored paper. Fold it along both diagonals: attach the lower left corner to the upper right and vice versa.
Turn the same sheet over to the other side and fold it in half vertically and horizontally. Unfold the square and fold it along the folds. It should look like a rhombus. Bend the top corner of the figure towards the center. The result should be a figure with 2 front and back “pockets”.
Each of them needs to be straightened and folded. Fold the bottom corners toward the center on all solid sides. Bend the corner up, you get something similar to a boat. All 4 sides need to be folded in the same way. After this, carefully straighten the figure and bend it in the opposite direction. Now fold it again along the folds, only this time inward.
You should get a cone. You also need to make an underskirt and sleeves from white paper. To do this, you need to cut out one square 20x20 cm and two more identical 10x10 cm.
The resulting blanks are folded in the same way as the dress. When everything is done, you need to put a colored skirt on the white skirt and attach the sleeves to the top.
Now we need to make the head. Pierce the plastic ball in the center and insert a toothpick. Draw facial features on the ball. Then take a sheet of colored paper and make a cone out of it so that the diameter of the base is 5 mm less than the diameter of the doll’s head.
Now you need to make a hair blank from a white sheet of paper. To do this, fold it in half and cut it into thin strips on one side, without touching the fold line. Glue the resulting blank to the bottom of the cone and to the head of the toy. Twist the paper hair by wrapping it around a pencil.
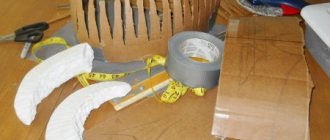
Glasses for dolls made of cardboard
For Barbie, Monster High and baby dolls, you can make bright and unusual accessories - cardboard glasses with colored lenses.
Shapes of frames, lenses and temples of glasses made of cardboard.
Prepare:
- cardboard
- transparent color film
- pencil
- scissors
- glue
- scotch
- felt-tip pens, markers, glitter pens, nail polishes, etc.
- ruler and measuring tape
Cardboard glasses.
- Face shapes and head sizes of dolls can be completely different. To make cardboard glasses fit, you better measure the distance between the eyes of a particular doll, the size of the eyes themselves, the distance from the eyebrows to the lower eyelid, etc.
- Look at the possible shapes of lenses, frames, and temples of glasses, choose the one that you like and suits the style of the doll.
- Draw a sheet of cardboard according to your dimensions, draw glasses and arms.
- Carefully cut out the glasses. If the cardboard is thin, duplicate the parts and glue them together.
- From transparent colored film, cut out parts to fit the size of the glasses lenses.
- Glue the “lenses” to the glasses.
- Color and decorate the glasses as you wish.
- Fold down the temples of your glasses.
Cardboard briefcase for cardboard dolls
To make a cardboard briefcase for a Barbie doll or cardboard doll:
- download and print the template (or redraw it to the size you need)
- transfer the outlines of the briefcase onto a sheet of cardboard
- cut the blank
- fold the blank, glue it in the places you need
- paint and decorate the briefcase
Cardboard briefcase: template. Blank for a doll's briefcase made of cardboard. Cardboard briefcase for a doll.
In national costumes
Thematic selection of paper dolls with national clothes. The advantage of such a selection is that the girl gets to know different folk costumes: Mongolian, Northern peoples, Mexican, Russian, etc.
These costume cutting stencils reflect the national traditions of different countries, which can be useful for the little budding designer. But such baby dolls do not have a model appearance, like Barbie or Winx. But we hope that your girls will like them too:
It is worth noting that these dolls were sent to us by our reader, Irina S. The archive contains 7 sheets (+ 2 additional costumes), you can download it here
The next set of dolls in national costumes for cutting
You can download the full 1.29 MB archive here, the archive contains 12 sheets, we only posted half).
Movable twitch doll
It is easy to make a movable doll with hinges of any configuration from cardboard. It's so convenient to play. It is also suitable for home puppet theater.
Movable cardboard dolls.
Prepare:
- templates for dolls (you can take them from this article, download them on the Internet or draw them yourself)
- cardboard
- hole punch or awl
- rivets (smallest)
- glue
- scissors
- materials and tools for drawing and coloring
- materials and tools for sewing, if you plan to make clothes for the doll from their fabrics
Materials and tools for making a movable doll from cardboard.
- Print out a template for your doll. If you draw it, remember that every detail must be finished. Typically, movable pupae articulate at the neck, shoulders, elbows, hips, knees, and ankles. You may have more or less joints.
- Transfer the blank onto cardboard, if necessary, paint and decorate the doll’s clothes.
- Carefully cut out the doll.
- Connect the joints with rivets. Make holes with an awl. You can also use small screws, like those found in eyeglass frames.
- If you are making clothes for a doll from fabric, proceed to this stage.
- Assemble the doll if you like, make accessories for it.
Movable cardboard doll: step 1. Moveable cardboard doll: step 2. Movable cardboard doll: step 3. Movable cardboard doll: step 4.
Movable doll made of cardboard.
You can get these cute dolls:
A family of jointed cardboard dolls.
Cardboard dolls on joints.
You can choose one of these templates.
Template for a jointed cardboard doll. Template for a movable doll made of cardboard. Mobile fairy made of cardboard: template.
Movable girl doll: template.
Articulated cardboard clown: template.
Pucker dog made of cardboard: template.
Twitchy cat made of cardboard: template.
IMPORTANT: If you want to turn your cardboard jointed doll into a jerk, attach the arm and leg pieces from the back. Make holes in each of them, as shown in the figure, and thread a connecting thread into these holes. Hang a bead on the end of the connecting thread. You can also attach a stick holder to the jerker.
Details of a twitch doll.
Scheme of fastening parts and connecting threads. Cardboard twitchers. You can attach a stick holder to the twitch.
Puppet doll
Turning an articulated cardboard doll into a puppet is also very easy.
- Take two sticks from balloons, for sushi, or just two simple pencils. Fold them crosswise and secure with tape.
- Make holes in the arms and legs of the cardboard doll (on the hands and legs), thread threads through them.
- Tie the ends of the thread to your improvised handle.
The doll is a cardboard puppet.
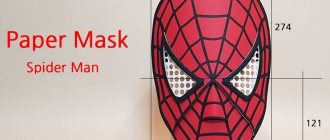
Puppets for finger theater
Finger puppet theater is great entertainment for children aged 2 years and older. You can make your own dolls-characters of his favorite fairy tale and dramatize it. And if the baby is already 3 years old or older, he will be happy to take part in creating the dolls.
IMPORTANT: The easiest option is to download finger puppet templates, cut them out and glue them to cardboard for strength.
Cardboard puppets for finger theater: template.
Cardboard puppets for finger theater: boy and girl. Cardboard puppets for finger theater: three little pigs and a wolf.
Cardboard puppets for finger theater: animals. Cardboard puppets for finger theater: characters from “Kolobok”.
Cardboard puppets for finger theater: princesses.
If you want to make finger puppets from cardboard yourself, prepare:
- cardboard
- simple pencil
- eraser
- ruler
- stationery and manicure scissors
- materials and tools for painting and decorating dolls
Homemade cardboard puppet for finger theater.
- Draw the characters of your future production. Their size should be such that you can make 2-4 holes for your or your child’s fingers.
- Color and decorate the dolls, then cut them out.
- If the cardboard is thin, make the toy in two layers.
Colored product
If you have little time and no desire to do a labor-intensive task, then you can make a red and white accordion doll. For it you will need a sheet of red and white double-sided paper, a red felt-tip pen, an eraser, glue, scissors, a small piece of red and white tape (preferably striped), and a simple black pen. Scheme of work:
- Fold a red sheet of paper like an accordion: fold a strip 1 cm wide from one edge of the paper, turn the sheet over and fold it again by a centimeter. Do the same along the entire length of the sheet.
- Bend the resulting accordion in the middle.
- Take a white sheet of paper and cut it in half. Take one piece and draw two vertical lines on it along the edges with a red marker. Place small dots in a clean space.
- Fold the same half like an accordion and also bend it in half.
- Lubricate the inner parts of the red sheet, folded like an accordion, with glue and fasten them together.
- Put a white one on the red accordion and tie them on top with an elastic band.
- From a white sheet, cut out the doll's head - a circle.
- Make a headdress: glue a strip of red paper onto the toy’s forehead, bend the free edges back, trim off the excess.
- Draw facial features on the circle.
- Cover the head from the wrong side with glue and glue it to the top of the accordion.
- Make a bow from the ribbon and decorate the doll with it.
- The toy is ready.
Creating something with your own hands is a very interesting activity that requires a lot of perseverance. Together with your child, you can make a paper doll with your own hands, which will allow you to have a wonderful and useful time.
Maslenitsa doll
IMPORTANT: Read in this article what crafts you can make from cardboard, paper and other materials for Maslenitsa with your child.
For a scarecrow – Maslenitsa from cardboard, take:
- colored cardboard
- colored paper
- white paper
- simple pencil
- ruler
- colored pencils, felt-tip pens, paints
- glue
Cardboard dolls for Maslenitsa.
- Carefully fold two sheets of colored cardboard, using a ruler, like an accordion, and then in half.
- Connect them together by placing one on top of the other.
- Use colored and white paper to make a face, hairstyle, and headdress for the doll.
- Connect the doll parts.
Japanese style toy
It requires three-layer napkins with patterns, a sheet of paper/cardboard, colored paper, a compass and ruler, scissors, and glue.
Using a compass, you need to draw 2 circles, each with a diameter of 3 cm. On the same sheet, you need to draw 2 rectangles 1x10 and 8x15 cm. Cut out all 4 blanks.
Fold the smaller rectangle in half and glue it between the two circles. The result is a head. Take the second rectangle and place it on a paper napkin, its size should be slightly larger than the workpiece. Fold the part that protrudes from the side of the napkin and fold the narrow side of the paper sheet. It turns out to be a collar. need to be glued to the product .
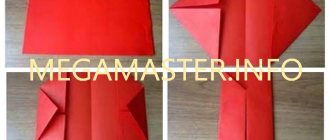
Next, a kimono is made for the doll. Fold the paper on the left and then in the same way on the right. Fold 1/3 of the kimono on the left side and exactly the same part on the right. Unscrew the lower part of the outfit so that the doll is voluminous. Glue a wide belt in the middle.
Then you need to make the sleeves. Cut a 9x15 cm rectangle from a napkin, fold it in 3 layers and bend it in the middle. Glue the resulting part to the back of the outfit.
Now you need to do your hair. To do this, cut out a circle with a diameter of 4 cm and a semicircle from colored paper. In the latter, several cuts are made and glued on both sides of the head. The Japanese version of the doll is ready.
Doll made of cardboard and fabric
Cardboard dolls can be “dressed” in dresses and suits made of fabric. Take one that doesn't fray. Then all you have to do is cut out the clothing parts and simply glue them to the doll's body. You can also make beautiful dolls in kimonos, in the Japanese style, from cardboard and fabric. Take:
- scraps of fabric
- cardboard
- scissors
- pencil
- ruler
- compass
- glue
Doll made of cardboard and fabric: blanks.
Doll made of cardboard and fabric: step 1. Doll made of cardboard and fabric: step 2.
Doll made of cardboard and fabric: step 3. Doll made of cardboard and fabric: step 4. Dolls made of cardboard and fabric.
- Draw on cardboard, and then cut out two circles with the same diameter, two identical strips and a rectangle.
- Assemble the doll: glue two strips and two circles, glue them to the rectangle.
- Use colored or painted white cardboard to create a hairstyle for the doll.
- Place the workpiece on a piece of fabric, wrap it as shown in the pictures below.
- Use another piece of fabric to make kimono sleeves.
Black and white dolls for coloring yourself
Of course, what could be better than finding and printing a ready-made bright doll with clothes? But, it’s even more interesting to paint her and her outfits the way you want. The same dress can be in a variety of colors; the skirt can be made white. and red, turn trousers into jeans or classic ones. In general, black and white options are just right for beginner little designers.
Doll made of cardboard and paper
Use the templates below or similar ones to make three-dimensional toys out of cardboard and paper.
Volumetric dolls made of paper and cardboard.
Volumetric princess dolls made of paper and cardboard.
Elsa doll made of paper or cardboard.
Items for paper dolls
Well, what is a paper doll without its house or castle? Rooms, interior items, furniture made of paper. They are the ones who create the necessary atmosphere. It is better to print furniture for a doll in three-dimensional form, that is, which needs to be “assembled”, glued together and get a miniature copy of a real crib, sofa or house.
VIDEO: Twitch doll “Santa Claus”
- Do-it-yourself amulets made of fabric and threads: step-by-step instructions, master class.
- Foamiran dolls: patterns, master class.
- How to sew a beautiful textile, interior, big-legged, Waldorf doll with your own hands: patterns, instructions, photos, videos.
- Amulet dolls - Herbalist, Podorozhnitsa, for health, Krupenichka, for family, Angel, Successful, for marriage, Well-being, for pregnancy
- Amulet dolls - for a child, Bereginya, Lovebirds, for luck, Bell, for the home, Desire
- How to make a Voodoo doll from paper, branches, felt
- Crocheted Lalalupsi dolls: master class, diagrams and description
- Do-it-yourself brownie amulet doll made from tights, burlap, thread and cardboard
- How to make a Barbie, Tilda, Motanka doll with your own hands?
- How to sew clothes for Barbie and Monster High dolls with your own hands: patterns, diagrams, photos.