Do-it-yourself color music - what could be more pleasant and interesting for a radio amateur, because it is not difficult to assemble if you have a good circuit.
In modern radio engineering there is a huge variety of radio elements and LEDs, the advantages of which are difficult to doubt. A wide range of colors, bright and rich light, high speed of response of various elements, low energy consumption. This list of advantages can be continued endlessly.
The principle of operation of color music: LEDs assembled according to the circuit blink from an existing sound source (this can be a player or a radio and speakers) at a certain frequency.
Advantages of using LEDs over those previously used in CMU:
- luminous saturation of light and a wide color range;
- good speed;
- low energy consumption.
The simplest schemes
A simple color music that can be assembled has one LED and is powered by a 6–12 V DC source.
The simplest circuit for one LED
You can assemble the above circuit using an LED strip and selecting the necessary transistor. The disadvantage is that there is a dependence of the LED blinking frequency on the sound level. In other words, the full effect can be observed only at one sound level. If you lower the volume, there will be a rare blinking, and if you increase the volume, a constant glow will remain.
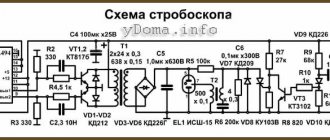
This drawback can be eliminated using a three-channel sound converter. Below is a simple circuit; it is not difficult to assemble it with your own hands using transistors.
Color music circuit with three-channel sound converter
This circuit requires a 9-volt power supply, which will allow the LEDs in the channels to light. To assemble three amplification stages, you will need KT315 transistors (analogous to KT3102). Multi-colored LEDs are used as a load. A step-down transformer is used for amplification. Resistors perform the function of adjusting LED flashes. The circuit contains filters for passing frequencies.
The scheme can be improved. To do this, you need to add brightness with 12 V incandescent light bulbs. You will need control thyristors. The entire device must be powered from a transformer. You can already work according to this simplest scheme. Color music using thyristors can be assembled even by a novice radio technician.
Color music circuit with thyristor control
How to make color music using LEDs with your own hands? The first thing you need to do is select an electrical circuit.
Below is a diagram of a light and music system with an RGB strip. For such an installation, a 12 volt power supply is required. It can work in two modes: as a lamp and as a color music. The mode is selected by a switch installed on the board.
Electrical circuit with LED strip for CMU
On what principle does color music work?
Color music installations are based on the method of frequency conversion of music and its transmission, through separate channels, to control light sources. As a result, it turns out that depending on the basic musical parameters, the operation of the color system will correspond to it. This trailer is the basis for the scheme for assembling color music on LEDs with your own hands.
Typically, at least three different colors are used to create color effects. It can be blue, green and red. Mixed in different combinations, with different durations, they can create an amazing atmosphere of fun.
LC and RC filters are capable of separating the signal into low, medium and high purity; they are the ones that are installed and configured in a color music system using LEDs.
Filter settings are set to the following parameters:
- up to 300 Hz for a low-pass filter, usually its color is red;
- 250-2500 Hz for medium, color green;
- everything above 2000 Hz converts into a high-pass filter, as a rule, the operation of the blue LED depends on it.
The division into frequencies is carried out with slight overlap, this is necessary to obtain different color shades during operation of the device.
The choice of color in this color music scheme is not important, and if you wish, you can use LEDs of different colors at your discretion, change places and experiment; no one can prohibit it. Various frequency fluctuations combined with the use of a non-standard color scheme can significantly affect the quality of the result.
The circuit parameters such as the number of channels and their frequency are also available for adjustment, from which we can conclude that color music can use a large number of LEDs of different colors, and it is possible to individually adjust each of them in frequency and channel width.
Manufacturing stages
It is necessary to make a printed circuit board. To do this, you need to take foil fiberglass with dimensions of 50 x 90 mm and a thickness of 0.5 mm. The board manufacturing process consists of several stages:
- preparation of foil PCB;
- drilling holes for parts;
- drawing paths;
- etching.
An example of a prototype of a printed circuit board.
The board is ready, the components have been purchased. Now begins the most crucial moment - the wiring of radio elements. The final result will depend on how carefully they are installed and sealed.
List of required radioelements
We assemble our printed circuit board with the components soldered on it into such an accessible lampshade.
Do-it-yourself color music console
RGB Christmas garland on Arduino
Good day, dear friends. There is very little left until the New Year, so today we will talk about something unusual that you can do for your home for this holiday. This time we will modernize your Christmas tree garland and make it blink not with standard programs, which are the same in almost all garlands, but with a completely different, non-repeating algorithm for turning on the light bulbs. We will be able to do this thanks to your desktop computer and the music turned on on it, that is, the garland will blink to your music. Connecting the Christmas tree garland to the computer.
Brief description of radioelements
Radioelements for an electrical circuit are quite affordable; purchasing them at your nearest electrical goods store will not be difficult.
For color and musical accompaniment, wirewound resistors with a power of 0.25–0.125 W are suitable. The amount of resistance can always be determined by the colored stripes on the body, knowing the order in which they are applied. Trimmer resistors can be both domestic and imported.
Capacitors produced by industry are divided into oxide and electrolytic. It won’t be difficult to select the ones you need by doing basic calculations. Some oxide capacitors may have a polarity that must be observed during installation.
You can take a ready-made diode bridge, but if you don’t have it, then a rectifier bridge can be easily assembled using diodes of the KD or 1N4007 series. LEDs are taken as usual, with a multi-colored glow. The use of LED RGB strips is a promising direction in radio electronics.
LED RGB strip
Operation algorithm
So:
- We take several garlands. Their length should not exceed 1-2 meters;
- An LPT adapter is suitable as an adapter;
- We prepare a shielded twisted pair cable;
- We connect the garlands to the head unit using an adapter and wires;
- Turn on the car radio and go to the menu. We find the “flash zone”, which is responsible for setting color music (in Pioneer car radios).
Musical color garland 220 30
Note. If the car radio is expensive, then it is possible to connect to the Internet. In this case, it will be easy to download one of the computer programs/players such as ALMP2 or KMPlayer. All that remains is to launch the selected player. The program will allow you to convert the frequency spectrum of a music track in the form of a data array.
Possibility of assembling a color and music console for a car
If you manage to please with color music from an LED strip made by yourself, then a similar installation with a built-in radio can be made for a car. It is easy to assemble and quick to set up. It is proposed to place the set-top box in a plastic case, which can be purchased in the electrical and radio engineering department. The installation is reliably protected from moisture and dust. It is easy to install behind the dashboard of your car.
You can also make a similar case yourself using plexiglass.
The plates of the required dimensions are selected, two holes are made in the first part (for power supply), and all parts are sanded. We assemble everything using a heat gun.
An excellent lighting effect is achieved if you use multi-colored (RGB) tape.
Steps
- Decide on the size of your garland show.
You can hang the whole house with garlands - both inside and outside - or choose a separate area in your house and in the front garden. Keep the following in mind as you plan your garland display:
- A strip is a section of garlands that can be individually controlled. For example, a single branch in a patio can be a stripe if you hang it with one set of garlands.
- All garlands in a strip work as a single section. Unfortunately, you cannot light a separate string light.
- Strips ranging from 32 to 64 are a great size to start with if you've never programmed lights to match music. Any streaks that are larger than this will result in you cursing the day you decided to take on the project (or the day your wife forced you to take it on).
- Ask for help.
This project can be very significant and challenging, so you may be overwhelmed at first. Recruit your friends and family or join the forums below for help. - Depending on the level of complexity, give yourself 2 to 6 months of preparation before your garland show is fully completed. It sounds terrifying, but that's exactly how long it will take you.
If you are a low-tech specialist, buy software that will help you program the blinking lights. There is also a free program for homemade systems (see links section). If you are ambitious and claim to be a technical master, codify this program manually in any major programming language. However, please note that you will not be able to use this option for pre-built products, as most of their protocols are closed source.
- The software you choose will break down the song you want your lights to sync to into very short segments (.10 seconds), allowing you to program each strip of lights to turn on, turn off, sparkle or twinkle. There are three commercial software options. Light-O-Rama is the supplier for most residential string lights displays. However, it is very complicated, so to match a minute of a song with 32-48 strips you will have to spend a whole four hours.
Animated Lighting is much more expensive, but easier to use. Some residential garland displays also choose Animated Lighting.
Connecting several garlands together
The Twinkly garland is extendable. If you do not have enough factory length, buy an additional kit that comes without a power supply and controller.
There are threaded connectors at the end of each garland. There is no need to solder or twist anything to increase the length.
You can also connect several garlands separately, while linking them together with one operating scenario.
To do this, go to the settings menu and click “Add another device” there. Go through all the steps again and connect it to the WiFi network.
Next, select the connected Twinkles on your phone, create and add them to one common group. The group will appear in the list of devices.
The group type must be “Sinc”. After this, apply certain work scenarios to the group.
Please note that for correct synchronization, all garlands must have the same types of LEDs - RGB, RGBW, RBW, etc.