Purpose of automobile gas analyzers
The general purpose of gas analyzers is to measure and analyze gas mixtures to determine their quantitative and qualitative (volume and percentage) composition. In particular, a gas analyzer for a car is used to measure the amount of harmful emissions in the exhaust gases of internal combustion engines running on gasoline, diesel and gaseous fuels: carbon monoxide (CO), carbon dioxide (CO2), hydrocarbons and other compounds. Engine diagnostics, adjustment and repair of carburetors , gas equipment, setting up fuel injection systems - this is not a complete list of work, the implementation of which is almost impossible without the use of automobile gas analyzers. Fuel consumption adjustment is a service that is especially in demand these days, when the cost of fuel is rising day by day.
Depending on the design, automotive gas analyzers can measure one or more components of exhaust gases (single-component and multi-component). One- or two-component gas analyzers can measure the amount of harmful impurities in the exhaust gases of cars (CO, nitrogen oxides) that are not equipped with catalysts. Some time ago, the most common were single-component gas analyzers for determining the content of carbon monoxide CO. The introduction of emission standards according to EURO environmental standards not only of CO, but also of other components of exhaust gases stimulated the production and use of multicomponent gas analyzers to assess their composition. Using conventional automotive gas analyzers, you can diagnose and adjust either gasoline or diesel engines. Universal gas analyzers allow you to diagnose and adjust both gasoline and diesel internal combustion engines.
EURO environmental standards
European standards are introduced by the UN EEC (European Environmental Commission) and regulate the content of carbon monoxide (CO), nitrogen oxides (NO), hydrocarbons (CH), and other harmful substances. Starting with the EURO1 environmental standard, introduced in 1992, the standards are gradually becoming more stringent, while exhaust gas aftertreatment systems must comply with a certain environmental class (environmental standards of the car) depending on its service life. There are 6 classes in total, from 0 to 6. Car engines equipped with catalysts and fully meeting EURO environmental standards that regulate the content of harmful impurities in the exhaust gases of cars and special equipment require the use of multicomponent gas analyzers, which are more accurate and expensive. The measurement methods for single- and multi-component gas analyzers of automobile exhausts are somewhat different from each other.
Exhaust gas composition
The exhaust gases removed from the combustion chamber during the exhaust stroke contain toxic and non-toxic components (about 200 in total), which can be combined into several groups depending on the chemical composition, properties and nature of the impact on the environment and the human body: – Non-toxic components. These are natural components of atmospheric air (for example, water vapor H2O). – Carbon monoxide (carbon monoxide CO). Released during incomplete combustion of fuel, it has a pronounced toxic effect. The degree of poisoning depends on its concentration and duration of exposure to humans. At doses above 1%, loss of consciousness and death are possible. – Nitrogen oxides NO and nitrogen dioxides NO2. Considered more dangerous than carbon monoxide. When nitrogen oxide is oxidized by atmospheric oxygen, nitrogen dioxide is formed - a gas heavier than air, which collects in niches and recesses and is very dangerous when servicing cars. Affects the mucous membrane and lung tissue; with prolonged exposure, bronchitis and disruption of the cardiovascular system are possible. – Aromatic hydrocarbons (compounds of the CxHy type). They are also formed during incomplete combustion of fuel. Incorrect engine adjustment, delayed ignition and low temperature in the combustion chamber lead to smoke. Hydrocarbon compounds are toxic, affect the cardiovascular system and are strong carcinogens.
Sulfurator PS1 Carnation for getting rid of pests and diseases of greenhouse plants
A wonderful gift for a gardener!
A highly effective device for the treatment and protection of greenhouse plants and crops.
Sulfurator PS1 “Gvozdika” is a device for disinfection with sulfur that will help get rid of pests and fungi in a greenhouse, greenhouse, cellar and basement without harming plants and stored products. The sulfurator is silent in operation and, due to the absence of a combustion process, does not pose a danger to the crop.
Guaranteed to eliminate the following diseases and pests in the greenhouse:
- All fungal diseases: powdery mildew, downy mildew, gray mold, scab, black spot, botrytis clinera, late blight, mold and others
- All insect pests: spider mites, aphids, whiteflies, thrips, woodlice, midges, sciarids, spiders, black spiders, mites, moths, mole crickets, ants, slugs and other insect pests
- Rodents: repels all rats, mice, shrews and others
High efficiency of treatment and protection:
- molecular sulfur vapors evenly cover all accessible surfaces of plants and rooms, penetrate into corners, crevices, dense vegetation and upper layers of soil;
- After sulfurization, sulfur is well retained on fruits and plants and retains its beneficial effects much longer.
The principle of operation is shown in this video:
Compared to a sulfur bomb, a sulfurator, sulfator, has the following undeniable advantages:
1) Very effective against fungi - rot, scab, powdery mildew and others.
2) Destroys insect pests and their eggs and larvae - aphids, whiteflies, mites (including spider mites) and others
3) Safe to use due to the absence of fire.
4) Uniform coverage of surfaces and plants.
5) Sulfur has acarofungicidal properties and helps increase the shelf life of crops.
6) Repels various rodents - rats, mice and others
7) One 50 gram briquette replaces 3-5 sulfur blocks.
 No harmful fumes such as sulfur dioxide or sulfuric acid fumes. The sulfur is evaporated by using a conventional 75-watt incandescent mirror lamp, and thanks to the use of a stainless steel housing, its use is completely safe. Can be used when plants are in any growth phase and between cycles.
9) Sulfurator can be used during flowering of greenhouse plants.
One device is capable of covering a room of up to 100 square meters with the thinnest layer of sulfur! Sulfur in the form of vapor allows you to cleanse the space of spores and larvae even in the most inaccessible places, as well as destroy insects and harmful bacteria.
Harmless to plants, greenhouses and people:
- unlike treatment with a sulfur bomb, the sulfurator does not form toxic sulfur dioxide and sulfuric acid vapors;
- If precautions are taken, it is safe for people and animals.
TV filmed a story about the sulfurizer “Gvozdika”:
Sulfurator PS1 “Gvozdika” is the most affordable model that uses a 75 W incandescent mirror lamp as a heating element.
Manufacturer's recommendations for use:
1. Treatment and prevention of diseases of greenhouse plants
The most important rule is to be on time. If the disease is advanced and has spread widely, the plants most often cannot be saved. And the sulfurator, unfortunately, is not a magic wand. But if you notice the disease in time (symptoms: yellow or wilted leaves, first spots, the pests themselves caught your eye), the device will help. At the first signs of disease, you need to remove the affected areas of the plants, turn on the device (in the summer, the processing area of 1 device is on average 100 m2) and leave it for a night or two. We also recommend carrying out preventive treatment, starting from the growing season, at night every 1-2 weeks.
Important! Treatment must be carried out immediately throughout the entire volume of the greenhouse so that pests cannot fly to untreated areas of the plantings. Therefore, if your greenhouse is more than 100 sq.m., then you need to have several sulphurizers and turn them on at the same time.
To operate the device, purchase a high-quality product for sulphurizers—Yellow Nebel, a plant disease remedy. One sachet, 50 grams, of Yellow Nebel is enough for 20-40 hours of operation of the sulfurator, depending on the settings of the device and the ambient temperature.
2. Preparing the greenhouse for winter
After harvesting, remove the plants. If there were affected plants, they must be burned. It is highly advisable to dig up the soil under the beds with a bayonet in order to raise insect larvae not only to sulfur, but also to future frost. Clean the walls and frame of the greenhouse.
Hang the sulfurator in the center of the space. Turn on, add 50 g of Yellow Nebel (sulfur). Close the door and windows tightly. Leave for 2, or better yet, 3-4 days.
In autumn it is better to use a 75 W lamp. If your device has 60 W, then it is good for the summer, but for the fall it is advisable to purchase a more powerful incandescent mirror lamp. Such lamps are sold in hardware stores for about 50-150 rubles.
3. Treatment of basements and cellars
Before storing the crop in the basement, you need to clean and protect the room from mold, insects and rodents. The sulfurator solves this problem with a bang. Some tips on how to do this most fruitfully.
The first thing to do is clean out the basement itself. With a brush, a rag, or anything else that’s handy. Mold, pupae, cocoons, if any, must be removed.
Then hang the device in the center of the basement at a height of at least a meter from the floor. Plug it in, pour 50 g of sulfur into the bowl, and lower the bowl itself closer to the heating element. Leave for two, or better for 3-4 days of continuous processing.
When using the device for the first time, it is advisable to visit the device and check whether the sulfur is boiling. If yes, then you need to raise the bowl above the lamp. Since it gets colder in the fall, and sulfur evaporates less readily, 50 grams will be enough for 3-4 days and there may still be some left.
Important point. The air holes of the basement do not need to be closed during treatment; let them also be cleared of infection and, most importantly, saturated with the smell of sulfur to repel rodents. The door, of course, must be closed tightly. After treatment, you need to clog the air ducts with newspapers or something else and leave the basement closed until vegetables are loaded into it.
During storage, if rodents do appear, you need to turn on the device at night or for a day. Pure sulfur is harmless to humans, does not penetrate into vegetables and is easily washed off with water.
Attention! Before first use, remove stickers from the bottom of the medication cup, top and bottom, if any.
Characteristics:
- Impact area - up to 100 sq.m.
- Heating element - mirror incandescent lamp 75 watts
- Power supply - 200 V, 50 Hz
- Power consumption - 75 W
- Power cable - 1.8 m
- Overall dimensions - 21 cm x 13 x 12 cm
- Weight - 0.81 kg
- Package weight: 0.9 kg
- Package dimensions - 23 x 15 x 15 cm
Warranty - 1 year (the warranty does not apply to the lamp)
Production - Russia
Delivery time: from 0 to 6 working days after prepayment.
Design and principles of operation of automobile gas analyzers
A simple automotive single-component gas analyzer is designed to measure the content of only carbon monoxide CO in exhaust gases, mainly using the method of afterburning incompletely burned components in the exhaust gases. Afterburning of CO is carried out in the measuring chamber of the device using a special heated filament, and the change in the temperature of the filament characterizes the CO content in the gases. The accuracy of the readings of such a gas analyzer is low and depends largely on the content of another component - CH hydrocarbon.
Determination of the content of harmful substances in exhaust gases by modern multi-component gas analyzers for cars is carried out without the use of chemical reagents, mainly by thermal (infrared) measurement method. The method is based on the principle of measuring the absorption of thermal radiation by various components of exhaust gases. Gas analyzers have built-in infrared emitters and radiation receivers. Between them there are measuring elements into which the analyzed mixture is supplied. By the magnitude of the decrease in the intensity of infrared rays passing through the gas and arriving at the receiver, it is possible to determine the concentration of any component in the gas mixture.
In addition to the measuring ones, the gas analyzer contains tubes with a reference gas mixture. They serve for continuous comparison of the degree of absorption of thermal radiation in the reference mixture and in the analyzed gas. The value of this difference is converted into digital or analog form and transmitted to a indicating or recording device. Before starting measurements, in order to avoid additional errors, the gas analyzer must be warmed up. Gas is sampled using a gas sampling tube (probe). To clean the exhaust gases supplied for analysis from soot, solid particles and water droplets, the tube is equipped with replaceable filters and water separators. A built-in pump is used to force the test gases through the measuring tubes. The calibration of the scales of automobile gas analyzers for O2, CO and CO2 is usually carried out in percentages, for CH - in parts per million (ppm), i.e. 1000 ppm = 0.1%. Thus, an experienced technician, using a gas analyzer of automobile exhausts, based on the complete information received about the process of fuel combustion in the engine, will be able to draw correct conclusions about the possible causes of its violation.
A device for monitoring the performance of the DC and the composition of the mixture.
This device does not claim any calibrated measurement accuracy and belongs to the class of indicators, or, as people say, “display meters”. However, its modest capabilities are quite enough for fairly precise adjustment of the mixture composition.
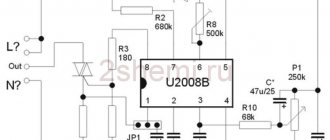
The device is very simple and is implemented on an Atmel microcontroller (AVR series) with built-in comparators and allows you to measure and display the signal from the sensor (range 0...1 volt) and its dynamics. The device is practically inertia-free and allows, in addition to the level, to evaluate the switching speed (signal edges). The resolution of the indicator is approximately 0.1V; to simplify reading, one LED is always on.
The capacitor connected to pins 13 and 14 of the microcontroller is the master capacitor for the comparator, so it is desirable to be more precise and stable (in my case, K71-7 2710pF one percent). A DS1811 or similar power monitoring chip/Watch Dog Timer can be used to reset/start up the microcontroller. Quartz 4 MHz. I provide files for flashing the microcontroller in two versions - in hexadecimal (testlambda.hex) and binary (testlambda.bin) formats..
Connection on the car: (+12) in the diagram - battery plus, (GND) - battery minus/ground, input (IN) - to the signal wire of the oxygen sensor (Lambda probe).
And this is what the finished device looks like, assembled on a breadboard
The oxygen sensor begins to work when the temperature of the sensing element reaches 350 degrees Celsius. Therefore, immediately after turning it on, you need to wait a few minutes for it to completely warm up. If a single-wire (not heated) probe was installed in the car, you must wait until it is warmed up to operating temperature by exhaust gases.
We have never repeated this design, so we cannot give any comments on it. But, most likely, this is a simple narrow-range voltmeter. That is, to put it simply, this is not quite an alphometer, since the characteristics of the DC are not taken into account and it is not alpha that is displayed, but the voltage removed from the DC, which in an “adult” alphometer is converted into alpha. But its readings can be easily calibrated using a standard gas analyzer.
And I also want to note one point, every car enthusiast should have a car repair manual,
after all, it helps us repair cars with our own hands. Sometimes you can do without a trip to a car service center. And sometimes just reading about your car can be useful.
Types and applications of automotive gas analyzers
Modern combined automotive gas analyzers, in addition to determining the composition of exhaust gases, are capable of diagnosing and providing additional information about the technical parameters of the engine (oil temperature, engine speed, start of injection pump operation, ignition timing, excess air ratio, etc.). Gas analyzers can be additionally equipped with a printing device, an interface for transferring data to a computer or a synchronized printer.
Depending on the conditions of use, automobile gas analyzers are divided into: – stationary – designed for operation in stationary premises; – transportable – used in mobile laboratories; – portable – for outdoor work; – block-modular – systems that are moved on special trolleys and are not tied to a specific location.
Desulfator or do-it-yourself dedivan charging
Desulfator or do-it-yourself dedivan charging
Our task is to obtain a long-lasting chemical battery from a battery. (c) dedivan
Where to begin? I'll start with trance. Everything in order - Take a ferrite ring K28x15x9. This is the most popular size. I warn you right away - Chinese yellow rings will not work from the power supply - they are not ferrite. The permeability can be from 600 to 3000. This is because we will not drive it through a full magnetization loop, to save losses in the core. Therefore, he has a reserve. First of all, we make a gap. A 0.4 mm thick diamond cutting wheel produces a gap of about 0.5 mm. Well, it’s like someone’s hands are shaking.
Secondly, we wind the windings. The first thing is isolation, for my grandfather this is sacred - never dangle on a bare ring. The varnish on the wire will be scratched, the voltage on our turns is up to 500 volts, it will break out sometime, usually at the most crucial moment. We take a 0.8 wire - we calculate that 60 turns should be removed along the inner circumference, turn to turn. We start to shake - here’s where my grandfather’s fingers cramp - there’s no longer the tension that was before. Only 56 were removed. But the trance has a reserve. And then the secondary winding - there should be 10 times fewer turns, only 6, but we wind it in several wires. It’s easier to wind this way - the wire is softer than one thick one, and the connection between the winding and the core is better. We also select the wire based on the condition of filling the inner circumference of the ring. Turn to turn in one layer. I got 4. Then we solder them in parallel on the board. Well, now... let's connect this trans to the circuit. Our key is a field-effect transistor for a current of more than one ampere and a voltage of more than 400 volts. We apply a pulse of 50 μs more than +5 volts to the input. During this time, the current in the primary increases to approximately 1 ampere. When the key is opened, the energy of the magnetic field seeks an exit - and finds it through the secondary winding and diode into the battery. The voltage in the secondary jumps to 20 volts. But according to all transformer rules, the current in the secondary is 10 times greater than in the primary. At the same time, it is clear that in the primary there will be 200V, and taking into account emissions from parasitic inductances, up to 400. That is why the field switch should be installed like IRF 740,840, etc. Well, don’t touch it with your hands - inductance is simple - it doesn’t care what your body resistance is - the current will always provide 1 ampere. So the comb may fly off. There are practically no diagrams - just installation rules. The power and ground wires are separated because a strong short pulse runs in the secondary wires and even on a few centimeters of straight wire a large emf occurs. The battery also shows a surge in voltage - up to 5 volts, depending on how bad the battery is. Therefore, we also install filters everywhere, both to power the circuit and the load. The circuit works like this: we accumulate energy for 50 microseconds, then we give it back to the battery for 5 microseconds, and we wait 500 microseconds for the battery to digest it so that it can be absorbed. You can send impulses less often. In a practical scheme, this is exactly what needs to be regulated. If the voltage on the battery increases, and we do not have time to consume all the energy, then we need to slow down.
This is a simple pulse generator for pumping. It gives a 50 µs pulse every 500 µs.
50 μs is a plus, after which there is a pause of 500 μs. 50 μs - the key is open - we are saving energy. At this time, on the secondary side there is a minus - nothing goes into the account. And only after the switch is closed, an emf pulse occurs. 5 microseconds - we give it back. And 500 microseconds - we wait for digestion. Well, or 495, to be precise.
Eventually:
Here is a prototype with a “Bedinievsky VD” working on the murdered Bosch. The owner thought that since it was BOSCH, there was no need to look after it. But no, it boiled over, two jars were shortened. I added distilled water - in two jars the density was zero four normal (at a minimum). The voltage was 7.90 volts at the beginning, after a day of operation it was 8.68 volts.
But not every battery will work. There are also such garage craftsmen - the can is shortened, but they put it on charge for a week, maybe it will help. They are already just rubbish. Either they will pour in any kind of acid, or even alkali “for desulfation.” It is easiest to select based on the density of the electrolyte. doniga: I collected it 2-3 years ago. Generates pulses over 60A. Powered by adapter 220/12V, 2A. Charges everything from little fingers to car batteries. Without control, the “small experimental” will heat up and deteriorate, and may explode. Possible application: desulfation of a car battery, due to its low power, at least 3 days are required. Attached is a schematic I modified in spl7 format and a board in lay:
Download: Desulfator or charging dedivan-a.zip
Gas analyzer
A gas analyzer is an electro-optical device for measuring the volume fraction of components in engine exhaust gases.
Gas analyzers come in 1,2,3,4,5-component types. Measured exhaust gas components: CO, CH, CO2, O2, NOx. We know that all modern gasoline cars (except for cars with direct fuel injection into the cylinders and stratified mixture distribution) at steady state (except for full load) must operate at a stoichiometric air / fuel ratio (Lambda equal to 1). Moreover, the accuracy of maintaining this ratio is quite high (Lambda = 0.97-1.03). Lambda is an integral parameter that allows you to evaluate the quality of the working mixture. And the quality of combustion of the mixture can be assessed by the composition of the exhaust gases. For diagnostic tasks, it would be correct to use 4 and 5-component gas analyzers, and those that are capable of calculating the Lambda coefficient.
For autodiagnostics, a 4-component gas analyzer is indispensable. It helps to look inside the combustion chambers of a running engine and determine how the combustion process of the fuel-air mixture proceeds. This mixture should, if possible, burn completely in the engine so that the maximum possible engine power can be achieved with low fuel consumption and the resulting harmful substances can be kept as insignificant as possible from the very beginning. Absolutely perfect combustion is impossible even with an ideal air-fuel mixture, since the time available for this is too short, even with the best design and optimal adjustment of all components important for combustion. From a theoretical point of view, combustion would be perfect with a fuel to air weight ratio of 1:14.7 or, representing in volume, 1 liter of fuel mixed with 10,000 liters of air. This ratio is denoted lambda.
The analyzed gas enters the analyzed cuvette, where the components being determined, interacting with the radiation, cause its absorption in the corresponding spectral ranges. Radiation fluxes of characteristic regions of the spectrum are separated by interference filters and converted into electrical signals proportional to the concentration of the analyzed components. When interacting with oxygen, the electrochemical sensor produces a signal proportional to the oxygen concentration. The l value is calculated automatically by the gas analyzer based on the measured CO, CH, CO2 and O2.
Modern high-class gas analyzers, in addition to reliability and ease of use, have many additional functions. They can measure engine crankshaft speed, oil temperature, and also store intermediate measurement protocols and transfer the results to a personal computer or print them on a built-in printer.
A very important quality of a gas analyzer from the operator’s point of view is its reliability. Since, by design, a gas analyzer is a complex electronic device, it is usually impossible to repair it on your own and you have to contact a company service center, which is extremely inconvenient. Therefore, when choosing a gas analyzer model, you should pay attention to its protection from external influences and the presence of a preliminary preparation unit gases
DIY alphameter diagram
A thought came to me like this... What happens to my car while driving, how does the mixture burn? The technicians came up with all this a long time ago, but decided to install an oxygen sensor and indicator on the car.
List of parts for modification: Lambda probe Bosch 2112-3850010-20 (output voltage 0-1 Volt) - $25 Device for displaying readings - $22 Nut for the hub on a classic (needed for lambda) New pants - $8 Wires, relays, fuse, lambda connector - $6 Total: about 70
Since everyone knows that the pants for the injector are different. So I took the nut and pants and went to the welder. They suffered for a long time but welded it! The problem was in the angle of the sensor, in the transverse stabilizer, rubbing against the body... but 20 minutes of gemara and everything is ok!
The next step was to install the device in the cabin. Screwed it on. brought out the wires. The device had 4 wires. 1 wire - ground 2 wire - constant plus for data from the lambda 3 wire to the ignition 4 wire takes lambda readings.
I figured out the lambda wires. These are two white wires (there is no need to connect the heating, otherwise it will fail without it) and two more wires - a gray permanent minus that was connected to ground. Well, it was black (stgnal) and was connected through a connector to the device.
I looked under the hood and realized that the power supply needed to be redone. I removed the power supply from the coil along with the power supply to the HBO and fed it through the relay. Plus I took it directly from the battery.
I'd like to note! wires + and -, which are responsible for the lambda and its readings must be taken directly to avoid loss. namely, the mass directly from the body, and the plus from the battery terminal.
On the go I put corrugations on some wires.
Turned on the ignition and started. and what did I see? It turns out that the HBO did not work as it should! the little guy played tricks on him and HOW! the car became like a beast!
Now the task is to balance the spacer for Solex for gas (gas mixer), with jets or the level in the float chamber (not decided yet). The spacer greatly affects mixture formation. it increases the vacuum in the wells, thereby drawing out more gasoline (re-enriching the mixture). but since this is not very critical now (there is a mixer for two chambers). And I drive mostly on gas.
Installation and operation instructions.
Short description.
The alphometer device that you hold in your hands is designed for visual monitoring of the current composition of the fuel-air mixture in both gasoline injection and carburetor internal combustion engines. It is a microprocessor system that digitizes the output signal of the oxygen sensor, measures it and displays it on a line of LEDs in accordance with the calculated value of the excess air coefficient
(the accepted designation is the Greek letter Alpha) or in American technical literature - (the Greek letter Lambda). What distinguishes it from a conventional analog alphometer is that it does not simply measure the voltage generated by the sensor, but “knows” the characteristics of the oxygen sensor, is able to recognize slightly different signals and, based on the measurements, calculates the coefficient. It can be installed in the car interior as an additional device, and also serve as a device for tuning the fuel of gasoline engines. The sensing element is a standard oxygen sensor based on zirconium oxide, used in automobile engine control systems (hereinafter referred to as EMS). The scale in the form of an LED ruler is graduated in units of excess air coefficient ( ). Coefficient “1” corresponds to the stoichiometric composition. Values less than “1” mean a rich mixture, more than “1” means a lean mixture. The table shows the types of fuel with which the device can be used and the mass ratio of air to fuel corresponding to the stoichiometric composition of the mixture, indicated by the device as “1”. The stoichiometric composition is the theoretically correct ratio of fuel and air, at which during the combustion process the oxygen in the air and the fuel will be completely consumed without a trace.
Unleaded gasoline 14.7:1 Methanol (methyl alcohol) 6.5:1 Ethanol (ethyl alcohol) 9.0:1 Propane (liquefied gas) 15.7:1 Can also be used for nitrogen oxide systems.
It is recommended for use with the device oxygen sensor BOSCH 0 258 005 247.
Installing the device in a car.
2.1. Place the device in a convenient location on the dashboard. Route the supplied cable harness through the hole in the body into the engine compartment. The sensor connector should be located in the engine compartment as close as possible to the sensor installation location, and the device connector inside the passenger compartment should be closer to the instrument panel. Secure the braid of wires to the car body so that no part of it can be damaged by the mutual movement of the car components. Connect the red wire of the braid to the vehicle’s on-board network to bus “15” or to bus “X” inside the passenger compartment, i.e. to the “plus” of the on-board network after the ignition switch through a fuse with a breaking current of 5 - 7.5 amperes. Can only be used for vehicles with an on-board voltage of 12 - 14 volts and a negative pole on the body. Make sure that the black wire is in reliable contact with the car body as close to the device as possible. Connect the colored wire to the side light switch so that a “plus” appears on it when the outside lighting is turned on at night. The device will dim its brightness when outdoor lighting is turned on.
2.2. If your vehicle has an oxygen sensor installed and operates as part of the engine management system, you must use a homemade adapter or direct connection so that the black wire of the black connector of the pigtail is connected to the black wire of the existing oxygen sensor. The gray wire of the braid connector with the gray wire of the oxygen sensor. If the sensor does not have a gray wire, then the gray wire of the connector must be securely connected to engine ground. Do not disconnect the sensor from the vehicle's standard wiring.