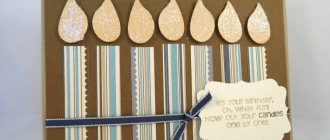
Every woman wants to congratulate her man in a special way. After all, the holiday is remembered for its atmosphere, mood and, of course, gifts.
A special role has always been given to gifts, because through it you can express without words all your warmth, respect, care and gratitude. And now it’s happened, the gift is waiting for its recipient, but something seems to be missing.
If you're familiar with this feeling, then this article will help you add an element of personality and perfect the surprise. We invite you to decorate your gift with original packaging design, which is very easy to make yourself.
A shirt and tie craft will be an excellent bonus to your chosen gift and will bring a lot of pleasure to both the recipient and you.
Postcard “Shirt and tie”
Master class by Antonina Mazur. Today in this master class we will make a men's suit and a shirt from cardboard . Let’s just decorate a postcard , which you can give to a close friend, dad, loved one, etc.
For this we need:
- cream cardboard;
- brown cardboard measuring 10x10 cm;
- tie ribbon;
- scissors;
- ruler;
- boutonniere ribbon;
- glue gun;
- two buttons;
- pencil.
Cut out a rectangle measuring 10 x 20 cm from cream cardboard and very carefully bend it in half. This will be a blank for a postcard, one half of which we will decorate.
We cut out a strip measuring 7 x 2.5 cm from cardboard of the same color. We retreat 2 cm inward from the upper corners and make marks with a pencil. We do the same with the lower corners, retreating 1 cm. We draw oblique lines under the ruler.
Without moving the rulers, we draw along these lines with scissors to form a fold line.
Now we place a square of brown cardboard in front of us. We retreat 4.5 cm from the top edge and draw a line parallel to it. We divide it into two parts, lowering the perpendicular. Then from the top point of this perpendicular we retreat 2.5 cm in each direction and draw oblique lines.
We cut the middle, and draw fold lines along oblique lines, as for a shirt collar. We bend the two halves of the jacket collar.
Cut a satin ribbon 8 cm long and tie one end with a loose knot, leaving a tail of about 1.5 cm.
We cut this tail into two parts and glue it in the middle along the wide side of the shirt collar.
The top corners should touch and hide the top of the tie. We glue them and attach the collar and tie in the middle of the top edge of the card to the bottom corners.
We glue a brown cardboard jacket on top, straightening the tie.
We attach buttons and a boutonniere, which can be made with a satin ribbon, tying it in a knot.
We receive a postcard that is intended for a true gentleman!
As you can see, you can make a completely “adult” card in the form of a shirt and tie with your own hands! Send us photos of your postcards made using this master class, we will be happy to publish them.
An interesting option in this video from YouTube:
The next two master classes - postcards using the origami technique - were prepared by Alina Stanislavovna Zagainova.
Example of a paper tie idea
There is a ready-made template, using it we cut out two pieces of absolutely identical ties from cardboard. Now we need to make decorations, for this we can use figures cut out of paper. We glue the two parts of the tie together and apply them to the front part for decoration. Using a hole punch, we will make holes and thread a beautiful ribbon through them.
Children's crafts - origami shirt
There are several schemes for folding a paper shirt. Some of them are complex and beyond the capabilities of a child, especially a primary school child. Even a preschooler can make a shirt using this pattern if he has the skills to fold a sheet of paper along the intended lines. During the work, the child may have difficulties when he needs to measure a certain distance using a ruler. Then adults should take on this stage of work.
By folding a sheet of paper according to this pattern, you will get an elegant shirt, which can be for men, women, or children. It all depends on additional accessories: bow, tie, buttons, applique.
For work you will need: • a square sheet of single-sided colored paper; • a simple pencil; • ruler; • small pieces of colored paper for decoration.
Step-by-step folding of a paper shirt
Take a square piece of paper.
Fold it in half with the colored side facing in. Expand. Fold again, but this time the other two sides. Unfold again. Two folds intersecting at right angles will appear on the sheet.
Bend the top and bottom edges of the sheet towards the middle. “Iron” the folds (that is, squeeze them tightly by running a hard object along them - a ruler, a scissors handle, or just a fingernail).
Use a ruler to divide the part of the workpiece to the right of the vertical fold in half, and put a small mark.
Divide the remaining part of the folded sheet on the left (from the mark to the vertical fold) in half again and put another mark. Divide the distance from this mark to the vertical fold in half again. From this mark, draw a line with a simple pencil to the upper right corner of the workpiece.
Applying a ruler to the line, bend the edge of the sheet outward. Iron the fold.
Perform the same actions with the lower right part of the workpiece. Turn the folded sheet 90° so that the folds are facing up.
Place a ruler horizontally at the point where the folds meet.
Draw a fine line. Fold the craft along this line, bending the top part down.
Rotate the workpiece 180°.
Draw a line from the upper right corner to the intersection of the horizontal fold with the edge of the sheet. Bend the corner of the craft down along it.
Do the same with the left side of the workpiece.
Turn the craft over to the other side.
Bend the upper right corner as far as possible towards the middle so that it reaches a vertical fold. You must act very carefully so as not to tear the paper in the place indicated by the arrow.
Iron the fold. Bend the left side of the workpiece in the same way.
Turn the craft over again.
Form a white shirt collar by folding the top edge of the sheet over the craft. The fold is shown with a dotted line.
To give the shirt a finished look, fold the corners inward, making the shoulders slightly rounded.
Use applique to decorate your shirt as your imagination dictates. These are the elegant shirts you get.
Ready-made templates and patterns of ties
Such templates are available ready-made on the Internet; they can be a good preparation for future crafts. Save them for yourself or print them out right away, this will be your lifesaver. On some templates there is a place for ribbon decoration; in the upper part there is a fold line for this, we fasten them with glue and thread the ribbon.
Simple origami shirt
If a child likes to make all sorts of crafts from paper, then you should select such patterns for him so that he does not lose the desire to engage in this type of creativity. It is advisable to time the making of this or that craft to coincide with some event. For example, soon many men will celebrate February 23 - a holiday dedicated to the defenders of the Fatherland. Therefore, invite your child to give dad a gift - fold a shirt out of paper.
This scheme is very simple. It only takes a few steps. Help your child figure out how to fold paper so that the end result is something like this.
You will need: • a square sheet of single-sided colored paper; • ruler; • a simple pencil.
Step-by-step job description
Prepare a sheet of paper.
Fold it in half and unfold it. Then fold the other two sides. Unfold again. Place it in front of you with the wrong side up.
Connect the side edges of the sheet in the center by folding the halves of the square in half. Iron the folds.
Divide the upper right edge of the sheet into three parts. Also divide into three equal segments and the midline to the horizontal fold. Draw a straight line connecting the first mark from the edge on the vertical edge and the last mark located on the horizontal line. In the photo it is shown as a dotted line. Fold the edge of the paper to the side, making a flap. On the opposite side, fold the paper in the same way.
To shape the lower part of the figure, turn the workpiece “upside down” (this will make it easier to work with). Attach a ruler, connecting the center of the craft with its corner.
Fold the paper outward. Iron the fold. Place the figure in front of you again as in the photo.
Fold the craft in half horizontally, tucking the bottom part under the top.
The shirt is almost ready, but the craft does not hold its shape, as the upper part is protruding.
Therefore, slightly bend the “shoulders” of the shirt inward, then the folds will hold both parts of the craft together. The shirt is ready!
By the way, here are some simpler options for postcards in the form of an order, a pocket and a flag:
Materials for making a tie
There are quite a lot of material options for crafts in the shape of a tie; these can be paper and cardboard, fabric and buttons. The paper origami technique will help inexperienced or limited people to quickly and easily create crafts. The same applies to children; origami is the most suitable way for them to create a tie. The main features of the form of the created object are reflected in the minimum folds of the paper work.
In order to give your work a decorative look, you can use ready-made ideas from the Internet.
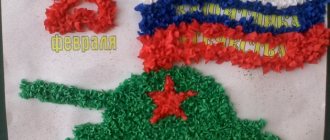
Postcard “Military uniform”
Very soon the time will come to congratulate our men on a wonderful holiday - Defender of the Fatherland Day. But not only adults will prepare congratulations. Our children also love to give surprises to their dads and grandfathers. So today we will make a card out of paper. Master class from Anna.
To make a postcard we will need:
- Colored paper in green, yellow and black, as well as a sheet of white paper;
- Glue;
- Scissors.
You need to cut out a rectangle of the desired size from green paper. It's better to take double-sided paper. But if you don’t have one, then you can use single-sided paper. Only then will you need to glue the sheet. This is necessary so that the collar of the jacket is the same color on both sides. You can immediately cut out 2 identical rectangles and glue them with their white sides facing each other. Now carefully fold the rectangle in half vertically. But we make a barely noticeable fold only on top. It will serve as a guide. Now we bend both sides of the rectangle to this mark. Here we are already making obvious folds. Photo 1
Next we will make a shirt, so we will take a white sheet of paper. You need to cut out a piece equal in width to the central part of the future jacket. That is, without folded sides. And the height of the part should be several centimeters higher. About 2-3, it depends on the size of the shirt itself. Using scissors, we cut through the part on both sides. The cuts must be the same length. We retreat from the top edge approximately 1 - 1.5 cm. Photo 2
Now we take the parts and bend them so that their corners meet in the center. So we made a collar for the shirt, which is fastened to the very top button. Photo 3
Let's continue to design the shirt. For the tie, take black paper. Let's cut out the part. Now you need to glue it to the shirt in the center. Photo 4
Now let's put the shirt aside for a while and continue working with the jacket. If the paper was one-sided, then you need to glue 2 parts to the front parts of the jacket. Now you need to bend them, forming identical triangles. Then we will make shoulder straps from yellow paper. To do this, cut out 2 identical rectangles and glue them onto the shoulders. Photo 5
Using a red felt-tip pen, draw 1 star for each shoulder strap. We will also cut out 3 very small circles. These will be buttons. Photo 6
Now we simply open the jacket and insert the shirt inside. You can glue it. Photo 7
This is such an interesting and simple military postcard for February 23rd.
Civilian version - tuxedo:
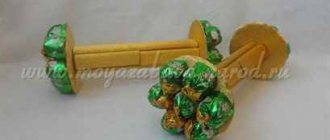
Tie as a gift
In order to make a gift tie, you need to prepare cardboard, multi-colored napkins, a pencil, scissors, gel glue, regular glue and a hole punch.
Gift creation process
We draw a tie and several stars separately on cardboard, and then cut them out with scissors. We place all the stars on the tie in a chaotic order. This is necessary in order to outline them with a pencil. It is necessary to immediately make holes for threading the tape. For decoration we will need napkin balls. They can be done in two ways:
- cut into small squares and roll into balls;
- tear the napkin into pieces and form into balls.
Apply glue to the drawn stars and place balls on them. It is worth paying attention to the fact that the same-color balls are pressed tightly against each other and that the entire space of stars is filled. We glue the edges of the tie with a different color of napkin balls. We fill the remaining space with other balls of different colors.
After everything is dry, apply glitter gel glue. The last step is a ribbon that can be glued with tape on the back side.
Other postcard options for February 23
"Origami Scrapbooking Shirt." Elena Batrakova. A shirt with a tie, vest and jacket is made using the origami technique using scrapbooking elements from multi-colored paper, magazine clippings, and decorated with half beads.
A very interesting postcard with a turning star:
5 more paper gift ideas for February 23:
Postcard for dad. Serdinova Irina Sergeevna.
Another voluminous postcard with a ship:
A gift for dad from Ilya Stepanov.
A simple but effective postcard symbolizing the peaceful sky above:
Postcard with a three-dimensional soldier using the origami technique:
an order from plasticine for your dad :
Send photos of your postcards to the “Our Defenders” competition!
In order not to forget the address of the page and share with friends, add it to your social networks: Do you want to know news about competitions or master classes?
Tags: February 23, DIY cards
Attention! It is better to write urgent questions in the comments on the website (form at the bottom of the page) or, better yet, directly by email. There are no notifications about comments from the VKontakte form! This form is more for feedback. 
Discussion: 5 comments
- ladyblogger:
February 19, 2015 at 15:49What a cool card! This is the first time I've seen this! Very original! Such a gift will definitely be remembered and surprising.
Answer
- Ksenia:
February 20, 2015 at 10:26 am
Very impressive card! But the main thing is that it’s not at all difficult to make one. Thanks for the master class!
Answer
Larisa:
February 24, 2015 at 01:27 pm
Yes, it’s not difficult at all, even a child can do it. And dad will be pleased.
Answer
February 20, 2015 at 12:04 pm
Let's try this version of a postcard for dad on February 23 with the children