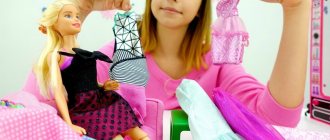
The fastest option for sewing new clothes for dolls
Take the basic necessary measurements for a simple dress:
- chest girth;
- length of the bodice area to the waist, skirt.
This information will come in handy at any time if we want to model something for a toy. You will also need a Velcro fastener.
Let's make a pattern for Barbie - a couple of rectangles for the top and bottom zones. Finish the edges, place the bodice on the body, and gather the skirt into gathers and sew to the bottom. At the end of the work, add straps and Velcro - it will be more convenient to fasten.
Uncover
Cutting doll trousers is similar to cutting human trousers. You should prepare several tailor's pins, scissors and a sharpened piece of chalk.
Important information! You can draw lines with a pencil, but it does not leave a mark on all fabrics. For avisent and bolognese, it is best to use a ballpoint pen.
Progress:
- Take the fabric and fold it in half, right side inward.
- Along the previously marked dotted line, attach the pattern to the fold of the fabric.
- Using tailor's pins you need to secure the pattern to the fabric.
- Trace the pattern strictly along the contour.
- The next contour follows the allowance.
- The workpiece is cut strictly in the outer line of allowances.
You might be interested in this: The procedure for sewing elastic into a waistband on a skirt
Brand new skirt
Sewing skirts is much easier than a multi-story magnificent structure. In addition to the simple design, you can easily vary the pomp and length of the skirts, add varied decor, belts, and appliqués.
It is enough to measure your waist circumference and length. Cut out two oblong elements - for the main fabric and for the belt. Hem the skirt piece on three sides, gather it into a pleat, and sew on a belt (you should use braid).
At the end, all that remains is to attach the Velcro fastener. Alternative: replace the belt and clasp with a braid that stretches and allows you to put the item of clothing on your body.
How to take measurements for pants and skirts
Required measurements:
- Waist circumference (From) - the measurement is taken horizontally along the narrowest part of the waist.
- Hip circumference (About) - measurement is taken at the fullest point of the hips.
- Trouser length (db) - measurement is taken from the center of the waist to the toes.
- Seat height (Vs) - you need to bend the doll into a sitting position and place it on the surface, measure the distance from the seat to the waist.
- Foot circumference (Oc) - can be removed for sewing tapered trousers.
You might be interested in: Making patterns and sewing a hat with a brim yourself
Measurements
Doll clothes from unnecessary things
If you have unnecessary items from children's and adult wardrobes stored in your home, try using them as supplies for clothes for Barbie dolls. If the girl is quite large in size, and the clothes are small, from a baby, then most likely there is no need to alter or cut anything. And if the sizes are large, then for medium or miniature toy children it is only necessary to sew it up a little, trim it and process the edges.
Tip: choose items that have ready-made trims, embellishments, details and interesting fasteners, and knitted ones have elastic bands and elastic elements. This approach will reduce the amount of work, and the new items will look very attractive.
Crafts for Barbie
The Barbie doll differs from others in that she is a very kind and sympathetic girl. She has many friends, loves the color pink, has a big house and has different talents.
First you need to decide what temperament the doll will have and what its goals in life are. She can be a ballerina, a traveler, a housewife, a doctor, and so on.
Then you need to come up with clothes, furniture and accessories suitable for this profession.
If the doll is a future traveler, then she will need an umbrella, comfortable clothes, a backpack or a suitcase. These items are easy to make yourself. You can make a suitcase out of cardboard, for clothes you need thick fabric, and for an umbrella, take the one that is sold with a cocktail.
Beads, sparkles or stickers are suitable for decoration.
Making a set: hat and dress
You can go further and create entire sets - jewelry, shoes, underwear. Let's consider a simple category - let's sew a matching set of headdress and dress in the same color scheme for Barbie.
Stock:
Note!
- Do-it-yourself owl - how to sew an owl, an owlet, an owl silhouette from fabric. Simple ways to create crafts
- Autumn crafts for the autumn holiday from leaves, fesalis, plasticine, vegetables - come up with a creative name, create masterpieces
- What craft materials to use for creativity: non-traditional, foamed, soft or natural pieces made by yourself
- shreds of appropriate volume and shade;
- scissors;
- sewing machine thread;
- centimeter;
- tailor's pencil;
- Velcro fastener;
- sewing machine.
Let's get started:
Let's take measurements of the chest from the front and back - they differ, but do not exceed 8 cm. You should also measure the length of the neckline, shoulder and to the highest point of the chest (at the darts).
We take simple but beautiful material. For a figure, a piece of 16 x 16 cm is enough. Fold the flap into 4 layers, set aside 1 cm from the center, 0.5 cm from the bottom. You will also need 4 cm for the sleeves. Mark a distance of 5 cm horizontally from the fold - this is our width chest (+1 cm per seam).
Make a pattern along the lines of the Barbie dress. First, open the canvas and fold it vertically. For a cutout in the throat area, it is better to create a deeper armhole, this will simplify the process. When you have unfolded the entire cut, carefully cut a couple of pieces on the back.
MK T-shirt for Ken
Hello! Who wants to make a T-shirt for a man? Come in! The T-shirt is designed for a doll whose chest circumference is 17 cm. And, of course, it doesn’t have to be a man))) I made the pattern myself. Here she is:
We'll need knitwear! I bought a black women's T-shirt with lace (99 rubles) at Fix Price. I washed it in cool water with a small amount of washing powder. So let's get started! We cut out the parts as is without allowances.
Seam allowances are taken into account in the pattern and are 4 mm. First of all, we process the edge of the sleeve: I bend it, pin it, stitch it. This pinning method risks breaking the sewing needle (ag). But I’m one of those who likes to take risks))) just kidding! I'm just neatly stitching. But it’s better to baste!
Here's what happened: And now the final question: who realized that he was serving me as a pincushion)))? Let's move on! You need to sew the front and back together at the shoulders: Pinned, swept, stitched! Well, or they sewed it by hand, it makes no difference.
Now we take the sleeve and apply it to the front and back (sewn together at the shoulders): And here the interesting moment begins! You need to pin or baste the sleeve cap (or head) to the armhole: Remember that the sleeve cap cannot be pulled when sewing to the armhole! Although everyone knows about this too, who am I telling this to...? Well, in case someone forgot))) We attach the sleeve. I write on a piece of paper, and on the back it looks like this. Phew))) the seam is even, nothing got chewed or pinched! Hooray)
We repeat the same action with the other sleeve: It worked! Everybody dance! Here you can go have a cup of tea or coffee and take a bath (if the situation allows))) But I’m a tough nut to crack and I decided to finish it right away and to the end! This is what a T-shirt with sleeves sewn on looks like: Turn it inside out and pin only on one side! Sew: Here: Then you need to process the edge of the T-shirt from the bottom, pin and sew. It is best to do this on your hands using a goat stitch. It is stretchy, making the T-shirt easy to put on. But I’m not looking for easy ways, so I change the settings on my machine and insert a double needle:
and I start to squirm))) I want to learn how to make a perfect seam with a double needle. Anyone who knows the secret will probably not look into this topic... But suddenly! Please help me :) Here's what I got:
Now fold the T-shirt in half, inside out! Pin off the second unstitched side seam and sew it up! And now, it would seem, the T-shirt is ready! But this is not so... What remains is the most tedious and terrible (in my opinion) task - processing the neck... Here even I have to baste)))
Next, I sew this hem on the neckline with a goat stitch, or sometimes a goat stitch or a goat stitch! But it is necessary, Olya, it is necessary! And I silently sew, clinging to ONE thread... like this: Carefully! Without pulling, take out the basting) And the T-shirt is ready! It remains to be ironed. Remove pieces of paper, hairs and threads. Black must be flawless. Let's call someone for a fitting! - Grandfather Victor!!! Can I see you for a second? Grandfather Victor was dozing in his chair, but he came!
And here he is in the darkness of the evening, in the light of a floor lamp, taking a photo with his slippers! )))
Please don't judge harshly :) It gets dark so early in Moscow, and I no longer had any patience to wait for the next day! I hope someone will find my MK useful! All the best!
Sewing process
The seam should be applied in a zigzag pattern from the edges of the sleeve. Bend the fabric from the back 1 cm, sew Velcro there. There is no need to sew any more stitching on the edging; just attach one more piece of Velcro to the reverse side. As a result, our work is simply and neatly fastened.
Fold the front and back, sew a seam no more than 1 cm wide. The lower part expands during processing.
Perform the first fitting on the doll. Put the blouse on inside out, mark the locations of the darts, and stitch them. Since the back is shorter than the front, trim the excess with a 5mm margin for finishing the edges.
We finish sewing the skirt. For it, reserve a square of 10 x 35 cm, process the cut with a decorative seam. In this case, it is better to loosen the top thread so that a couple of decorative stitches of 2-3 mm each can be placed there. Pull the thread for a neat gather.
Recommendation: tie all the threads into knots so that nothing comes unraveled or untied.
If you did everything correctly, the top and bottom of the model will be equal in length. You don’t have to sew the skirt and bodice and leave them separate, although according to the classics, they need to be connected. Connect both parts and sew with a 5mm seam. All folds should be distributed evenly; it is important to insure yourself with extra fitting.
Fabric doll products
For beginners, there are many different lessons and explanations, calculations, so as not to make mistakes in cutting. Otherwise, the thing may turn out to be either very large or very small.
You also need to focus on small details and decor to make the item look realistic.
Headdress
- For a doll's hat, we measure the head - usually the diameter does not exceed 10 cm. You will need a little - only about 4 x 12 cm.
- Sew the edge, make a hoop by joining the joints - this will require a needle.
- Fold the piece in half so that the “face” faces up.
- Trace along the contours, leaving a seam allowance of no more than 0.3 cm. Do not move the details.
- Cut out the fields from a 13x13 cm square piece, fold it in four, then place a solid circle in the center. Mark and cut out the center piece.
- Place the bottom to the top so that it is easy to sew on. Leave a tail for the side seam.
- Sew all the places on the machine with a zigzag along the edge, making sure that there are no shifts, folds or excess. It is more important to outline everything well, then sew it properly, than to alter it.
Our cute example of hat craftsmanship is ready - all that remains is to dress up the fashion model and take her out for a walk to the envy of everyone.
Paper dolls and accessories
Paper dolls can be a good component of exciting play. Here everything is limited either by your imagination, or on the Internet you can find a large number of samples of dolls of various shapes, hair and eye colors.
Clothes for paper dolls are very easy to make. A variety of ideas can be found on the Internet, magazines or books. Rectangular grips are used for fastening to clothing.
To work you need paper, scissors, glue, colored pencils, markers or pens. The paper doll needs to be placed on a sheet and traced along the outline. It is important to outline the shoulders, waist, hips, as well as those parts on which the outfit will be “put on”.
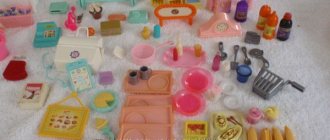
DIY accessories
What additional things can be done for dolls? In addition to new types of clothes, our little fashionistas probably need mini things for dolls that will help organize their lives. For example:
Hangers made from paper clips. Take pliers, straighten out large paper clips and form them into “hangers” that can be hung on a string or crossbar. Now the entire mini-wardrobe of doll outfits will be in order.
Jewelry box. Beautiful necklaces, belts or bracelets can be stored in a nightstand or box made from several matchboxes glued together. On top you can paste them with multi-colored magazine clippings. A more reliable approach is plastic miniature boxes of jelly beans or chewing gum.
Hanger for caps and hats. Take a strong wire and a stand for a Christmas tree or pyramid, and use pliers to wind the pieces of wire onto the trunk. Twist the ends into a spiral or concentric circles (they should not injure the child). You can hang any hats on these improvised “branches”; you always have a choice of all the available items before your eyes.Furniture for dolls
Matchboxes, scraps of fabric, leather, wooden and plywood blanks are suitable for furniture.
Bedroom
For a bedroom set you will need a cardboard box, foil, colored paper, glue, scissors. First, you can make a dressing table.
- You need to cut the cardboard box to the height of the table.
- Take a piece of foil equal to the width of the workpiece. This is the future mirror.
- Cut out leg space on the front. You can cover the box with self-adhesive wood-look wallpaper or paper.
- Glue the foil onto a piece of cardboard and connect the mirror and tabletop.
- Draw drawers. You can glue handles made of beads.
Dresser
For the chest of drawers you will need matchboxes, cardboard, colored napkins, and beads for pens.
- You need to connect the matchboxes so that the “boxes” move forward.
- Paste over the workpiece.
- Make a table top out of cardboard.
- Connect the parts together, glue the handles.
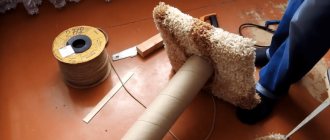
Sofa
For the sofa you will need wooden blocks, dense material that imitates upholstery (suede, velvet), liquid nails, and cotton wool.
- You need to cover the armrests with material and secure them with glue.
- Next, you need to put pieces of cotton wool under the seat upholstery and also cover it with material.
- Connect the seat, back and armrests.
You can sew pillows from leftover fabric and knit or crochet rugs.
Clothes for Barbie: photo examples of incredible masterpieces for a doll
In fact, the possibilities of a creator are unlimited. Literally everything in the house can be used. Inspect unnecessary toys, furnishings, and pieces of fabric especially carefully. Involve your child in the work. Your daughter will probably want to become a real little fashion designer - don’t hold back her imagination, provoke ideas, any manifestations of creativity.
These qualities will definitely come in handy in the future, because design skills are simply invaluable at any age. Don’t be embarrassed if your first attempts are a bit lumpy—practice and experience make all the difference, and besides, this is not for evaluation, but for fun.
We hope that this small master class will help you awaken your imagination and beautifully dress up your favorite toys for a walk or for a holiday. Barbie clothes are a real gift for girls!
Please repost
0
Crafts from different materials
- An unusual approach to standard materials is also used in the manufacture of doll accessories.
- Chairs and a bench made from school rulers or ice cream sticks will take their rightful place in a doll house.
- Crockery and cutlery can be cut from a plastic liner from a box of chocolates.
- The balloon will make a swimsuit for Barbie and a backpack for her shoes.
- Paper clips can easily be turned into coat hangers.
You too can create and invent a world for your favorite doll!
How to sew a hat?
You can emphasize the doll's stylish image with the help of an accessory such as a hat. In the simplest version, it can be made from fabric, cardboard and a plastic cover. The stages of work are as follows:
- We measure the volume of the head. As a rule, for Barbie it is about 10 cm.
- We take a long strip of fabric, fold it, and sew it with a seam.
- We make a circle from a long strip, which will become the basis of the future headdress.
- To keep the Barbie hat in shape, you can put a pre-cut circle of thick paper inside the strip.
- The bottom for the headdress is made of fabric taking into account the size of the doll's head. It should fit tightly.
- After preparing the bottom, it needs to be sewn to the brim. To hide the seams, use decorative braid or some other decoration that is sewn or glued at the junction of the brim and the bottom.
That's it, the hat is ready. You can also make a handbag in the same style to make the doll’s image complete and harmonious. The easiest way to make a hat is from dense fabrics, such as felt. It is easier to use, holds its shape well and allows you to turn any design idea into reality.
Dollhouse toys
If your daughter's doll has children, then in addition to the children's room, they may need toys. And you can make them yourself. For example, to make a teddy bear, you just need to glue two ears of smaller beads to a large bead. Make the paws in the same way. Draw the bear's face with acrylic paint.
Or here’s another toy option for Barbie:
- Take a padding polyester, a wooden stick and a light cloth.
- Draw a horse's face on the folded fabric.
- Cut and sew, adding padding polyester inside.
- Leave a small hole for the stick.
- Next, sew on the eye bead.
- Now insert the wooden stick inside and tie it with a ribbon for better fixation.
You've got a toy rolling horse.
We sew the simplest dress from a sock
The basis of the doll's wardrobe are dresses and skirts. Some may find the process of sewing such clothes too difficult. In fact, everything is extremely simple if you know about some secrets. So, to sew the simplest dress, you don’t even need to create a pattern; sometimes you don’t even need a needle and thread. We take an old sock left over from a pair, cut off the toe and get a straight, formal dress. The elastic sock top can be used as a skirt, strapless top or mini dress. Don’t rush to throw away the heel; it can become a hood or an original collar for a jumper or sweatshirt.
Sewing Tips
Making clothes for a Barbie doll with your own hands does not require much skill, but you should still follow some rules:
- The doll's body is the same shape as a human's. That is, clothing should be the same as human clothing, but smaller in size. At the same time, when sewing clothes for a doll, keep in mind that small items require more care. On small items, holes, inaccuracies, and clumsy stitches are much more noticeable.
- one mistake or inaccurate movement of the scissors can ruin the entire piece of fabric, so it is better to make patterns on paper first. Cardboard is used for such patterns.
Pants for a doll without a pattern
How to sew pants for a doll without using a pattern? Very simple! For this you will need:
- Chiffon or nylon (2 rectangular pieces).
- Thin elastic band.
- Sewing kit.
Important! The required length of the fabric should correspond to the size of the product, and the width should be slightly larger than the half-circumference of the thigh. The wider the pieces of fabric, the better.
Without pattern
How to sew trousers on a doll or how to sew trousers for any doll is described in the following steps:
- The first step is to sweep over all the details.
- The rectangular pieces should be folded with the right sides facing each other.
- A step cut should be set aside from the bottom.
- Sew from the mark to the waist.
- Sew the crotch seams.
- Place a gather along the waistline.
- The lower sections should be sewn together, and then pulled together.
- The knots can be hidden under a buttonhole stitch.
Rethuses for centipedes
Additional information! Both a boy and a girl doll can try on such pants. Regardless of whether it is big or small. Suitable for models: Barbie, Paola Rain, Monster High, Big Foot dolls, etc.