Optimal conditions for drying clothes
Owners of private houses in the village dry clothes the old fashioned way. They hang it on ropes stretched in the yard between two supports. The natural drying method is considered the most optimal. This is confirmed by a number of advantages:
- When drying naturally, the laundry does not dry out and is saturated with oxygen. On the street, toxic fragrances from washing powders erode. Linen brought in from the cold smells fresh, but dried items indoors may have a musty smell.
- Outside, especially in warm weather, laundry dries faster. This happens due to wind blowing. Moisture from the fabric evaporates faster.
- Laundry drying outside does not harm a person. If you do this indoors, fungus appears on the walls from the evaporating moisture. In addition, all family members living in the house breathe these fumes, which contain particles of washing powder.
Outdoor conditions are considered the most optimal for drying clothes, but they are not always available. The obstacle is inclement weather or the lack of a private yard for the person living in the apartment.
Devices in the form of different grid configurations help dry laundry indoors
If it is impossible to use outdoor conditions, drying clothes is moved indoors. They come up with various devices in the form of gratings. However, here too you need to think about the optimal location for them. Ideal conditions on the balcony. Here, moisture evaporation is not dangerous for living family members. Even if the balcony is glazed, opening the windows can create a draft to speed up drying.
If you exclude the balcony, then it is optimal to place the dryer indoors near the radiator. Warm air causes moisture to evaporate faster. However, the bedroom will not do. In the hall, drying laundry spoils the interior. It is optimal to place the dryer near the radiator, where it is least visible, for example, in the bathroom or kitchen.
Dryer outside. Everything ingenious is simple!
Summer, cottage, fresh air and sun... it would be a shame not to take advantage of this if you have a big laundry to do. After washing your clothes, hang them in the yard - this way you will save on electricity, forget about the humidity in the house and can enjoy the aroma of freshness that your clothes will smell of.
According to statistics, about 90% of city residents dry their clothes at home: on balconies, radiators, and in dryers. Having gone to the country, they cannot get rid of old habits. Meanwhile, home drying not only wears things out, but also entails significant costs.
If you live in a private house or go to the country, dry your laundry in the open air! This is good for both your belongings and your health.
5 REASONS TO DRY OUTSIDE:
1. Natural freshness . No air conditioning needed. The sun and wind will do their job. Any odors remaining after washing will disappear within a few hours. And if it’s spring outside, and the air is filled with the aromas of flowering trees, you won’t be able to part with them even at home!
2. Immaculate cleanliness. Ultraviolet light is a natural antiseptic that kills bacteria and protects against mold and linen mites. Sunlight brightens things, which means white things will simply shine!
3. Durability of things. Rapid heating and spinning in the dryer will wear out the fabric. Even 100% cotton sheets tear quickly. What can we say about delicate fabrics - silk, synthetics, brocade? Natural drying preserves things for a long time. Don't believe me? Think about the wardrobes of your grandmothers and great-grandmothers, in which clothes were stored for years.
4. Energy saving . Sun and wind don't cost you a penny. But you will have to pay for electricity - for a dryer or radiator. Save money - it's easy at the dacha!
5. Harmless to health. When laundry is dried in the fresh air, under the influence of wind and sun, it undergoes additional processing, which is so lacking in closed city apartments. Natural sunlight contains an ultraviolet part, which disinfects laundry from all types of biological components.
In a city (and especially a big one) it is difficult to dry things outside. In some places this is completely prohibited. But if you live in the country or in your house with a large yard, take out the dryer - and take advantage of the gifts of nature!
WHAT SHOULD AN OUTDOOR DRYER BE?
Of course, reliable and compact. The capacity of the dryer is also of great importance. For example, Brabantia, a well-known European manufacturer of household goods, offers its practical solution for drying clothes in the fresh air - umbrella-type outdoor dryers .
What model is yours?
The first thing worth noting about Brabantia outdoor dryers is their compactness and ease of installation. In order to bring the dryer into working position, you just need to insert the dryer into a special base (for soil or concrete) and open it.
The easy-to-use “umbrella” folding mechanism ensures that the ropes are always taut; moreover, there are several rope tension positions with locking.
High quality UV resistant ropes with a non-slip profile will last for ages. If, nevertheless, the need for replacement arises, then there are no problems here either - the ropes are easily and simply replaced individually.
For most models, the guides rotate smoothly even with a maximum load of wet laundry - there is no need to bypass the dryer with the laundry basket. Also, all guides have special holes for hangers - ideal for drying delicate items.
After use, the dryer folds compactly and is covered with a weather-resistant cover. It is done! Leave the dryer in the yard or bring it into the house or onto the veranda - your choice.
We can only give a few tips to housewives:
— Before washing things, study the label: it will tell you exactly how to care for the fabric, what you can do and what you can’t do. Pay special attention to clothing and items made from synthetic materials.
— Hang bedding so that no wrinkles form. If there is not enough rope, fold the sheet or duvet cover in half - and you won’t have to iron the linen.
— To prevent the dress from losing its shape, hang it on hangers. The same can be done with a jacket, blouse and any similar clothing.
— Hang T-shirts by the hem, neck down. This way, marks from clothespins can be easily smoothed out or hidden by tucking a T-shirt into jeans or pants. But it is better to hang trousers and shorts by the belt so that they retain their shape.
— It is better to place woolen items on a horizontal surface so that the water runs off. There's no need to hang them up at all, but if you want them to air out and smell fresh, you can do this when the wool is barely damp.
— Do not dry black and colored items in the sun for a long time. It's better to hang them in the shade. This way they won't fade. On the contrary, if you have washed white clothes or bedding, hang them in the sun: this will make things even whiter. You will get the white effect without aggressive chemicals.
Everything ingenious is simple! If you want to save electricity and avoid high humidity at home, keep things for a long time and make them fresh and pleasant to the touch, dry them outside. All you need is an outdoor drying rack and a few clothespins.
Types of dryers
Special devices have been invented for drying clothes - dryers. Another name for them is dreyers. They are a lattice made of rods or ropes. Factory-made products are conventionally divided into two groups: stationary and portable. Dryers of the first type are permanently installed in one place where they create the least amount of interference. Usually they choose a balcony or a bathroom. Portable dryers can be placed anywhere, and after the clothes are finished drying, they are stored in the pantry.
Dryers are divided by type of location:
- Floor-standing models are usually all portable. Install them on legs.
- Stationary wall models. They can be sliding, folding or in the form of a one-piece structure.
- Ceiling models are similarly classified as stationary. Most dryers consist of a series of brackets and ropes.
- Wall-ceiling models have two mounting points: to the ceiling with brackets, and to the wall with a special bracket.
To assemble a clothes dryer with your own hands, no drawings are required. Homemade designs are no different from factory-made analogues. It is enough to visually inspect the dryer once and copy the design without any drawings.
To better understand the types of drayers, it’s worth taking a closer look at them:
- Portable dryers have many modifications. Horizontal models take up a lot of space. It is more convenient to take them outside or place them indoors where there is a lot of free space. Vertical models are convenient for apartments where space is limited. However, laundry takes longer to dry on them, since due to the close arrangement, ventilation is reduced. Fixed mini-dryers are mounted on a radiator or bathtub. After drying the clothes, remove them. Important! Portable electric models are convenient for quickly drying washed items, but it is difficult to assemble such a structure at home. Most often, factory dryers are found; they are made of stainless steel tubes, inside of which a heating element is placed. On a horizontal dryer, laundry dries faster due to better ventilation, but takes up useful space in the room
- If you decide to make a wall-mounted clothes dryer yourself, the easiest way is to go with a non-folding option. The structure has supports attached to opposite walls. Cords are stretched between them or thin tubes are installed. Craftsmen can copy a factory-made folding drayer. An inertial dryer is popular, in which the ropes are wound onto a shaft due to a spring mechanism. Another popular type of dreyer is the accordion. It consists of a set of tubes movably connected to each other by plates. The inertial dryer and the accordion have restrictions on the weight of the hanging laundry
- Among ceiling fixtures, the structure most often made is the type of hanging vine. It consists of two brackets attached to the ceiling. Holes are drilled in them through which a cable is pulled for hanging and adjusting the height of the tubes; laundry is hung on them. Ceiling model is convenient on the balcony
Wall-ceiling type dryers are less popular in DIY production. Not every owner wants to drill simultaneously into the ceiling and wall lining for brackets and brackets.
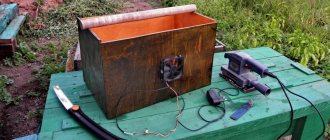
Making a drill for wood carving with your own hands
And yet, if we talk about an easy-to-use drill, most users agree that the best option is the one in which you, as they say, hold the motor in your hands. With all this, it should not be heavy, bulky, and should not tear off the hand when starting.
We bring to your attention an example of making such a drill for small jobs with our own hands.
For this particular drill the following was used:
- brushless electric motor with permanent magnets DPM-25;
- a piece of pipe from a vacuum cleaner;
- collet clamp with replaceable inserts;
- power button;
- 2 banana plugs;
- two-wire power supply wire;
- heat shrink tubes.
DPM-25 electric motors are represented by a large number of modifications with significantly different parameters. So, the number of revolutions they produce can be from 2500 rpm. up to 9000 rpm. So you can choose with the characteristics you need. You can buy them in many online stores or on the radio market, which is several times cheaper.
It must be said that in addition to 25 engines, there are also 30 and 32 and more powerful ones, and also with different parameters.
I now have an engine waiting its turn for something of the same appearance and design, powered by the same 27 volts, but with a diameter of 100 mm. Both this and the ones we offer you for a homemade drill were used in aviation technology.
The button can be with or without locking. Collet clamps are selected in a radio shop according to the motor shank (this one is 2 mm) and the diameters of the tool shanks that are planned to be used for work. Here, the variety of options is even greater than when choosing an engine.
You can also use a collet clamp from a dental drill. In specialized stores it is not that expensive, but you can find very inexpensive used ones.
And there are also plenty of options for supplying electricity to the engine. A very convenient and simple method using a tulip-type connector, where “+” is supplied to the central wire, and “–” to the outer cup. And given that the motor is reversible, the direction of rotation should be adjusted on the power supply:
These small digressions will not distract us much from the process of making a particular drill, but they can be useful in terms of varying its design.
1. Cut off the part of the vacuum cleaner tube that goes to the narrowing - this way the motor will be installed more securely, with a length so that it is convenient to hold the tool in your hand.
2. We cut a heat-shrinkable tube with a diameter of 32 mm along the length of the electric motor housing and, securing it to the shaft in a vise, rotating it by the power wires, we seat it, evenly heating it with a technical hair dryer from the center to both ends. In this case, we will just get the required size to fit it tightly in the tube. But, if you use a different tube for the housing, you can use electrical tape by winding the required amount of it on both ends of the motor housing.
3. Drill the hole for the electrical wire in the right place, based on the parameters of the button and the wire itself.
4. We cut out the restrictive rings and the seat for the button from suitable sized plastic containers for medications, children’s toys such as soap bubbles, etc.
5. Connect the wires through the button. Better - by soldering method. And, of course, do not forget to use heat-shrinkable tubing in the soldering areas to eliminate the slightest possibility of a short circuit.
6. Assembling the drill. If the sizes of the rings were chosen successfully, we simply press them into the body tube, and if not, then we use either hot melt glue or any suitable one for the materials used.
7. Place a collet chuck with a collet under the desired bur or drill, connect the drill to the power source. All.
The length of the body was chosen solely for reasons of convenience of placing the instrument in the hand.
The tool is powered by a factory-made regulated power supply - not a cheap thing, but very useful for many purposes in the home workshop. You can also use any step-down transformer that has outputs from 25 to 32 volts - permissible voltages for operating this engine, but it is better to adjust it to a nominal value of 27 volts.
It remains to add that such a drill is simply irreplaceable when used as a micro drill when carrying out small work on wood, when using drills with a diameter of less than 1 mm, and for grinding and polishing work in hard-to-reach places.
If you decide to make a drill with your own hands, then you should definitely know that instead of collet clamps, a three-jaw microchuck is often installed on such a tool. They come in different designs and parameters, which determines how they are mounted on the electric motor shaft. Sometimes hot glue is also used for this purpose, but alignment is difficult to do, although it is possible, but this method is only suitable for low-speed machines with low torque.
So there are many manufacturing methods and options for using such a tool as a drill.
Dear readers, if you have any questions, please ask them using the form below. We will be glad to communicate with you;)
How to make your own clothes dryer
Before starting the manufacture of a stationary drayer, first select the place where it will be installed. Its size and design depend on this. If you decide to make a portable clothes dryer outdoors, you don’t have to be limited in size. However, it is important to consider that in bad weather you may have to use the device inside the house. For this reason, it is still worth paying attention to the dimensions.
Tools and materials
First of all, the material is prepared for the work. Strict requirements are imposed on him. After washing, the laundry is hung out damp. The dryer material should not release coloring substances upon contact with water. It is important that there are no roughness or burrs, otherwise there will be puffs and abrasions on the linen.
Of the available materials at hand, most often you have:
- Metal tubes. The frame will be strong, but there are many nuances. Tubes made of ferrous metal should absolutely not be used even if painted. They rust and leave stains on the laundry. Aluminum, copper, and brass tubes are resistant to corrosion, but they are soft and can withstand the light weight of the laundry. In addition, they are difficult to connect with each other. If you rub laundry over the tubes, a small mark will still remain. Stainless steel is the ideal choice. The frame will be durable and will not rust from contact with water. Stainless steel tubes are the best material for drayers
- Plastic tubes. The material is resistant to corrosion, and this is its only advantage. It is impossible to hang a lot of laundry on a plastic tube, as it bends.
- Wooden slats. The natural material is easy to process. However, upon contact with water, the wood collapses and turns black. The emerging fungus will leave dirty stains on the laundry. It is optimal to make the body of the dryer from wood. For underwear jumpers, it is better to choose a different material.
- Rope and wire. These two materials are the most popular for dryers. Ropes are made from artificial thread; natural ones are not suitable. The wire is chosen with a galvanized coating.
Based on the results of the review, we can conclude that it is optimal to make your own clothes dryer from stainless steel, wood, wire and rope. If you resort to a trick, a plastic tube will do. To make it rigid, a metal rod is inserted inside.
The tool is selected for a specific material. You will need a grinder, a saw, an electric drill with a set of drills, a tape measure, and a pencil.
The tool will be needed not only to assemble the dryer, but also to hang it on the wall or ceiling
If the drayer is not portable, it will need to be fixed to the ceiling or wall. You will need dowels, brackets, and anchor bolts. You will need a hammer, pliers, and wrenches.
Each material has its own method of fastening. Stainless steel tubes are connected by electric welding. Wood requires self-tapping screws or bolts.
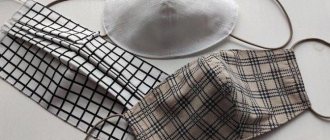
Where and how to dry clothes
Previously, clothes were most often dried outside, stretched on a rope between two poles or trees. Many still remember similar pictures from childhood. The main inconvenience of this method is the inability to dry things in cold or rainy weather. Nowadays, apartment residents no longer hang laundry in the yard, but use a variety of devices to dry things at home.
This is how our ancestors, as well as grandparents, dried clothes
In the retail chain you can find many portable folding models of dryers (hereinafter also referred to as dryers, from the English d ryer - dryer) . In most cases, such structures are bulky and inconvenient to use. More practical are hand-made drying products, mounted on the wall or ceiling in the bathroom.
A simple drying device that attaches to a battery
Homemade homemade drayers can be attached to batteries. In this case, the laundry dries much faster after washing than on a standard dryer, and the design itself takes up very little space (see photo above). A loggia or balcony can also be used to install modern structures.
How to make clothes lines for drying clothes
The simplest rope dryer can be made in a couple of hours. It will require a minimum of materials. You just need to find a free corner in the house where it won’t interfere.
The essence of the design is to fix fasteners for ropes on opposite walls. First, prepare two boards. Their length will determine the width of the drayer. The boards are secured with dowels and screws to opposite walls.
For a rope dryer indoors, choose an empty corner
Metal loops for ropes are screwed into the fixed boards. Special anchors will be used for this. On one side they have a ring, and on the other end there is a thread like a self-tapping screw. The anchor is simply screwed into the board by hand. When all the elements are installed, a strong artificial cord is passed through the rings, pulled tight and secured with knots.
Using a similar principle, they make their own clothes dryer on the street, choosing the walls of neighboring buildings as supports. You can simply dig in posts with jumpers in the shape of the letter “P” or “T” and stretch ropes between them.
Advice! Instead of ropes, galvanized wire 2-3 mm thick is suitable.
How to make a clothes dryer out of aluminum on the balcony
Aluminum tubes cannot be joined by conventional welding. When you want to assemble a dryer from this particular material, you should take a different path. First, the installation location is determined. Usually they use a balcony, where it occupies a certain space.
Aluminum tubes move freely along the profile grooves
On opposite walls, lines are marked along the width of the brackets for the future structure. Take an aluminum profile with an internal width between the side shelves of 10 mm. Saw off to size of the workpiece. These will be the brackets. They are fastened to the wall with dowels strictly according to the markings. The profile slot is directed towards the front side, that is, away from the wall.
Using a tape measure, measure the exact distance between the two walls. Tubes are cut. They should fit freely into the profile slots. If they do not fit in length, shorten them a little. The tubes will be securely held in the slots of the profiles, but heavy laundry should not be hung. Aluminum is a soft metal and bends under load. A bent tube can fall out of the groove and the laundry will end up on the floor.
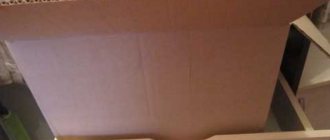
An easy way to make a ceiling dryer
If you have absolutely no skills in working with wood or no time, then there is an option for the lazy. This method will help you build a hanging dryer in 5 minutes.
- take two plastic or wire hangers for clothes,
- we put wooden rods between them, or simply pull the threads tighter between them;
- Hanging from the ceiling
DIY Folding Wall Clothes Drying Rack
To ensure that the dryer attached to the wall does not interfere, fold it optimally after drying the laundry. There are many options for folding designs. The simplest is the folding model.
Of all the folding options, the easiest way to make a folding dryer for the wall
Assemble a clothes dryer with your own hands from wood, since this material is the easiest to build a rectangular frame from. Jumpers for hanging linen can be inserted from a different material. A plastic, stainless or aluminum tube will do.
The finished structure looks like a ladder. In order for the drayer to recline, the frame is attached to the wall with hinges from below. The upper side is secured with rods made of a thin chain or strong cord. The length is selected individually, taking into account the angle at which the ladder should deviate from the wall. Additionally, in the upper part, a latch is attached to the frame, and a counter plate is attached to the wall. The latch will hold the dryer in the folded position.
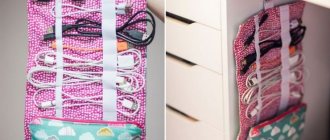
Toy dryer
Those who have small children often have to wash small items a little at a time - T-shirts, panties, tights, socks. It’s not easy to use a large dryer to dry them, but you can make a mini clothes dryer from a pair of clothes hangers and wire. It will also be a means of education: even a very small child can handle such a toy, so let him, while playing, learn to help and do chores around the house. How to make a toy, but quite suitable mini-dryer for children's clothes, see next. plot:
DIY folding outdoor clothes dryer
The assembly of folding structures is more difficult due to the need to create moving units. However, there is a way out of any situation. You will need an old umbrella with strong, unbroken spokes. The fabric part does not matter what condition it is in. It is immediately cut off. The umbrella skeleton is used for hanging light laundry.
You can dry light items on the umbrella spokes
This option is convenient when you need to make a clothes dryer outside the window of an apartment building. The umbrella, in an inverted state, is tied by the handle to a protruding rail fixed on the window sill. If there is a tall tree nearby and you can reach a branch from the window, this is also a good support for hanging a folding drayer.
What tools are needed
The minimum list of tools that you can use:
- hammer drill (+ drills and bits for self-tapping screws);
- hacksaw;
- roulette;
- pencil.
Of course, it will be easier and faster to make and install a dryer if you mechanize the process as much as possible: use a circular saw or jigsaw, grind wooden structures with an angle grinder, screw in screws with a screwdriver.
Nowadays, a clothes dryer is an indispensable thing in the house. But the stronger and better the material, the more expensive it is. Basically, dryers are made of plastic, aluminum - the cheapest and short-lived, stainless steel and steel - are much more expensive. If it is not possible to purchase a better quality dryer, you should try making one at home using improvised materials. It's not as difficult as it seems at first glance.
Rate this post
DIY clothes dryer-hammock in the yard
There are many options for rope dryers designed for outdoor use. One of them is a hammock. The design is portable. If necessary, it can be taken into the house and hung from the ceiling.
To hang a hammock you need two supports, which can serve as tree trunks
Two wooden slats are prepared for the hammock. Drill holes at a distance of 10-15 cm and tighten pieces of cord of the same length. Secure the end of each rope by tying knots.
To hang it on a tree, tie a rope to each hammock strip to form a triangle.