Material used from the channel of blogger Aka Kasyan. A smartphone is a device that has become an indispensable communication device for all people. They are used to access the Internet and often for a long time. But smartphones have one drawback - battery life. In the best case, the battery will work without recharging for one day, and if you use it actively, then for several hours. This article and accompanying video show you how to make a powerful homemade Powerbank that can even charge your smartphone or tablet or a combination of both simultaneously.
You can buy the baby monitor, which is described at the beginning of the video, and all the components of the power bank in this Chinese store. There is an article on our website about how to receive cashback (cost refund) in the amount of 7% of the price of all purchases. Download the schematic, board and other project files here.
Why is it profitable to make a power bank yourself?
In order to improve the performance of mobile phone batteries, portable chargers were ordered, which are popularly called power banks. But in its single form, such a device is not even half capable of charging a phone battery. And even three such devices do not provide a way out of the situation. Buying a powerful power bank is quite expensive. A normal powerbank, say, with a capacity of 10,000 milliamps costs 25-30 dollars. Considering this and the long waiting time for the parcel, it is easier to make your own option.
External battery repair in a service center
When the power bank is out of order, and diagnostic equipment and professional tools are not available, it is better to repair the external battery at a service center. Otherwise, you can make it unrepairable. The most difficult part will be to repair an external battery if water gets into the portable device. In this case, the technician will have to disassemble, clean the board in an ultrasonic bath, solder and restore the contact tracks. If coffee, tea or water has been in the power bank for a long time, it may not be possible to repair the device or such repair will be impractical. If the PowerBank is connected incorrectly, the USB and mini-USB connectors become deformed or fall into the housing. If the tracks located on the board are broken, the device may not turn on. Sometimes such symptoms are observed when the power button is pressed in. When a power bank breaks down, there is often a malfunction of the power controller or damage to the connector itself. You can repair an external battery at a very reasonable cost.
Description of the power bank circuit
The powerbank circuit consists of three main parts. This is a lithium battery charge controller with an auto-shutoff function when fully charged; battery compartment with parallel-connected 18650 lithium-ion batteries; 5-10 amp power switch from the computer power supply; a boost converter in order to increase the voltage from the battery to the desired values of 5 volts, which are needed to charge a phone or tablet; USB connector to which the device to be charged is connected.
In addition to its simplicity and low cost, the presented circuit has high output current values, which can reach up to 4 amperes and depends on the rating of components such as a field-effect transistor, a Schottky diode at the output and inductance. Chinese analogues are capable of providing an output current of no more than 2.1 amperes. This is enough to charge a couple of smartphones at the same time, and our power bank can handle 4-5 smartphones.
Let's look at the individual components of the structure. The power source is 5 parallel-connected 18650 batteries from a laptop. The capacity of each battery is 2600 milliamps per hour. The housing used is from an adapter or inverter, but another suitable housing can be used. As a charge controller we will use a charge board purchased here. The charging current is about 1 ampere. You can also take a ready-made inverter that will increase the voltage from the battery to the required 5 volts. It's very cheap. Maximum output current up to 2 amperes.
Circuit assembly
At the first stage, we fix the batteries and fasten them together using a glue gun. Next, you need to connect the controller to the battery to check how the charging process occurs. You also need to find out the battery charge time and understand whether auto-shutdown works when fully charged. Everything is labeled in detail on the board.
You can charge from any USB port. The indicator should show that charging is in progress. After 5 hours, the second indicator lights up, which means the charging process is complete. If a metal case is used, the batteries should be additionally insulated using wide tape.
Read also: DIY wood lathe bed
One of the main components of the circuit is a step-up dc-dc converter, an inverter - voltage converter. It is designed to raise the voltage from the batteries to 5 Volts needed to charge the phone. The voltage of one battery is 3.7 volts. Here they are connected in parallel, so an inverter is needed.
The system is built on a 555 timer - a field-effect transistor and stabilization of the output voltage, which is set using a zener diode vd2. You may have to pick up a zener diode. Any low-power zener diode will do. Resistors of 0.25 or even 0.125 watts. Inductor L1 can be removed from the computer power supply. The diameter of the wire is at least 0.8, it is best to make 1 millimeter. The number of turns is 10-15.
The circuit contains a frequency-setting unit that sets the operating frequency of the timer. The latter is connected as a square pulse generator. With this selection of components, the operating frequency of the timer is about 48-50 kHz. Gate limiting resistor R3 for a 4.7 Ohm field effect transistor. Resistance can be from 1 to 10 Ohms. You can replace this resistor with a jumper. Field effect transistor of any average power with a current of 7 amperes. Field switches from motherboards are suitable. Small reverse conduction transistor vt1. A kt315 or other low-power reverse conduction transistor will do. Rectifier diode - it is advisable to use a Schottky diode with a minimum voltage drop across the junction. Two containers serve as a power filter.
This inverter is pulsed, it provides high efficiency, high output voltage stabilization, and does not heat up during operation. Therefore, there is no need to install power components on the heat sink. If there are difficulties with Schottky diodes, then you can use the diodes that are found in computer power supplies. Dual to-220 diodes are found in them.
The photo below shows the inverter in assembled condition.
You can make a printed circuit board. There is a link in the description.
Testing a 5 volt inverter
We check the inverter for functionality. The smartphone is charging, as you can see, the charging process is in progress. The output voltage is kept at 5.3 volts, which fully complies with the standards. The inverter does not heat up.
From car charger
A powerful portable DC source designed to replenish the capacity of laptop batteries is assembled using components from a car phone charger. To assemble the product, you will need 18650 batteries, which are taken from faulty batteries for computer equipment.
It is recommended to check the condition of the products; it is unacceptable to use damaged elements. To make a Power Bank, you will need 8 devices of the 18650 format (each voltage is 3.7 V).
2 banks are assembled from the existing batteries, the contacts are connected in series. The total voltage of each can will be 14.8 V; a monolithic copper cable is used to connect the elements, which is attached to the poles using solder. It is recommended to use a wire with a cross-section of at least 0.5 mm², which will ensure the transmission of increased power and guarantee the reliability of the connection.
The blocks are installed in a plastic box; hot glue is used to fix the elements. It is recommended to use a plastic relay box installed in cars as a housing. The material of the walls has increased strength, the cover is installed with screws through a rubber sealing edging, which prevents water from entering the batteries and the controller.
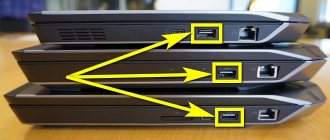
Technological holes for additional elements (USB ports and a three-position switch) are pre-cut in the walls of the casing.
The battery outputs are soldered to the switch terminals, the cords are led to the controller from the car charging unit. Then the USB connector block is connected, all connection points are insulated with a special polyvinyl chloride tube or insulating tape.
The cables are laid in the voids between the elements; thermal adhesive or plastic clamps are used for fastening. Then the cover is put in place and the charger is tested; the capacity is enough for 2-3 cell phone charges.
There are special boxes designed to accommodate 8 elements of the 18650 standard. When using a factory casing, there is no need to connect the batteries with wires; metal contact plates are provided at the bottom of the casing.
An additional advantage of the box is the fixation of current sources with contact springs and special protrusions on the cover. The disadvantages of the product include its delivery time (it is made in China) and the fragility of the latches located along the perimeter of the box sections.
A standard charging controller is installed inside the case; on the outside there are USB ports rated for a current of 1 and 2 A. For charging elements, there is a separate input equipped with a control diode. To maintain the output voltage at 4.85-5.0 V, a standard regulator is used. The design includes a cell charging regulator that automatically breaks the power circuit.
When making a homemade charging unit, it is possible to expand the functionality of the device by placing LEDs on the casing. Light sources are installed in pre-drilled holes; hot-melt adhesive is used for fixation, which additionally seals the device.
The lamps are then connected into a common circuit, which is connected to the battery through a switch. The device is used simultaneously as a flashlight and as a charging unit; the number and arrangement of light bulbs can be arbitrary.
Final assembly into the body
We need to cut out the side walls from a piece of plastic. The charge controller has two LED indicators that show the charge percentage. They need to be replaced with brighter ones and displayed on the front panel. There are two holes cut out in the side wall for micro USB connectors, which means you can charge two devices at the same time. There are also holes for LEDs. A hole for the controller, that is, for charging the built-in batteries. A small hole will also be made for the power switch.
All connectors, LEDs and switch are fixed with a glue gun. All that remains is to pack everything into the case.
A USB tester is connected to the output of the device. It can be seen that the output voltage remains firmly at 5 volts. Let's connect mobile phones and try to charge them from a homemade Power bank. Two smartphones will be charged at once. The charging current jumps to 1.2 Amperes, the voltage is also normal. The charging process is progressing successfully. The inverter works flawlessly. It turned out compact and, most importantly, stable. The circuit is easy to assemble; familiar components are used.
Your smartphone always discharges at the wrong time, have you thought about buying a Power bank? Take your time, now we will tell you how to make an external battery with your own hands! 4 interesting methods for making a portable charger - choose any one.
It is not always possible to charge a gadget from the mains. In this case, portable charging is simply necessary. But since this is a fairly popular item, there is a lot of low-quality junk on the market. It's easy to make a wrong choice. But let’s not be mistaken - it’s better to just make our own Power bank.
Advantages and disadvantages of homemade products
The advantages of self-assembling a Power Bank include:
- the ability to create devices with increased voltage or capacity;
- components of old products, lithium-ion or nickel-metal hydride batteries left over from household or computer equipment are used for manufacturing;
- It is possible to replace some of the batteries that have failed during operation (when using a collapsible box).
Disadvantages of homemade equipment:
- Electrical knowledge and skills in working with soldering equipment are required;
- requires the purchase or independent production of a charging unit (with an overdischarge protection circuit) and a booster module;
- difficulty in finding a box of a suitable configuration;
- rough appearance of the device (except when factory casings are used);
- shorter service life compared to factory products;
- lack of additional elements (power switch, control diodes or auxiliary connectors);
- risk of damage to external equipment when charging due to errors in the installation or assembly of the voltage regulator;
- When using high-quality components, the final cost of the charger is comparable to the price of factory devices.
Method 1. Old battery - new opportunities
How to make a Power bank from old phone batteries? - Just. A step-by-step description of the method will help you avoid mistakes.
- Battery from an old phone
- Wires
- Controller
- USB input
- Electrical tape, tape, hot glue.
- We take an old mobile phone and remove the battery from it. We will need 3, 6 or 9 such batteries. The more, the longer the device will last.
- We stack 3 drives next to each other, fix them lengthwise with tape, and wrap them across them with electrical tape. In this case, the terminals remain open.
- We find a suitable housing. Even a simple soap dish can fulfill this role, it all depends on the size.
- Using 2 wires, we connect 3 pieces together: one wire is “+”, the second wire is “-”. We do not connect the central terminals of the battery. They serve as a temperature sensor and their whole point is to demonstrate the remaining charge for a specific device.
- We mark the location of the controller and make a hole to insert the input.
- We attach all the parts with hot glue and you're done!
Read also: Welding work cost
Power bank made from obsolete phone batteries
That's it, in just 6 steps we got a portable battery.
In principle, the manipulations are simple. The only thing that can stop you is that not everyone has such a number of outdated batteries.
From phone batteries
Mobile phone batteries are used to create a compact, small-capacity power bank. It is recommended to use at least 6 similar products of the same capacity, which are connected into a common circuit and then covered with a plastic casing.
To reduce the size, you need to assemble 2 cans; masking tape or insulating tape is used to hold the elements. To simplify the switching circuit, the batteries are placed with contact pads in one direction.
Then the extreme contacts of the current sources in each bank are connected with a copper cable. The wiring is attached by soldering; before connection, the polarity of the elements is checked with a test device. The batteries are connected in a parallel circuit, which allows increasing the capacity of the future Power Bank.
When assembling, only the outer contacts on each current source should be used; the middle pad is not used (this element is designed to control the temperature of the battery). The second bank is switched using a similar scheme.
Prepare a plastic case with suitable dimensions, which should accommodate the charging control unit and the previously assembled battery banks.
The casing houses the connecting wiring and the back of the USB connector.
After connecting the cables, the components are placed in a box, and plastic or foam pads are installed to limit movement. It is necessary to test the operation of the received device; the capacity of the installed elements should be enough for 3-5 charges of the smartphone battery.
Hot melt adhesive, screws or latches are used to connect parts of the casing and additional covers. The type of design depends on the configuration and design of the parts. It is recommended to make a detachable design, which will allow you to remove contaminants accumulated during operation and replace failed elements.
A good result is achieved by using a plastic water pipe, which is heated with a hair dryer and pressed around a dummy battery cans.
Method 2. The lantern will illuminate the path, the phone will “feed”
Do you have a flashlight? Now you will learn how to transform a flashlight so that it not only illuminates the path, but also helps you stay in touch.
Flashlight charger
- Flashlight with 3.7 V storage
- Voltage converter with built-in USB output
- Energy charge controller.
- Let's disassemble the flashlight.
- The resistor with the soldered LED must be removed. This makes it possible to change one of the glow modes to another mode - charging.
- In the place where the plug was previously located to charge the flashlight, we place a converter with an output.
- We solder the “+” and “-” from the battery to the battery charge controller. After this, we solder a 5 V converter to the OUT+/OUT- contacts of the provided controller.
- We check the functionality. If necessary, we resolder it.
- We attach the converter and controller. Ready!
This modern lantern will give you a double advantage on your hike. And there is light, and it’s not scary to be left without communication at any moment.
The main thing here is to do everything correctly, you will definitely have a flashlight, and then it’s a matter of technology.
From AA batteries
Budget Powerbank is assembled using the following method:
Instead of AA batteries, it is possible to use batteries with a similar configuration on a nickel-metal hydride or nickel-cadmium base. It is necessary to include a unit for monitoring charging parameters in the design of the unit; when operating the devices, the design features of the batteries should be taken into account.
For example, nickel-cadmium cans must be discharged to zero, which will preserve the capacity of the products. You can make a Power Bank with removable elements that are charged in a special charger.
Method 3. How to make a portable charger from batteries
This method is somewhat similar to the first one, but here we will use regular lithium-ion drives 18650 2200 mAh 3.6 V
- Li-ion batteries 18650 2200 mAh 3.6 V. - 8 pieces
- Car charging
- USB input
- Block housing with car relay
Portable device diagram
In just a few steps we will again achieve what we want - we will make our own Power Bank.
- You need to cut 2 holes in the housing: for the switch and for the entrance.
- We solder storage batteries together in groups of 4. You can see the diagram in the image. We install them in the case.
- We solder the combined blocks to the switch, then from the switch to the board, from the board to the USB input. This process is also shown in the diagram.
This is perhaps the fastest way. Such a device will work even for an amateur due to its simplicity. Just 3 steps and your DIY external battery for your phone is ready.
What does a power bank consist of?
Any power bank has a simple internal structure and consists of several elements:
- batteries soldered together in parallel;
- control boards with converter, voltage controller, transistors and LEDs;
- temperature sensors;
- fuse;
- chip displaying charge level.
The electronic components of the power bank are enclosed in a plastic or metal case.
The operating principle of the external battery is very simple. When you connect a smartphone, the device begins to transfer the accumulated energy and quickly replenishes the gadget’s capacity in the absence of stationary sockets. The external bank itself is charged from the network, but it is not necessary to recharge it after each use. Typically, the device’s capacity is enough for several cycles of restoring the capacity of a standard smartphone.
The advantages of purchased power banks include not only reliability, but also compact sizes
Method 4. External energy storage with a solar battery
Another interesting option. As daylight hours begin to increase, it is timely to discuss the benefits of solar energy storage. You'll see how to make a portable charger that can be charged from solar energy storage panels.
- Lithium-ion energy storage 18650 format,
- Case from the same drives
- 5V 1A voltage boost module.
- Charge board for battery.
- Solar panel 5.5 V 160 mA (any size)
- Wiring for connection
- 2 diodes 1N4007 (others are possible)
- Velcro or double-sided tape for fixation
- Hot melt adhesive
- Resistor 47 Ohm
- Contacts for energy storage (thin steel plates)
- A pair of toggle switches
Read also: How a triac power regulator works
Basic circuit of an external battery
- Let's study the basic circuit of an external battery.
The diagram shows 2 connecting wires of different colors. Red is connected to “+”, black to “-”.
- It is not recommended to solder the contacts to the lithium-ion battery, so we will put terminals in the housing and secure them with hot glue.
- The next task is to place the voltage increase module and charging board for the battery. To do this, we make holes for the USB input and USB output 5 V 1 A, a toggle switch and wiring to the solar panel.
- We solder a resistor (resistance 47 Ohms) to the USB output, on the reverse side of the module that increases the voltage. This makes sense for charging an iPhone. The resistor will solve the problem with the same control signal that starts the charging process.
- To make the panels easier to carry, you can attach the panel contacts using 2 small female-male contacts. Alternatively, you can connect the main body and panels using Velcro.
- We place a diode between 1 contact of the panel and the energy storage charge board. The diode should be placed with the arrow pointing towards the charge board. This will prevent the solar panel from draining the storage battery.
How many charges will this Power Bank last? It all depends on the capacity of your battery and the capacity of the gadget. Remember that discharging lithium drives below 2.7 V is highly undesirable.
As for the charge of the device itself. In our case, we used solar panels with a total capacity of 160 mAh, and the battery capacity was 2600 mAh. Therefore, under the condition of direct rays, the battery will charge in 16.3 hours. Under normal conditions - about 20–25 hours. But don't let these numbers scare you. It will charge via miniUSB in 2-3 hours. Most likely, you will use the solar panel when traveling, hiking, or long trips.
Conclusion
Is it worth assembling the battery yourself? Firstly, this requires appropriate skills and a fairly large amount of free time.
But even if they are, it is necessary to find all the components of the device, and if batteries from non-working batteries are quite easy to find, then in most cases you will have to buy a charge controller.
Considering the cost of the controller, USB output and, in some cases, the converter, the economic feasibility of self-assembly seems minimal.
But if for some reason such components are at hand, then an additional power bank will not be superfluous.
Assembly process and diagram
We cut out holes in the case for the switch and USB input.
We solder the batteries according to the diagram, into two batteries of 4 each, and install them in the case.
Next we solder the batteries to the switch, and from the switch we solder them to the board, as in the diagram, and from the board we solder them to the USB input. See below for a photo of the finished device.
Materials
You can make your own external battery from any type of charge carrier.
The most common materials are:
- AA batteries;
- Batteries from old phones with sufficient capacity;
- Batteries from old laptop batteries.
In any case, regardless of the media you choose, you will need a charge controller to which the USB wire will connect.
Naturally, it is necessary to take into account that all media must be in good working order.
<Fig. 3 Solar powered>