A simple device allows you to create light illumination even where there is no electricity.
A garden lantern can be used individually or as a whole complex to organize decorative lighting for plants and stones. You can make a glowing solar-powered flashlight on your own.
Let's look at possible schemes for creating a decorative lighting fixture for a garden plot.
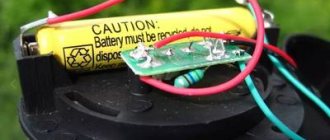
Wiring diagram of a garden lamp
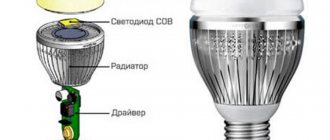
The operating principle of a solar lantern is very simple, regardless of the size of the device. For its operation, you will need a panel that will collect the sun's rays, a storage battery, a voltage converter, and a luminous element capable of receiving energy.
The elements are arranged in a chain that will work with the correct selection of LEDs and other parts.
Electronic circuit diagram for assembling an LED flashlight:
How does a garden lamp work?
The absence of a power connection makes the LED flashlight a very convenient and cost-effective way of lighting. During the day, while the sun is shining, the flashlight stores solar energy in its battery.
The weather must be cloudless and clear to collect light as efficiently as possible. Some flashlights have a controller inside that turns on the light as soon as it gets dark enough outside. Then the accumulated energy in the batteries begins to be consumed.
When completely discharged, the lamp stops producing light. The work looks like this :
- During the day, the storage panel converts the sun's energy into low-power electricity.
- The resulting energy is redirected to the battery using a diode.
- The positive potential through a resistor controls the absence of glow before dark.
- As soon as dusk or another type of dimming sets in, the transistor turns on (the effect is obtained due to a small positive potential in contact with the base) and starts the LED to glow based on the energy contained in the battery. The flashlight emits light.
- The light diode evenly doses the energy production from the battery to prevent complete discharge.
- As soon as it starts to brighten, the positive voltage cuts off the transistor, as a result of which the LED stops receiving energy to glow. During this period, the battery charging process starts again.
Simpler models without a controller accumulate energy and spend it evenly, providing glow at any time of the day.
Installation
The circuit consists of a minimum number of elements, so installation can be easily carried out using a hinged method. The length of the “legs” of the parts will be quite enough to perform soldering without the use of additional wires. After completing installation and checking the functionality of the manufactured luminaire, all joints should be insulated using a heat pencil or appropriate sealant.
For those who prefer to mount components on a printed circuit board, they can do so using a universal circuit board of suitable dimensions or one made independently.
Selection of parts for manufacturing
Most solar lanterns are created with solar panels that do not exceed 9 sq. cm in area. To make a lighting device with your own hands without using electricity, you will need electrical elements with the following characteristics :
- diodes from 1 to 1.5 volts;
- batteries with a storage volume of 3000 mA and a generated voltage of 3.6 volts;
- solar panels with a total area of 60x60x4 mm, which are distinguished by the production of 4.4 volts with 90 mA;
- for control you will need 4 MLT 20 kOhm resistors;
- transistors KT503;
- glass element as a lampshade;
- PVC base.
All the elements described above will be located on one board, which you can solder yourself. To simplify the process, you can find universal boards in radio stores that will allow you to quickly start working on an LED flashlight.
To create a circuit, you need to stock up on stranded copper wire, which will allow you to draw electrical paths.
A maximum of 4 flashlights can be included in one circuit. With proper assembly, this lamp will work much longer than the purchased one.
To assemble an LED flashlight, you will need not only to select suitable materials, but also to take care of the tools :
- drill;
- stationery knife;
- soldering iron with solder;
- pencil.
Step-by-step instructions for creation and assembly
The first thing to choose is a beautiful lampshade. You can make it from a coffee can, bottle, shot glass or any other glass form. It is best to select a small container that will allow the light to spread as much as possible around the perimeter of the area.
You will have to work according to the following plan:
A hole is made in the bottom of the glass container with a drill.
The procedure should be carried out after the glass has cooled to avoid injury. Hold glass containers with gloves and do not press too hard to prevent the glass from breaking.- A base is created that is suitable in size for the neck of the glass container. You can cut it out of PVC yourself using a stationery knife, or at an advertising agency (thanks to the latter option, it will be perfectly smooth).
- A furniture nut or any other bolt is installed into the base using a soldering iron.
- a circuit is assembled to which all the necessary elements are soldered.
- The PVC base is degreased using an alcohol solution or solvent. The coating substance should not touch the electrical parts of the solar cell, otherwise it will not work.
- The solar battery is attached to the PVC base using super glue, you can use the moment.
- Excess glue is removed with a clean napkin.
- Use a drill to make holes in the bottom for the wires.
- We pass them through and seal them.
- We take a PVC tube with a diameter of up to 5 mm and cut it to fit the base for the diode.
- On a PVC base in the center of the future flashlight we place LEDs in a tube.
- We solder the LEDs together with the wires and protect them with a special varnish.
- We connect the lampshade and the base with the working elements.
- Additionally, we protect the board from scratches with varnish or other transparent compound.
When connecting the PVC base and the glass bulb, you should use sealant or glue to prevent moisture from passing through it. As a result of this simple action, it will be possible to increase the service life of wires and other elements.
For flashlights, you can use stands of any diameter and size. They are created from PVC pipes and then painted in the desired color. You can make a low lantern near the ground, or organize a tall lamp, which will serve not only as a lighting device, but also as a beacon.
Bugs and difficulties
When creating an LED lamp, many people make the simplest and most common mistake - they solder the circuit elements in the wrong sequence. You can avoid it if you strictly follow the electronic diagram and do not deviate from the step-by-step plan for creating a flashlight.
Difficulties may arise at the stage of sealing and degreasing. All procedures must be carried out carefully so that individual elements of the circuit are not damaged.
The following substances should be handled with care:
- solvent and degreaser;
- Super glue;
- solder for soldering iron.
All work must be carried out wearing a mask and gloves to avoid damaging your eyes and hands. For the first time, creating a lampshade from a glass container may not work out, so it is better to prepare two containers at once. One will serve as a prototype, and the second will be used for the lamp itself.
DIY garden lamp made from a tin can
So, how to make a garden lamp with your own hands from a tin can? To do this you will need cans, nails, a hammer, clamps for fastening, two rectangular wooden beams fastened together, and small candles.
At the first stage, prepare the work surface: fasten the beams and, using fastening clamps, fix them. This is necessary in order to protect the tin can from deformation during drawing. The second step is to select and apply a pattern to the paper that will decorate the jar. Attach it to the can (or you can use a felt-tip pen to dot the pattern directly onto the can) and put it on the piece of wood. Then use a hammer and nails to transfer it to the light fixture. The third step is to install the candles inside the tin can. It will help to gently diffuse the light through the holes.
Experiment with different nail sizes to create a unique design.
Let us note that making a lantern from such a garden lamp is as easy as shelling pears. To do this, you need to attach a simple metal wire to the can.
Pros and cons of a homemade device
In country houses there are often interruptions in electricity, or it is completely absent. The desire to make a lighting design for a garden plot can have great difficulties when laying wires. DIY LED flashlights will help solve the problem.
Their creation and use is associated with the following advantages :
can be made from inexpensive scrap materials;- do not require professional skills during assembly;
- easy to install and dismantle as needed;
- does not require any energy source other than natural light;
- does not involve expenses during operation;
- environmental friendliness of the device.
Despite the visible advantages, a homemade LED flashlight also has some disadvantages :
- In order for the flashlight to work, you will have to work on quality connections;
- if you install it in a dark place, the batteries will not be replenished and the LED will light up;
- when working on a lamp you will need to use tools that not everyone knows how to use;
- you will need to purchase some parts for the circuit board and organizing the parts of the lamp, which contributes to costs;
- cannot be repaired if broken.
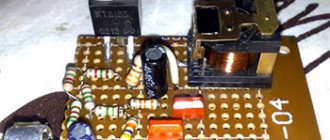
Electrical diagram
Shown here is the simplest diagram that even a novice craftsman who has never created garden lamps and other similar products can figure out. The system has only 7 components.
Using this diagram, assembling a garden lamp will not be difficult.
To understand the diagram and understand why certain parts are needed, you need to consider how the finished product works:
- When sunlight hits the surface, the transistor is in the off state. Therefore, the accumulated energy is supplied to the battery and charges it.
- After sunset, when no light reaches the photocell, the transistor opens and voltage is supplied to the LEDs. That is, the equipment is charged for as long as possible during the day, and turned on at dusk.
- The operating time of the lamp directly depends on the battery capacity and the power of the LEDs used in the design. Usually the components are selected so that they are enough for 6-8 hours of work.
Approximate expenses
The cost estimate for creating a garden solar lantern is difficult to estimate due to the difference in design elements. If you use available materials, the costs will be small. To purchase a board and other radio components you will need no more than 500 rubles.
The most expensive part will be the solar panel . Its cost can start from 10 rubles to 1000 rubles, depending on the quality of the product and the brand. The most expensive elements will last a long time and delight the owner of the site with bright light.
Cheap boards break quickly and may not work immediately after manufacture. Additional costs may include PVC pipes. The best option is to find an alternative to them, or use existing supplies.
The expense table might look like this:
| Details | Price | Quantity | Purchase amount |
| Solar panels | 170 rub. | 1 PC. | 170 rub. |
| Storage battery | 220 rub. | 1 PC. | 220 rub. |
| LEDs | 12 rub. | 3 pcs. | 36 rub. |
| Resistor | 2 rub. | 6 pcs. | 12 rub. |
| Transistor | 5 rub. | 3 pcs. | 15 rub. |
| Diode | 3 rub. | 3 pcs. | 9 rub. |
| total amount | 462 rub. |
A budget option for one LED flashlight will cost about 500 rubles, according to the table. You can purchase what you need to create it in bulk in order to collect several products of this type at once, then the total purchase amount will be even lower per unit of luminous device.
Review of solar wall street lights with motion sensors
Pros:
- Does not require electrical wiring. Bought it, attached it and use it.
- Energy saving.
- In the conditions of central Russia, solar-powered street wall lamps without motion sensors do not shine all night long, since the battery does not have time to fully charge under our usually gloomy sky. The motion sensor saves battery power.
Minuses:
- The mounting location of the lamp should be such that the solar battery is located in direct sunlight.
- In winter, snow falls on the solar panel and it stops working.
- The battery will have to be replaced sooner or later.
- They only light up when a person walks by. For decorative lighting of the landscape, you should use lamps without motion sensors that illuminate the space constantly.
Popular model with good design. There is a motion sensor, the operating range depends on the location of the lamp. LEDs - 16 pcs. Protection level: IP65. Li-ion battery: 3.7 V, 1000 mAh. Brightness: 100 lm. Price: 929 rubles for 2 pieces. ..
Plastic case. Protection: IP65. Lithium rechargeable battery 3.7 V / 900 mAh. LEDs - 16 pcs. Weight: 185 g. The motion sensor is triggered at a distance of 3-5 m. Price: 428 rubles.
Popular and nice model with a motion sensor. The sensor's response range depends on the location of the lamp. Aluminum body with plastic. LEDs - 20 pcs. Color temperature 5500-6000 K. Protection level: IP55. Battery Ni-MH 1000 mAh/3.7 V. Brightness: 340-600 lm. Price: 841 rub. ..
A convenient design with a loop allows you to easily remove the lamp from the wall (for example, to put it away for the winter). According to the seller, the motion sensor works for 8 meters (in reality it is probably less). The light turns on for 20 seconds and if there is no movement within the sensor's coverage area, the light turns off. Quite dim, LEDs - 6 pcs. Lithium battery: 600mA, 3.7 V. Price: 964 rub. .. There may be cheaper ones in a white case, but we managed to find them only for 822 rubles. ..
Housing made of stainless steel and plastic. Housing protection IP65. Lithium battery 3.7 V / 2200 mAh. LEDs - 8 pcs. The light is warm white or cool white to choose from. Two operating modes. When there is no movement, the brightness is 20 lumens. When a person passes by 2000 lumens - 18 seconds. Price: 587 rub. ..
Two body color options (black and white). Protection level: IP65. Several operating modes. One of them lights up dimly, but when the motion sensor is triggered, it lights up at full power. The way the lamp is mounted makes it easy to remove it from the wall. Li-ion battery: 3.7 V / 1000 mAh. LEDs - 16 pcs. Price: 696 rub.
Solar-powered LED wall-mounted street lamp with a rotating mechanism. LEDs: 18 pcs. Housing protection degree: IP65. Price: 1,039 rub. ..
LED wall street lamp powered by a solar battery. LEDs: 17 pcs. Housing protection degree: IP65. Price: 317 - 1,265 rub. ..
46 LEDs. Lithium-ion battery 3.7 V / 1700 mAh. Protection level: IP65. Body color black or white. There is a motion sensor. Price: 1,272 rub. ..
Bright lamp with 118 LEDs. Housing protection: IP65. 3 operating modes. Motion Sensor. Price: 1,033 rub. ..
Wall lamp with 14 LEDs with a rotating mechanism. Brightness - 70 LM. Housing protection: IP65. Motion Sensor. Price: 1,742 rub. ..
For sections of walls located in the shade, outdoor wall lamps are used to allow the solar panel to be exposed to the sun.
Outdoor LED lamp with remote solar battery. Brightness: 180LM. Motion Sensor. LEDs - 56 pcs. Price: 1116 rub. ..
Outdoor LED lamp with remote solar battery. Housing available in white or black. Motion Sensor. Brightness: 450 LM. LEDs - 22 pcs. Price: 828 rub. ..
Outdoor LED lamp with remote solar battery. Motion Sensor. Brightness: 750 LM. Price: 1900 rub. ..
Outdoor LED lamp with remote solar battery. Housing available in white or black. Motion Sensor. Brightness: 1000 LM. LEDs - 188 pcs. Color temperature: 6000 K. Price: RUB 2,704.