Design Features
Spotlights equipped with LEDs consume less electrical energy. Their maintenance is minimal and low-cost. Their service life is up to 90 thousand hours. They can be installed not only in the room, but also outside. Such devices do not deteriorate due to unfavorable negative conditions. The design of floodlights allows them to emit a lot of light.
You can make a homemade LED spotlight. If any breakdowns occur, they will not be difficult to fix.
The LED spotlight consists of several parts:
- Case boxes;
- Staple;
- Matrices. The diodes are attached to the board and protected from damage by special polymers;
- Drivers.
Diagnostics
First of all, it is necessary to determine the cause of the LED spotlight malfunction. As an example, let's talk about checking the performance of a rectangular Volpe spotlight with a matrix including 9 diodes. The total power of the lamp is 10 W. The luminous flux is 750 lm.
The check is carried out in the following order:
- Inspect the wiring for physical integrity. Check for breaks, burnt insulation, or kinks in the cable. The purpose is to ensure that there are no breaks in the conductor.
- Check the device body, as well as the LED matrix for mechanical damage (deformation, chips, cracks).
- The next task is to check the input voltage by opening the back panel of the case. The input voltage should be 220V (AC). If there is no voltage, the cause of the breakdown is not in the lamp, but in the electrical circuit. Measurements are carried out with a standard multimeter. The output voltage is 12 V (DC).
- If there is no output voltage, the breakdown is looked for on the converter board. Inspect the contacts for oxidation, look for cracks in the tin coating in areas of soldering or burnt-out elements.
- If the above verification methods do not produce results, test the performance of the matrix.
Electrical and technical specifications
If you are making a homemade spotlight, first check the features of its electronics. This way you can get the job done efficiently and eliminate the influence of high temperatures on the device.
Solid-state semiconductors respond negatively to temperature changes. This leads to their degradation and reduction of alloying additives.
If the active panel of the device heats up to a critical temperature of +60°C, the intensity of the emitted light will decrease or a complete breakdown will occur. Remember, the higher the power of the LED, the less time it will take to fail because it will overheat.
When you make a device at home, take care to create a high-quality heat removal system. Divide the emitter into a thoughtful number of parts and arrange them correctly. The choice is up to you: parallel or serial. If a simple type of spotlight is being manufactured, only one radiation element can be installed.
Fastening components
Before you start assembling a powerful spotlight, stock up on parts and components. If you have a car, some of the components will be found at home. The remaining part can be purchased, or borrowed from friends.
To make a lantern with your own hands you will need:
- LED matrix equipped with a driver. Such parts are installed on poles with lamps that have stopped working. All you have to do is replace the lamps that have failed. You can buy a new part at an electrical goods store.
- Frame. It can be made from metal parts and plywood. A halogen flashlight is suitable for the housing. You can find an old one that you use for fishing or hunting, or you can buy a new one.
- Wires for connecting parts and connecting the device to the electrical network.
- Foil for reflector. You can purchase this material at your nearest store. Choose tapes with high density.
- Tough glue.
- Sealant.
- Radiator for cooling.
You can see the entire tool here. The tools that are useful for making a flashlight include:
- grinder;
- welding machine;
- a drill equipped with a drill;
- soldering iron;
- solder.
Step by step process
To make a mini anti-aircraft searchlight with your own hands, follow the step-by-step instructions. The assembly technology will be discussed in more detail below.
Drawing and diagram
You need to study the LED connection diagram. The power of one radiating element will not be enough. So prepare a few pieces.
Most often, the circuit provides only one circuit, consisting of several or one LED. Most circuits work on the same principle: LEDs are connected to a matrix where a current-limiting resistor is installed. Instead of an electronic current stabilizer, you can use a driver.
Frame
If you choose a case, this can be done in several ways:
- First, select a “box”, and then select all the necessary parts based on its size. Use this option if the dimensions of the spotlight and mounting are more important.
- If the priority is the power of the device and the flow of light, choose the housing last.
There are several methods for selecting a shell for a spotlight:
- Use an old unnecessary spotlight - from a headlight or a long-range flashlight. It can be either halogen or incandescent. Take it apart and get rid of the old filling.
- Shop body. Despite the costs, this method is more advantageous in technical and aesthetic terms. You can also make a spotlight on a tripod with your own hands, so it will be higher.
- Make your own body. To do this, use available materials.
When choosing a case, keep in mind that it must be multifunctional: protect the internals and serve as a radiator to remove heat from the LEDs. If the spotlights will have a power of more than 50 W, choose aluminum structures. They have greater thermal conductivity.
Lamp selection
To select a lamp, use the following parameters:
- Power of the finished device. If the spotlight is less than 30 W, then there is no point in creating a lighting device. Popular options are with a power of 50 W or more. The maximum amount of light is provided by spotlights with a power of 100 W or more.
- Voltage. In order not to look for a power source, set the voltage to 220 V. If desired, you can install LEDs at 12 V to recharge from the car network. You can make a battery-powered spotlight by inserting batteries into it.
When choosing LEDs, consider the following parameters:
- LED voltage;
- operating current.
Collection
- You need to start assembling the spotlight from the matrix. It is formed from LEDs to which a resistor is attached. Assembly is carried out on foil or a canopy. Consider the heat dissipation design in advance.
- You need to form a reflector. To do this, cover the compartment with LEDs with foil.
- When the matrix is ready, it is attached to the body. To do this, use a soldering iron and solder. Don't forget to remove the power cable or install batteries. If everything is calculated correctly, after turning on the device, it will light up brightly.
Replacing parts
Eliminating broken wiring does not require special qualifications from a home technician. It is much more difficult to find and fix a breakdown on a printed circuit board, driver, voltage converter or matrix. You can’t do this without special knowledge. You will also need the ability to work with diagnostic instruments and a soldering iron.
The following parts may be subject to repair or replacement:
- limiting capacitor;
- power unit;
- driver;
- matrix.
Current limiting capacitor
This component causes a malfunction when the spotlight lamp burns unevenly, constantly flickering. This problem is usually associated with the fact that manufacturers, in an effort to save money, install a current limiter that does not match the characteristics of the driver.
power unit
A common cause of malfunctioning of the spotlight is a breakdown of the power supply. In such a situation, you can purchase a new power supply or pick up this part from another device (for example, from a printer). If you decide to buy a new unit, it is recommended to take it with you to the store, since its technical characteristics are indicated on the case. To get the block, you first need to disassemble the spotlight.
Driver
Low-power models often lack a power supply. In such cases, an LED driver is used instead of a block. Since the diode is not able to receive power directly from the network (an alternating current other than the mains is needed), the driver is used. The device operates based on operating temperature and time, changing the output current to the LED.
To replace the driver, you should disassemble the spotlight to set the technical parameters of the driver, and then contact the store. Just as in the case of a power supply, you can select a suitable driver from another device.
Matrix
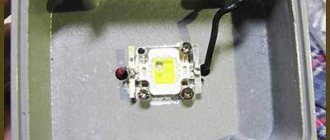
The most common cause of spotlight malfunction is excessive heating of the matrix, which leads to blown fuses. The spotlight is disassembled, after which the damaged matrix is taken out. To do this, unscrew the four screws and solder off the conductive parts. Next, apply a layer of thermal paste to the LED and solder the conductive parts back. The operation is completed by screwing the matrix into place.
In some cases, the wiring in the matrix goes through the holes in the substrate. It acts as a matrix radiator. In the transition areas, the wires must be covered with an insulating layer (primarily we are talking about the positive wire). This will avoid a short circuit to the device body.
Advice! Before replacing the matrix, you should clean the substrate and the area where it will be installed. It is recommended to treat these areas with a heat-conducting compound.
The shape of the matrix must not be disturbed. It is recommended to use only “original” screws so as not to damage the design. Also, do not forget about the polarity: the red wire is positive, the black or blue wire is negative, the green-yellow wire is directed to the body.
If at least 2-3 burnt-out diodes are detected, you should not wait for the matrix to burn out completely. In any case, the device is no longer able to function normally, as a result of which the drivers and voltage converter will soon fail.
Note! If the matrix does not work with a filled compound element, it cannot be restored.
Voltage converter circuit board
If, when checking the board, obvious signs of burnt-out elements are found, the device will need to be repaired. The figure below shows a converter circuit for a spotlight.
Before replacing non-functioning parts, you should ring the LEDs. First, one of the board legs is unsoldered, since ringing the soldered elements will not give the correct result. If necessary, burnt out parts are replaced with new ones.
Low power floodlight repair
As an example, let's look at the repair of the SDO01-10 floodlight. Device power - 10 W. An external inspection shows peeling of the protective coating on one of the floodlights. There are also dark spots on the light-emitting surface of the matrix.
Repairing a matrix with a damaged LED emitter is possible, but such a part is not cheap. The cost reaches 40-50% of the price of the entire spotlight. In addition, purchasing a new matrix presents another difficulty - most often there are no markings on the LEDs. As a result, it is not easy to determine the type of emitter.
To simplify the task, we install the spotlight driver from the burnt-out matrix to a lamp with a working matrix. On the old driver, the protective resistor burned out (its value is 1 Ohm), which indicates a breakdown of the diode in the diode bridge at the transition from the key resistor to the control resistor. However, replacing the driver did not restore the functionality of the spotlight.
After further testing, a break in the optical feedback pair was detected. Replacing the pair gave results - the lamp started working.
How to use a spotlight
Most often, homemade LED spotlights are used to illuminate the yard, garage or other local areas.
You can use your imagination and make a more advanced model - make a portable device (on a tripod, which was mentioned earlier), which can be used for studio photo or video shooting.
Small spotlights with a power of up to 24 W can be used to illuminate car interiors. You can take them with you on picnics and create additional standard lighting. Before the New Year holidays, you can decorate the building with homemade spotlights.
Knowing how to make a reflector for your home, you understand that it is not difficult. This will require simple materials and tools, and the assembly process will take 2-3 days. If everything is done correctly, you can create original lighting fixtures that will decorate your home area.
Useful tips
Some useful tips for repairing LED floodlights:
- When replacing the matrix, be sure to pay attention to the polarity.
- Be sure to remove the hardened heat-conducting paste under the matrix.
- The surface should be degreased with alcohol.
- When soldering, you do not need to overheat the surface. Soldering time is up to 2 seconds. If the matrix is overheated, the crystals will be destroyed or their new characteristics will not allow the spotlight to function normally.
- To repair a high-power spotlight, the knowledge used in repairing low-power lamps is sufficient. There are no special differences between devices of different power.
- If a matrix with a large number of diodes is not filled with a compound solution, the non-working diode will need to be replaced. To perform this operation, a micro-soldering iron is required. You need to work carefully so as not to overheat the crystals.
- If it is impossible to see the values on the burnt-out resistances, you cannot do without the instructions for the spotlight. It must contain the relevant data.
Anyone can fix a spotlight. However, to perform repair work, at least basic knowledge of electrical engineering is required, as well as skills in using a soldering iron and a multimeter. You also need the ability to read diagrams to understand the design of the spotlight.
