Ready-made factory furniture is not always diverse, and the cost of unusual and high-quality models is sometimes high. Why not try making your own furniture? If you don’t have confidence in your own abilities, then you can start with a simple coffee table. Making a table with your own hands is not so difficult; you can use not only ordinary wood, but also wooden boxes. The structure can then be treated with varnish or stain. The result is an unusual and durable model.
In order to make a beautiful table, you don’t need to buy expensive materials at all; you can make it from ordinary boxes.
Attaching the apron
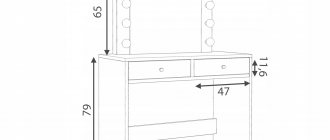
Cut two more pieces of 5 by 20 cm board, 80 cm long, and two boards of narrower boards equal to the narrow side of the tabletop. The boards must be flush against each other. Apply wood glue to the wide part of the boards and attach them to the edges of the tabletop and screw them in place with self-tapping screws at a 45-degree angle.
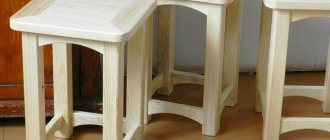
Table legs
From a timber with a section of 10 by 10 cm, cut out 4 legs of the future table of the desired height. We recommend choosing a height of 40-45 cm.
Also cut two pieces of 10 cm thick timber 65 cm long and two pieces 48 cm long.
Painting
To make your homemade coffee table look beautiful in photos and in real life, paint its legs and tabletop.
For natural wood, you can use your favorite color of paint or stain and varnish.
Before painting, it is better to sand the wood with sandpaper.
Preparatory work
In order to make a coffee table yourself, you will need not only drawings, but also materials and tools. Stock up on the following construction equipment:
- wood (solid wood);
- water-based coating varnish;
- solvent;
- acrylic paint;
- brushes;
- self-tapping screws;
- jigsaw;
Material for making a coffee table
- screwdriver;
- grinding machine;
- milling cutter;
- drill.
As for wood, the best choice would be solid pine 2.5 cm thick. In accordance with the drawing, the parameters of the coffee table, which you plan to make yourself, are 1.5 m x 0.5 m.
Attention! The table does not need separate legs.
Varnish is necessary to cover the finished structure; in total you will need about 0.3 liters of it. It is better to purchase acrylic paint with glitter. With its help you can give an unusual look to an interior item. The table will be assembled using self-tapping screws. Their size should be 4 x 60 and 4 x 40 mm. As for other tools and materials, there are no special requirements for them.
Table made from scrap materials
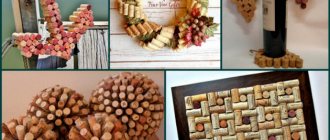
If you are wondering what you can make a coffee table out of, any available materials will come to your aid. The main thing is that the table has legs and a flat top surface. We offer you several ideas for creating a coffee table from unusual materials.
From books
Another option for libraries is an elegant bedside table made of folios. It's easy to turn your idea into reality:
- Find books that are suitable in appearance (thick, with bright covers).
- Stack the books on top of each other in a chaotic manner and glue them together.
- Secure the glass surface on top with silicone glue.
Transformable table made of drawers
You can make a table based on wooden boxes in which fruits and vegetables are transported and stored.
Let's say you found new or vintage drawers, now we'll make a transformable coffee table:
1. Paint or varnish the boxes to your taste, let dry;
2. Lay the drawers on their sides and align them to form a square;
3. Secure the drawers with self-tapping screws.
The upper, flat part of the drawers will become a tabletop, and their side parts can be used to store magazines or teaware. Turn the table over and put it on its end - you get a shelving unit.
Pallet table
If you have a wooden pallet, it can serve as the base for a coffee table. For this craft you will need furniture legs. You can buy them at a hardware or hardware store. You can also cut the legs from the timber yourself.
To make the tabletop smoother, cover it with plexiglass or a piece of polished plywood.
Parts of the table are painted if necessary, and then the legs are screwed in.
From a barrel
The photo of a handmade coffee table made from a barrel is also attractive: the original furniture looks aesthetically pleasing and practical. In addition to its direct purpose, there is also a “bonus” - the ability to store various small items inside. The algorithm is as follows:
- Cut the wooden barrel in half.
- Make a tabletop-lid and “edging” from timber.
- Place the half-barrel on the legs.
- Paint and varnish.
Tabletop from the door
An old wooden door can also become a countertop.
File about half of the door.
Paint the tabletop and legs.
Attach the legs to the door using self-tapping screws and metal corners.
Coffee table-window
If you have replaced old wooden windows with plastic ones, do not rush to throw away what is left. An entire window along with a wooden frame will decorate a table in a vintage style.
To make the table more durable, secure a sheet of painted chipboard or several boards fastened together under the tabletop-window.
Screw the legs to the tabletop.
From cuts
Several flat cuts, arranged in a “ladder” or in another fancy shape, will become an original addition to the interior. The main thing is to securely fasten the elements together.
Suitcase table
An old suitcase can also be used to create a storage table.
Cut two pieces of plywood to fit the inside of the suitcase and glue them to the bottom and lid of the suitcase from the inside. This is necessary to make the table surface more durable.
Screw the legs to the bottom of the suitcase using self-tapping screws or self-tapping screws.
When closed, you get a table, and by opening the lid, you can put magazines, dishes and other things in the suitcase.
Instruction No. 2 – creating a coffee table from a suitcase
Do you have an “old-school” suitcase in your closet at home that has been a travel companion for your family members on more than one occasion, but has long been out of order? It’s not for nothing that you didn’t raise your hand to throw it away, because today we will tell you how to turn it into a functional and stylish coffee table.
Old suitcase as a coffee table
Step No. 1 – collect the necessary materials.
This original table can be made in several variations. To bring our idea to life, you must first collect the following items:
- short legs made of metal or wood (for a table that will move, wheels are needed);
- screws;
- plywood;
- screwdriver;
- drill with thin drills;
- ruler.
Such a table can become an element not only of an apartment, but also of an office.
Having collected everything you need, let's start making the table.
Step No. 2 – attach the legs.
Draw points where you will then drill holes.
So, now on the bottom of the suitcase you need to use a ruler to mark three points located in the corners in identical positions, and then drill a hole in their place.
Drill the suitcase
We will bring the legs to the suitcase, but it will not be possible to hold the fastener on the fabric, therefore, we will need to lay plywood inside, in which holes will be made at the same points as on the suitcase.
Now we attach the legs using fasteners.
Attach the legs to the suitcase and plywood at the same time
Step No. 3 – decorate the table.
That's it, our suitcase-table is ready! All that remains is to decorate it according to your own understanding. We suggest you use the following as decorative elements:
- icons with flags of different countries;
- tags left over from flights;
- stickers;
- brands, etc.
Here your imagination is not limited by anything, the main thing is to keep the look of the suitcase-table aesthetic, and not “drown” it in stickers.
It is not at all necessary to turn a suitcase into a coffee table by blindly following these instructions. In fact, there are many more options available, for example:
- the suitcase can be painted with spray paint;
- the suitcase can be covered with small mirrors;
- The suitcase can not be placed on legs, but placed on the floor without them, especially if it is large;
- the surface of the table can be made inside an open suitcase with an open lid;
- you can put a small suitcase on top of a large suitcase and make a table in several tiers, etc.
In general, nothing limits you, only the flight of your imagination. Listen to him and take action.
The final version can turn out to be absolutely anything
Coffee table from dining room
You can give a second life to your boring dining table. We offer you instructions on how to make a coffee table out of a dining table.
First you need to decide on the desired height of the table and the size of its tabletop:
1. Unscrew the table legs;
2. Using a circular saw or handsaw, saw off any excess from the dining table top;
3. Sand the ends of the tabletop with sandpaper;
4. File the table legs to the desired length;
5. Paint the table the desired color;
6. Attach the legs to the new coffee table.
Instruction No. 1 – creating a coffee table in a marine style
The marine style has been and remains one of the most favorite design styles for various pieces of furniture of our compatriots. Perhaps the fact is that only dreams of the sea warm us in the winter cold, or it is some kind of subconscious craving for the secrets of the depths. We are not given the opportunity to find out the reason for the enduring love for the marine style, however, we can quite rekindle it even more by assembling a coffee table with our own hands and using all the attributes of our favorite interior design in it.
Here's an unusually beautiful table you can make with your own hands
Step #1 – necessary materials.
So, in order to bring our planned marine masterpiece to life, we must first collect the materials and tools with which our idea will be realized.
So, the following are subject to collection:
- handle for a rake (about 140 centimeters in length);
- old window frame;
- if the frame contains something broken, tarnished, etc. glass, you will also need two sheets of window glass (one regular, the other 4 millimeters thick);
- sandpaper of various fineness;
- end cutters;
- white acrylic paint;
- saw;
- rubber or felt coasters;
- thin hemp rope;
- paint scraper;
- drill with a set of drills;
- wooden boards;
- various decor (glass pebbles, artificial starfish, clean sand, etc.).
We will make our table from half of an old window frame like this
Having collected everything we need, we will proceed to the step-by-step production of the table.
Step No. 2 – process the window frame.
So, take the previously prepared window frame and start cleaning it of old paint and dirt:
- first remove the base layer with a paint scraper;
- then with sandpaper, first coarse-grained, then fine-grained.
First of all, it is necessary to remove all dirt from the frame.
Treatment from dirt and roughness must be done carefully. Otherwise, our product will never look like a piece of furniture, but will remain an old window frame.
The old layer of paint is removed with a paint scraper, and subsequent contamination is removed with sandpaper of various grains.
After complete processing, it will be necessary to deal with the glass. So, if the glass is intact and does not look dull, there are no cracks or scratches on them, then their surface should simply be washed thoroughly with a special product, or using ordinary hot water and soap.
If the glass is intact, it does not need to be replaced with a new one.
If the glass is cracked, you will have to pull out their fragments and replace them with purchased new sheets of transparent material. Finally, using end cutters, the metal corners that previously played the role of frame clamps are removed.
The final stage of frame processing will be as follows:
- applying several layers of white acrylic paint to the cleaned product alternately;
- waiting until the layers of paint dry.
Carefully paint the frame white with fresh acrylic paint.
When it becomes clear that the frame is completely dry, you will need to take sandpaper and rub the part a little in some places in order to make the wood show through. This way, you will create a perfectly aged look for the product.
Step No. 3 – making legs for the coffee table.
So, take a previously prepared rake handle, and using a jigsaw or saw, divide it into equal parts, each of which should be approximately 35 centimeters.
Using a saw, divide the handle into several parts to obtain four pieces that will serve as table legs in the future.
Each cut piece will need to be sanded with sandpaper. Then determine where the bottom of each cutting will be and place a stand on it from:
- felt;
- rubber.
It is best to attach the stands with glue, but you can also attach them to a self-tapping screw.
These overlays are perfect for your homemade rake handle legs.
Step No. 4 – cut out the parts from the boards.
So, now you will need to take wooden boards and cut them into blanks the same width as the frame. In this case, the length of each part should be 8 centimeters.
Sand the cut parts with sandpaper
Sand the base of each part with sandpaper, and then make holes in it in four places, as shown in the picture. They will be needed in order to attach the cuttings.
Cutting out holes
Step No. 5 – putting the details of the coffee table together.
Using self-tapping screws of the longest available length, we place each leg on a wooden base. After which we attach the parts to the frame using any available fasteners, also with self-tapping screws.
Place the part with attached legs onto the frame
Now watch carefully. The part of the frame to which the legs are attached will be located at the bottom. It is on this that we will lay out decorative elements. However, we need to wash and degrease both glass parts:
- the one that is already part of the frame;
- glass purchased separately.
Both sides of each glass need to be treated.
While the glass is drying, braid each leg with the rope you have prepared. Both ends of the rope will need to be glued to the legs:
- one at the base;
- the other at the junction of the leg and the table.
Now we need to carefully glue the rope directly to the handle, repeating this action for each of the legs
Step No. 6 – decorate the product with “seafood”.
Now you need to scatter the seafood in the frames. Perfect for this:
- sand;
- glass colored pebbles;
- imitation of sea inhabitants.
Decorate the table with items with marine symbols
It is advisable to fasten all the elements in the frame with glue so that they do not bunch up, thereby breaking the composition you created with such care.
Step No. 7 – place the glass on the workpiece.
Take glass 4 millimeters thick and cover the box you made with it, leaving about 2 centimeters of the former window frame uncovered on each side.
Please note: first, in the workshop, you must ask the 4-mm glass to be ground so that its edges are rough, and also that there are 4 holes along its edges, each of which will have a diameter of 4 centimeters.
Cover the frame with glass, leaving free edges on each side
It is also necessary to stock up on rubber gaskets and place them under the fasteners when you “seat” the mirror onto the frame using self-tapping screws.
Screw in the screws carefully, because the glass may crack and you will have to make a new one, spending money again.
Step No. 8 – decorating with ropes.
Take the same rope that was used to cover the cutting legs we made. Then tie an oblong knot from it, going around the frame on all sides with rope, and gluing the rope on all its sides.
If you know how, tie a sea knot
When the loop of the not yet connected corner reaches the free end of the rope, thread them, if you know how, so that you get a sea knot.
Afterwards, the rope will need to be doubled, pulled in the opposite direction, and glued again to the frame.
If desired, the outer corners of the table can also be decorated with the kitsch that lies inside your frame. Hurray, the table is ready!
The table could use ready-made decor
Useful tips
Look for upcycling materials at flea markets. In such places you can find antique doors, windows, and fittings that will form the basis of your craft. Moreover, they will cost mere pennies.
Pallets, boxes and scraps of boards and plywood can often be found on special stands in large hardware stores. The trimmings are subject to write-off, so they are given away free of charge.
You can even use waste material to create tables. For the countertop, you can use old tree stumps, metal or plastic barrels, even bottle caps or drink cans glued together.
Don't be afraid to show your imagination. Frequently visit flea markets and yard sales and let the materials tell you what you can make with them.