Very often in kindergarten and elementary school children are asked to do a craft. As a rule, this fate does not pass over parents, who always help their children in everything. Children often practice postponing everything until later. They hold out until the last minute and towards the end of the night they admit that they need a craft by tomorrow morning. There are no prepared materials for the assignment, and you don’t want to get a bad grade. In this article we want to talk about how to quickly make insects with your own hands from scrap materials.
Question answer
Wouldn’t it be funny to paint a fence made of corrugated sheets with pictures, since it’s already painted at the factory?
It is very easy to draw on a fence made of corrugated board. If you are confused by its color, select patterns, scenes, ornaments that can be painted in combination with the background of the fence. It is acceptable to make large drawings of cartoon characters, landscapes, and still lifes.
What place in the garden is better to allocate for a pond?
For a pond, it is precisely undesirable to be located in the garden shade. The water will begin to bloom, become polluted, and become covered with a film. Try to arrange an artificial pond in an open place, and plant low ornamental plants around it. Stones, flagstone and other available materials are suitable for landscaping the area along the edges of the reservoir.
It’s rare to see a dacha without flower beds and flower beds. Therefore, I think that they will not surprise anyone. Is it possible to plant them with some expensive and rare plants?
Considering the assortment of flower shops, it is hardly possible to surprise anyone with an exhibition of purchased flowers. But it’s not worth overloading flower beds or flower beds with many plants. Everything should always be in moderation so that it pleases the eye. Your own ideas, embodied in your summer cottage, may surprise you.
We sew a funny fly as a gift
I want to share with you how to make an original fly as a gift from a whistle and ordinary materials.
You will need materials:
Tools:
So, let's begin!
Here's an item - it's a simple whistle!
Oh, and he didn’t give me peace for a long time. Until the idea of making a fly out of him matured in my head.
Well, once you have an idea, urgently implement it!
I will compose as the action progresses.
1. Let's draw a pattern:
We are looking for suitable fabrics in the hamster reserves. Great! I found artificial green suede for the abdomen and torso.
2. Cut out the details:
3. Sew, leaving a hole for the whistle and for turning:
4. We cut the seams and turn them inside out. We attach the whistle to the body. Who knows: either we sew it in or we glue it in. I managed to sew it in quite well:
5. We stuff the torso and abdomen with holofiber:
6. Connecting the parts to each other:
Let's move on to the wings. At first I thought of making them from two types of knitwear. Then suddenly a mesh was found and therefore we have wings made of three types of fabrics: silver and blue knitwear and mesh. Accordingly, there are six wing parts.
7. Cut out the details:
8. We sew the parts together, leaving holes for turning. Preparing the wire for the wings. To do this, bend it along the contour of the pattern. To prevent the wire from clinging to the fabric, twist its ends together and wrap them with insulating tape:
9. We turn the wings inside out and insert the wire frame into them:
10. We sew up the hole and sew wire along the edge of the wings:
11. The wings are ready. We sew them to the body and give them any shape. I got it like this:
12. Let's move on to the paws. We make 3 wire blanks. We bend the edges of the wire:
13. We take the cord, melt the edges with a lighter, and thread the wire into it. We fix the ends. I simply sew to the wire fold:
14. We sew the finished legs to the body and shape them. Our fly turned out great! Hooray!
But I want some zest.
I need a fly as a gift and with meaning. So we make the inscriptions: “ If anything happens, WHISTLE” and “ . ”
The inscription can be embroidered, you can simply write it on a piece of fabric and sew it on. They helped me do this on thermal transfer paper using a printer. I simply sewed the inscription onto the wings.
Now the fly is finally ready , its length is 24 cm.
It turned out to be a fun, original gift for friends.
If my idea is useful to someone, I will be simply happy!
Happy creativity!
Hurry up to do good! Fly like flies when you are needed!
Source
Beautiful ideas
If you place such a log near your house, it will surely delight you with its unique appearance. Such a flower bed can be of any size and located in any place convenient for you. Making it won’t be too difficult either: use a hatchet to make a hole, add soil and plant any flowers.
Decorating the landscape of a suburban area with the help of a dry stream is a very interesting idea. Anyone, even a novice gardener, can make a dry stream and this is its main advantage. So that the stream does not seem empty, unfinished, it must be decorated with plants. The good thing is that they can be anything you like.
Interesting garden crafts can be made from car tires. These could be flowerpots, swings for children, or just funny animal figurines. A creative approach, a little patience and skill - and now original products are showing off at your dacha.
New, exceptional ideas arise among summer residents when creating different things from plastic bottles and caps. How unusual a vertical flower bed for greenery looks or how unusual the furniture looks. For such ideas you need to be patient and have a sufficiently large number of bottles.
Even in order to put firewood in a woodpile for the winter, you can use a creative approach and achieve excellent results in decorating your dacha area.
How wonderful the recreation area with a live gazebo looks. A laconic and at the same time amazing place for a family dinner or relaxation. It’s nice to even just sit here after a hard day and drink tea in nature.
See the next video for more details.
Cardboard castle
You can make a knight's castle from two boxes of different sizes and several rolls of kitchen napkins. The roof cones are attached to the cylinders with hot glue. The boxes can be sewn or stapled together.
The castle windows and drawbridge are cut out with a stationery knife. If the towers need to be enlarged, then use masking tape to secure the bushings.
Particular attention is paid to painting the castle. You can draw individual stones and decorate arches beautifully. A flagpole with a bright pennant on the roof will look impressive. Be sure to make the top edge of the box jagged, then the structure will look like a real medieval castle.
Where to begin
If you decide to decorate your yard or garden with homemade products, put off the rush and think about what you can use
After all, it is important that the landscape design is harmonious, and every detail is in its place
What will influence the choice of decor:
- the presence of an artificial or natural body of water on the site: a pond, stream, mini-fountain or pool;
- number of plants and flowers;
- location of buildings: residential building, gazebo, barn and garage.
Design of the entrance area of a private courtyard with flower beds and accessories
First, draw up a layout of all objects and think about how you can decorate each of the individual zones:
- garden;
- garden;
- porch;
- backyard with summer kitchen and barbecue;
- facade of a house with flower beds.
Decor for the garden and yard can be made from various means; even long-needed and unused items, for example, old tires, buckets, furniture, bicycles, dishes and plastic bottles, will do. Dry branches, stumps, snags, stones, rebar and broken equipment are often used.
You can breathe new life into old clothes and shoes by decorating your beds and flower beds in an original way. With the help of clothes you can build a useful item - a funny scarecrow for the garden. It all depends on your imagination and resourcefulness.
DIY garden scarecrow
What available materials and things can be used:
- Corks – you can create whole masterpieces from cork wine corks: curtains for the summer kitchen and veranda, cute figurines, hot stands, seats and ottomans, hangers, picture frames, key holders and just cute figurines. You can add fir cones, pallets, dried flowers, beads to the composition, or simply paint the elements in bright shades. Sometimes they lay out paths between the beds with corks or make a rug on the porch;
- Old cutlery - they can be used to create original figurines, bells, chandeliers and holders for all kinds of small things. Forks, spoons and knives are indispensable in any garden, workshop or garage - they are fasteners for things in the form of little men, and funny sculptures in the garden and flower beds, and even metal flowers;
- Zipper for clothes - an original “zipper” craft can be a flower pot, a bucket, or just a decorative element for the garden. If you collect several of these zippers, you can sew a bright cover for a flowerpot, glass and old bucket, breathing new life into things;
- Ropes and threads are an excellent material for creating beautiful curtains for a veranda or terrace. To do this, you will need to tie up to 250 meters of strong and thick jute rope using the macrame method. You can braid any gazebo and even a porch in this way;
- Unnecessary furniture - you can update anything: from a dilapidated post-war chest of drawers and an armchair to a creaky bed. To do this you will need sandpaper, paint, varnish and a little imagination. The surface of the decorations can be painted with retro patterns and designs, and then decorated with fresh flowers or garden supplies. The products look very beautiful among green bushes and vines;
- Old musical instruments are a great opportunity to get creative. A wooden guitar that has long been abandoned and not used can be covered with mosaics or painted - the product will look wonderful among the flower beds. And an old piano can become an independent flower garden, also having undergone a small upgrade;
- Wire - you can twist it into a fancy garden sculpture in the form of animals, plants or people. It is better to use thin copper wire - it is more flexible and easier to process. Always purchase material with a reserve in case you want to make figures in larger quantities or larger in size;
- Plumbing - you can decorate an old sink in a summer kitchen by refreshing its covering with bright mosaic tiles, or create an unusual flower bed from an unnecessary toilet, bathtub or washbasin;
- Leaky shoes - absolutely anything can be used here: old boots, boots, slippers, pumps or denim sneakers. You can beautifully paint shoes along with laces, glue bright decorative elements and plant fresh flowers inside. Therefore, when auditing old things, you should think several times if you want to decorate your summer cottage.
Based on the photographs, it will not be difficult for you to repeat any craft idea you like for your dacha or garden, or make a product with your own hands from scrap materials using these new items.
Video: how to build a craft house
Save time: selected articles delivered to your inbox every week
The popularity of handmade products is difficult to underestimate; they will always attract admiring glances, especially when they are made by children. They often look unusual and original, in addition, they have a special energy. Today, in our review by the Homius editors, we will look at several options for decorative house crafts, made with our own hands from available natural materials.
A fairy-tale craft will open the door for a child to the world of magic and fantasy PHOTO: pinterest.de
Arrangement of outbuildings, gardening area
In order not to lose the attractiveness of the site, it is necessary to pay attention to the arrangement of these places. However, they should not be overloaded with decorative elements.
A few decorative touches will add attractiveness and help tie it into the overall picture of the site.
The entrances of the premises look nice, decorated with signs made in the form of old craft workshops, hung on supports and chains. Decorated with mounted vases of flowers. They are made from old barrels, barrels, tanks, troughs, etc.
In the garden, it is appropriate to install animal figures: bunnies, hedgehogs, owls, turtles. Artificial mushroom families are planted in the berry bushes. Such arrangement will only add attractiveness and charm to the garden and vegetable garden. It is permissible to install a scarecrow in the form of a wolf or other fairy-tale character in the garden. Made from plastic bottles, plaster or plywood.
The garden will be filled with birds using homemade bird feeders installed on the trees. They are made from hollowed out wooden logs, plywood, plastic bottles and even tubes of toilet paper. Birds will protect trees from pests and fill the surrounding space with pleasant chirping.
The fence is of no small importance for arranging a dacha. The outer boundary of the territory is usually made of durable material
You can use construction rubble for the base of the fence. Install wooden lintels along the top.
Elements of the general design of the site, pictures, inscriptions are placed on wooden products. There are decorative elements and figures on the columns. Internal fences have more decorative and separating functions. It is appropriate to make such fences from wicker wicker, equip them with car tires, or mark them with a low picket fence.
When decorating a summer cottage, the main thing to remember is that this is a recreation area. It should be cozy, delight, and inspire the family. The arrangement should be comfortable and harmonious. Bring satisfaction and joy. Decor should be in moderation. Oversaturation is just as harmful as undersaturation.
https://youtube.com/watch?v=qfq7H-dNUws
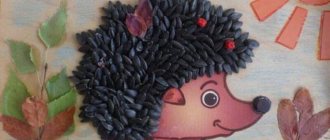
Beetle from a plastic bottle
You can create insect crafts with your own hands in the form of bees or large beetles from an entire plastic container. Its surface is decorated using various techniques: covered with napkins, painted, or placed inside with glitter or beads. Tendrils are made from chenille wire and attached to the neck of the bottle. Wings and legs of an insect are cut out from another plastic container and glued to the workpiece. You can further decorate the face by gluing eyes and drawing a smile.
There are many more different options for how to make crafts in the form of insects with your own hands. Experiment, create unusual things and involve your children in the process, learning new details from the life of bugs with them.
Crafts from jars
Every home accumulates a lot of jars - glass and tin: from canned food, condensed milk, paint, etc. Don’t rush to throw them away, it’s better to see how many useful things you can make for your home from them.
Using tin cans
- Shelves for hats, gloves and scarves in the hallway.
- Shelves for towels in the bathroom.
- Storage system for neckerchiefs and scarves in the dressing room.
- Wall organizer for sewing supplies or yarn.
You can also attach tins to the kitchen wall above the work table to store cutlery. But this is not very convenient.
It is better to make a kitchen organizer desktop, with vertically standing cells.
Kitchen organizer made from jars
Step 1. Wash and dry the jars thoroughly. Then, if they have sharp, jagged edges, file them down.
Step 2: Paint the tins in your desired color to match your other kitchen decor and leave to dry completely.
Step 3. Cut a rectangular piece from a board or chipboard 5-8 cm above the jars. Its length should be equal to the sum of the diameters of all containers in one row. Paint this piece too and dry it.
Step 4. Punch a hole in the top of each can with a nail, using a block of wood for support.
Step 5. Assemble all the parts by screwing the containers to the wooden base on both sides with screws.
Step 6. For ease of carrying, attach a handle from a piece of leather belt to the end of the base using screws and washers.
Manufacturing process
Such tins are suitable not only for storing small items. They make interesting vases or flower pots in eco-style. To do this, just paste them in a circle with small twigs or fasten ordinary wooden clothespins to the sides.
Vase made from a jar and clothespins
Decorating a jar with twigs
Idea for storing in glass jars
Depending on the size, glass jars can be used to store cereals, spices, stationery, buttons, small fasteners and many other things. But standing on a table or in a drawer, they take up a lot of space and can fall and break.
A great idea is to hang these screw-top jars from the bottom of a shelf or hanging cabinet. What do I need to do? Nothing special: just punch a few holes in the lids and screw them to the shelf from below. And then screw the cans into them counterclockwise.
The idea of storing small items when there is a lack of space
To remove a glass container, just grab its bottom and turn it in the opposite direction.
The second life of baby food jars
Organizer for storing cereals
Glass jars are also useful in the workshop
Linen moths
Every family probably has a mountain of waste material. This means that the chance to complete a craft for school increases.
To create an original butterfly we will need:
- clothespins;
- colored cardboard;
- watercolor paints;
- tassels;
- matches;
- glue;
- pencil;
- scissors.
So, when everything is ready, you can get to work. Take clothespins and paint them in different colors. Take all colors at your discretion. Let all clothespins dry thoroughly. In the meantime, we'll take care of the wings. Draw wings on a piece of paper. Cut them out using scissors. Take all the prepared matches and paint them the same shade as the clothespins. When all the parts have dried well, glue them to the clamping point on the clothespin itself. Now glue the wings cut out of paper to the same place. Our air butterflies are ready. It took very little time to create them. And together with your child, this lesson will bring a lot of joy.
Cardboard box
Everyone has a small box of chocolate bars, tea or other items at home. From such a thing you can make a box with your own hands for jewelry, threads and needles, small office supplies... One of the simple and quick options is to cover a cardboard box with a rope. You just need to prepare the materials:
- a cardboard box about 20 by 15 cm, so that its lid opens upward;
- tourniquet;
- glue gun and rods for it;
- for decoration you can take: coffee beans, decorative stones, seashells, multi-colored buttons...
Heat the glue gun well, tightly glue the base and lid of the box with a rope in 2-3 layers. Do not apply a lot of glue so that threads do not appear, and also fit the rows of the rope tightly so that there are no gaps.
You can also glue felt or corrugated paper inside the box, or you can leave it as is.
Fairytale house crafts: unusual DIY ideas from scrap materials
Crafts made from scrap materials combine fantasy, magic and amazing objects in an unimaginable way. For example, even an ordinary stone will become a source of inspiration, and you can also come up with interesting options from the scales of a cone, acorns, zucchini, and clothespins. This is not a complete list of materials.
Of the most popular options, you can build the following models with your own hands:
- a fairy-tale house of a hedgehog grandmother on chicken legs;
- a hut or an old man's hut.
There are a lot of options for making crafts; let’s look at the popular ones in more detail.
Thin branches will make a completely realistic forester's hut PHOTO: yandex.com.tr
Zucchini will make an unusual craft “Autumn House” PHOTO: kapustina-ppds6.edumsko.ru
Old things
Crafts for the garden are made from different materials. An excellent solution would be to use old things to decorate flower beds.
Bicycles, chandeliers, and boats are suitable for this. Such decorative elements are hard to miss. They will definitely be remembered by guests and will delight property owners.
Oval or round flower beds are created from ordinary flower pots. You can open an old suitcase, pour soil into it and plant flowers.
Shoes are used as containers for plants. Bright shoes and boots, which you would hate to throw away but have no one to give them to, will be a great addition to your garden.
Caterpillar made of beads
To develop fine motor skills, it is very useful to work with beads, seed beads and other small decorative elements. Children will definitely enjoy making a worm from large beads together with their parents. Colors and textures can be combined at your discretion.
To work you will need:
- chenille wire;
- beads;
- wire cutters;
- glue;
- artificial eyes.
Cut a piece of chenille wire to the desired length. Start creating an insect craft with your own hands by securing a ball at one end. Now you need to make a loop of wire to hold it in place. Then pass the blank to your child and invite him to string beads on a thread, alternating colors. This can be finicky work, but it's great for developing hand-eye coordination. Leave a little space at the end and form a head. Secure the wire with a loop. Glue the eyes on both sides and then shape the caterpillar.
Making garden sculptures
Homemade garden sculptures can not only decorate a dacha, but also give it a special atmosphere and uniqueness. To make sculptures, you can use plywood, stumps, clay, plaster or cement mortar, old car tires, scrap metal, plastic bottles and even foam! The most important thing is that all the figures are combined with each other and are in harmony with the surrounding landscape, otherwise the summer cottage will look like a warehouse.
Plywood figures
Plywood figures
It is easy to make any decorative figure from plywood. During the work you will need:
- sample;
- jigsaw;
- waterproof plywood;
- primer;
- self-tapping screws;
- screwdriver;
- multi-colored paint.
The figurine can be voluminous or flat, depending on the chosen template. Flat ones are easier to make and the process itself takes less time. To do this, apply a template to a sheet of plywood, trace it with a pencil and cut off all excess with a jigsaw. Then the sections are polished and the workpiece is treated with a protective primer. When the plywood dries, all that remains is to paint the figurine and install it in the garden.
Volumetric figures look more original and can perform additional functions, such as this cow.
Figurine for the garden
To make it you will need 4 identical sheets of plywood and several small fragments from which the animal’s head will be made. Additionally, you will need a metal or wooden frame and a container for plants. Plywood sheets are cut according to a template and fastened together in the form of a box. A cow's head is assembled from the scraps, the ears are attached to it, and the whole thing is screwed together to the base. Then you need to properly paint the structure, dry it, and then install and secure it to the frame. Place a container inside, fill it with soil and plant ornamental plants.
Plywood figures for the gardenPlywood figures for the gardenCrafts for the garden
Plaster sculptures
Making a country planter from a gypsum mixture and a bottle
Gypsum or cement mortar makes it possible to pour a sculpture of any shape and size. For small figures, the mold is made from plastic containers, and to create a large sculpture, you will need to assemble a durable metal frame. If you have no experience, it is recommended to start with small products of simple shape; compositions of fresh flowers surrounded by gypsum mushrooms with bright caps, figures of gnomes or, for example, a turtle near a homemade pond look very nice.
Base for the figurine Apply a layer of plaster to the base Sculpt the head Working out the details Working out the details
When mixing gypsum, PVA glue should be added to the solution - 1% of the total mass of the product. To create large figures, the gypsum mixture is applied in layers; Each layer must dry completely before applying the next. Finished sculptures are usually painted in different colors, then they look bright and festive.
We paint the figurine and plant flowers. The decoration is ready
Flower beds will also help to decorate the dacha, especially in an unusual design, various arches, and figured benches. From the simplest available materials, if desired, you can create amazingly beautiful things, just by using your imagination.
Match option
If you need to make a craft for an exhibition at school, then invite your child to assemble a simple house from matches. You can try assembling the model first without using glue. Wooden sticks are laid in parallel layers, each of which is located at an angle of 90 degrees to the previous one.
Match heads can be selected in different colors and used to build a door pattern or the contours of a roof. The craft for which lit matches are taken looks interesting. The house comes out with original scorch marks.
If PVA glue is used for the construction, then the wooden parts can be assembled with a dense cloth, building a wall of the required size. If you carefully clean the heads with sulfur, then the house is assembled only from wooden sticks of the same size. The work is painstaking, but the house will look like a real log house.
Now you know how to make a house. Instructions with a step-by-step description of all stages will help you complete the job easily and quickly. Be sure to involve children in the construction of the building and its external design. This will accustom children to manual labor, and also develop imagination and skills in working with cardboard. Happy endeavors!
How to make your cottage beautiful
Editorial “So Simple!”
I have prepared for you 11 useful finds for the garden from
simple wooden pallets
. The result will inspire you to redo it!
Do you want to buy very beautiful planting boxes or pots for plants? However, given their price, it’s scary to leave such an acquisition in the countryside unattended, especially if you’re not very confident in your neighbors. This problem can be solved with the help of pallets. They would look great with flowers on a porch or as a raised floral display. At the same time, such boxes are well ventilated and are quite durable!
The ideal material for building a country shed or woodshed is the same cargo pallets
In terms of cost, perhaps the most budget option.
Or maybe you've been dreaming about a swing for a long time?
This is simply a miracle solution for those who love to dig in the garden! This gardening bench is simple and quick to make, looks unusual and will last quite a long time.
Just by turning over the pallets and decorating them to your liking, you will get a chic fence that can not only isolate you from the street, but also delimit the garden into zones.
If you, like me, love to pamper your home with vegetables and fruits carefully grown on your own plot, then this method is definitely for you. Neat, even beds made from wooden pallets will undoubtedly make your site tidier, and there will be many fewer weeds!
Don’t know where to place the rakes, shovels, and brooms that are always lying under your feet or leaning against different surfaces? Rather, pay attention to this simple method. Just look at the space savings!
And thanks to wooden pallets, you can decorate one of the unsightly walls in your dacha with flowers. If there are places on the fence that you would prefer to hide, you can do this with the help of plants planted in a pallet nailed to the fence.
How interesting and original such a multi-level flower bed looks! And it’s not at all difficult to make, and it won’t take much time.
Garden furniture, benches, sun loungers and an impromptu patio in the backyard of the house - all this can be assembled from standard wooden modules, like a LEGO set.
Convenient devices in the form of a folding table on the wall of the garage, wooden racks for pots of flowers and spices, and thousands of other crafts for the garden that can make the life of a gardener easier.
Have you already figured out where to put your wooden pallets?
I also suggest you check out this amazing master class, thanks to which you can Anastasia Davidenko
Nastya does yoga and loves traveling. Fashion, architecture and everything beautiful - that’s what a girl’s heart strives for! Anastasia is an interior designer and also makes unique floral-themed jewelry. She dreams of living in France, is learning the language and is keenly interested in the culture of this country. He believes that a person needs to learn something new all his life. Anastasia's favorite book is “Eat, Pray, Love” by Elizabeth Gilbert.
For a real summer resident, the best place in the world is his country plot. And therefore, every land owner strives to equip his hacienda in the best and most original way possible. Our article will help you with this.
There are a great many ways to make the interior of a summer cottage with your own hands more beautiful and bright.
But before we look at specific decorating techniques, let's talk about some general aspects of landscape design:
- The site should be divided into sections - colorful flower beds can be created on them, thanks to which the entire surrounding space will become more interesting;
- You need to lay winding paths - they will help create a feeling of something extraordinary;
- You should use a variety of handicrafts - they will add originality to the hacienda;
- It is necessary to plant ornamental grasses - thanks to them the garden will become lighter and airier;
- When thinking about how to make your summer cottage beautiful with your own hands, do not forget about the possibility of using plants with brightly colored leaves - plantings whose foliage combines green color with yellow, cream, white or pinkish stripes are especially suitable for this purpose;
- Well decorated - for this it should be decorated with stones and flower beds;
- The key point is to create a resting place. In it you can relax and admire the beauty of your summer cottage.
A clattering fly made from natural materials. Master class with photos
Not only children, but also mothers who read their favorite story to their kids every evening know K. Chukovsky’s fairy tale “The Tsapping Fly” Of course, the adventures of the hospitable fly cannot leave anyone indifferent. The hostess cordially welcomed bugs and cockroaches at the banquet, when suddenly she became the captive of a huge and evil hunter - a spider. The fly was lucky; she was saved by a brave knight. Which? That's right, mosquito.
Well, who said that a fly is an annoying and unremarkable insect? She just has a sweet tooth, and therefore tries to be closer to people. Where else can a fly be lucky enough to enjoy delicious food? We propose to make a beautiful and cultured ticking fly from natural materials , which will not fly into the kitchen without asking and steal crumbs from the table. The craft looks like this.
To create our natural craft, we take out from the bins:
Our fly is the green-eyed beauty of our autumn composition. Let's make two big eyes out of plasticine, a nose like a potato, and a thin tube - a smile. At the top of the head we will attach a small piece of plasticine, into which we will stick sticks - antennae. This is how the smiling face of the craft turned out. It's time to attach it to the pine cone.
Now we attach the head to the body using plasticine.
The paws of a clattering fly will be made from rowan berries. We don’t remove the fluff; it doesn’t interfere at all. Our main task is to carefully separate two berries with tails of the same size. We carefully study the bunch, break off the necessary branches.
We attach the finished arms to the body. Let's use balls of black plasticine. First, we will attach them in the neck area of the craft, and then we will stick tails with berries into them.
How can an insect survive without wings? You can not do it this way. Let's look for suitable leaves or petals among the dried plants. If there is no herbarium collection, you can cut out the wings from colored paper.
We attach the wings to the back of the craft, if necessary, align and straighten them.
Our clattering fly made from natural materials is ready. All that remains is to choose a place for the fly to overwinter. We definitely won’t let her go outside. It is deep autumn, cloudy and cool outside. Let's leave the clicking noise on the windowsill among the indoor flowers and make a mosquito for company. Who's with us? Making this craft from fall materials will bring a lot of joy.
Source
New crafts - beautiful paths
Paths are another important aspect that summer residents rarely think about. But as soon as the weather turns bad, dirt and black soil stick to the shoes, which spreads throughout the entire area.
An available option is paving slabs. Its main advantages:
- low price;
- laying speed;
- ease of transportation;
- various colors and shapes;
- the ability to replace the damaged section without compromising the integrity of the rest of the track;
- durability and wear resistance;
- environmental friendliness.
Minuses:
- becomes slippery from moisture;
- in winter, due to temperature changes, it becomes fragile;
- settles on a soft sandy or soil cushion; backfilling is required.
What materials can the applique be made from?
To make insects from paper, you can use the following materials:
- Colored paper is the main material from which most of the product consists.
- Multi-colored cardboard. Some parts require reinforcement to maintain their shape. Additionally, cardboard is the basis for flat compositions.
- Paper napkins, perforated or laminated paper are useful for making some craft parts.
- Glue, double-sided tape, stapler - tools and material for fixing all parts of the composition.
- Scissors, a simple pencil, a ruler.
Additionally, decorative materials can be used - beads, ribbons, rhinestones, colored plastic stones.
Examples of useful and stylish ideas
According to experienced summer residents, there are simply no useless things on the site - there are forgotten ones. You need to look around: old furniture, a broken bicycle, unrecycled plastic can inspire creativity.
From seemingly garbage, you can make various useful homemade products:
- Old barrels, carts and even pots can be used to create unique flower arrangements.
- A dilapidated bed, a wooden pallet is a good basis for flower beds that fit well into the overall design of the landscape.
- No less popular are plastic bottles and jars, from which it is easy to construct interesting fences, borders, decorations for flowerpots and flower beds, and even sculptures or a country washbasin.
- Everything is limited only by the author’s own imagination and creative approach.
- It’s easy to build a beautiful bird feeder from collected twigs, logs and plastic.
Original country paths, laid out with your own hands from wood or stone, will make the area more comfortable. And the remains of building materials will always be suitable for the implementation of another, unlike anything else, garden composition.
A bench for pleasant country gatherings and relaxation can be made in the form of an old carriage, processing old boards, complicating the design with wheels from an unusable wheelbarrow. By adding a flowerpot from a barrel to the composition, you can get an unusual duet that you definitely won’t find at your neighbor’s house
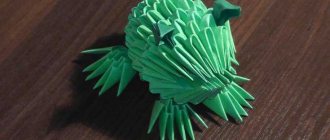
It’s very easy to sculpt a variety of figures from polymer clay, gypsum, and leftover polyurethane foam. The work does not require special skills, but little men, swans, frogs and other representatives of the world of fauna and flora seem to come to life when they settle in their summer cottage.
Subtleties of making crafts
Plastic bottles of different sizes, boxes or boxes - small or impressive in size - this is both a popular and easy-to-work material. Using it, products can be given almost any shape. Such raw materials are simply cut.
To make the result of the work pleasing, the work is coated with suitable dyes. Shades can be chosen either neutral (pastel and calm) or bright, depending on the mood and temperament of the owners. Each time such crafts become more perfect: cartoon characters, household items and even country furniture come out of the master’s hands.
Some summer residents go much further and acquire a special glass cutter. This tool allows you to make candlesticks and pots from a simple glass bottle. Crafts are decorated with bottle caps as decoration.
Don’t think that only flowerpots can be decorated with bottle caps. These small objects are quite suitable for decorating a fence, country curtains, they even decorate furniture - tables, chairs, country swings. The result is an unusual interior solution
It is important not to overdo it, but to design the landscape tastefully and in complete harmony with all the decor on the site
A little imagination and warmth can bring the landscape to life. A piece of love, diligent hands, multi-colored plastic covers - this is how you get a fabulous flowerbed in your backyard
Newspaper snail
There are insect crafts that are very easy to make. A child can make them with his own hands for kindergarten with minimal help. For example, you can use unnecessary newspapers or magazines that are found in every home to make a snail. This kind of handicraft will teach your child to reuse materials and take care of nature.
Additional materials:
- paints;
- brush;
- artificial eyes;
- black pen;
- chenille wire;
- scotch.
The process of making crafts is very simple:
- First, cut off a piece of newspaper and roll it into a thick tube. We secure the edges with tape.
- We paint the tube on all sides and wait for the paint to dry.
- Now you need to roll the tube into a spiral, leaving a small “tail”. Secure the spiral with tape.
- A child can independently glue the snail’s eyes, make wire horns and draw a face. The craft is ready.
Junior group
Young children's hands are not yet well prepared to work with small elements, so it is worth choosing crafts with large parts.
Approximate insect applications for the younger group:
Making a bee
You can make a bee if you invite the kids to work with templates in advance:
1. Cut out an oval body from yellow paper. Prepare several strips of black cellulose to decorate the body. Glue the strips onto the base.
2. Glue white wings onto the main blank. The shape of the parts resembles a heart.
3. Glue the eyes, antennae and sting. Cut out the antennae and sting from paper. Twist the strips using a scissor blade.
The eyes can be made from the base material or ready-made parts with movable pupils can be offered. Glue the finished bee to the cardboard.
Coil manufacturing:
Now you need to make a coil. To do this, take a bolt and wind 7-8 turns of copper wire with a diameter of 0.5-0.7 mm along the thread, then twist the finished coil from the bolt and solder it to the board.
The coil is in its place and our beetle is almost ready, all that remains is to figure out the power supply. For ease of use of the beetle, I suggest installing it directly on the battery (crown). To do this, we need two crowns, one can be taken as a used one, from it we will need to remove the power mark and solder the wires from the board to it. See below for how to do this. The second crown will power our circuit and serve as a stand for the beetle.
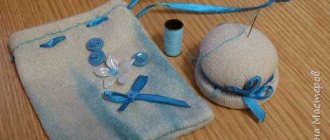
Fabric pillow
Let's make a donut pillow. We will need:
- Synthetic knitted fleece fabric.
- Felt pieces of different shades.
- Fillers (eg batting).
- Colored threads.
Let's get started:
- We take felt and make circular shapes out of it, using a plate, cut out the center, you should get a hole.
- After this, you need to cut out a second circle of a different color, provided that it is smaller than the first. We make a wavy shape for our “glaze”. The topping will be pieces of felt. Using a sewing machine, sew two circles, all elements along the zigzag seam. And finally, we take the batting and fill our pillow.
Junior group
Young children's hands are not yet well prepared to work with small elements, so it is worth choosing crafts with large parts.
Approximate insect applications for the younger group:
Making a bee
You can make a bee if you invite the kids to work with templates in advance:
1. Cut out an oval body from yellow paper. Prepare several strips of black cellulose to decorate the body. Glue the strips onto the base.
2. Glue white wings onto the main blank. The shape of the parts resembles a heart.
3. Glue the eyes, antennae and sting. Cut out the antennae and sting from paper. Twist the strips using a scissor blade.
The eyes can be made from the base material or ready-made parts with movable pupils can be offered. Glue the finished bee to the cardboard.