Make a photo cube with your own hands
Small anti-stress cubes are now available for sale.
A cube assembled in a special way can be rotated endlessly. But if you make it larger and stick photographs on it, you get a double effect, a real anti-stress. It especially delights children. Flipping through the photographs on the cube, it evokes warm feelings in adults. Before writing this article, just in case, I scoured the Internet in search of other options for assembling and sticking photographs. For various reasons, the order in which I viewed the photos did not quite work for me. And the way I want to share with you seems to me to be the most interesting. It loops and constantly returns to the first photo, holds 10 photos and is fairly easy to assemble.
First, you can watch the video to make it more clear, and then I will describe step by step the entire algorithm for assembling the cube.
Figure from a scan
What does sweep mean? This is a diagram with which you can make one or another craft from paper or other material, for example, cardboard. Before you start working with a transformer, you need to be able to do a scan. To create it you will need:
- Paper or colored cardboard.
- A simple pencil.
- Ruler.
- Scissors.
As mentioned above, a cube consists of several squares, in which absolutely all sides are equal to each other. First you need to draw a large square in the middle of the leaf. It is worth remembering that squares have angles of 90°. And also for those who forgot, the cube has 6 faces. It follows from this that there should be exactly six squares on the sheet. In addition to these, we have one extra left and we just need to depict it on the side of some square. Now all that remains is to draw allowances (0.5-1 cm) on three squares on the side and cut off the corners from them at an angle of 45°. The result should be something like this:
Easy production using a ready-made template
This method of making a cube is easier and does not require knowledge of the school curriculum. To organize, you need to find a ready-made cube template on the Internet, print it out and cut it out, then bend the paper along the marked dotted lines and glue it into a finished craft. All this way, you get a wonderful cube that your child will love to play with.
When making a cube using the origami technique, it is recommended to start with the simplest option. After making a couple of these cubes, you will learn how to make a paper cube and get proper practice.
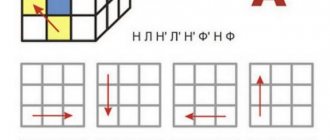
Origami transforming cube
To make a transforming cube with your own hands in origami style , you need to remember how modules are made. It is thanks to the modules that the cube can be held together without the help of glue, and the toy itself will turn out to be very interesting and unusual. Let's move on in more detail to the question of how to make an origami transforming cube out of paper.
- First you need to fold a square sheet in half, then bend the edges towards the middle.
- Then bend the lower left and upper right corners inside the sheet.
- Now fold the sheet in half and put the corners that remain unbent into the pockets of the right and left corners.
- Next, turn the sheet over and bend the resulting corners to the vertical corners.
Thus, a module was created. For a cube of such modules you will need six pieces. All six modules must be done in the same way. Please note that each of them has pockets into which you will need to place other modules. Now all that remains is to connect all the origami parts to create a figure. Do it according to the scheme so as not to make mistakes:
The transforming origami cube is ready. To make your craft more beautiful, you can make each edge a different color or texture.
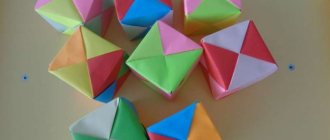
Puzzle cube
To help your child develop, you can construct a puzzle cube from paper. It consists of eight small cubes, which are made according to a cut out template. The large puzzle cube has 6 sides, so 3 of them must be black and 3 must be white.
Having made the blank, we begin to construct the puzzle:
- take 3 white cubes and 3 black cubes;
- We connect them using double-sided tape.
The puzzle cube is ready, you can give it to your child.
How to make a Rubik's cube from paper
Perhaps it is better to make such a bright cube together with children!
These are the stages of work to be performed:
| Illustration | Description of action |
| Take a square and fold it in half | |
| Unfold the sheet and fold one side towards the middle. Ironing the fold | |
| Unfold the fold and fold the other side | |
| Bend the first corner. We do the same with the opposite | |
| You need to bend the edge of the “door” with a bent corner | |
| We grab part of the “door” and bend the product at a slight angle | |
| Now to the resulting figure we bend the second side with a bent corner, also in the form of a “door” | |
| You need to bend the opposite corner, getting a parallelogram | |
| The corner of the parallelogram needs to be hidden in a pocket | |
| We bend the element with the corners facing each other outwards | |
| Hiding the corner of one element in the pocket of another | |
| We put all the elements into each other's pockets, forming a cube reminiscent of a Rubik's product | |
| The result is beautiful and impressive |
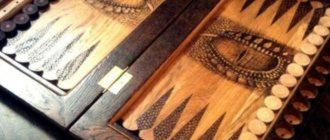
How to make a dice out of paper
To assemble the dice, you need to print out a cube template for gluing.
We use thick cardboard onto which we transfer the template PHOTO: russiachess.ru
LiveInternetLiveInternet
https://deaprint.ru/works/image-42.html
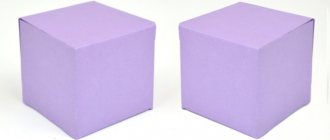
How to make your own flip photo cube - an original photo album in the shape of a cube with 12 pictures. Will serve as a memorable and versatile gift for any occasion.
A regular photo cube is a cube with a photo on each side, six in total. The reversible photo cube is designed in such a way that it can be “turned” inside out, and six more photographs will be revealed there—twice as many. Such an original and useful thing can serve as a wonderful gift for any occasion. The inverted cube is made by only one (at least in the spring of 2008, I was able to find only one) company, for two weeks and half a thousand rubles. The amount seemed too high to me, but most of all I didn’t like the timing, since there was a week left before the next holiday, I decided to make the toy with my own hands. In addition, a homemade gift will bring much more joy to both the congratulator and the congratulated.
We will need:
- 8 small children's cubes, the kind that are put into pictures
- 12 photos
- glue
- strong tape
- three hours of free time
It is better to take plastic cubes, they are much lighter than wooden ones. The standard size of such cubes is 4 cm, which fits well with the 10x15 photograph format. The pictures on them should stick well, if they don’t stick well, tear them off completely and lightly sand the surface, we’ll glue them directly onto the plastic. In this case, it is better to take an appropriate glue, for example “Moment”, but if we are gluing photographs onto paper, then we use regular PVA.
Photos for the cube need to be prepared for printing in a special way: everything you want to place on the photo cube must fit into a square twice the size of the side of the children's cube (for cubes with an edge of 4 cm, we get a plot part measuring 8x8 cm). It is advisable to step back from the edge of this square a few millimeters in case the photo lab stretches or shrinks the frame a little when printing.
We send the prepared photos to the laboratory for printing or print them ourselves on a photo printer. By the way, right now there is a promotion where you can order photo printing for your cube absolutely free
. Details are at the end of the article.
Let's start preparing the base of the photo cube. In order for it to turn inside out, the cubes from which it is made must be hinged to each other. For this we use tape.
Look at the picture: a strip of tape is glued to two cubes and they can be thrown around a common edge. On the other side, exactly the same strip is glued, for greater strength of the hinge. Attention
When gluing, do this: place two cubes (or blocks of cubes) side by side, laying strips of unnecessary pieces of photo paper between them in two layers, and lightly pressing the cubes together, glue a strip of tape.
If you don't put photo paper, then when the photo is pasted onto the cubes, they won't be able to fold tightly! If you will be printing photos on an inkjet printer, use strips of appropriate paper. Strips of tape should be approximately half the length of the edge of the cube, and one and a half times longer. Then, when sticking photographs, they will hold the tape and hold on to the cube themselves - this will increase the strength of the entire structure. Alternatively (I haven’t tried it), you can take a good double-sided tape and glue it along the entire length and width, and then remove the protective layer and stick photos on the tape. If you are printing with an inkjet on thin paper, this should work.
The main thing when gluing is to glue it correctly, otherwise the photo cube will not unfold correctly. Look at the diagrams and everything will work out for you! To better understand the order of gluing, I painted the tape in different colors: the one we glued first was yellow, the second was blue, and at the end it was red.
- Glue 8 cubes into 4 pairs. It is clear that you can glue along any edge.
- We take two pairs and glue them into one four. We are guided by the yellow tape that was pasted earlier. Then we take the remaining two pairs and glue the second four in exactly the same way.
We fold two fours (we use the blue tape as a guide, the yellow tape is not visible, it’s on the back side) and glue the final photo cube.
Don’t forget to layer the photo paper when gluing and glue each “hinge” on both sides.
If something is mixed up during the process, the tape can be easily removed and the process can be repeated. The result should be a cube that turns inside out (you can mark one side of one cube and make sure that it is visible in one position and not in the other).
We take the photos from the lab and move on to pasting them. From each photo we cut out a square the size of the side of a photo cube, so that the intended frame fits into it. For framing, it is convenient to make a stencil from a transparent thick film, cutting out a square of the desired size. To cut, apply the template to the photo, then press the ruler along the side of the template and cut off the paper with a sharp knife.
Now we cut each photo square into 4 equal photo square parts and glue them onto the edge of the photo cube. We pasted over all six edges, let the glue dry, turned the photo cube inside out and continued pasting it “from the inside out.” This work is much simpler and clearer than gluing cubes with tape, but it requires more time, patience and accuracy; the final result largely depends on the quality of its execution. Do not allow glue to smudge; they can glue your photo cube in one position and it will not be able to unfold.
Let the glue dry completely and check the photo cube. I hope you like the result!
In this video, which we shot together with Stas Savin, you can see the entire process of making the cube with your own eyes.
This video is on YouTube
Information taken from the site https://www.denvo.ru/blog/photocube-selfmade.html