Landscape design in microcosm. How to make a closed terrarium in a light bulb with your own hands.
At first glance , make an eternal terrarium that does not require maintenance
it is not possible, however, in living nature there are many examples of closed micro-ecosystems, for example,
the closed world
of caves or wells, hollows inside a tree.
But not everyone can see the macrocosm of such a system with their own eyes, but everyone can try to create a maintenance-free terrarium with their own hands, for example, inside an ordinary light bulb
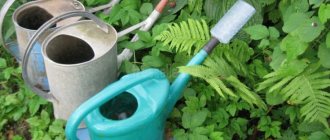
All you need to create an eternal terrarium is an ordinary electric light bulb, preferably with a power of 200-300 W, but if you don’t have one, 95 W will do, pliers, a screwdriver, tweezers, glue, sealant and PVA, basic protective equipment in the form of glasses and gloves.
Preparation
We will make a terrarium from the most ordinary incandescent lamp. First we need gloves, pliers and a screwdriver.
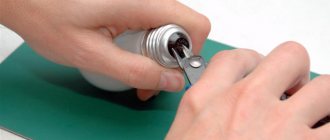
Using pliers, remove the contact point of the light bulb and its mount from the base. To put it simply, it is a metal nickel in the bottom base of the light bulb and its insulation, reminiscent of black glass.
Next we need to remove all the contents from the glass flask. We take a screwdriver and push the contents inward with progressive movements, after which we successfully remove it from the light bulb. Ready. After this, it is advisable to treat the inner surface of the base for sharp fragments.
You also need to think about the mounting system for your closed ecosystem. This could be copper wire, hot melt glue on some flat surface, or an ordinary nylon thread for hanging a light bulb.
But don’t forget: even though the terrarium is a closed ecosystem, it needs sunlight. This must be taken into account when designing the mount.
The preparation of our future terrarium is completed, and now we can begin filling it.
What will you need?
Let's tell you in more detail how to make an eternal terrarium from a light bulb - you need to start by preparing tools and raw materials.
You will need:
- big light bulb;
- glasses and gloves;
- tweezers;
- pliers with round tips;
- flat screwdriver;
- sand;
- moss;
- additional elements for decoration.
Tools should be prepared in advance by placing them on the workbench. You can buy everything at a hardware store. Glasses will protect your eyes from splinters, since the most difficult and traumatic stage of work is preparing the light bulb.
Selection of terrarium contents
At a minimum, for the normal functioning of the terrarium, it needs: gravel or small crushed stone for drainage, sand and soil for soil formation. All these materials are quite accessible and sometimes lie right under your feet. Next, you can select several small plants of your choice.
For example, moss - this choice is due to the extreme vitality and durability of the species. Let's add a few more random plants and some kind of wild object, be it an acorn, a small pine cone or a shell and much more that comes to your mind, as an entourage.
Eternal terrarium (closed ecosystem)
While everyone is making jam, Katya is making moss :) It turns out, although inedible, it’s quite cute and entertaining.
So, first of all, we head out to the nearest forest or park, taking with us a container, bags and some kind of tool for poking around in the ground. We collect low-growing plants (I collected mainly moss), pebbles and all sorts of other treasures, such as pine cones. Don’t forget to dig some soil along with the plants and go home.
At home we are looking for a jar with a hermetically sealed lid . You can simply “roll up” the ecosystem in a jar, but the ability to open the jar can be very useful for watering plants at first until the system stabilizes. Wash the jar thoroughly from the inside and wipe dry. I have a 750 ml jar, you can use larger or smaller vessels.
We also need drainage . I will use coal as drainage; you can also use expanded clay or pebbles.
We will also need a spray bottle with water for irrigation .
If you have a small vessel with a narrow neck, tweezers will come in handy.
We lay out our wealth, sprinkle the plants with a little water so that they don’t wilt.
Lay a drainage layer.
For drainage there is a small layer of soil. Don't forget to lightly spray it with water.
Now we figure out what we are going to live in a jar.
My jar is very small, so I didn’t put a pine cone or an acorn in there. Do not fill the jar to the top; leave at least 1/3 of free space.
When you are satisfied with the result, spray the plants with water from the spray bottle and close the lid (don't forget to put a rubber band).
It is best to place the jar where direct sunlight does not reach it, and at first check whether the moss is drying out and spray it as necessary. Ideally, the ecosystem in the jar will reach equilibrium - condensation will accumulate on the walls, and watering will no longer be required.
If you decide to make yourself an “eternal terrarium”, or you already have one, share your photos in the comments!
And I will share a few photos from the Internet for ideas and inspiration.
Very small terrariums, which, in my opinion, will look very good on the desktop.
Here is another example of a closed ecosystem - a very popular eternal terrarium in a light bulb.
But here is a closed ecosystem that is already more than 40 years old! It belongs to gardener David Latimer, who capped the bottle in 1972 and has never opened it since.
Filling the terrarium
Since we will be making our terrarium in a light bulb, and it will be quite small, we suggest you make a funnel out of paper, with which you can easily distribute bulk materials evenly over the surface of the inner wall of the glass flask.
At the very beginning we pour gravel, then sand, and cover everything with earth on top. The soil formation stage is completed. Next we need tweezers. Using this tool, we can easily distribute all other plants and objects in the soil of the newly made terrarium.
Naturally, our plants will need moisture, so before sealing the bulb we add a small amount of water from a syringe. Then we need to seal the base so that outside air does not penetrate there. This can be done using a cut branch of a suitable cross-sectional diameter and hot glue. You can easily come up with your own options.
Photo ideas for making a mini-terrarium from a light bulb
Once you start engaging in an interesting hobby, your imagination will give you new and interesting ideas.
Several mini-terrariums on one shelf will look beautiful. Light bulbs should be placed at different angles and different compositions inside.
You can put mini-cacti in a light bulb, which will feel great in dry sand.
You can find “air” plants for a terrarium in online stores or from hobbyists on flower forums.
You can place the light bulb not only on silicone legs, but also on an elegant stand made of durable wire, which is twisted and sealed around the light bulb base in the form of a spring.
A terrarium located on natural cobblestones will look beautiful. To do this, the prepared light bulb must be carefully glued to the selected stone.
Such a terrarium is sometimes called an eternal one. If you make its lid airtight, your own microcosm will be formed inside the terrarium, which will exist without outside participation.
The water evaporates, collects on the glass in the form of condensation and returns to the soil, feeding the plants. Plants release oxygen, decompose and turn into fertilizer for the next plant. The whole world is in an incandescent light bulb.
How the terrarium works
The point of sealing the glass flask is that the terrarium, thanks to its integral, closed and autonomous ecosystem, is almost completely self-sufficient.
The only thing he needs is sunlight. Almost the same processes occur in it as on our planet. There its own life will develop, the water will evaporate, settling as condensation on the walls of the vessel, then flow back into the soil.
Some plants will grow upward, others will begin to decompose over time, releasing carbon dioxide and allowing new ones to grow. All you have to do is watch the process and enjoy the new acquisition you made with your own hands.
Formation of a lamp terrarium
The final stage of how to make a terrarium from a light bulb is the formation of a habitat for the moss. It is better to use regular sand as a primer, which can be dried in the oven at 300 degrees or calcined in a frying pan.
We pour sand, moss and decorative elements inside. To stabilize the light bulb, you can glue the legs to the bottom in advance, or make a mount in the form of a stand. Such a lamp terrarium will be an excellent decoration for the home; it can be used as decoration in combination with other compositions.
How to make an eternal terrarium in a jar
It is better to take a jar with a screw cap. Wash thoroughly and wipe dry.
Pour a centimeter or two of drainage into the jar (expanded clay, pebbles, activated carbon or one thing). Then about the same amount of soil. Sprinkle a little water. Using tweezers we arrange plants and decorative elements. Ideally, one third of the jar should remain unfilled, more is possible. The main thing is that the plants do not reach the edges.
Now you can screw the lid on. For tightness, it is better to apply glue. Now you can decorate the lid and admire your ecosystem.
Choosing a container
There is only one rule for the container: one must be transparent. Preferably glass, but plastic will work too. The container can either have a hole or be hermetically sealed; this will determine what plants can be placed inside and whether the composition needs to be moistened.
In any case, a non-standard vision in choosing a container is welcome. You can take not just a jar or a vase, but an unusually shaped bowl, a light bulb or a New Year's ball.
Terrariums in glass teapots look charming.
Terrariums are a fun way to use magnetic containers from IKEA. In this case, the lid will need to be replaced with a film that half covers the front of the container.
Plants for the garden in a bottle: how to choose the right one?
It is better to choose slow-growing plants to keep in a glass container, otherwise you will have to update the composition very often. Typically, plants themselves slow down their growth, since the root system simply has nowhere to develop in such a small space. In some cases, it is appropriate to slightly trim the roots when replanting to slow down their growth.
When choosing plants for a florarium, you need to consider how they get along with each other. It is advisable to choose options that recreate a certain natural area behind the glass:
- To create a desert with your own hands, all kinds of succulents (cacti, aloe, spurge, crassula, etc.) are suitable. By the way, a florarium with cacti is practically the easiest and most classic option.
Thanks to the variety of succulents, you can create your own unique piece of the desert
- Ferns and moss can give the effect of a dense forest.
A wonderful florarium with moss and decorative figurines will be an excellent New Year's decor
A piece of forest in a florarium
- You can create your own tropics using orchids, dieffenbachia, bromeliads, alocasia, etc. (by the way, when using flowers for a florarium, the main thing is not to overdo it: 1-2 flowering plants are enough). It is the florarium with orchids, created with your own hands, that has recently become at the peak of popularity among flower growers. Tradescantia in a bottle is also common.
A piece of the tropics in the interior
- The mountain landscape will be recreated by succulents with various ivies.
Mountain landscape in the florarium
Advice! If the plants are nevertheless selected for their beauty, and not for the same needs, you can use the following trick: plant them in different pots or containers and cover the surface with stones. It will be possible to care for each of them individually, and from the outside it will seem that the entire composition is in the same soil.