Origin of the game
Backgammon is a very old game. According to scientists, it appeared in the Ancient East about 5,000 years ago. The very first board was found in Shahri-Sukhta (region of Asia Minor); research suggests that it is about 3000 years old.
Backgammon came to Persia from India. There is even a legend about this. A long time ago, the Indians decided to test the Persians and sent them chess , believing that they would never solve this game. But one Persian sage understood its meaning and, in revenge, sent the people of India his game - backgammon, over which they puzzled for about 12 years. “Nard Takhte” translated from Persian means “fight on a wooden board,” characterizing the complexity and intensity of the game.
In the Middle Ages, thanks to the Crusaders, it spread to Western Europe, and also gained popularity in European countries in the 12th century. It was then called backgammon, which meant hitting the bones. Representatives of kings and nobility played it at the courts.
This fascinating fun has reached our time. If you study the diagrams on how to make backgammon with your own hands in pictures, you can understand that this will not cause any difficulties. The main thing is to choose the right materials and make the drawing correctly.
Landing dates
Preparation of planting material depends on the growing region.
- In Crimea, Kuban, and Krasnodar, cherry seeds are kept in damp sand until autumn; the first overwintered shoots will appear next spring.
- In the Rostov region and Stavropol Territory, as well as on the Black Sea coast, cherry pits are kept in wet sand for five months and planted in autumn or spring.
- In central Russia, cold winters pose a danger to young shoots. Therefore, their aging period reaches 6 months, and planting in the soil is carried out in early spring.
What does the board look like?
Before you begin manufacturing, you need to find out what elements the playing board consists of. It has a rectangular shape and consists of two parts, each of which has 12 points. These points have the shape of an elongated triangle, the base of which is on the edge, and their height reaches approximately half the board.
In the middle, the playing space is divided by a vertical stripe , which is called a “bar”. Players usually place knocked out chips in this area, of which there are 15 each. There is another concept - “player’s house”. These are six points that are located on one side.
The turn order is determined by a pair of dice. In some cases, 4 cubes are used. In purchased sets you can sometimes find special cups for mixing bones.
Playing backgammon can improve thought processes. If you play it at least 2-3 times a week, your intelligence level will increase by 10%. Not only logical thinking develops, but also ingenuity and enterprise.
Preparation of materials
Before you make backgammon with your own hands, you need to make a detailed drawing of all the elements so that errors regarding the size of the board are not discovered later. You need to decide on them first. The height is the same (3.5 cm) , but the length and width may be different:
- 40x20 cm - small;
- 50x25 cm - medium;
- 60x30 cm - large backgammon.
After the drawing is completed, you need to purchase the following materials:
- plywood is the basis of the future board;
- slats - for making sides;
- loops - will be needed to connect the two sides;
- stain, glue.
Plywood should not be rough or have burrs. Otherwise, it will have to be carefully polished to avoid any troubles during the manufacturing process and during play.
Transferring a drawing
When the plywood is prepared, it's time to choose a pattern. If you look at modern backgammon, you will notice that ornaments with dragons, plants or arabesques are very popular.
The choice should be approached with special attention so that the design matches the plane of the future board. It is necessary that symmetry, so important for the game, be maintained. On the outside, the ornament can be large in size, but on the inside you shouldn’t do this, because there should be room for points.
The drawing is transferred to plywood using carbon paper. To do this, place a copy and a sheet of paper with a drawing on the board. All this is secured with tape and the outline is outlined with a simple pencil. If some parts of it remain undrawn, you should complete the image completely.
The points must be measured well using a ruler. They must be the same size. You need to draw them with a pencil on the inside of the workpiece.
Carving methods
After transferring the drawing, another important step follows - cutting out this image. It can be performed using the following methods:
- Classic - the contours are cut using a knife; it must be held at right angles to the board. If it is not possible to hold it this way, you need to tilt the workpiece a little at an arbitrary angle. Subsequently, the convex parts of the pattern are formed using a flat chisel, and the concave contours are formed using a semicircular one.
- In the second method, the pattern is sampled using a hand router and a finger cutter. It has an undoubted advantage - it is the speed and accuracy of maintaining a right angle. Your hands will not get tired from such work and will not strain. There is also a small drawback - working with a milling cutter, which is only possible in a workshop. It creates noise and a lot of dust. If the cutter cannot reach some places, they are cut with a knife.
- The third method is possible if you have a burning machine available. Then the image is simply burned along the contour. But this activity will require a certain amount of time, and the drawing will be flatter.
Features of such reproduction
Is it possible to grow cherries from seeds? Certainly! The main thing you need to know about the features of this type of reproduction:
- The characteristics of the parent plant are not passed on to the children, so new trees may not bear fruit or produce small, sour fruit.
- Cherry is not a self-pollinating tree. Therefore, to obtain a harvest, you need to plant several varieties in one area.
For these reasons, pitted cherries are grown either for ornamental purposes or to produce a rootstock. Even cherries that do not bear fruit are often grown on plots due to their biological characteristics and attractive appearance. Cherries are grown for decoration because:
- The trees are unpretentious and do not require special conditions.
- Frost resistant.
- They rarely get sick and are attacked by pests.
Painting and processing
When the drawing is ready, you need to start painting. Usually, a stain is chosen for this, preferably an alcohol stain, because if you use water, the product may swell. You buy a stain of one color, which is then diluted to three shades, from light to dark.
First, the internal surfaces are painted; after they have dried, you can begin painting the panels. You need to paint in two layers, and varnish the image on top.
Next, you need to process and prepare the slats. Measure them in length and width in accordance with the drawing. Then mark the areas for the chips with a pencil and cut them out with a knife. All slats are glued to the board using mounting glue.
To make the game work, you need to make loops. To do this, grooves are cut with a knife to the size of the purchased loops. They are secured with self-tapping screws.
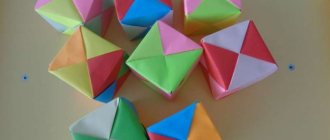
The board is ready, you need to completely patch it again. As chips, you can use regular ones for playing checkers or buy ready-made ones in the store. If you have time and desire, you can grind them yourself. Using stain, paint 15 pieces white and the other 15 black.
Backgammon is a very exciting and thought-developing game . You can make a board for it and chips yourself at home. Even a beginner in wood carving can make it. The main thing is to do the drawing and drawing correctly.
Zanoza Workshop is a shop-workshop that makes jewelry from exotic woods. The peculiarity of Zanoza is that at the moment we already have one of the largest product catalogs, which includes more than 350 models. Unique jewelry made from precious wood: padauk, niove, merbau, apacho. Jewelry made of beautiful wood in the style of fantasy, science fiction, steampunk, cyberpunk, etc. We develop new models and make original jewelry to order.
: Epoxy resin
Mix one portion of resin (according to the instructions on the package) in a disposable cup and stir the mixture with a spatula.
Let's add decorative material to the epoxy. I really liked the powder and glitter.
Pour the resin into the mold. Filling should be done with extreme caution. Don't pour too much because the resin will stick out through the top of the mold.
The resin will shrink slightly in size after drying.
Saturday, July 20, 2013
How to make your own dice? DIY dice.
In this post, I want to talk about my experience in making dice at home. You can find this article by searching: - How to make dice yourself? — Instructions for making dice. — How to make six-sided dice at home for playing dice or backgammon?
Since I am involved in historical reconstruction, I was interested in making simple dice for medieval games, for example for the German game - Gluckshaus - “House of Happiness”.
Unfortunately, the first bones did not turn out the way I wanted, but more on that later.
The choice of material for the dice was simple, since my workshop works with exotic woods, I chose African wood - niove.
The drill attachment will significantly speed up the work and allow you to quickly process the edges of future dice.
We move on to putting numbers on the edges of the cube, but first we will choose how they will look, will they be just dots, like on Viking dice, or will they be concentric circles, like on ancient Roman dice? From the materials that I found, approximately 70% of medieval bones have numbers indicated by concentric circles (1-2 circles and a dot in the center), and such bones have been found for more than 2000 years!
Once you learn how easy it is to cut, connect, and glue straight triangles onto this game board, you'll be sure to want to add geometric designs to other projects. Simple tools and simple techniques make making this board fun.
- Overall dimensions: when opened - 530x432x32 mm; closed - 264x432x64 mm.
- Materials: walnut, maple and mahogany veneer; MDF 6 mm thick; mahogany.
Mastery
- Learn how to cut several layers of veneer into parts for geometric patterns.
- Learn to carefully join veneer without visible gaps.
- Make two identical pieces of the game board by sawing through a closed box.
History of dice
The origins go back to ancient times, but how many years the cubes have existed is unknown. People really wanted to know what awaited them in the future, and for this they created special fortune-telling bones. They were thrown up and tried to determine the meaning of the combination that appeared on them. Later they began to use the fruits of the trees. For some time, dice were made from animal bone.
Asia is considered the birthplace of bones. Scientists and archaeologists still find during excavations roughly finished pieces of wood or fragments that were used for magical purposes. Dice made of stone were discovered in a place called Nectaris. The items found date back to the 6th century BC. The fact remains that gambling has been part of people’s lives since time immemorial.
Objects found in the 6th century are not the most ancient. For example, the British Museum contains astragalus, which have four sides with small indentations and markings. The Theban remains date back to 1573 BC. From Asia, dice for the game gradually migrated to Italy, Spain and France.
Start by preparing the veneer
1. To create the board playing field, cut strips of walnut and maple veneer measuring 38x191 mm, making 30 pieces of each color. Quick tip! To carefully cut the strip using a sharp knife along a metal ruler, place a flat piece of hardboard or plastic underneath.
2. From scraps of 13mm thick hardwood, cut four top plates measuring 38x254mm and four bottom plates measuring 51x254mm. In the four top plates, make mounting holes with a diameter of 4 mm at a distance of 25 mm from the ends.
Rich broth
To make the broth richer, the meat can be cut into small pieces. (Maxim Volkov, chef of The Mad Cook restaurant)
You can use minced meat for meat broth. This way we will get a very rich meat broth. The minced meat can then be fried with onions and spices and used for navy pasta, for example. (Sergey Dushkov, chef of Loft17 restaurant)
If you want a very rich broth, just add more meat. (Dmitry Zotov, brand chef of Haggis Pub&Kitchen, Madame Wong, Pate&Co, Zotman Pizza Pie restaurants)
Article on the topic
Ten rules for good soup
Make a triangle pattern
Carefully and tightly connect the triangles to each other using small pieces of masking tape, which will be removed before sticking the set onto the base.
1. Take a straight strip of veneer with straight edges, which will serve as a ruler to align the triangles when assembling. To assemble each quadrant (quarter) of the game board, first use masking tape to adhere one of the light maple triangles, pressing its base against the veneer ruler. Now carefully glue the walnut and maple triangles together in pairs to form parallelograms. Tape them first to the edge of the ruler (photo F ) before connecting them to each other. Continue assembling until each quadrant consists of seven maple and six walnut triangles. The side free from masking tape will subsequently become the front side of the ornament.
Quick tip! Maintain the orientation of the triangles as you remove them from the stack and place them the same way they were placed: top side up, bottom side down. Any angular deviations when cutting out the narrowings will be mutually compensated when you assemble the parallelograms. Carefully remove the masking tape connecting the quadrant to the veneer ruler. In the same way, assemble the other three quadrants.
2. For the dividing strips (Fig. 1) , take two pieces of maple veneer measuring 80x230 mm. Read the Expert Tip and follow the directions to straighten the edges. Use the same method to align the maple veneer on the edges of the playing field halves.
3. Glue one quadrant to the edge of the divider strip, centered. The side with the adhesive tape (bottom) should be facing up. Transfer the triangle vertex position marks to the other edge of the dividing strip (photo G) and glue the second quadrant, aligning it with the marks.
Place the set sheet on the edge of the workbench and, aligning the square with the vertices of the dark triangles, make marks on the other edge of the dividing strip.
Cover the entire surface of the playing field with tape. Avoid overlapping stripes to ensure even pressure when applying the kit to the base.
Quick tip! Make sure the playing field is square by measuring its diagonals. If their sizes do not match, try turning one of the quadrants over and then transfer the tape to the opposite side.
In the same way, assemble the second half of the playing field, connecting the remaining quadrants with another dividing strip. Cover the entire surface of the set with tape (photo H) and remove the pieces of tape from the opposite (bottom) side.
Line up the edge of the steel ruler with the tops of the outer maple triangles and use a sharp knife to trim the game board to the final size.
DIY bra
Are designer underwear expensive? You can make your own bra for your loved one. Our article will help you do this.
1
A new bra from an old one
You can make a new bra from an old one that you wanted to throw away.
To do this, take:
- Old bra
- Ruler
- Pencil
- Chalk
- Cardboard paper for patterns
- Silk fabric
- Lace
- Hooks
- Open up the old bra and remove the underwires.
- Mark the depth of your bust cups. To do this, place the bones on the cardboard and make the depth you need.
- Make 1.6 cm along the edges of the seeds.
- Using the pattern you made, cut out the main piece from silk fabric.
- Cut the cups from the previously ripped bodice. Spread these cups too and transfer the measurements to the template.
- Make cup patterns. Cut out pieces from silk fabric and lace.
- Make a belt. Take measurements of your old bust.
- Sew all the resulting pieces. First sew from lace, then from silk. Next, connect the parts.
- Sew hooks into your product.
2
Lace sconce
This type of bust can be used by those with small, neat breasts. It is intended more for a romantic evening than for everyday life. A lace bra will highlight your sexuality and make your look more romantic.
Necessary materials for work:
- Lace
- Elastic band (thin for straps and wide for placket)
- Clasp
- Make a pattern. To do this, cut out a right triangle so that its hypotenuse on the outside is slightly rounded. Cut out 2 of these triangles.
- Attach your pattern to the lace and secure with pins. Cut out the asymmetrical details of the cups.
- Sew cups from two halves.
- Take a wide elastic band and trim it with lace. Sew the elastic to the cups along the bottom. Attach the clasp.
- Take a thin elastic band and cover it with lace fabric in the same way and sew it to your bra.
The product is ready.
Whatever type of bra you choose, the main thing is to make the pattern correctly. Careful, careful work and your imagination will help you create beautiful underwear that will suit your figure and highlight all your advantages.
Front page
Internet
How to delete a saved password in Yandex Browser
Source: https://sovetclub.ru/byustgalter-svoimi-rukami