how to make a paper lily
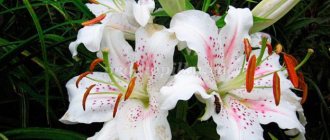
A little about the flower... Lily means admiration, which is why it is so good for a wedding, birthday, or just to tell someone how much you love them. Making a paper lily is easier than many types of other flowers because the lily has a simple and expressive petal shape.
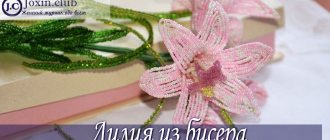
Here you will find ten wonderful examples of how to make a paper lily flower with your own hands . Various materials can be used for manufacturing. Lilies made from corrugated paper look very beautiful . If you are interested in origami or just want to learn this wonderful art, in the article you will find several examples of how to make an origami lily . Check out the master classes below and choose an option to suit your taste.
Option #1
To make it, we needed watercolor paper, three beads, wire, some white corrugated paper, a sharpener, a soft rag, watercolor pencils, PVA glue, knitting needles, scissors.
Draw a petal template (an example is provided below in the article under the samples section). Cut out petals from watercolor paper following the example. Choose the quantity at your discretion, but remember that to create one lily you need 6 pieces. Using a sharpener and green and pink watercolor pencils, you need to sharpen the dust and color the paper. Wet and wring out a kitchen cloth. Then we lower the flower into the water and immediately remove it. Place face down on a rag. We draw two parallel strips with a knitting needle. Round off the petals.
Now you need to make the stamens. We wrap the wire with white corrugated paper, smearing the edges with glue. Cut the wire into small pieces of the required length. We bend either end and then wrap it with a piece of paper. After which this edge needs to be painted brown, and the stem itself green. To make a pestle, attach beads, wrap them in corrugated paper and paint.
We collect a flower. We make small cones. Take one, cut off the bottom and insert three symmetrically arranged petals on glue. Then we insert another cone with three petals, and at the end we insert the stamens with a pistil. The leaves must be arranged asymmetrically. Cover the back side of the petals with PVA glue.
Related article: DIY Christmas tree toy mushroom made of polystyrene foam
How to make corrugated circles?
Such interesting bases for our flowers can be made in several ways. Let's stick to the simplest things. A rectangle of green double-sided paper is folded into an accordion. Try to keep all folds at equal distances. Then bend the workpiece in half and glue even strips along the edges together. You will get the third part of the circle. The remaining two are done in the same way and then attached to the first. It turns out to be a circle, the middle of which is covered with a lily flower.
Try to create such beautiful flowers yourself. Good luck!
How to choose the right lilies
How many lilies can you make yourself for a unique gift for your loved one? What color of paper should I choose? The information written below will help you answer all your questions. Be patient and use your imagination! Good luck!
- orange or yellow flowers are given to wish health and long life;
- buds with white and pink shades mean a person’s desire to support you in a difficult situation, to become a support;
- by giving white lilies, you will hint to their owner of purity and purity of soul;
- brindle color wishes the owner financial well-being;
- The blue color represents aristocracy and nobility.
- If you give one lily, it will be considered a declaration of love. Usually representatives of the stronger sex take such a step if they do not have the courage to openly admit their feelings;
- three flowers are a symbol of faith, hope and love. Often such bouquets are given to friends and work colleagues;
- five lilies mean that their owner is incredibly beautiful and sophisticated;
- a marriage proposal is made with the number of seven flowers;
- nine lilies are given as standard on International Women's Day;
- eleven buds are given on special occasions: anniversary, jubilee;
- if you are handed a bouquet of thirteen lilies, you know that they want to break off relations with you;
- Fifteen lilies given to a girl/woman mean the man’s serious intentions for life together.
Triple origami lily with green backing
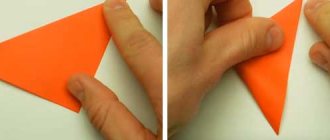
The original lush lily using the origami technique can easily be supplemented with a green base for a more natural look.
The base is formed using a simple lily manufacturing pattern. However, other steps will be required in the final stages.
- The workpiece is carefully stretched to the sides.
- The internal parts are smoothed and folded inward.
The finished parts of the flower are inserted inside the substrate and secured. You can decorate a child’s room with this craft or use it for a school exhibition.
Making a flower from individual elements
Let's look at how to make a paper lily in a different way. The photo below shows the step-by-step process of making a flower. It is assembled from individual identical petals made according to a template. Don’t forget to additionally fold each element in half along the central fold for relief of the workpiece.
You can make a craft using only petals, painting the inner sides halfway with light-colored gouache paints. The lily looks interesting, in which the middle is also made from smaller parts.
The work is going to be done with a slight overlap of one petal on the adjacent one. This is necessary so that when the lily is finally assembled it has a cone-shaped shape.
Also look at the photo on how to make a lily with your own hands with thin stamens, at the ends of which small pieces of paper of a contrasting color are attached. Assembling the flower onto the stem is carried out according to the method already described above, so we will not repeat it.
DIY foamiran flowers: features and master classes
Reading time: 7 minutes Don't have time?
The link to the article has been successfully sent!
We will send the material to you by e-mail
Foamiran is an unusual and pleasant to the touch material. Faux suede is used to make interior decorations, luxurious bouquets, decorate cards, and create unique hairpins and headbands. Today is the editorial office of HomeMyHome magazine.
ru has prepared for its readers 11 step-by-step instructions on how to make flowers from foamiran with your own hands.
We will offer you templates and useful recommendations from craftsmen, and also talk about how to properly care for finished products.
Incredible, exquisite and vibrant foamiran jewelry attracts at first sight
Ranunculus is a very delicate creature with lush buds and a variety of colors. This flower can now often be found in the most luxurious bouquets. The size of the ranunculus is from 7 to 10 centimeters in diameter, and in appearance it looks a little like a peony or rose. A blooming ranunculus can look like a poppy.
Ranunculus made of plastic suede
How to make a ranunculus from plastic rubber:
IllustrationDescription of action
| To give texture to the petals, the foma leaf needs to be ironed through crepe paper. This way it will become a little thinner and get a characteristic relief. |
| You can pull out the petals on bottles or a small light bulb. |
| Trace the petal templates. It is better to do this with a white pencil, this way there will be no marks left on the material. Do not use sharp objects for tracing; they may tear the sheet. |
| Before cutting out the petal, shape it on a convex object, slightly stretching it in the desired direction. |
| After stretching, cut out the petal so that the template mark line is not visible. |
| After making petals of different sizes, make several of the smallest blanks, shading them with a sponge and pastel. |
| Make the core of the flower from a bead or a foil ball. Wrap the workpiece with foamiran and stretch the material so that there are no folds. |
| Secure the center of the flower with hot glue. |
| Trim the head with scissors at the base. |
| Secure the base to the wire for the stem and glue it with second glue. |
| Wrap the stamens around the head and glue them with hot glue. |
| Fasten the tinted petals together so that you get a small circle with a diameter the size of the center of the flower. When gluing, make sure that the petals are about halfway over each other. |
| After creating the core of the ranunculus, glue the petals sequentially from smallest to largest in a circle. |
| The gluing technology is simple - each petal should be approximately halfway over the previous one. |
| In this way, glue 4-6 layers of petals. The more petals, the larger the flower. |
| Cut out the sepals from the green fom and lightly pull them to shape. |
| Glue 5 sepals onto the base of the flower; they can be lightly tinted with powder. |
| Place a floral tube onto the wire and secure it with instant glue. |