Photo: start-good.ru The decoupage technique came to us from Ancient China, although the name itself was given to it much later by the French. An interesting, simple, budget-friendly and always effective way to decorate any product is not lost on DIY decor lovers. Today we will talk about bottle decoupage and offer 10 interesting ideas!
Varieties of decoupage
The ancient technique of decorative design of objects today has several popular directions.
How to decoupage a bottle of cognac using rice napkins
Decorating cognac bottles with rice napkins is perfect. To do this, we need a primer, a pigment to match the background of the napkin, a file, PVA, napkins, stamps or stickers, brushes, and a fixative varnish.
To design a bottle you need:
- Prepare the surface (clean, degrease and coat with primer).
- Place a rice napkin on the file with the image facing inward, lightly moisten the napkin with water and place the image on the bottle.
- Remove the file and cover the cloth with PVA. In this way, completely decorate the bottle.
- If necessary, add decorative elements (stamps, stickers, etc.).
- Cover the product with aqualac.
- After drying, apply the pigment to the protruding parts of the bottle.
- Cover the product with a fixative.
Using rice napkins on a bottle of cognac you can create a real masterpiece
This decoration is also suitable for small bar bottles, but for anniversary cognac bottles a more effective decoupage technique with an abundance of decorative elements is suitable.
Decopatch
The technique is essentially similar to creating a patchwork quilt. The design consists of individual small elements that are united by a common theme or similar color scheme.
Selecting details for decoration requires a competent and thoughtful approach. To make the task easier, purchasing a ready-made kit designed to work specifically with this technique will help.
Bottle using decopatch technique
This decoupage technique is reminiscent of patchwork - sewing things from small patches of different textures. Therefore, you will need multi-colored scraps and scraps of paper of any density. Napkins, old gloss pages, newspapers or special paper are suitable here. Bottles decorated with sheet music look very interesting.
Choose one characteristic that will unify your patchwork bottle - such as style, theme, color or texture. They don't have to be identical: use the color wheel principle or contrasts. The main thing is that there is a concept, and a brand new bottle will not look tacky. Decopatch is good both as a background and as a full-fledged independent decor.
Photo: domsdushoy.ru
Classic (direct) decoupage
It is the simplest technique with which it is recommended to begin acquaintance with this decorative art.
The creative process consists of gluing paper elements onto a previously prepared surface. Creating decor requires care, otherwise unsightly bubbles and folds will appear on the surface of the bottle being processed.
There are several basic methods of working in the direct decoupage technique:
- using a file;
- brushes;
- ironing.
For beginners, it is recommended to master bottle decoupage using classical techniques.
Materials and tools for work
First of all, you need to purchase the basic components to create the decor. Namely, the object on which decoupage will be carried out, glue. Next you should proceed based on the selected type. Secondary materials for work can be: napkin, acrylic paints.
Reverse technique
Reverse decoupage of bottles will require a product made of transparent glass, since the placement of decorative elements occurs on the inner surface of the product. The technique involves a slightly different order of actions.
Note!
- DIY gifts for February 23rd - a large selection of ideas for creating unusual gifts for Defender of the Fatherland Day
- What to give a 2-year-old boy - a list of the best options for an interesting and useful gift (120 photo ideas)
- Papier-mâché - TOP 120 photo reviews of original products. Detailed instructions for beginners on creating beautiful crafts
Original ideas for decorating bottles with decoupage
Large and small bottles, products with bizarre shapes or graceful curves, made of transparent or dark glass always look original. It is very simple to decoupage bottles with your own hands, but to do this you need to master a simple technique and carefully select an original idea.
At the preparation stage, great attention is paid to details and the selection of materials, which will help to quickly and easily realize the most interesting idea. Before you begin, you need to study in detail the possibilities of decorating bottles and select consumables that will help realize the idea.
Volumetric decoupage
This is a relatively young decorative technique that is rapidly gaining popularity. The decor allows the use of shells and molded parts to create three-dimensional decorations on the glass surface.
Experienced craftsmen often use a special plastic paste as a base.
An important advantage of the decoupage technique is the absence of strict frameworks that limit the creative imagination of the master.
You can use any techniques, decorative details and artistic design methods to create unique designer items. You can admire the creations of experienced craftsmen by studying pictures of bottle decoupage.
Application
To use the coffee can decoupage technique, you will need ordinary available parts. The duration of the process will pleasantly surprise you, because in a short period of time you can achieve amazing results.
Stylists most often use techniques when decorating rooms made in different styles. For example, it could be Victorian style, Provence, or other styles.
It is difficult to decorate furniture in this way, because in this case experience and a certain level of skill are required.
Important! As a gift to friends, or, for example, for a housewarming, you can bring a bottle decorated using this technique into your home.
Tools
The list of necessary devices is small. Usually these tools are found in any home. Therefore, a new hobby will not require serious financial investments.
You will need:
- brushes of different sizes;
- containers for water and various materials;
- soft fabric;
- stationery knife;
- foam sponges;
- sandpaper;
- sharp small scissors.
Decoupage: glass jar to create a vase
To create a charming vase, you can use a jar with a sealed (lever) seal, that is, a metal clamp. In such a jar, the lid is secured with metal rims, which are very easy to remove. In addition, this type of container does not have the so-called threads that are typical for jars with a lid. And the conical shape is a strong argument in favor of the fact that this type of blank is ideal for a vase.
Vase from a jar - decoupage on glass: step by step
Necessary materials:
- jar with a hermetically sealed closure (clip);
- technical acetone + fabric;
- clear varnish + soft flat brush;
- white paint (ceramic) + gloves;
- flat paint brush;
- fine-grained sandpaper-1000, 2000;
- bowl of water;
- sponge brushes or chopped dish scouring pads;
- napkin;
- decoupage glue + flat soft brush;
- waxed thread and beads (optional for decorating the vase).
Master Class
Jar preparation:
- Unfasten the lid from the jar and pull off the metal hoops. Clear the jar of labels (it is best to soak the container in hot water and remove possible glue residues with technical acetone).
- Wash the jar well and set aside to dry. Degrease a dry container with technical acetone (extraction gasoline may also be used). Leave for a while to allow the moisture to evaporate.
- The first applied primer layer is a clear varnish. A thin layer of varnish should be applied with a flat, soft brush. Then drying and hardening (here you need to apply the information on the varnish packaging). Be sure to stir the varnish thoroughly before use. Using varnish as a primer increases paint adhesion. Another method you can choose is to frost the glass surface with sandpaper.
- The next step is to apply the paint with a sponge, applying and lifting from the surface. Choose a thin layer. You actually want to avoid using too much paint because it will be difficult to spread later. But if this happens to you, then have a second sponge ready to collect the excess. Of course you can use sponge brushes. But choose an economical material, i.e. the kitchen version, cut into pieces.
- Paint the recessed parts of the can with a brush. You can use regular acrylic paint, although ceramic paint is better. It is truly incredibly durable, and you can even buy it in test bags. One sachet is enough for a whole jar. It is better to pour the paint onto a stand to more conveniently distribute the amount on the sponge. Since there will be some time between subsequent coats, it is recommended to place the paint stand in the bag and close it tightly. This ensures that the liquid does not harden. After the first coat of paint has dried, apply a second and again leave the can to dry. The third layer is the last. Use clean sponges every time. Ceramic paint is really fast drying and each coat takes about an hour to thoroughly cure.
- Before you begin applying the wipe, one more step is to sand with fine-grit sandpaper (1000), and then wipe the can with a damp cloth to remove dust. You can also sand between coats, especially if you notice any unevenness.
Decoupage glass jars with napkins:
- It's finally time to apply the napkin. Cut out the design with small scissors, then gently soak the tip of your finger in water and pluck out the edges. You can immediately remove the motive if it is more convenient for you. A shape that is pulled out rather than cut out fits into the background more easily. Each napkin most often consists of 3 layers, so it's time to separate them and leave only the top part with the pattern.
- The part of the jar on which the napkin is glued is smeared with decoupage glue. Press the napkin, starting from the center, and then work your way towards the outer edge. Try to do this accurately to avoid creases.
- Apply a thin layer of glue to a napkin. Do this with a soft, flat brush. Move from the inside out. When applying glue, press the brush lightly onto the napkin, but do this very carefully because the wet napkin is delicate and can be easily torn. Again, be careful not to create creases.
- Leave the jar for the glue to dry, and then paint over the background of the napkin with white paint, which, although light, has a slightly different degree of whiteness. By the way, paint over the contours of the napkin motif so that they are not so sharp and do not stand out too much from the white background.
- Wipe the white paint that was applied to the outside of the picture with fine-grained sandpaper (1000), and then apply varnish to the entire can in 4 thin layers, each only after the previous one has dried. After the last coat has dried, sand the whole thing down with 1000 and then 2000 grit sandpaper.
You will be pleased with the end result. The tissue paper matches the can very well and you can't really see any line between the paper and the paint. A thread of beads, which you select in color to match the dream catcher motif, perfectly complements the entire composition.
Materials
In addition to the original shaped bottles themselves, you need to prepare:
- PVA glue;
- acrylic paints;
- varnish of various types (including craquelure if necessary);
- primer;
- masking tape;
- decorative elements (napkins, postcards, photographs, etc.);
- degreaser (dishwashing detergent, alcohol, solvent);
- additional details (ribbons, braid, beads, beads).
Varnish for decoupage is used differently depending on its functional purpose.
The final protective coating requires a varnish that is resistant to abrasion and changes in air humidity.
Note!
- Kinusaiga technique - TOP-140 photos of the best ways to create crafts using the Kinusaiga technique with your own hands + instructions for beginners
- Do-it-yourself passe-partout - a master class with step-by-step do-it-yourself schemes. Making tips + photos of the best examples
- Decoupage with napkins: TOP-150 photos of ways to decorate with napkins. Simple instructions for beginners at home
Experienced professionals advise:
- acrylic, polyurethane and alkyd varnishes for a high-quality protective layer;
- decorative varnishes with different effects for decoration.
As an adhesive, you can use inexpensive PVA glue or special decoupage mixtures.
Decoupage eggshells on bottles
This decoupage will add volume to the patterns on the item, making the bottle truly unique. You will need:
- Shells cleaned of dirt and films
- Wide flat brush
- PVA
- Special napkin for decoupage
- Acrylic paint
- Toothpick
- The varnish that will be used for the finishing coat
Let's get started:
- Before applying to the bottle, crush the shell into small pieces with your fingers. However, adjust the sizes depending on your idea.
IMPORTANT: Some craftsmen glue large pieces of shell to the surface, and then crumble them with a blunt object, placing them with a toothpick. However, it is better for beginners not to resort to this method.
Crumble the shells for decoupage on the table
- Apply glue to the surface of the bottle. It is recommended to start from the neck. Pieces of shell are applied to the glue and smoothed using a toothpick. Remember to lightly press down the material.
Press down the shell with a toothpick during decoupage.
- Cover the entire bottle in this way, but do not touch the bottom. Top coat the entire piece with white acrylic varnish.
Decoupage the bottle from the neck
- Since you need to highlight the cracks, you should cover the surface of the bottle with a brown varnish with a sponge . It is better to mix several shades in advance to get the desired one.
Coating with brown varnish to decoupage the surface of the bottle
- Without waiting for the varnish to dry, wipe the bottle with a damp cloth. This way the varnish will remain only in the cracks, which is what is required.
- Cut out the desired images from napkins. Separate the top layer from them
Decide what images are needed for this bottle decoupage
- Now attach the selected drawings to the bottle and apply glue on top
IMPORTANT: Apply the glue from the center to the edges using a wide brush.
Bottle after decoupage with pictures
- The final stage is applying acrylic varnish
This is what a bottle will look like after decoupage with shells. Eggshells in decoupage can serve as an imitation of reptile skin. Decoupage with shells goes well with flower designs. Bottles with decoupage from shells look quite stylish and unusual
Preparation
Work always begins with preparing the glass surface. A prerequisite for obtaining a quality product is the complete removal of stickers and labels from the surface of the selected bottle.
Then it is thoroughly washed with dishwashing detergent and dried. Experts use alcohol solutions or solvents to effectively degrease glass surfaces.
The glass is carefully sanded with sandpaper and degreased again.
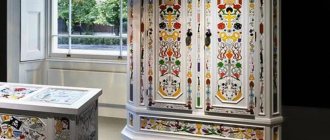
Decoupage of enamel dishes
Often our enamel dishes begin to deteriorate: the enamel comes off, the design wears off from washing, and the color becomes dirty. Rust appears in some places. What to do?
We turn on creativity, roll up our sleeves, prepare a place for “dirty” work and dive headfirst into the process. And so that our loved ones do not interfere, we involve them in this sacred rite...
Tools and materials for utensils:
- rust converter;
- alcohol;
- primer-enamel for rust;
- white enamel;
- napkins, prints, decoupage cards;
- alkyd-urethane varnish;
- brushes
Let's start processing the container:
- If there is rust on the dishes, be sure to treat them with a rust converter. Repeat the treatment several times, otherwise the corrosion will go further and the entire decor will be ruined.
- Degrease the surface of the dishes and remove excess rust converter.
- We prime the surface with a special primer-enamel for rust. Apply three layers. Sand after each layer.
- We paint the surface with white enamel.
- Prints, napkins and decoupage cards are glued to urethane varnish. It grips well on flat surfaces.
- For the background and drawing, you can use the same primer-enamel for rust, mixed with acrylic paints to the desired color.
- Additional surface decoration elements can be used.
- We sand the surface well and apply alkyd-urethane varnish. It is self-leveling and self-leveling.
Working with enamel and metal utensils is more labor-intensive, but the effect will not be long in coming. You can update your pots, jars, teapots and decorate your kitchen with exquisite dishes.
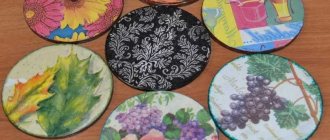
Preparing paper elements
A variety of paper blanks are acceptable for artistic decoration.
- When using special napkins, the elements are simply cut out and removed from the base.
- Magazine illustrations and postcards require pre-soaking in warm water so that they can be easily removed from excess layers of paper. The parts are cut out with sharp scissors.
- Using regular napkins will require cutting out the intended patterns.
To learn more about the process of preparing various paper parts, watch the video tutorials.
DIY bottle decoupage: how to get growths
Often, volumetric elements are required to decoupage a bottle. You can get growths on bottles in various ways. The best way is to use polymer clay. This method makes it possible to obtain a plain, convex element of any shape. Clay decorations are attached using decoupage glue, “Second”.
When working with polymer clay, you should use a special softening agent; you should bake the material in the oven at 130 degrees.
Three-dimensional patterns on a bottle can be made with ordinary putty by filling an empty PVA tube and squeezing the material along the contour of the desired pattern.
When decoupaging bottles, you can use improvised means that everyone usually has in their home.
After drying (about a day), the putty must be sanded: this way all unevenness and sharp edges are removed.
You can also obtain voluminous decorative details using improvised means. For example, growths on a bottle can be made with salt dough or pasta. The dough is kneaded from flour, glue, water, vegetable oil. Pasta is glued to the surface and painted in the desired color.
Gluing parts
The most exciting step in the creative process is gluing paper elements onto the glass surface.
The work will require accuracy, attention and concentration.
- The parts are carefully coated with an adhesive; in addition, it is easy to apply it to glass.
- The blanks are placed on the glass and their surface is very carefully smoothed, expelling air bubbles and excess glue.
Pasting methods
Experts recommend several methods of applying napkins:
With a damp brush: the molten design is fixed in the corners with droplets of water. Then wet the entire wet brush and stretch it over the surface. After this, glue is applied.
Pre-varnishing: apply aerosol hairspray to the dry fragment and allow it to dry. Such a drawing does not break due to the movement of the brush.
Into a puddle: a puddle of glue is poured onto a dry fragment spread over the surface, and the adhesive composition is distributed over the entire surface. Excess is removed with a soft cloth.
From a file: place the napkin with the pattern down on the file, moisten it generously, and straighten it out. Excess water is drained and the design is transferred to a jar.
By hand: use your fingertips instead of a brush. The glue is driven in from the middle of the fragment to the edges.
Applying varnish
The final step in the work is applying a varnish coating to the surface of the product.
This is necessary to protect the bottle from aggressive environmental influences, abrasion, and scratches.
The varnish is applied to a thoroughly dried surface. For better protection, experts recommend applying several layers of varnish. Any master class includes the final varnish coating stage. It is important to thoroughly dry the previous layer before applying a new coat.
Stages of decoupage technique
The creative process of work can be divided into several technological stages, the sequence of which must be strictly followed:
- Bottle preparation includes washing, removing labels, and degreasing the surface.
- Surface primer.
- Gluing decorative elements.
- Application of varnish coating.
Regardless of the materials used and the complexity of the work, the design stages are unchanged. Decorations should be selected and cut out in advance.
Applications of rice paper
Simple decoupage of a wine bottle can be done using rice paper, which is used for baking.
The best option would be paper with a floral pattern.
Operating procedure.
- The surface of the washed bottle must be dried and degreased.
- It is recommended to tear the paper to obtain an original effect.
- It is easy to glue the elements onto the glass using glue. Another way involves placing damp paper on the bottle and drying it with a hairdryer.
- At the final stage, the bottle is coated with transparent varnish.
Operating rules
If you adhere to the basic requirements of the decoupage technique, you can simplify your work:
- The bottle should have a smooth surface.
- When using paper napkins as a design, only the top layer must be glued.
- For better gluing of the design to the glass surface, it is recommended to use decoupage glue, but if there is no place to purchase it, then as an alternative you can use PVA glue diluted with water in a 1:1 ratio.
- To protect the pasted pattern from moisture and mechanical damage, the product is coated with a thick layer of acrylic varnish.
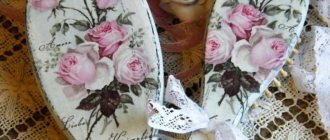
Decoupage with tights
An original option for voluminous design is the use of tights for voluminous decoupage.
The advantage of this method is that it is easy to shape the tights into any shape and create a beautiful drapery on the surface of the bottle.
Using this method, it is easy to perform original decoupage of a bottle of champagne.
Operating procedure.
- The first step is to prepare the surface of the bottle.
- The tights must be soaked in the adhesive composition, having first cut off their upper part.
- Then the tights are pulled over the bottle, gathering them into folds.
- The dried workpiece is painted with acrylic paint.
- Additional design involves the use of paper parts, beads, and decorative varnish to give the bottle an impressive look.
- At the end of the work, it is necessary to apply a varnish coating.
The original design involves the use of beads or coins for additional stylish decor of the gift bottle.
Types of decoupage
There are five types of decoupage. Let's look below at what they are and their manufacturing techniques.
Classical
This type of decoupage is very simple. The main task is to carefully cut out the image and stick it to the surface. Carefully pay attention to dimpled and bulging areas and smooth them out as you go, trying to avoid tearing.
The surface can be coated with colored or craquelure varnish in advance. Craquelure is a crack in the paint layer in a piece of painting or any other paint coating.
Direct decoupage uses the technique of gluing a picture to the outside of an object.
Decopatch
For a decorative patch you need: a set of pieces of paper. The technique consists of gluing the surface with materials that are in demand according to the idea and recreating one continuous coating.
Decopatch is a combination of decoupage and patchwork. Patchwork is a technique of sewing things from pieces of fabric. The flaps are connected into oversized blocks according to the area of geometric shapes.
Many pieces of paper create a patchwork quilt effect and the end result is a completely filled surface.
At the end we get a brilliant mosaic.
Reverse technique
For transparent glass objects, reverse decoupage is often used. In order to sell a product with such decoration, the following requirements must be met:
- Find the desired picture;
- Paste the design on the other side of the product with the front side facing the glass;
- Make a craquelure;
- Add background;
- Apply topcoat.
The main feature of this species is its unusualness. Not everyone will think of applying a design to the opposite side and end up with visually the same decoupage as when performing other techniques.
Volume
Decoupage with volume contains “raised” components of the illustration, which become more voluminous due to the mass for modeling. A similar result can be achieved by gluing identical parts onto each other in multiple layers.
A relief surface can be created using paste, gel, shells, fabric, 3D map and putty.
Art
Smoky, also known as artistic decoupage, unconditionally imitates painting. Through colorful material and variational maneuvers in art, the boundary between the picture and the surface around the drawing is erased. There is shading and finishing of details. At the end there is a transparent haze.
You may need skills or a master class from a specialist.
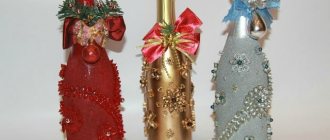
Decoupage bottles for a wedding or anniversary
Wedding decorations are usually kept in the same style. This affects the decor of flower bouquets, celebration halls, and festive glasses. It’s easy to complement the style with original decoupage bottles.
You can use paper napkins, original wedding cards, or even photographs of the newlyweds as decorative details.
Additionally, it is easy to decorate such bottles using lace, beads or beads.
An original bottle of champagne with the image of the hero of the day will be a memorable and pleasant birthday gift.
As additional decorative elements, it is easy to use thematic drawings or spectacular craquelure varnish to create a unique product.
Vintage bottle
An unusual vintage vessel can be decorated using the craquelure method.
To obtain a spectacular antique bottle, a special craquelure varnish is applied to the surface covered with paint. When dry, it will crack, creating the appearance of a surface that has been fairly worn by time.
In addition, it is easy to paste the bottle with paper elements of the corresponding theme: ancient writings, geographical maps, floral motifs.
At the end of the work, the product must be varnished.
New Year's decoupage
Celebrating the New Year also involves a non-standard approach to decorating the festive table or arranging New Year's gifts.
Decoupage of a New Year's bottle involves the use of a white background or openwork lace as decoration. New Year themed designs are easy to cut out from greeting cards.
An excellent design option would be beautiful snowflakes, which are easy to cut out of ordinary paper napkins, towels or toilet paper.
You can get ideas for decorating bottles by looking at a photo of a decoupaged bottle. A creative approach will allow you to create an original interior element or customize a gift.
Decoupage using toilet paper
For decoration, you can use paper towels or toilet paper. It is thin, textured and easy to work with.
Operating procedure.
- Store the bottle and degrease the outside.
- If necessary, apply the pattern with acrylic paint. Let dry.
- Tear the paper into pieces of the required size and thoroughly soak it with glue.
- Glue the paper parts onto the pattern elements, giving them volume.
- Dry the bottle.
- Carefully apply a thin layer of acrylic paint. If necessary, stick on rhinestones or beads.
- Coat the finished bottle with varnish in several stages.
In a similar way, it’s easy to do New Year’s decoupage using white paint and clear varnish.
Photo of decoupage bottle
“Lady in the Hat”: decoupage of wine bottles
Wine is a favorite drink of women. Therefore, designing a bottle of wine in the “Lady in the Hat” style would be appropriate and extraordinary.
The main element of this decor is a bottle cap, which is made as follows:
- Take cardboard, from which the crown of the hat and a circle with a hole for a cork of the required diameter are cut out.
- The elements are glued and decorated using satin ribbons of different sizes. The tapes are applied to the surface coated with glue.
- The hat is optionally decorated with feathers, beads, roses, etc.
Decoupage of wine bottles will be an excellent interior decoration in any room
Depending on the style of the cap, the bottle itself is designed. Most often, decoupage is performed using fabric: a fabric previously soaked in a solution of PVA with water (1:1 ratio) is laid out on the prepared surface of the bottle, forming elegant folds. After drying, the fabric is coated with glue several times and painted in the desired color. This design looks most impressive on a round bottle.
Decoupage
Decoupage is translated from French as “an object that is cut out.” In needlework, this word was originally used to describe the method of applying elements cut out of paper onto an object. For greater strength, these glued elements were later varnished, and the surface took on the appearance of painting. This is how poor peasants in China decorated furniture, and this is where this technology for making decorative items with their own hands came from. This article will talk about how to decoupage a glass bottle.