how to make daisies from paper
Daisies are the embodiment of simple beauty and sincere joy. In this article you will learn how to make paper daisies with your own hands . These are very simple flowers with characteristic shapes, so their paper counterpart is also very easy to make.
A paper daisy flower with a yellow center surrounded by rays of white petals brings sunshine to any floral arrangement or bouquet. Here are 12 simple examples with step-by-step photos. These are daisies made from corrugated paper , several origami models and light versions of daisies made from colored paper using templates.
Paper chamomile quickly
Here's how to make simple paper daisies . This is just a diagram, but very simple and understandable. If you need to make a lot of flowers quickly, this is a great easy way.
You need a sheet of any paper, approximately 22 x 30 cm, glue, tape or a stapler.
- Before folding and cutting the paper, color it as you wish.
- Fold a sheet of paper in half lengthwise.
- Draw a line 3 cm from the edge across the width of the paper.
- Cut the strips approximately 1.5cm from the folded edge to the line.
- Fold the two uncut edges together and secure with glue or tape.
The paper chamomile is ready.
Author: Andrea Mulder-Slater Photo source: kinderart.com/art-lessons/seasons/paper-flowers/
A bouquet of daisies made from sweets with your own hands. Sweet - design.
A bouquet of daisies made from sweets with your own hands. Master class with photos
Master class: “Sweet bouquet”.
Suite - design Author: additional education teacher Novichkova Tamara Aleksandrovna MBOU DOD Lesnovsky House of Children's Creativity. Description of work. The master class is designed for children of primary school age, teachers, creative parents and those who like to make gifts with their own hands. Daisies are made from corrugated paper and candy. The process of making flowers is not complicated, but it requires patience and accuracy. Making a sweet bouquet will bring great pleasure to adults and children. Purpose. Sweet design is the creation of flower arrangements from sweets. You can present an original, sweet bouquet as a gift for a holiday, a birthday, or simply as a token of gratitude. Or decorate your home with an unusual candy design. Purpose: Making a gift for the Day of Family, Love and Fidelity. Objectives: - expand children’s understanding of the variety of arts and crafts products; — improve the ability to work with corrugated paper; — teach the sequential production of flowers, the preparation of unusual flower arrangements; - to cultivate interest in work, aesthetic taste, a sense of love and respect for your loved ones, family.
All-Russian Day of Family, Love and Fidelity is a very young holiday; it is celebrated in our country on July 8, starting in 2008. The initiators of its appearance were residents of the city of Murom, Vladimirov region. This is not a coincidence - it is in Murom that the relics of Saints Peter and Fevronia rest. In the Orthodox tradition, they are considered the patrons of marriage and family. Peter and Fevronia of Murom are holy spouses, one of the brightest personalities of Holy Rus', whose lives reflected its spiritual values and ideals: fidelity, devotion, love and self-denial. The symbol of the family holiday is the chamomile. Why chamomile? This is the most common and famous flower in Russia, and the holiday is celebrated during the most blooming summer season. In addition, chamomile has been a symbol of love since ancient times. On this day, the best families are given awards, bouquets of daisies, festive concerts and folk festivals are held. Let us give our family a gift and please them with our attention and love. I suggest watching a master class on making daisies using the suite design technique.
Chamomile, emitting light, similar to the sun, hurries everywhere after us, its own, without crossing. Until late autumn Bold glances are thrown at us. Her cheerful yellow eye Through her white eyelashes... Throughout all the clearings and fields, Chamomile since May For your happiness, for our joy It grows, blooms and glows. M. Dudin Materials and tools: - white and green corrugated paper; - candies in gold foil; - wide tape; — tubes for cotton candy or kebab sticks; - scissors; - PVA glue;
Step-by-step execution of a bouquet. We take candies in shiny, gold foil. These will be the centers of the daisies. We will need 5 of them. You can make the bouquet larger. Let's take cotton candy tubes and wide tape.
Cut off the tape -10 cm, wrap the candy. Then insert the tube and press the tape tightly.
We do this with every candy.
Let's start making chamomile. Cut a rectangle from white corrugated paper, measuring 30cm by 9cm. Cut into even strips, not reaching the edge 2cm.
It can be made simpler. Fold the strip like an accordion and cut it.
Round off the ends of the petals. We unfold our “accordion” and it turns out like this.
Using a stick or scissors, whichever is more convenient for you, we will give the petals a natural shape. Let's twist them a little. We make such preparations for all daisies.
Take PVA glue. Lubricate the bottom edge of the corrugation and twist it around the candy onto the stick.
We continue to twist the petals, gluing them with PVA glue.
Let's give the daisy a natural look and straighten the petals. Now chamomile is not only sweet, but has also become beautiful.
This is what it looks like from the back. We will make the rest of the daisies using the same principle. Let's start making chamomile leaves. Cut a rectangle of green corrugated paper 8cm long and 4cm wide. For one flower we will make four leaves.
Fold the rectangle in half, round it off, cutting off the edges. Making small cloves. You can use a template. I prefer to teach children to do this kind of work themselves, following an example, fostering independence and creativity.
Cut out the leaves for all the daisies.
Using a strip of green paper 1.5 cm wide, we tape the leaves to the stem at a short distance from each other. The result is such a delicate chamomile. Let's look at it from all sides. We make the rest of the daisies and put them in a vase.
Here they are our sweet, snow-white daisies. Can't wait to give them to your loved ones. Let's add solemnity to the bouquet. Let's arrange our “Sweet bouquet of daisies” on a palm leaf (rabilinia) and tie a bow. Now you can give! Let's put the bouquet in mom's room. Let peace and tranquility reign in the family. May our loved ones live happily ever after.
And the granddaughter made these daisies for her parents.
Family is the basis of every life, Love is the basis of all foundations, And loyalty is above all whims, All together - better than any dreams! Let love and fidelity and family live in every home! After all, everyone in the world knows for sure that only the house will save me!
We recommend watching:
DIY gift for your beloved mother. Master class with step-by-step photos “Daisies” application using cotton pads and colored paper DIY candy cake. Master class Do-it-yourself bouquet of Chupa candies - Chups
Similar articles:
Candy cake. Suite design master class with step-by-step photos
Application from napkins. Daisies
Quilling. Chamomiles. Master Class
Quilling chamomile. Master Class
To the authors
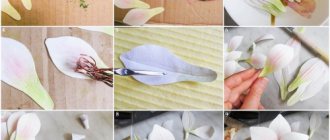
How to make a daisy from corrugated paper with your own hands, step by step with photos
- Take orange or yellow corrugated paper and cut out this blank from it, from which we will make the core of the future chamomile:
- We take a solid round-shaped base - it can be polystyrene foam or candy. We wrap this base with yellow paper and tie the tail with white thread or wire:
- Lubricate the resulting workpiece with dry glue, and then carefully apply flock powder to it using a brush in the same color as the paper:
- The resulting core should look like this:
- Now we take white corrugated paper and cut out the following blank from it:
- We carefully wrap the core into this blank as shown in the photo below:
- As a result, you should end up with a tube like this, which must be tied on one side with thread or wire:
- On the other side, the white paper needs to be bent so that you get a kind of skirt:
- We take scissors (it is best to use nail scissors for this purpose) and cut out chamomile petals from white paper:
Important! There is no need to strive for the petals to be perfectly identical. Nowhere in nature will you find a single daisy that has exactly the same petals.
- Decorate the resulting chamomile with artificial greenery and use the craft for its intended purpose.
Scarlet asters and snow-white daisies with sweets
Everyone loves flowers, from young to old. And sweets too. And if these two components are put together, what will happen? That's right - a bouquet of sweets!
Sweets hidden in the petals of snow-white daisies and scarlet asters are an unusual and original gift that will impress even the most sophisticated person.
The highlight of such a gift is its uniqueness, because each bouquet is created by hand. Do you want to learn this skill? You've come to the right place! Here we will teach you this needlework and tell you about all the nuances and tricks. Roll up your sleeves, our photo story begins!
What materials do you need to stock up on?
- Corrugated paper, preferably floral green, red and white. How can you tell if paper is floral or regular? The first one feels very hard to the touch, and if you pull it by the edges perpendicular to the embossing lines, it should stretch very well.
- Crepe or any other gold-colored wrapping paper.
- Foil.
- Sweets.
- Double-sided tape.
- Scissors.
- Strong threads of any color.
- Bamboo skewers.
- With a brush.
- Glue PVA-M.
- Regular narrow tape.
- Yellow glitter.
- Pink satin ribbon.
- Decorative elements: cut paper and red foam hearts.
How to make a bouquet of sweets?
Let's begin!
1. First we will make asters, we will need 3 of them in total. From red corrugated paper, cut three strips of the same length of 20 cm, but different widths: 3 cm, 4 cm and 5–5.5 cm.
2. Fold each strip in half twice, make cuts on the side, but not all the way, leaving 1.5 cm from the edge. Make the same cuts throughout the paper, 0.6–0.7 cm wide.
3. Round off the tops of the workpiece.
4. Gently stretch the middle of each petal.
5. Take some candy. Wrap it in foil, twisting the tails of the skewer. Secure everything on top with tape. Place double-sided tape at the base of the candy.
6. Take the narrowest red strip and start wrapping it around the candy.
7. Then wrap the middle and wide strips on top and secure with tape. It is not necessary to use all 20 cm of the length of these blanks at once. You should intuitively feel when it’s time to move on to the next petals so that the flower has the necessary splendor. If it doesn’t work out the way you would like right away, don’t despair; after 2-3 attempts you’ll definitely get the gist.
8. Cut off the excess paper at the base of the candy.
9. Bend the petals down one at a time.
10. Using a skewer or toothpick, twist the petals inside the flower, covering the candy and giving them a natural look. Astra is ready.
11. Let's start creating daisies, we need to make 6 of them. Making chamomile is very similar to aster, but has its own nuances. Cut the blank as for an aster, but of the same size, the widest one. Make the edges of the petals uneven, giving them a natural look. Prepare two such blanks.
12. Tear one of the blanks into several small pieces, each 5–6 cm long. Fold the petals one to one like an accordion.
13. This is what you should end up with on your table.
14. Prepare the candy in the same way as for the aster.
15. First, glue the “accordion” blanks to the tape.
16. Then, wrap the usual long strip of petals around them on top until you feel that the daisy is quite fluffy.
17. Secure the paper with tape by wrapping it tightly around the base of the candy.
18. Using a skewer, peel back the petals, exposing the middle of the flower.
19. Using a brush, coat the chamomile core with glue and quickly, before it dries, sprinkle it with yellow glitter. The chamomile bud is ready!
20. Using the example of chamomile, I will show you how to glue the bud cups and stems. Cut out a circle (oval) of green paper measuring 3 cm x 3 cm, coat it with glue, pierce it with a skewer and attach it to the base of the candy.
21. Then, cut out a green strip 1.5–2 cm wide and glue the cup of the bud on top. Next, we paste the same strip over the entire skewer.
22. Take a suitable pot for the bouquet, cut a piece of foam plastic at least 3 cm high to its size and secure it to the bottom of the container using double-sided tape.
23. Cut out 4 triangles from green corrugated paper. We glue double-sided tape to their bottom side.
24. Glue the paper inside the pot as shown in the photo. Please note: the last top four elements are not triangle-shaped, but petal-shaped.
25. Forming a bouquet. First we stick the asters into the foam.
26. Then, six pieces of daisies.
27. Place decorative cut red paper and several hearts down on the foam.
28. The pot can be left as is, but you can also decorate it. In this master class, the container is decorated with two types of paper - green on top and gold on the bottom. It is attached to the pot using double-sided tape. The same tape is used to secure a pink satin ribbon along the line connecting the papers. The latter is also decorated with decorative self-adhesive butterflies.
The bouquet is ready! Production time depends on your experience and confidence. In any case, one day is more than enough for you.
Get creative, dear readers! Create, intrigue, surprise!
woman-35.ru
Chamomile from beads: master class on weaving
For lovers of working with beads, there is a great opportunity to create daisies from beads with your own hands. Schemes may vary in complexity, but each craftswoman can determine the degree of complexity for herself.
The chamomile flower consists of 7 petals and a yellow center, and the stem is tall and has carved leaves.
Materials:
- Wire
- Beads: yellow, white, green
We unwind 50 cm of wire from the bobbin and string an unpaired number of white beads onto it. We make a loop out of this by twisting it several times. Leave a piece of wire 5-6 cm near the petal.
We string the same number of beads onto the long edge and make a second petal. They should fit tightly to each other. Having made the required number of petals, close them into a circle. To do this, twist the ends together. You will get a chamomile with an empty center.
To make the center of the daisy, you need a piece of wire 15-20 cm. We will attach one bead to the end. We will need 25 pieces, which need to be moved tightly and the outer ones secured. Create a spiral and place it in the center of the petal blank.
The stem can be made from a bamboo stick or a wooden skewer.
You can also use an unnecessary knitting needle.
The flower needs to be attached to the stem, you can also make leaves. Each istik can consist of 3 or 5 loops.
Elegant bouquet of poppies
Beauty can and should be created with your own hands. With the help of simple manipulations, ordinary sweets can easily be transformed into a luxurious bouquet of poppies.
To work you will need:
- 7 truffle-shaped candies;
- corrugated paper;
- wide and narrow polypropylene tapes;
- decorative mesh;
- scissors and nippers;
- floral wire;
- wooden skewer;
- tape;
- decorative greenery;
- lush bow.
Divide each piece of wire into 4 equal parts. Cut the thin ribbon into strips 25 cm long.
Cut out 7 rectangles from corrugated paper with sides approximately 18*12cm.
From each rectangle, cut out a trapezoid as in the photo.
Place the trapezoid on the rectangle and place the candy in the middle. Roll the paper into a tight roll.
Insert the wire into the roll from the side of the base of the candy without piercing it. Wrap the paper around the wire and secure with tape.
Tie a ribbon around the roll near the top of the candy.
Flatten the edges of the paper to form poppy petals.
Prepare 6 more flowers in the same way.
Attach the resulting poppies to a wooden skewer with tape. Add greenery in random order between the flowers.
Wrap the flower blank in net and tie a lush bow.