Father is the most important person in the life of each of us. It is very important to please him with a pleasant and original birthday gift.
A handmade postcard is a win-win option, because in any case you put a part of yourself into the craft. In addition, with your own hands you can make an original, creative postcard, reflecting the interests, desires, dreams, and profession of your father in it. He will be very pleased to receive such a gift from his son or daughter.
All ideas on how to make a birthday card for dad with your own hands can be divided into three groups:
- simple and effective;
- made in scrapbooking style;
- voluminous and stylish.
Next we will talk about several options related to each of these groups. Remember that these are just concepts that do not have to be repeated one after another - you can add something of your own to them, special. Making such a postcard is not difficult: even a child can handle it.
A simple card for dad from kids
All you need is cardboard, markers or pencils, scissors and glue.
- We trace the child’s palm on plain paper - we need the palms to be folded, so trace both the baby’s left and right hands. We transfer the template to cardboard and cut out two parts.
- We write a congratulation on one of the palms on the inside. If your child is still struggling with written letters, do something simpler: stick a photo of him.
- Take a strip of paper and fold it like an accordion. We attach the end to the first palm, and the opposite side to the second.
- Putting the card together.
- All that remains is to decorate the front part - this can be done using applique or using decorative elements: beads, rhinestones.
All is ready! The child will like this activity, it will allow him to spend his time usefully, and the result, of course, will bring joy to dad.
What kind of card can a child make for dad?
We use beads
The keychain with beads is the most popular.
Required material:
- beads can be of different sizes and from different materials;
- leather lace;
- ring.
Work algorithm:
- one end of the lace is tied into a knot.
- The beads are strung one by one on a cord. You can arrange them according to size, alternating colors, randomly. It is recommended to use beads on the same line from one material: wood, glass, metal.
- After the last bead, a second knot is tied.
- The remaining part of the lace is passed through the key ring and secured with a knot. The excess piece of skin is cut off.
- The work is done.
If you use thin wire or fishing line instead of lace, you can string buttons of different colors and sizes on them. The thread should end with a bead or beads. Then the work will look complete.
Postcard for dad in the form of a car
You can make a cool shaped postcard if you make it in the shape of a car. If there are several children in the family, they can participate in preparing congratulations together.
- Using a large sheet of thick paper or cardboard, draw the outline of a car. We draw windows, doors, headlights.
- Cut it out. We cover the windows with white paper - this way we indicate that they are transparent. We will cover the headlights with paper of a different color - for example, yellow.
- You will need children's photographs , from which you need to cut out only the faces. The size must correspond to the size of the windows: we will glue in “passengers”.
- We paste in the faces so that it gives the impression that a lot of people fit in the car. You can also use photographs of your mother, grandmother and other relatives or close friends of your father.
- Use a marker to draw the steering wheel. We cut out letters for congratulations from bright shiny paper - these can be the words: “Congratulations”, “Happy Birthday!”, “Happy Holidays!” or something else.
We attach the letters to the car - the gift is ready. You can additionally attach a loop to the card: then the father will hang an unusual photo, for example, in his office and will remember his creative children.
Postcard with a car for dad
Unusual ideas
Not everyone has the opportunity to buy a wide variety of materials and fabrics in order to make a keychain with their own hands. You can realize your creative fantasies using improvised means. More practical materials will also come in handy, which can later be used for other crafts. The collection of unusual ideas includes the following non-standard methods of making key rings:
- Lego pendant. From small parts you can assemble an unusual design. It’s good if there are holes in the elements of the designer, but if there are none, then you can make the holes yourself using an awl. All that remains is to attach the ring and hang the keys on it. Such a decoration will look original if you assemble an impromptu wall key holder from other parts of the designer.
- Keychain made from corks. Many people throw them away, not even realizing that they can be used to make an original decoration for keys by painting any design with acrylic paints on a pliable material. For example, you can paint a cork in the colors of the country’s flag, depict a gnome, a beer can, etc. After this, a special mount for the chain is screwed into the material.
- Foam decoration. You can cut a figure of any shape and size from this material. Suitable for creating abstract compositions. Styrofoam is easily pasted over with sequins and fabric, so you can make a rather unusual keychain using different techniques and materials. For example, pokeball, heart, letter, car logo, etc.
- A wooden keychain is the best option if you want to do something with your children. It is enough to arm yourself with a small piece of wood. It can be rectangular, square, round. The drawing is applied to the surface with acrylic paints. Here you can show all your imagination, depict your favorite cartoon characters, flowers, animals, etc. After drying, the drawing is varnished, and a special mount for the keychain is screwed into the product itself.
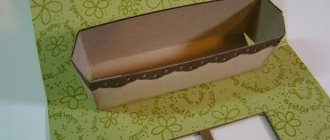
Postcard with tools
If dad is a jack of all trades , then a great idea would be to give him a card in the form of a bag of tools.
We will need:
- a set of colored paper;
- glue;
- scissors;
- cardboard of a dull color - a neutral, light shade is better.
We glue a paper pocket onto the cardboard base: to do this, cut out a rectangle slightly smaller than half of the base, glue it on the sides and bottom. You can use double-sided tape.
Now let's start making tools - we'll make a hammer, a hacksaw and a chisel:
- We draw the outlines of the tools on the cardboard: they should be large so that they look on a postcard.
- We cover the hammer: the handle with yellow, and the part with which the nails are hammered in with black paper.
- Chisel: handle – blue, tip – yellow.
- Saw: blade – yellow, handle – brown.
We insert the tools into the pocket. On top we make an appliqué with the letters “To the best dad!” We fold a 5 cm ribbon in half and attach it to the top of the card on the reverse side.
Dad will definitely love this craft!
Materials for production
The first thing you should take care of before starting work is the material from which the accessory craft will be made. First you need to think about what the keychain will be like. Shape, size, style - all this needs to be taken into account. After all, you can’t give a brutal man a cute felt cat.
So, to make a keychain with your own hands, you may need the following materials:
- felt, small pieces of multi-colored fabric, rags, velor, tulle, etc.;
- polymer clay (for needlewomen who know how to work with such material);
- pieces of natural and artificial fur, leather, wool, velsoft;
- beads, buttons, sequins, beads, rhinestones for decoration;
- wooden blanks, wine corks, regular Lego sets and other available materials that can become a reliable basis for a homemade accessory;
- wire, elastic bands, fishing line, tape, glue gun with rods, knitting threads, floss;
- padding polyester, foam balls for stuffing soft and bulky products;
- felt-tip pens, paints, keychain mounts and much more.
When it comes to making your own accessories, there is an inexhaustible flow of ideas, because you can use a wide variety of materials. You can sew, mold, paint, knit a keychain, showing your individuality and imagination.
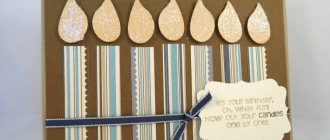
Stylish applique card
This is an unusual card. It is simple, stylish, and has few decorative elements. A serious person with taste will like it.
Button decorated card for dad
- Let's prepare a sheet of velvet paper. Ask your mother or grandmother for buttons: you need one large blue color and smaller buttons in bright colors. The quantity depends on how many children there are in the house.
- We arm ourselves with a needle and thread and sew a large button to the front of the paper about ¼ part below the top edge (pre-fold the sheet in the form of a book, you only need to sew on one side). We place smaller buttons lower down.
- Using a black felt-tip pen, we finish drawing the torso, arms and legs of the little men - you don’t need to draw them carefully, just mark them with strokes.
- On the back we write heartfelt congratulations and give it to the birthday person.
If possible, decorate the edges of the card with lace paper.
This is how easy it is to make greeting cards for your beloved father!
Features of crafts
You can give your dad a craft on February 23, New Year, but the most important thing is not to forget about his birthday. On this day, he is especially pleased to make sure that he is “the best dad” in the child’s opinion. A child at any age can make a gift craft. The mother can help the kids, but the craft itself should be very simple. Grown-up children are able to surprise their father by making the present themselves. You can engage in such “creativity” at home, in kindergarten or at school, in a labor lesson.
What is important in such crafts? The main work should be done by the child himself, and an adult can unobtrusively suggest an idea and help if difficulties arise. It is advisable, when thinking through a project, to take into account the father’s passions and hobbies, especially the specifics of his profession or hobby. Real luck if the craft has practical value.
An important role is played by the congratulatory inscription, which must be present on a homemade gift. It can be very simple - “Beloved Dad”, or it can also include warm wishes. A gift for dad's anniversary usually clearly indicates such an event, and the "round" number features prominently.
Book safe
You will need:
book with hard cover, pva glue, water, stationery knife, brush, pencil, ruler.
You will need:
deep cardboard box, disposable paper plates and cups, acrylic paint, pencil, ruler, tape, stationery knife, long wooden spatulas, 2 orange corks, red flat button, colored paper, felt-tip pens.
- Close and seal the box with tape.
- Draw the silhouette of the doors with a pencil.
- Cut out the doors.
- Cut the windshield across the box.
- Fold the windshield forward and make a wide slit.
- Secure with tape.
- Make the seats by folding the back down.
- Paint the car with acrylic paint.
- Cut the base of the paper cups and glue the lights on. Make an exhaust pipe from the rest of the glasses.
- Make a radiator grill using 6 spatulas.
- Make a sight glass divider using the seventh spatula.
- Make hazard lights out of traffic jams.
- Glue the wheels using plates.
- Draw logos with a felt-tip pen.
- Cover the interior with colored paper. It is better to use a brown color that resembles natural leather.
- Glue a red button and draw a smiley face on it.
You will need:
2 rapan shells of different sizes, a small stone, large round shells, small spiral-shaped shells, a glue gun, toothpicks, wooden skewers, varnish, thick cotton thread.
- Apply glue to the stone and glue a larger rapana shell. The shell should not wobble, it should be firmly attached to the stone.
- Glue a wooden skewer inside a smaller rapana shell. This will be the bow of the ship.
- Glue the skewer with the nose onto the base of the sailboat.
- Glue 3 wooden skewers perpendicular to the base of the ship.
- Trim the first and third skewers so that they are just below the middle skewer.
- Glue large shells as sails on the front side of the mast, and on the back side glue toothpicks that will serve as yards. There should be 3 shells on each mast.
- Make ropes from cotton thread in this way: tie the thread to the back of the ship, then pull it along the top of the masts all the way to the bow, then stretch the thread from bottom to top, winding it onto the yards on each mast, and if the thread slips in some places, fix it with glue.
- Glue spiral shells to the tops of the masts.
- Cover the craft with varnish.
The shell ship is ready!
You will need:
open cones (from 50 to 300 pieces), wire, glue gun or superglue, varnish.
Coin grenade
Metal craftsmen will appreciate a master class on making a mini version of the lemon. The body is formed from alternating copper, bronze, cupronickel coins soldered with tin. During further processing, it is necessary to ensure that the tin does not soften as a result of heating, constantly cooling with water. The ribbing is done with a file (drill), a wire serves as a pin, and the trigger lever is machined from a small metal plate. After etching, the color of the coins appears, and an iridescent pattern appears on the body due to the initial alternation of metal.
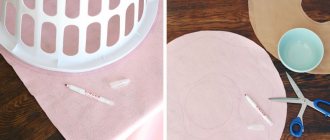
Picture frame
This is a very simple option, take regular cardboard and cut it into a square shape. Then cut out the same square, cut holes in it, it will be for the photo.
Take regular woolen threads or embroidery floss and wrap the finished frame in any order. Now glue the frame to a piece of cut cardboard and insert a photo.
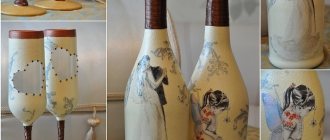
Crafts for dad from daughter are more cute, we will make a three-dimensional postcard. Girls always approach crafts creatively.
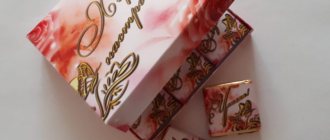
Gifts and sweets
Men tend to love delicious food. There are many gift ideas for dad for his anniversary, but one of them is making a birthday cake, he will definitely like it. In this case, the mother’s assistance is not canceled. The addition will be a poster with congratulations and photographs of the hero of the occasion, as well as touching words about his best human qualities.
We offer another unusual fruit option. After washing the apples, we stick a popsicle stick into each and dip it into caramel syrup, then into a nut mixture with grated cookies and multi-colored dragees. Pour liquid chocolate on top. When the samples are dry, wrap them in foil and tie them nicely with a ribbon.
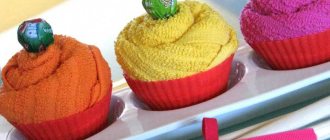
A father with a sweet tooth will love the “sweet ball.” We make a round base from foam rubber. Toothpicks will be stuck into it, one end of which goes into the candy. Alternating white and black wrappers will create the look of a soccer ball. You can go further and lay out a green field with a gate using improvised means.
Adults enjoy gifts no less than children. And children's gifts are very expensive for parents and are kept, as a rule, throughout life, bestowing with nostalgic memory.
Useful devices
Sons, like all men, are more inclined to rationality. Therefore, when choosing what gift to give dad for his birthday, they want to make it as useful as possible.
Phone holder made from a plastic bottle
An excellent solution in this case would be a phone holder made from an ordinary plastic bottle. It will be an original craft for dad for his birthday.
Necessary materials:
- Plastic bottle;
- Stained glass paints;
- Brush;
- Scissors.
- Stage 1 Cut out the holder of the desired shape from the bottle. It is better to entrust this stage to adults or ask for their help, since when working with scissors or a knife, you can easily get hurt.
- Stage 2 Paint the designs that seem most suitable to you. You can use inscriptions with wishes as a painting. A useful and creative gift is ready.
You can make your own phone holder in two simple steps.
Birthday gifts - all the best ideas in one place
Cat keychains
The presenter will begin with a step-by-step creation of the contours of a fish and a cat's head according to the cells and a durable pattern for further formation of blanks. The parts are glued together to give volume, left to dry for a couple of hours or overnight under pressure. Then they are coated with acrylic paint several times to level the surface. Further coloring is demonstrated in detail, the nuances are explained. A simple pencil and a manicure brush will come to the rescue. Result: a cheerful cat catches a fish with its paw, the elements swing on chains of different lengths. Clouds are made in the same way, but instead of cardboard the material is felt.
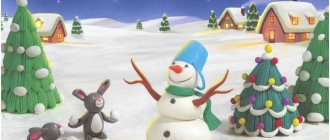
Let's use plasticine
A good option is plasticine crafts, suitable for children of all ages. After drawing a picture, a small child will simply write out the word “dad” in stripes. It’s easy to decorate a frame cut out of cardboard, placing any elements on it: stars, a sun, flowers. There is no limit to creative imagination here.
Elephants, snails, bears, ladybugs and even a flying saucer, boys and girls can do all this. Older children can create real sculptures with meaning. The parent is guaranteed positive emotions.
Volume keychains
Tatyana will share a simple and accessible method for making a 3D hanging, following the example of which everyone can choose an individual design by printing the picture they like or drawing it themselves. Then you will have to cut it out and attach it to a bulky piece. The latter is glued together from several layers of corrugated cardboard. Protecting with tape on all sides will increase service life. You will only have to buy special accessories with a ring for attaching to keys or a zipper slider separately.