Gift for mom
A child can independently or with the help of an adult make cute and funny DIY crafts for his mother for her birthday. It could be a simple but “promising” gift in the form of a jar of promises, or decoupage in a vintage style.
Bag for a friend
Today, one of the most popular options among all gifts is a handmade shopping bag.
Such a thing will quickly become an integral part of her work routine for her friend, since it is distinguished not only by its beauty, but also by its convenience.
Jar of promises
Take an empty plastic jar with a lid. Colored pieces of paper for notes in a beautiful cut shape are placed in it - for this you can use scissors with curly edges.
On each piece of paper, a promise is written for mom, for example, to wash the dishes, walk the dog, help cook dinner, or go to the movies together.
A label is placed on the jar with the inscription “Valid until” indicating the mother’s date of birth and the next year: during the year, the mother will be able to draw one coupon and present it to the donor for execution. The only condition is to have time to redeem all coupons!
Gifts for a teenager
After 12 years, a child is able to choose a gift for himself, but he still wants to delight him with surprises. So, the list of gifts for a teenager looks like this:
- Movie tickets, planetarium, museum, robot insert and so on.
- Books.
- Watch.
- Hoverboard, electric scooter, bicycle.
- MP3 player and headphones.
- Gaming mouse and wireless keyboard for computer.
- Tablet.
- New model smartphone.
- Chocolate, cookies, candies and other favorite sweets.
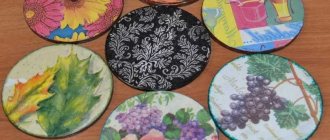
Decoupage box
Using the decoupage technique, magnificent, sophisticated products are created that are not ashamed to give to your mother. For work you will need an untreated wooden box, napkins with a floral pattern (this will become the highlight of the program), white acrylic paint, PVA glue, and a bowl.
The box can be pre-sanded with fine sandpaper - this way the paint will adhere better.
Procedure:
- Mix paint, glue and water in a ratio of 1:1:3 and cover the outer surface of the box with the mixture. To get an even white color, the primer is applied in two or three layers.
- Cut out flowers from napkins and think about how to arrange them on the lid and walls.
- Glue the flowers to the dried surface using diluted PVA glue - take two parts of glue to one part water. First cover the lid with flowers, then, after drying, cover the side parts one by one.
- Cover the entire product with the remaining adhesive solution on top of the flowers to secure the result. If possible, apply several coats of clear varnish to the dried adhesive layer for added smoothness and protection.
Such thoughtful DIY birthday crafts look expensive and elegant.
Making a present for your significant other
- Family Tree. It is possible to embody the idea of this surprise on canvas, on one of the walls of the room, on an artificial tree. The wall on which a mighty oak tree is depicted looks quite original and stylish, and its leaves are frames with photographs of the same size.
To create a decorative plant you will need: a flower pot, small pebbles, artificial grass, strong branches, green paper and photographs, PVA.
Everything is extremely simple. We secure the branches firmly in the pot using pebbles. Cut out leaves of various sizes from green paper. On large ones we paste photos from the archive. We fix the foliage on the tree.
- Clay dishes. They will help you create such a surprise in a special pottery. After receiving a short master class, you will create a jug, cup, plate or dish on which you will commemorate the conclusion of your union. You can take a short-term pottery course together. Make presents for each other. The workshop will also be a great place to celebrate your anniversary and will leave only positive memories.
- Glasses. But not simple ones, but decorated ones. The decoupage technique, your talent as an artist, or basic skills in working with a rope or braid can come to your aid. As an artist, you will need acrylic paints, for decoupage - festive napkins, for weaving - ribbons in delicate tones and glue. Give free rein to your imagination and feelings.
- Swans. These birds are a symbol of devotion, tenderness and true love. You can create these birds from paper (origami). This technique was invented in the East, and today, using it, you will please a loved one.
The composition consists of a large number of identical small parts - modules. Without the use of glue, threads, paper clips. The structure is held together by inserting modules into each other. The scheme for creating a swan is easy, but it is long and painstaking work. And for a gift you need to create a pair. Use white paper. But you can also fantasize - come up with a fancy color of the bird. This gift will complement your interior and will always remind you of mutual love and marriage anniversary.
- Commemorative capsule. Its production is quite simple. Take a large transparent Christmas ball. Remove the top from it - the cap. Fill it with dry rose petals. They can be from a wedding bouquet or from those compositions that decorated the hall. Add elements that remind you of your celebration: small bows, beads, etc. Close the top. Hang the capsule in the most visible place - it will always take you back mentally to that happy day.
Dear friends, that's all for me today. Pamper and delight your loved ones, give gifts and your attention. And also recommend to them and your friends on social media. networks read this article. I will always tell you what to give. See you again!
Sincerely, Anastasia Skoracheva
Gift for grandma
If Grandma loves to bake and cook, you can make her a birthday craft that is fun, beautifully designed, and useful - a tea towel cupcake.
For the cupcake you will need a beautiful cardboard with a pattern and a small bright hand towel, preferably terry. Then follow the instructions:
- Cut a 10 cm wide arc from cardboard and fold it into a cake pan.
- Secure the edges with a stapler at the top and bottom.
- Twist the towel diagonally into a rope.
- Fold the flagellum lengthwise into a ring, make a depression on either side to form a small top, and secure with a pair of transparent elastic bands.
- Place the resulting “cake” into a cardboard pan.
To prevent the towel from falling apart, a cherry-flavored Chupa Chups candy is inserted into the middle, which grandma will probably share later. If white or plain cardboard is used for the mold, it can be decorated with colored corrugated paper.
You can “bake” more of these cupcakes, place them in transparent wrapping paper and tie them on top with a satin ribbon or braid.
You can add a note to the package describing the recipe. The text will be something like this: “Cooked with love, care and effort.” Great DIY craft for grandma's birthday!
What to give on February 14?
On Valentine's Day, a girl should be given a gift in the shape of a heart, for making which you can use the ideas below.
Soap hearts
A fragrant, gentle soap in the shape of a heart will delight lovers of various scrubs, creams and body lotions. For soap making you will need:
- soap base of any color (sold in specialized stores) or toilet soap;
- refined vegetable oil;
- white and red food colors;
- flavoring (vanillin or aromatic oils, the smell of which the girl likes);
- granulated sugar;
- microwave container;
- ice cube trays or heart-shaped silicone baking molds;
- wooden shelf for sushi.
The soap is prepared like this:
- Grind the soap base into small cubes and place them in a microwave-safe container.
- Melt the cubes until you obtain a homogeneous, viscous consistency. Don't let it boil.
- Mix the dyes in a new container and add them to the melted soap base. Pour in 1/4 tsp. vegetable oil and 3-4 drops of flavoring. Mix the resulting mass thoroughly.
- Add sugar to the soap base and bring the composition to complete homogeneity. It should have medium thickness and density.
- Pour the resulting mixture into molds and leave until completely hardened. Once the soap has hardened, carefully turn the molds over and remove the hearts.
- Wrap the hearts in red gift paper and tie them neatly with a pink ribbon.
How to prepare an envelope with soap hearts without special molds is shown in the video below:
Heart in a lamp
From an ordinary light bulb you can prepare an unusual and extravagant souvenir that will be an excellent interior decoration. For this you will need:
- bulb;
- red wire;
- red or black acrylic paint;
- beer or bookbinding cardboard;
- a piece of foam;
- glue Moment;
- stationery knife;
- awl/knife;
- pencil and ruler;
- screwdriver.
The souvenir is prepared in several stages:
- Form a box from cardboard. Make a round hole in the center, the diameter of which coincides with the dimensions of the light bulb socket.
- Apply decorative dots directly from the tube to the box. While the paint dries, form two hearts on sticks from the wire, one of which should be 2-3 cm higher than the other.
- Prepare a small round “pillow” from a piece of foam plastic. Place previously prepared wire hearts on it.
- Using a screwdriver and an awl or a kitchen knife, carefully open the base (base) of the light bulb and remove all the internal contents.
- Place hearts inside the light bulb, and then glue the resulting structure to a cardboard stand.
- Decorate the center of the festive table with a souvenir.
Instead of a cardboard stand, you can use a block of wood, which can be decorated with an inscription with a declaration of love or any other phrase.
Coffee heart
Having given a girl a coffee cup for her birthday, on February 14th you can present her with a heart in the same style. To make it you will need:
- coffee beans;
- paper;
- cardboard;
- wire;
- wooden ice cream shelves;
- white thread;
- jute thread;
- iron can (can be from condensed milk);
- sponge;
- cotton pads;
- decorative flowers and ribbons;
- glue;
- brown acrylic paint.
The coffee heart is made in this order:
- Fold a sheet of paper in half and draw half a heart on one side. Cut out a paper heart along the lines.
- Place the paper heart on the cardboard, trace it and cut out the desired shape along the contour. Prepare the second cardboard heart in this way.
- Wrap two wires in paper and glue them to cardboard hearts.
- Glue cotton pads in several layers between the two hearts to create volume. Next, paste them over the entire surface of the large heart and wrap it with thread.
- Apply brown paint to the heart and after it dries, glue the coffee beans.
- Cover an iron jar in a circle with ice cream sticks. Next, it is advisable to paint them white or any other color.
- Wrap jute thread around the wires that hold the coffee heart.
- Insert a sponge into the jar, place the finished heart in it and secure with glue.
- Decorate the finished product with ribbons, flowers and/or other details.
Thread painting
Such a picture can be prepared without any drawing skills. For this you will need:
- wooden tablet or board;
- knitting thread of any color (it is advisable to give preference to red and pink shades);
- nails;
- a sheet of paper or newspaper;
- spray paint or dark acrylic paint;
- hammer.
A picture is made from threads in this way:
- Paint the wooden tablet and leave it until completely dry. Then sand it with sandpaper to highlight the texture of the wood.
- On a sheet of paper or newspaper, draw an even, large heart, which is attached to a wooden tablet. Nail nails along its contour at a distance of 2-2.5 cm from each other and remove the paper.
- Take the thread and tie its end to one of the nails with a triple knot. Next, trace the entire outline of the heart with it, grasping each nail. Once the outline is drawn, all that remains is to fill the entire internal space of the heart in a random order.
- At the end, fasten the thread to one of the nails and make a triple knot again. The picture is ready.
Another idea for a panel made of threads and nails in the photo:
How to make a simple picture in the shape of a heart using the “string art” technique is shown in the video:
Box with confessions
Another idea for an inexpensive romantic gift for February 14th is a confession box. To prepare it, just buy or make a small box with your own hands and fill it with notes with messages - declarations of love or wishes.
Instead of a box, you can use a coffee can, and wrap the confessions beautifully and wrap them with ribbon. How to implement this idea is clearly shown in the video:
What to do for dad
If dad wears glasses and a tie, a tie glasses case makes a witty gift. The tie is folded and sewn so that at its wider end an entrance for glasses with a tongue lid is formed.
Velcro is sewn or glued on the inside of this cover, and its counterpart is attached to the tie itself. Your homemade glasses case is ready!
Note!
- Quilling crafts: features of the working technique, step-by-step instructions and clear diagrams for beginners + ideas for creative crafts (150 photos)
- Crafts made from corrugated paper: 100 photos of creative solutions for crafts + step-by-step diagrams and instructions for making your own
- Crafts from foamiran: ideas for creating crafts and interesting patterns for making flowers
Gift for the soul
Sometimes the question may arise in your head about what gift to give your friend just to please her on a difficult day after work.
Note!
- How to properly make a birdhouse with your own hands from scrap materials: we create an original birdhouse according to sketches
- How to make candles with your own hands: instructions for making wax, gel, scented, homemade decorative candles with a wick
- What you can make from foamiran with your own hands: we create flowers, Christmas tree decorations, snowflakes, three-dimensional paintings (photo + video)
Fun T-shirt for Grandpa
There are many ideas for DIY crafts for grandpa’s birthday, but the best ones are those that are also fun. One such idea is a graphic t-shirt.
To work, take a white T-shirt in grandpa's size, permanent paints and a brush. It’s important to come up with a funny drawing or inscription, it’s good if it means something to grandpa. You can use stencils.
How to make a graphic t-shirt:
- Lay the T-shirt out on a flat surface.
- Place sheets of white paper or cardboard between the front and back of the product so that the paint does not bleed through on the back.
- Make a drawing or inscription and let the paint dry.
Such a creative do-it-yourself craft for grandpa for his birthday speaks of a creative approach and effort - you simply can’t help but like the gift.
Products without sewing
Fabric scraps are always useful for a needlewoman. They can be used to create a painting. Such DIY fabric crafts without sewing look impressive and attract attention. You need to draw an image on paper, and then transfer all the components of the drawing onto scraps of fabric.
To get the finished canvas, glue all the elements to the base. It’s easy to make such a picture; it will become a real highlight of the interior.
Box with a surprise for your beloved friend
A friend will definitely like a small but meaningful handmade gift - a box with photos of them together, reminiscent of fun days.
Note!
- Crafts made from polymer clay | Step-by-step master class on creating beautiful crafts
- DIY epoxy resin crafts - options for original crafts, step-by-step instructions for pouring and making them yourself
- Lego crafts: step-by-step master class on creating simple DIY crafts + original versions of Lego products (photo + video)
Take a square wooden box without decoration with an internal size of approximately 8x8 cm, white cardboard, printed small photographs that are placed in the box, a ruler, scissors, a pencil, glue and a satin ribbon. A strip the width of the photographs is cut out of cardboard and folded like an accordion.
A photograph is pasted onto each part of the strip. A piece of tape is glued to the upper part of the accordion on the back side, so that the accordion with the photo can then be pulled out using it, and the lower part is glued to the bottom of the box. The accordion is folded and the box is tied with ribbon. Such stylish and emotional birthday crafts will be remembered for a long time.
The best ideas for a homemade gift for March 8
If March 8 is just around the corner, it's time to prepare a surprise for the girl. DIY gift ideas will help with this.
Bouquet of sweets
To prepare an original composition of sweets, you will need:
- candies;
- corrugated paper of different shades;
- transparent mica;
- skewers;
- strong threads;
- scissors.
The instructions for making paper flowers with candies inside are as follows:
- Cut 4 pieces of different shades of corrugated paper, as shown in the photo:
- Fold one of the papers into 4 times and cut off the sharp corners on one side.
- Unfold the paper and give the petals a convex shape, stretching them slightly.
- Repeat the same with the remaining pieces of paper.
- Using a wooden skewer, twist the edges of the petals of the future flower.
- Wrap each candy in transparent mica and secure with thread.
- Place the candy in the smallest paper blank and gradually add all the other petals to get a beautiful bud.
- Make several of these buds, glue them onto wooden sticks and combine them into a beautiful bud or create an unusual composition.
Ruffled tulip
To prepare paper tulips you will need:
- corrugated paper;
- wire;
- scissors.
The bouquet is prepared using the following technology:
- Make blanks in the form of 6 strips of corrugated paper measuring 3x18 cm. When preparing them, cut along the corrugated line.
- Twist the strip 2 times in the middle and fold it in half:
- Stretch both layers of paper and make a convex petal. Then compress them again and twist them at the base. Do this with each prepared strip.
- Cut 2 cm strips across the green corrugated paper and wrap them around wires 15-20 cm high to get stems.
- Screw three inner and outer petals around the stem. Prepare several of these flowers.
- Cut out leaves of any shape and design from thick paper. Decorate the finished flowers with them, placing the entire composition in a small vase.
Bouquet of pompoms
Another gift idea for March 8th is a romantic bouquet of pom-poms that will never fade. To assemble it you will need:
- yarn in white, beige and pink colors;
- 3-5 thin branches;
- white spray paint;
- green felt;
- pink ribbon;
- white lace braid;
- scissors;
- glue gun;
- twine.
The bouquet is made in the following sequence:
- Wrap 3 fingers with thread of the same color 50-75 times. To get pompoms of different sizes, wrap 2 or 3 fingers. The more yarn you use, the larger the buds will be.
- Cut the pom pom thread from the skein of yarn. Next, stretch a new thread 20 cm long from the skein and cut it off.
- Pull the cut thread between your fingers and tie it in a knot, securing the previously assembled pompom.
- Carefully remove the pompom from your fingers and tie it in a tight knot again. Cut the finished loops in half. Open the pompom and trim the protruding threads to obtain a perfect ball. Prepare several buds in the same way.
- Paint the branches with white paint and leave them until completely dry. Next, glue the pompoms to them.
- Cut out a double leaf from felt for each flower and glue them to the stems.
- Cut strips of braid, ribbon and twine to the same length. Tie them on the bouquet in the form of a bow. If desired, add a postcard to the composition.
Present for aunt
You can try making a candle for your aunt yourself. Such a gift is pleasing to the eye, practical and shows that they were not too lazy to spend time on making it.
For the candle you will need the following items:
- paraffin or wax (buy separately or use regular candles);
- floss thread or thick cotton yarn;
- a saucepan plus a smaller container for melting wax (for example, a ladle that fits into the pan);
- mold for a candle - this can be a glass cup from an Ikea candle or several small tin molds from the same company;
- spoon for stirring;
- wooden skewer or pencil.
Instructions on how to make a birthday craft in the form of a candle:
- Place one end of the wick thread into the candle mold and tie the other end to a skewer or pencil.
- Pour some water into the pan and place it on the stove, place the ladle in the pan. Turn on the burner.
- Place small pieces of wax in a ladle or grate on a coarse grater to speed up the melting process.
- Melt the wax over low heat, stirring until the mixture becomes homogeneous.
- Remove the ladle and pour some melted wax into the candle mold to secure the wick. Wait a couple of minutes.
- Pour the remaining mixture into molds.
Note!
- Christmas crafts - how to make them yourself? 150 photos of the best themed crafts
- Crafts made from stones: creative options for crafts made from stones + step-by-step instructions for making your own, methods and schemes of work
- Crafts from disks: a step-by-step master class on how to create them yourself, creative ideas for crafts of varying complexity + simple patterns for beginners
It will take at least a day for complete curing. After this, the wick can be trimmed. A glass with a candle can be decorated with decor and tied with a ribbon.
If you add a few drops of essential oil when preparing wax, you will get a DIY aroma candle. This is a simple and useful craft idea for an aunt or other relative's birthday.
The process of creating a bag
Fold the elastic evenly in half, and then carefully sew it from the long side to the main part of the bag.
Take a colored blank and attach it to the main part. Make sure that the elastic you sew is strictly in the middle.
The stitching should be done taking into account a few millimeters as an allowance for the seam. It is best to stitch the edges with a seam called “zigzag”.
You need to do the same steps with the second part of the bag. The resulting seam must be smoothed and “secured” with a line at the top.
At every holiday, you should look your best. Visit the portal https://manikyurdizajn.ru and study ready-made ideas for creating a manicure there.
The edges of the bag are joined with a French seam. Next, you need to turn the seams out after ironing them.
Note!
- How to make wooden shelves with your own hands - original design options
- Kinusaiga technique for beginners: what is it, a description of creating paintings from threads
- How to weave a figurine from rubber bands: how to learn to weave animals, toys and what you can make from rubber bands on a slingshot
The fabric used for the handles is folded in half, ironed, and then it needs to be stitched. It is important to fold the edges so that they intersect in the center and then they can be sewn.
The top of the bag must be processed, bending the fabric by 2 cm. After the raw ends of the handles are bent by approximately 1 cm, they must also be carefully stitched. Stepping back from the elastic band at least 5 cm, you can sew on a button.
This easy-to-make bag is quite roomy. Therefore, if you don’t yet know the best way to make a gift for your best friend with your own hands, then just use these instructions and then you can pleasantly surprise someone close to you.
Treasure for my sister
A homemade box would be a nice gift for your sister. To make a heart-shaped box you will need thick cardboard (for the bottom), a pack of wooden toothpicks, beautiful yarn - the walls will be made from it, PVA glue, a glue gun, scissors or a stationery knife, an awl, beads, and various decor.
How to make a beautiful box without a lid:
- Using a knife or scissors, cut out a heart shape of the desired size from cardboard - this is exactly the size of the finished box.
- Stick toothpicks into the cardboard around the perimeter of the mold at a distance of about 1 cm. If the cardboard is hard, you can use an awl. Additionally secure the sticks with glue.
- Wrap the toothpicks with yarn using the basket weaving technique - alternately going around the sticks from the outside and inside, rising higher and higher.
- Place a bead on the ends of the toothpicks with glue. Decorate the walls with additional decor if desired.
In the box you can store something that a girl or woman uses every day: a comb, hairpins, hand cream. Depending on the color and texture of the yarn, the box will look different. If desired, you can change the shape of the craft and make it round, oval or square.
Postcard
A handmade postcard will be an original addition to the gift. It can also be the main one, for example, to congratulate colleagues at work or numerous acquaintances.
Making a postcard is a fascinating process, because in it you can show all your creative potential, and the variety of techniques and materials allows you to make a wide variety.
Before starting work, you should decide on the theme of the holiday, choose an idea and select materials. Everything you need can be found at a craft store.
For example, to congratulate everyone on Valentine's Day, you can make such a card.
Card with hearts
To make it you will need:
- blank postcard with an envelope made of thick white cardboard;
- sheets of scrap paper of various colors;
- figured hole punch;
- scissors;
- white thread;
- glue;
- needle.
First, prepare the hearts to decorate the front of the card.
Using a hole punch, punch out the required amount, based on the fact that you will need two hearts of each color.
Holes can be made with a hole punch
If you don't have a hole punch, then prepare a heart template and cut it out using it.
Place the prepared elements in two pieces of the same color on the front side of the card, secure with glue. This must be done so that they remain in place during the sewing process.
Place the hearts on the cardboard
Using a machine, sew with white thread in the middle, without going beyond the borders of the hearts. Then make a few backstitches.
Attach hearts
You can sew hearts on your hands. In this case, try to do this as carefully as possible so that the stitch “step” is the same.
Use scissors to trim off excess threads.
Bend the sewn hearts along the line.
Place the finished card in an envelope
The card is ready, you can write a few congratulatory lines and put it in an envelope.
Two-tier paper cake
Paper crafts for birthdays are perhaps the most popular. For the cake you will need two cardboard or tin round boxes with lids (you can take cookie containers or buy ready-made ones in a gift store), colored paper, glue, satin ribbons or braid, Kinder bars and a small purchased gift - a typewriter, a set of felt-tip pens, a toy from lego. The boxes can be reused in the future.
How to assemble the cake:
- Cover the boxes with colored paper on the sides and top.
- Glue the smaller box bottom to the lid of the larger box.
- Place Kinder bars on the sides of the boxes to form a fence and tie with ribbon.
- Place an additional small gift in each box.
- Arrange candles, if desired.
The bars can be of different sizes - this will make the fence look even more fun. Even an adult will be happy with this cake if you put, for example, a new smartphone or a watch box inside.
Gifts-impressions
Children are open to new things, are not afraid of thrills and are ready to experiment. A joint trip for a walk to another city, a picnic in nature, a trip to a water park or a football match, a pizza or cake making master class, a ribbon show, a soap bubble show and many more events that will give the birthday boy a storm of emotions and will be remembered for many years .
Monochrome photo frame
For the craft, take a ready-made photo frame in white or black, several white and black pencils of different sizes, black and white paint, and a glue gun.
The frame is designed very simply: pencils are glued to the frame on all four sides in three rows. With each row, the size of the frame decreases, so pencils of different lengths are needed.
This stylish, laconic frame is made in two colors: if you cannot find black or white pencils of the required size, you can take colored ones and paint them in the desired color. A black and white photo of him and his brother together is placed in a frame.
Caskets
To create beautiful souvenirs, all kinds of materials and techniques are used, the main ones should be considered separately.
A unique item can not only diversify the interior and become an excellent gift, it is practical, because in containers you can store such things as:
- Jewelry.
- Decorations.
- Accessories.
- Candies.
Before starting the process, you should decide on the sizes that are selected, taking into account the purpose of the craft. It is equally important to successfully decorate the surface so that the product does not look banal.
Wooden samples can last quite a long time, but to create them you need to prepare the appropriate tool, paint and varnish coating and familiarize yourself with the detailed algorithm of actions.
The easiest way to make a frame is from ready-made boxes, which are lined with fabric, bright paper and decorated with small things.
Advice! The most luxurious crafts are not those for which expensive materials were spent, the main thing is the creative approach and imagination of the master.
For a work colleague
Colleagues can make crafts on their birthday as gifts if the level of their relationship allows it. Many people have been friends with colleagues for years, and in this case, knowing about the interests and hobbies of a colleague, it would be appropriate to do something pleasant, and perhaps useful, with your own hands.
The only rule is that the gift must be made very carefully and look perfect, as they say, “like from a store.”
DIY sweet gift
Content:
This surprise will not leave your friend indifferent, because all the girls love sweets so much. Look at the photo at the stages of preparing a gift for your friend with your own hands.
To make the delicacy you will need to prepare the following set of tools:
- sweets of any kind;
- floral foam;
- small pot;
- glue;
- skewers;
- artificial grass or moss.
The sweet composition is performed in a certain sequence.
- Glue a skewer to each of the sweets.
- Place the prepared foam on the bottom of the pot.
- Artificial grass should be placed on top of the foam.
- Next, insert the sweets on skewers.
A delicious surprise is ready!
Postcard to a female colleague
For a colleague whose relationship can be called friendly, a homemade original postcard will be a pleasant birthday gift.
To do this, take thick pink colored paper, fold it in half and cut out a female silhouette in a dress with a full skirt so that the two halves are connected at the arm and skirt: the card should open like a book.
The skirt can be decorated with corrugated colored paper, an additional hat can be made, and happy birthday and pleasant wishes can be written inside.
Touching anniversary gifts
On your anniversary, you can prepare a touching gift for your loved one, the options for which we will consider below.
Tea bags with photos
If a girl loves tea, she should be given her favorite drink, but in homemade bags with photos of them together. For this you will need:
- delicious brewed tea;
- white paper coffee filters;
- photo paper or thin cardboard;
- thick white threads or thin rope;
- sewing machine;
- needle;
- stapler;
- scissors.
The gift is prepared as follows:
- Cut 2 identical rectangles from coffee filters and sew them together on three sides, leaving 1-2 mm from the edges.
- Fill the finished bags with tea, bend the corners and sew the edges using a typewriter. If you want to make round bags, you need to leave a small hole in them for tea, and then sew it up without any bends. Sew all the bags together in this way.
- Select your favorite photos, reduce them or crop them in a graphics editor so that they are the same size. Print on photo paper or cardboard, cut them out and use a needle to make holes in them.
- For each bag, cut a thread 10-15 cm long. Thread them through the prepared holes in the photographs.
- If the tea bags are rectangular, the threads can be attached to them with a stapler by folding the top edge of the bag. If they are round, it is better to sew on threads.
- Present tea bags in beautiful packaging or present with a cup.
Instagram style memorial album
If a girl actively runs an Instagram page and posts a lot of photos together, you can use them to create a creative gift. For this you will need:
- photos from Instagram (can be printed using PostalPix);
- thick colored paper or cardboard;
- pen/marker;
- decorations (stickers, glitter);
- PVA glue;
- decorative wide ribbon for the spine.
The album is assembled in this order:
- Cut out sheets of colored cardboard, the size of which is 2-3 cm larger than the photographs themselves. To decorate each photo card, use stickers and pleasant inscriptions applied with multi-colored pens.
Colored cardboard can be replaced with map pieces. They will be combined in an original way with photographs.
- Using glue, connect all the pages and place them in a thick book, leaving only space for gluing the spine with washi tape. If there is none, you can use thick tape or thick paper and glue.
- After making the spine, leave the album under pressure for a while so that its pages stick well. The gift is ready.
"Business" bottle
Colleagues are often given alcoholic drinks as a present. The bottle can be decorated in an original way, emphasizing the business nature of the relationship.
To make a bottle case, a section of a striped shirt sleeve is cut from the cuff to the elbow, the hole is sewn up, and the bottle is placed inside the sleeve so that the cuff is higher than the neck. A piece of red or blue fabric is tied at the neck under the cuff in the form of a tie.
Adults perceive children's crafts with great enthusiasm, be it a gift for mom on Mother's Day or a DIY craft for grandpa on his birthday. By encouraging children's creativity, parents help children develop a sense of beauty, teach perseverance and patience, and in many ways develop and learn themselves - after all, adults can also make crafts and gifts.
Bath salt
Of all the things you can do with your own hands for a friend’s name day, there is an original version. To do this you will need the following set of tools:
- protective glasses;
- kitchen scales;
- sieve;
- respirator;
- capacity;
- molds;
- salt;
- food coloring;
- lemon acid;
- cosmetic oil.
Now let’s figure out the sequence in which you need to make bath salts in the form of bombs.
- Pour sifted salt (300 g) into a container.
- Add citric acid (150 g) to the salt and mix everything.
- Next, pour 5 ml of oil into the container and mix again.
- Pour in the dye selected according to the color scheme. It is recommended to stir the mixture immediately to obtain a uniform color.
- Add a small amount of water to the container.
- We develop the finished mixture into molds.
- After 15 minutes, take out the resulting balls and wait until they dry. This takes no more than 2 hours.
It is better to place the finished bombs in a decorated box.
Photos of birthday crafts
Mother's gift
On your mother's birthday, you want to prepare a special gift for your closest and dearest person.
Little children can sing their mother’s favorite song or make a postcard from cardboard and colored paper, boys can make a photo collage with touching family photos, and older daughters can embroider a scarf for their mother.
Often, when we choose a gift for a person, the choice falls on flowers and a box of chocolates. But a chocolate-flower bouquet made of fabric or corrugated paper looks much more original and unusual.
Men's gifts
A great gift for a man on his birthday would be a bag for keys and tools. Leather or denim are perfect materials for it.
You can make covers for documents yourself using the decoupage technique, or decorate ordinary metal boxes for storing fishing equipment.
A male chef will certainly appreciate a men's apron made especially for him with appliqués and convenient pockets.
A great idea would be homemade frames, key rings, drawers and boxes for storing small parts.
Case for phone
Today, stores offer a huge selection of phone cases and panels. Such accessories are necessary not only for the safety of the gadget, they can also emphasize the individuality and good taste of its owner.
A carefully crafted homemade case can be a wonderful gift; materials such as silicone film, wide elastic, denim and felt fabric are suitable for its manufacture.
To create an exclusive design, you can use decorative elements and fabric applications.
Professional designers advise not to use a large number of multi-colored parts, but to adhere to the “three colors” rule, then the finished product will look stylish and tasteful.
A quick and easy DIY gift
Origami is an ancient Japanese art based on the repeated folding of paper. Various diagrams can be found on the World Wide Web. So, you can fold: an envelope for money, a postcard, a box for a gift.
Note!
- How to make wooden shelves with your own hands - original design options
- Kinusaiga technique for beginners: what is it, a description of creating paintings from threads
- How to weave a figurine from rubber bands: how to learn to weave animals, toys and what you can make from rubber bands on a slingshot
Compositions of fruits and vegetables are now at the peak of popularity. For example, in the summer, you can pick strawberries, put them on thin sticks (skewers for kebabs), cover them with chocolate and arrange them into a bouquet. Tasty and healthy.