The nuances of working with cement mortar
For decoration and design additions, you can use flower pots, flowerpots, figurines of fairy-tale characters or plant objects made with your own hands from cement. This material cannot be called capricious, and most people have a lot or little experience working with it. Still, there are several important rules that must be followed to ensure that crafts made from cement mortar are of high quality and durable.
The technology for preparing the mixture itself is as follows . The main components are prepared: cement, construction sand, water and tile adhesive (for better ductility and reducing the risk of microcracks). For 1 part of cement, take 2 parts of sand (for greater strength, you can take 1 part) and 1 part of glue. Lastly, add water in small portions to the consistency of thick sour cream. It is convenient to work with such a mixture: it does not flow and at the same time is quite plastic.
All cement products require prolonged drying. Hardening can last up to 7 days. To prevent the surface from cracking, the finished creation is covered with polyethylene. To give the product a beautiful and correct shape, the base is placed on a mound of sand or buried in it (depending on the idea), but not on a flat surface.
After complete hardening, the figure must be coated with a primer and only after that can paint or varnish be applied. If the craft has roughness and other irregularities, it should be refined with sandpaper and a file before priming.
In addition to cement mortar, concrete is sometimes used, which is characterized by the presence of large fractions (pebbles or crushed stone) and increased strength. Crafts made from concrete for a summer residence can be represented by large monolithic boulders, and this material is also convenient to use to create a base for various compositions (a platform for a fountain, a pedestal for a sculpture, a terrace for flower pots, etc.).
Another material similar in its application is gypsum. It is not as strong as cement, but more plastic and decorative. It can be used to create hollow shapes. For garden creativity, molding (sculptural), acrylic and architectural types are used. When working with this material, you need to take into account its rapid hardening. It is often recommended to add it to cement mortar when creating sculptures.
Mushrooms not from a barrel: we create figurines for the garden
Today, few people use their garden plot exclusively for growing vegetables and fruits. Owners of land plots try to give them beauty and comfort and adopt various tricks for these purposes. The easiest and most win-win way is to decorate the area with figures you made yourself. And the simplest figures are mushrooms. Of course, you can limit yourself to putting an old red bowl with polka dots on the stump: you will get a kind of “fly agaric”. But I want something more original and aesthetic. Let's try to create, if not a masterpiece, then something close to it.
Cement mushroom
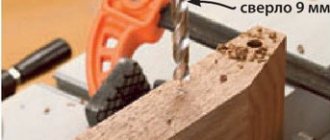
Prepare the solution by mixing cement and sand in a ratio of 1:3, add water until the mixture becomes creamy, place polyethylene at the bottom of the bowl and fill it with cement. After 20-30 minutes, insert three nails into the cement, which will become the frame for the mushroom stem. Nails can be replaced with other objects, for example, a thin pipe or a piece of fittings. Leave the workpiece until completely dry. Use this time to make the legs. Model its shape using a plastic material such as a piece of linoleum. Roll it up and secure it with tape. Pour cement inside the “leg” and connect it to the cap. It will take three days for the figurine to dry completely.
After this time, you can decorate the product using acrylic paints. For such purposes, they are better suited than others, since they do not crack over time, dry quickly, and retain their original shades for a long time. And most importantly, they are not afraid of moisture, heat, cold and mechanical damage. Place the decorated mushroom in the chosen location.
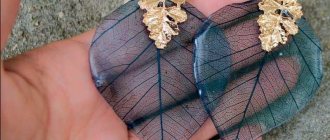
If you create a mushroom in the summer, then follow the advice of the professionals. Make a cap-shaped hole in the sand using a bowl, line it with a large burdock leaf and fill it with cement mortar. This way, the hat will have wrinkles and it will look more natural.
Here's another interesting option. Stock up on sand, cement, two nylon stockings, facade primer, acrylic paint, an alternative to which is façade paint or for concrete. Mix three parts sand with one part cement, add water. The consistency of the mass should resemble thick sour cream. To prevent cracks from appearing on the surface of products over time, use a plasticizer.
Place part of the solution for the mushroom stem in one stocking, and place the other part in the second stocking to make a cap. Hang the stockings on the bar. It's time to form the details of the product. Place a jar under the stocking with the intended cap, and cover its bottom with polyethylene so that the solution does not stick: the task is to ensure that the cement spreads along the bottom. Tie the top of the stocking tightly.
Interesting ideas for beginners
Having no experience in using cement for decorative purposes, it is better to start with something simple that does not require modeling skills and obtaining the desired consistency. The first exhibits in your garden can be cute mushrooms, colorful balls or original flower pots.
To make a mushroom you will need an old rubber ball (the size of the cap will depend on its size), a plastic bottle (it will become the basis for the stem, its size should be proportional to the cap), a metal rod to attach the cap to the stem. The ball is cut into two halves, one of which is placed in a bucket of sand and pressed evenly. Next, cement mortar is poured into the resulting form and leveled.
The bottom and neck of a plastic bottle are cut off and inserted into the filled form in the center, immersing it by 1 - 2 cm. Then, using a long iron rod, the future stem and cap of the mushroom are connected and the cavity inside the bottle is filled with the solution. The product should harden for several days, after which you need to remove the piece of the ball and the plastic cylinder.
After a few more days, the product can be coated with paint and decorated with various elements. Mushrooms of different sizes look impressive on the plot in the form of a small clearing. It is also worth noting that your imagination may tell you to use other containers (bowls, jars) and methods for making garden mushrooms.
It’s enough to just make an openwork ball that seems so light and airy. For the base, use a balloon (the size of the future shapes depends on how much you inflate the balloon). Next, any rope is placed in the prepared solution and then the ball is wrapped around it.
Advantages of concrete forms
Due to the versatility of concrete and its resistance to any weather factors, which wood and polymers cannot boast of, objects of any shape, size and functionality, including flowerpots, are cast from it. And with the advent of various plasticizers and dyes for concrete in the public domain, it became possible not only to improve the characteristics of the solution and the finished product, but also to immediately obtain a presentable appearance. It’s no wonder that polished concrete floors, which look like an expensive, exclusive coating, are becoming increasingly popular. To make concrete flowerpots, they practically do not use ready-made adhesive mixtures, although they are presented in abundance, but rather a homemade solution based on Portland cement is mixed.
Complex figures with a frame
It’s more fun to decorate your country house with sculptures of animals and mythical characters. Such creations involve the preliminary production of a durable frame and layer-by-layer application of cement mortar.
Interesting flowerpots can be made using buckets from construction mixtures. At the first stage, a container of suitable size is wrapped with a plaster mesh and covered with a thick layer of cement. At the second stage, until complete hardening, decorative adjustments are made, making an imitation of an old stump with natural wrinkles on the bark.
A monolithic figure of a hippopotamus would look appropriate near artificial reservoirs. The place for it must be determined immediately and carefully aligned, since in the future the figure will be stationary.
Two elongated plastic basins, which must be fastened with wire, are suitable as a frame. Another option is also possible: a thick cement solution is covered on top of a pile of broken bricks or crushed stone.
The figure itself does not contain complex elements and is easy to perform. After hardening, the product is treated with fixing impregnation and dry pigment for concrete, rubbing the powder with a hard sponge.
More complex sculptures are made in several stages: 1) making a frame from wire and foam plastic or containers; 2) covering the workpiece with a plaster mesh; 3) applying the mixture in several layers; 4) formation of small details (facial features, special texture, folds of clothing, etc.); 5) priming and painting the finished work.
Flowerpots in the shape of swans will become an elegant decoration of the garden. The body frame is an old plastic basin, the neck is woven wire. The head, wings and imitation plumage will have to be made from a cement mixture, showing the skills of a sculptor.
Monolithic figures have a significant weight, so as an alternative there is a way to create lightweight large objects. You can decorate your garden with boulders of different sizes.
To make them, any unnecessary and lightweight material (cuts of polyurethane foam, plastic bottles, polystyrene foam) is tied into a tight lump with wire.
The resulting base is wrapped in a plaster mesh and covered with thick cement mortar. The more irregularities and protrusions there are, the more natural the “stone” will look.
Small garden figurines are made from a mixture of cement with the addition of gypsum or Portland cement.
Here you can use the manufacturing methods described above, as well as any basics: old toys, items of clothing, household utensils.
Forms for concrete flowerpots
As for the forms, here, who knows, there are a lot of ready-made prefabricated and monolithic forms on sale, allowing you to get a variety of decorative flowerpots. However, their use is rare, both due to their decent cost and due to the excellent imagination of our homemade craftsmen who are able to turn almost any available device into a masterpiece.
- Containers - boxes, boxes and boxes of everything, more or less suitable.
- Plastic containers - bottles, canisters, eggplants, buckets of food and finishing materials.
- Household plastic and utensils - basins, buckets, baskets, tubs, saucepans, cups, pots, etc.
- Prefabricated forms - made of wood or metal.
- Fabric forms - burlap, towels, rectangular or oval rags.
- Things and shoes - most often children's and adult rubber boots, but there could be any old boots, shoes, or even bast shoes.
By and large, almost any object that catches your eye can become a form, if it can actually be adapted for filling at least once. They even manage to dig holes in the ground/sand, lay a film, and on top - a large leaf of burdock for texture and concrete. You can’t make a full-fledged flowerpot this way, but a bowl for succulents or decor for decoration will work out great.
One of the participants of our portal makes urns from concrete, but they can also be flowerpots if the shape is slightly modified. And in the original version, you can reorient the design for flowers.
IrinaZb Member of FORUMHOUSE
My trash can is made of concrete - I made a trapezoid from old scraps, if you prefer, you can use a square. The size of the figure should be larger than the diameter of the container (I use a bucket) that is inserted into the middle of the wooden form. Then I nailed the wooden base to the sides of the mold. I covered the walls, the bottom of the mold and the bucket with plastic wrap and secured it with tape.
Why is this work attractive and useful?
In order to make this fairytale house, buy all the necessary tools and materials, and carefully read the entire step-by-step “instruction” chain so as not to miss a single detail. You may think that it is difficult for you to make this house, because you have never done anything like this before, but when you get into the process of work, you will realize that it is not so difficult.
I love that this job allows you to express your creativity while still having a fun and rewarding day with your kids: let your kids help you too, it will be a fun activity for them and they will also make good use of their time.
Where to start? What are the step-by-step steps to make this fairytale house?
How to make a mushroom for the garden from cement - master class with photos
Mushrooms are often used as garden decoration. But purchased mushrooms are expensive, and it’s not always possible to find on sale exactly what you would like to see in your garden. Let's try to make them ourselves.
Materials for garden mushroom
You will need:
- Cement;
- Sand;
- Thick nylon stockings - two pieces for one mushroom;
- Facade or universal primer;
- Facade paint, concrete paint or acrylic paint.