Decorative candles are very popular. They are used to create a festive and romantic atmosphere or simply decorate the interior.
There is a wide variety of such products on sale. However, their cost is quite high, and it is not always possible to choose the ideal option to suit your taste.
The solution to the problem is simple - you can make your own decorative candle. Original ideas can be gleaned from photos of candle crafts. You can repeat any idea you like, or create your own unique craft.
Burlap decor
You can make an original Christmas candle craft using available materials. You can take a regular thick candle and decorate it with burlap. This craft will harmoniously fit into the Christmas atmosphere.
For production you will need:
- ordinary candle;
- sackcloth;
- decorative ribbon;
- miniature wristwatches;
- thread and needle.
Cut a piece of burlap to the desired size, sew it or pin it. Insert the candle into the resulting case. Tie a ribbon around it and attach the clock. The original candle is ready, place it in any convenient place.
Craft applique Christmas candle from foamiran
Foamiran is a synthetic, absolutely non-toxic, safe even for children, a modern material for needlework, all kinds of crafts, arts and crafts. This material is also called plastic suede, artificial suede, revelour, von eva, foam or fom.
To make a candle craft, you will need colored decoupage paper with patterns (green, blue, yellow, pink, red and light blue); black colored paper, A5 size; white sheet of paper, size A5; glitter foamiran with sparkles, gold color; scissors; glue; a simple pencil; black satin ribbon with white polka dots, 2 cm wide and 25 cm long; ruler; parts template.
First you need to cut out all the templates from paper. We attach the candle template to decoupage paper of different colors and cut out six parts, one of each color. We apply the template to the back of the foamiran and, using the blunt side of scissors, presses 6 parts along the contour and cut them out using scissors.
Cut a strip of black colored paper 5 mm wide and 14.5 cm long. Cut it into 6 equal parts. These will be wicks for candles. Using a ruler and pencil, mark a white sheet of paper on all sides into different segments. Using scissors, cut out semicircles according to the markings (i.e., one semicircle from point to point).
Next, you need to glue a white sheet of paper to a black sheet of paper, so that you get a black frame around the white paper. We attach candles to the white part of the paper - three in the middle (in a fan) and three just below them (also in a fan), as shown in the photo. And then, glue the top row of candles and the bottom one.
We recommend reading: Fortune telling by candles for Christmas
We glue wicks to each candle. Glue a candle flame onto each wick. We make a bow from a satin ribbon and tie it in the middle with a black thread. Glue the bow in the center to the bottom row of candles. The craft applique “Candles” is completely ready.
Sources:
- https://handcraftguide.com/ru/toys-made-paper/rozhdestvenskaya-svecha
- https://kladraz.ru/blogs/blog16559/rozhdestvenskaja-svecha.html
- https://dominafiesta.com/podelki-na-rozhdestvo-2018-svoimi-rukami/
- https://vtemu.by/novosti-v-temu/applikaciya-svecha-svoimi-rukami-shablon/
- https://www.chudopredki.ru/10201-detskie-podelki-applikaciya-svechi.html
Autumn composition
You can also make an original autumn composition from burlap.
This attractive children's candle craft is sure to entice kids with its fall foliage and golden colors.
Necessary materials:
- candle of the required diameter;
- sackcloth;
- dense thick thread (ideally twine);
- lace fabric;
- glue (you can use a universal or glue gun);
- kraft paper;
- foliage;
- scissors.
This candle craft is made of paper, so you need to use it for its intended purpose carefully. Cut off some of the burlap.
Make a small fringe by unraveling the edges of the material. Secure the burlap tightly to the cut, wrapping it with twine. Secure the rope with glue.
Decorate the twine with a lace strip. Make decorative leaves from craft paper. You can also use real dried leaves. Tie the leaves with twine to form a beautiful bow. Glue the piece to the candle.
DIY Christmas candle craft for school
Schools often hold competitions for the best crafts for Christmas. One of these crafts is the Christmas candle. Any school-age child can make a Christmas candle applique from colored paper. Select the size of the candle and the entire applique to suit your needs, as well as the background color. You can make several of these crafts at once by simply folding the paper in several layers.
Any school-age child can make a Christmas candle applique from colored paper.
First, we need to cut out a large yellow circle and a slightly smaller green one from paper. Circles can be decorated by cutting patterns around the rim. We will also need five small red mugs, a red paper bow, a small white paper candle and two lights - orange and smaller yellow.
We glue the green circle onto the yellow one, and the orange flame onto the yellow light. We glue a candle into the middle of the green circle. We glue a bow to the bottom of the candle and a flame to the top. We decorate our craft with red balls. And we add beauty - shiny varnish.
Tools and material required for applique: colored paper (about 4 colors), scissors, PVA or other glue for paper, felt-tip pen, glitter varnish (optional).
Candle decorated with dried flowers
In winter, you always want to add a piece of summer to your interior. Therefore, you can make a craft New Year’s candle decorated with dried flowers.
Materials:
- white candle;
- ordinary candle;
- spoon;
- tweezers;
- dry flowers;
- scissors.
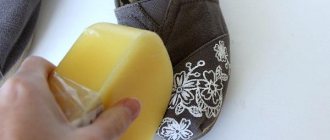
First, you should draw up a decoration concept; you should imagine what the finished composition will look like. Light a regular candle and hold a spoon over it, with the concave side facing the flame.
Using a heated spoon, gradually smooth the dried flowers onto the candle you are decorating. Proceed with caution, the petals may be damaged.
Excess parts of dried flowers can simply be cut off. Don’t rush to attach all the flowers at once, do it gradually.
- How to sew a decorative mini bag with your own hands
- Crafts from cotton pads - beautiful ideas and tips on how to make decorations and toys with your own hands (70 photos)
- DIY New Year's crafts: 70 photo ideas and a master class on making crafts for the holiday
If some parts cannot be fixed with a heated spoon, simply attach them with glue. However, use a minimal amount of glue.
To secure the decor, cover the candle with an additional layer of paraffin.
Take another candle, cut it into pieces, remove the wick. Melt the paraffin, pour it into another container and dip a candle with flowers into it.
And today we are sculpting from wax! I hope you and your little ones enjoy it! 3+
Wax as a material for modeling, perhaps, until recently was the least common among modern children. Now wax modeling is gaining momentum in popularity.
. And for good reason!
You can sculpt from it almost the same way as from plasticine, but it has one undeniable advantage - thanks to it you can sculpt candles
(read - fill the house with light and comfort, create a festive mood and share it with friends, as well as make unforgettable gifts for relatives for any celebration). In addition, both the process of sculpting candles and the contemplation of their burning flame relieves stress and brings peace.
In this post you will learn:
* PROS AND MINUSES of using BEESWAX when sculpting with children;
* DIFFERENCES between ALL NATURAL and INDUSTRIAL wax;
* WHERE TO BUY WAX AND HOW TO USE IT;
* SECRETS OF WORKING WITH THIS MATERIAL;
* BRANDS OF READY-MADE STYLE KITS WITH CHILDREN;
* RESULTS OF TESTING DIFFERENT WAXES by me;
* WHICH WAX IS BETTER TO USE WHEN WORKING WITH SMALL CHILDREN?
===
Candles can be made in a variety of ways, but in this post we will only consider one that is suitable for working with small children - modeling.
The best material for making molded candles is considered to be beeswax. Molded candles are also often made from paraffin, but I do not recommend using it when sculpting with children, because... paraffin is a product of petroleum refining, and when burned it also releases toxins.
Nowadays natural beeswax is commercially available
without any additives,
and colored wax with additives (giving it beautiful shades and softness)
, which is produced by enterprises specifically for making candles for children.
Let's consider both options.
LET'S START WITH NATURAL BEE WAX
Beeswax can be purchased at places where beekeeping products are sold (including even at the market), as well as in stores with an assortment of goods for creativity and handicrafts (for example, at Read.ru - in the form of bars of various shapes and sizes or foundation plates) .
Beeswax has its own tricks:
+ This is an environmentally friendly natural material, it is highly respected by advocates for a clean environment and in general by lovers of everything with the prefixes “eco”, “bio” and “organic”;
+ It gives off warmth, is pleasant to the touch, and also has a pleasant natural color and aroma - due to which adherents of the Waldorf method of child development are considered a “harmonizing” material;
+ Has healing properties - found use in folk medicine as an anti-inflammatory and antimicrobial material;
+ You can color it yourself to suit your taste! This can be done by melting it in a water bath and adding food coloring (if you are for maximum naturalness), wax crayons or wax paints of the color you need, as well as other special dyes;
+ Suitable for any crafts (not just candles) that children love to do - for sculpting ordinary figures, Christmas tree decorations, etc.
+ Is a reusable material - crafts can be melted and the wax can be used again 
However, beeswax also has its disadvantages:
— Beeswax, like all beekeeping products, can cause allergies. So be careful and attentive!
- Costs more than plasticine;
— Requires some preliminary preparation before the actual modeling. At a minimum, it needs to be warmed up (in water, on a radiator or in the oven), and at most cleaned. If you are unlucky and the wax you bought contains foreign inclusions, you need to melt it in a water bath and strain;
— You need to sculpt from it faster than from plasticine or special baby wax, because... During the sculpting process, it gradually hardens and becomes less plastic. However, using hot air from a hair dryer or hot water can solve this problem.
I also heard that to soften beeswax when sculpting with children, you can add a little lanolin (sheep's wax) to it. However, we have not tried this ourselves.
But we tried coloring beeswax with liquid food coloring from the Easter set. It turned out quite well. To do this, I melted the wax in a water bath, removed it from the heat and added dye. Next, when the wax had cooled to a temperature tolerable for the hands, I “kneaded” it (without this step the dyes did not want to mix evenly with the wax) and melted it again (to obtain a homogeneous mass). Then poured it into the lid. The result was quite pleasing (on the left is a photo of the dyes from the set, on the right is wax colored with red dye):
I also tried to color the wax with beet juice, but this did not work - the paint did not mix with the wax, but settled to the bottom.
NOW ABOUT MULTI-COLORED WAX FROM RUSSIAN MANUFACTURERS
For several years now, sets with colored wax for making/decorating candles from the Luch plant (the same one that produces my favorite plasticine), as well as (LORI trademark), have been actively sold. What is noteworthy is that both manufacturers are located in Yaroslavl
Some sets from Lucha:
Kits for making candles with children from wax from Lucha “Make Candles”
in Ozone, in My-shop, in the Labyrinth
===
And here are the sets from Lori:
Kits for making candles with wax children from Lori “Make a candle”
in My-shop, in the Labyrinth
Advantages of ready-made candle making kits:
+ The wax does not require any preparation before sculpting - it is already soft and colored (and there are even plates of gold, silver and mother-of-pearl colors) - open the box and sculpt!
+ During the sculpting process, the plasticity of the wax does not change - the time for experiments, correction of errors and even a complete redesign is unlimited;
+ The sets immediately contain wicks and stacks.
Disadvantages of the sets:
— Neither the Lucha kits nor the Lori kits indicate the type and composition of wax used anywhere. It is completely unclear what else is added to the wax (what dyes, softeners and other components, and maybe even harmful ingredients?). Of course, I understand everything about the trade secret, but I would still like to know at least the approximate basic composition of the candle mass.
Most sets include - wax (in the form of plates or bars), wick, stack. Some sets (only from Lucha) also have molds, but I believe that for small children when working with wax they are not necessary, because... wax is a hard material for cutting out of them with molds. However, do not rush to throw them away; they will definitely come in handy when modeling from dough or when working with wax at an older age. In addition, one of the sets with molds contains gold and silver wax
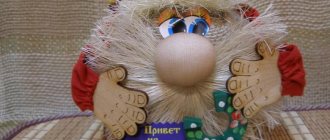
I’ll show you a photo of some candles that my daughter and I made from colored wax.
TESTING WAXES
I decided to compare the properties of waxes from Luch, Lori, as well as pure bee wax and personally colored bee wax.
Evaluating the wax during the sculpting process
The easiest way to sculpt with wax is from the Lucha kits - it feels like you are sculpting from soft plasticine. During the sculpting process, the wax still softens under the influence of heat from the hands and does not change its properties. The wax is more homogeneous. The smell is not pronounced plasticine-like. In total, there is a richer selection of colors across different sets.
Modeling from Lori kits is a little more difficult - like hard plasticine. To make it comfortable for small hands to sculpt from large pieces, I even had to heat it up a little with a hairdryer. The smell is more pronounced plasticine-like.
Modeling from pure and hand-painted beeswax without preheating is not possible. After warming up (we did this in hot water) it molds well, but not for long. It hardens during the sculpting process. The smell is amazing, pronounced honey.
Evaluating the wax as the candle burns
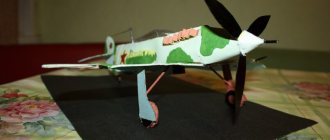
My daughter and I made a small candle from each of the above types of wax (about 7 cm in length; 1.5 cm in diameter) and compared how each wax behaves when the candle burns.
For the experiment, when testing wax candles, we placed a store-bought paraffin candle (white) next to it.
Here's how these candles performed during the burning process (first photo, then description + what was left behind the scenes):
In principle, wax candles from Lucha and Lori behaved quite similarly. They were the first to start flowing profusely and burned quickly (from Lori wax - in 27 minutes, from Luch - in 33 minutes). When extinguishing (if you specifically sniffed), a chemical smell was observed. The Lori wax candle crackled as it burned. Subsequently, I repeated the experiment with other colors of these waxes - the result was similar.
The natural beeswax candles began to leak seriously only towards the end of the burn. The first of the natural ones to flow was the colored candle and went out 1 hour 29 minutes after the start of combustion, then the most environmentally friendly one gave up - after 1 hour 41 minutes. The smell when stewing is very pleasant - honey. Both candles crackled as they burned.
As it turns out, candles crack if water gets into the wax during their production. In our case, as for natural wax, this is not surprising, because we heated it in hot water before sculpting. But where the water in wax candles from Lori comes from is a mystery to me.
The paraffin candle was the last to burn out. By the way, it flowed the least and did not crack. It was surprising that it burned the longest. I attribute this to the fact that it was still significantly thicker than the self-made ones, about half a centimeter in diameter, and the wick was thicker. And the thicker the candle, the longer it burns.
Just in case, I also did a cutting test. When cut, the paraffin candle crumbled, but all wax candles did not.
WHAT WAX SHOULD BE USED WHEN STYLING WITH CHILDREN?
If you are going to sculpt with wax often and on an industrial scale, then for everyday activities you should take natural beeswax. If you want to make beautiful candles for a holiday or as a gift, buy colored ones!
===
Some other articles about modeling materials:
Play dough. Let's understand this material, 1+, 2+About plasticine..., 1+...4+.All about modeling mass! 3+ ==Join my project “Sculpting with Children!” on Babyblog!
Decorating with salt
Another original idea for crafts with candles for the New Year. The candle can be decorated with stylish salt decor.
To decorate a candle, you should prepare:
- low decorative candles in iron molds;
- fine salt;
- paint, preferably acrylic;
- washcloth;
- disposable plate.
- Crafts for Mother's Day - how to make simple and beautiful original decorations and toys with your own hands (130 photos + video)
- Craft flag - how to make it with your own hands correctly? Master class on making for holidays and parades (105 photos)
- Eyes for crafts: how to make templates and a master class on making eyes from various materials (100 photos)
First, it is advisable to raise the wicks in the candles to make them easier to move. Pour a small amount of acrylic paint into a plate. Blot a piece of washcloth with paint. Paint the ends of the candles.
Without waiting for the paint to dry, sprinkle the painted surfaces with fine salt. Hold the candle from below and from the wick side.
Carefully set the candle aside, holding the wick. Wait a while for the paint to dry.
Decorate all the candles in the same way. This craft is ideal for the New Year holidays, since the salt is stylish and impressive.
Materials and preparation for work
To make original candles, you need to choose their design and color in advance, and decide whether they will be scented or regular.
For work we will need the following materials and tools:
- water bath pan;
- container for melting wax;
- molds for candles. Before work, it is better to lubricate them with liquid soap, dishwashing detergent or vegetable oil;
- baking soda;
- wick. For wax candles, it is recommended to use natural cotton threads;
- wax dyes. Natural wax crayons and food coloring (not water-based) are suitable; you can also use gel pigments;
- stick or pencil. Needed to secure the wick;
- wick weight;
- natural wax. It can be purchased in specialized stores in the form of wax or granules.
Halloween candles
To celebrate Halloween, you can make “blood candles”. For production you need the following materials:
- old white candles;
- red candle;
- a small dish (can be replaced with a disposable plate);
- decorative elements (to your taste - bunches, bugs, etc.);
- lighter.
Place a white candle on a plate. Light a red candle and wait for the paraffin to melt. Pour paraffin onto a white candle, creating a kind of “bloody” drip.
- Craft angel - 105 photo ideas on how to make your own angel quickly and easily from scrap materials
- Crafts from matches - 125 photos of original ideas for professionals and simple crafts for beginners
- Crafts with children: a review of interesting and exciting ideas for creating toys and decorations (115 photos)
This needs to be done in several layers. After each lap, leave the candle for a few minutes to allow the paraffin to harden. Thanks to this, the decoration will gain volume.
After the paraffin has dried, you can decorate the candle with additional decor. For example, you can take small children's toys - insects, spiders, cobwebs, etc.
Manufacturing progress
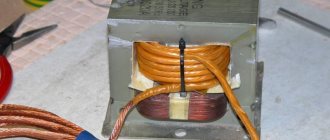
The process of making wax candles is quite simple to perform. If everything is done correctly and all simple conditions are met, you will enjoy not only the work itself, but also the excellent result. This master class will help you navigate the choice of product and perform it in the best possible way.
First you need to melt the wax in a water bath.
On a note! If you purchased large pieces of material, it is better to cut it into smaller pieces.
Next we proceed to fixing the wick. We attach a weight to the lower end of the thread so that the future wick does not dangle when filling the mold with wax. If it is possible to make a hole in the bottom of the container, then thread the thread there and tie a knot at its end; in this case, a weight is not required. It is advisable to wax the thread itself. Tie the upper end of the wick to a pencil or stick, as shown in the photo:
Related article: Crochet bags with DIY patterns: detailed master class with photos and videos
Now you can start filling the mold with wax. Let the wax harden. There is no need to rush to remove the finished candle from the mold; it is better to let it stay in it longer.
When the product has hardened well, you can pull it out of the container by pulling the end of the wick. This will work if there is a weight attached to the wick. If the thread is secured to the form with a knot, you just need to cut it.
Sequin decoration
Another original idea for the New Year or a romantic party. The candle can be elegantly decorated with sparkles of golden, emerald or other colors.
The easiest way to secure glitter is with double-sided adhesive tape. Place several strips of masking tape around the candle.
The number of stripes depends on the size of the candle. You shouldn’t cover it completely; for greater aesthetics, make gaps.
Remove the top layer of adhesive tape. Sprinkle the pasted areas with glitter of the desired color on top. As an alternative, metallized foil in silver or golden color. The craft will also turn out stylish, but a little different.