From the history of macrame
The first knots that people learned to make appeared at the dawn of civilization and were used for hunting and fishing. The first materials were animal wool and plant fibers.
The development of knot weaving began with the development of navigation. It is sea knots, known for their strength, intricate weaving and great variety, that form the basis of the art of macrame.
The sailors secured the gear and sails with ropes, tightening them with strong knots. And in his free time, he ties ship's utensils, bottles, and household items with twine.
Even now, modern sea wolves can give a master class in rope weaving. And their work will differ little from the hand-made panels of macrame craftswomen. More than 4,000 methods of tying knots have migrated from maritime crafts into the hands of needlewomen.
Macrame knots for beginners are made in fewer ways. We will look at them using examples of finished products, and you can also watch a video for beginners with a detailed step-by-step description.
History of macrame
This art was born with the first knot that ancient man tied. The first nets for catching birds and fish (first knotless, then knotted) were made from grass or animal hair.
But the sailors of the sailing fleet improved this technique best of all. Due to their professional activities, they had to be able to tie various sea knots, of which there are more than four thousand. In their free time from their main work, they had fun braiding flasks, bottles, utensils, knife handles, etc.
Already from sailors in the 14th century, residents of other countries learned the technique of sea weaving and applied it in their products. That is why sea knots are so widely represented in the macrame technique.
If in our time simple material is taken for work, then for weaving of that time gold thread, silk threads and laces, animal hair, and leather were used. The craftsmen used amber, beads, pearls, and wood in their work (they used them as decorative elements).
Macrame crafts
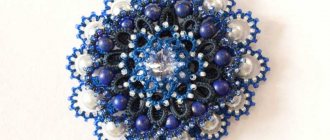
Using the macrame technique, they make small accessories for the home, cases for glasses and phones, boxes, pendants, earrings, as well as large works for office premises and public buildings, wall decorations with amazing ornaments emphasizing traditions and national flavor, macrame owl, which serves a symbol of wisdom and decorates many public institutions.
Flower pots allow you to place flower pots in a wide variety of places in the room, creating an interesting design.
The use of macrame for making furniture or to complement it fits organically into any interior; wicker chairs and shelves can transform a room, adding a touch of relaxed atmosphere; curtains and poufs will create a romantic mood.
Note!
DIY gifts for February 23rd - a large selection of ideas for creating unusual gifts for Defender of the Fatherland Day
What to give a 2-year-old boy - a list of the best options for an interesting and useful gift (120 photo ideas)
- Papier-mâché - TOP 120 photo reviews of original products. Detailed instructions for beginners on creating beautiful crafts
The photo of macrame shows various uses of equipment for furnishing premises.
Main nodes
Over the course of thousands of years of existence, the macrame technique has absorbed many different methods of weaving knots. In every corner of the Earth this art may have its own characteristics.
Weaving is divided into several main categories:
- Decorative, these knots are not intertwined with each other, but are performed separately. Designed for decorative design of any detail. For example, to hide a button on a product;
- Working, such knots are considered the simplest; they are used for weaving jewelry, linens and serious products;
- Auxiliary, these nodes are intended for reliable fixation of threads after completion of work with the product;
- Chinese craftswomen classify this weaving method in a special category, since it is special in the complexity and originality of the patterns created.
For a clear example, it is advisable to look at photos of the macrame technique and the main components.
Material for work
For work, threads of different thicknesses and different twists, from different materials, synthetic, natural animal, and plant are used.
Most often used in work:
- leg-split;
- twine;
- nylon cords;
- clotheslines;
- jutes;
- fishing line;
- cotton threads in several folds;
- dried plant stems;
- braid.
Preparing for work
Preparation for work takes a lot of time (about 10%) and consists of several stages.
- Execute the sample and determine the density of the sample.
- Cutting working threads. When measuring, do not stretch to avoid length errors.
- Sealing the fluffy, hot ends over the flame of a candle or lighter, smeared with glue or varnish.
- Smoothing the threads over steam.
- Hanging on the base in one of four ways.
- Shortening to avoid tangling by winding into “butterflies”.
Thin threads
Thin threads are used for small items: neck decorations, hair decorations, finishing of finished clothes. These include nylon, silk, cotton threads, floss. For ease of operation, they are combined several times.
The patterns turn out beautiful, and the crafts are light and elegant. Earrings, pendants, pendants, and women's ties are woven from thin threads.
Macrame: bracelet for beginners made of cord
A stylish bracelet can be made from a regular nylon cord, even without decorating it with various beads.
Detailed instructions with step-by-step photos
1. First of all, measure your wrist.
2. Fold the cord in half, thread it through the buckle, and tighten it.
3. We draw the ends of the cord through the second part of the buckle. The distance between its two parts should be equal to the circumference of the wrist +2.5 cm.
4. Let's start knitting knots. We pass the cord from the left and move it along the buckle through the left side of the loop. Tighten the cord so that the center is opposite the buckle. Now we draw the right side of the lace under this center. We pass the left cord under the right side, through the knot under the buckle and through the right side of the loop. We tighten it.
5. In this way we fill all the space between the parts of the fastener with knots. They must be the same size.
6. We cut off the excess cord close to the knot and burn it with fire. We hide the ends under the last pair of knots.
If everything is done correctly, the bracelet will look like the photo.
For those starting to learn macrame weaving, the bracelet patterns presented in the video lessons below will not be amiss.
Features of material selection
Whatever threads are chosen for the job, certain requirements are imposed on the material:
The threads should be smooth. Too fluffy or voluminous will create an inexpressive design.
Macrame weaving for beginners begins with choosing soft, pliable threads of medium thickness. They are easy to work with, and distortions and errors in weaving are immediately visible in the drawing.
When choosing synthetic threads, pay attention to how slippery the surface is. Slippery ropes will not make it possible to make a neat knot or securely fasten the weave. The product will be loose and shapeless.
Note!
- Kinusaiga technique - TOP-140 photos of the best ways to create crafts using the Kinusaiga technique with your own hands + instructions for beginners
- Do-it-yourself passe-partout - a master class with step-by-step do-it-yourself schemes. Making tips + photos of the best examples
- Decoupage with napkins: TOP-150 photos of ways to decorate with napkins. Simple instructions for beginners at home
The material should be strong, but not hard. If the thread breaks in the middle of knitting, you will have to unravel the entire product and start weaving all over again.
Consider the twist of the threads and their flexibility. The “wooden” threads will stick out from the finished fabric. To soften hard material, the threads can be soaked or boiled in water for several minutes.
The material in thickness, density, color must correspond to the theme, model, and complexity of the ornament of the selected product. The quality of the thread can be checked by the label on the skein, which indicates the degree of twist, thickness, care of the finished product, washing, shedding, and strength.
Macrame weaving patterns
Macrame for beginners (the simplest weaving patterns are used for the first works) most often begins to learn to create things or jewelry. Complex knots are predominantly decorative; long canvases are rarely created from them.
Macrame weaving patterns - “spider”
The most common schemes:
- "spider". Here square knots are used on 8 or more original threads;
Macrame weaving patterns - “rhombus with lapel”
- "rhombus with lapel". The scheme allows you to create beautiful openwork canvases that are quite strong, but not filled;
Macrame weaving patterns - “rhombus with rep knot”
- "Rhombus with rep knots." A universal scheme that allows you to create both filled canvases and those with voids. It all depends on the degree of tightening;
Macrame weaving patterns - “checkerboard”
- "chess". One of the simplest schemes. It uses tie knots arranged in a checkerboard pattern. When tightly tightened, it is possible to create a filled canvas;
Macrame weaving patterns - “hinged”
- "hitch". A system that runs on top of the main product. It is decorative.
Weaving tools
Before you start weaving, you need to stock up on tools that will be needed during work and will help in creating a smooth, neat fabric with beautiful knots:
- Sewing kit: measuring tape, scissors, pins for fixing threads. It is better to choose large pins with large heads on long legs;
- Crochet hooks of different diameters, knitting needles, awls to help correct knitting inaccuracies;
- PVA, glue gun for fixing complex elements;
- Weight to hold threads in one direction and prevent tangling;
- Holders (clamps) will be needed to secure the base. They resemble a vice and hold wooden bars and rings from which to begin knitting;
- A hard pillow (can be replaced with a piece of polystyrene foam, a piece of plywood with foam rubber), covered with dense durable fabric (jacquard, barakan). Necessary for fixing threads and starting weaving. The optimal dimensions of the device are 30x45 cm.
- The work uses decorative fittings, large beads, and buttons.
Tip: to learn the macrame technique, choose threads of medium thickness and not very slippery. The pattern clearly appears on them and is easy to navigate. Thin ones are also not suitable due to small parts and unclear elements. Fabric made of thin threads cannot be altered.
Materials and tools
To work you will need tools:
- hard pillow for horizontal weaving.
Tip: If you don't have a pillow on hand, a piece of foam will do. For many, it is even more convenient to use.
- pins for fastening;
- crochet hooks (large sizes);
- scissors;
- tape for measuring (you can use a ruler, but it’s inconvenient to measure);
- clamps - special textile vices for fastening threads vertically;
- glue;
- hanging weights for aligning threads;
- decorations - buttons, rhinestones, beads (depending on the needlewoman’s idea).
Methods of attaching threads. Beginning of work
All macrame lessons for beginners begin with the choice of model, material and careful study and analysis of weaving patterns. The step-by-step instructions explain in detail, step by step, how to weave threads together correctly and which knots to use in a particular case.
There are two types of working threads: axial and working. The axial ones are braided with working threads in such a way that they completely hide them. Working threads are several times longer than axial threads. They serve as the basis for attaching knots and various types of knitting.
You can attach the working thread to the base in the following ways:
Facial sketch. The working thread is folded in half. The fold extends over the axial one in the direction “towards you”. Thread two ends through the resulting loop and tighten.
Purl sketch. The working thread folded in half is thrown over the axial thread “from itself”, the ends are threaded into the resulting loop.
Rep cape. Tie a neat knot on the axial thread. It belongs to one of the types of knots and is also used to start weaving.
Double knit cape. Make a front cast plus additional fixation of the working threads on the axial yarn over on the left and right sides.
Macrame products: diagrams (video)
Macrame is a very useful technique for children's development. Introduce them to this type of needlework, and you will see how their imagination changes for the better.
The art of weaving knots in Slavic culture was equated with pagan rituals, because amulets and amulets were made using precisely this technique. Nowadays, the art of macrame has become not just fashionable, but also a practical hobby.
. Modern craftsmen combine weaving with decor from beads, rhinestones and semi-precious stones. Let’s try to master this interesting technique ourselves.
Types of nodes
The technique of weaving macrame comes down to a sequential combination of knots. In the first lessons, craftswomen learn the basic types of knots, how to tie and alternate them correctly and accurately to create a beautiful pattern.
The basic ones include a square flat knot and a simple Hercules knot. On their basis, other types of knots are obtained, of which there is a very large variety. Remember the parable of the Gordian knot, which could not be untied, but the knots in macrame can be adjusted, they can always be untied and re-tied.
The Hercules knot is made by weaving two working threads together one turn and then another turn. Among them, right-sided and left-sided flat nodes are distinguished. The name depends on which thread is on top.
The diagram shows a detailed execution of the unit. To fix the weaving, two axial threads are used, which do not participate in the formation of the knot. A chain of simple flat knots forms a wrist bracelet or a decorative cord for a pendant.
A square flat knot is obtained by alternating left-hand and right-hand knots. At the base there are still two axial ones. From two flat ones a square is obtained, from the shape of which the name of the knot comes. This technique is more voluminous and is suitable for creating simple crafts, baubles, toys, and handbags.
From the very beginning
Macrame is a knot weaving technique that came to us from the Ancient East. It was once used by sailors to weave knots and tie sea ropes. In Russia, the peak of macrame popularity occurred in the 70-90s of the 20th century: in every women's publication of those times one could find wicker flower pots, decorative panels, bags, jewelry and even clothes. At the same time, creative macrame clubs for children appeared, where they learned to weave. But today interest has faded a little: gadgets have replaced handicrafts.
Read also: Why did you lose interest in a girl?
Flower pots using macrame technique
As a rule, after studying the basic elements, they begin to create more complex compositions.
Macrame for beginners is suitable for making flower pots. The finished flowerpot is a special way of braiding a flowerpot or flower pot on long pendants, also decorated with macrame weaving.
To make it you will need:
- vase,
- nylon threads,
- tape, scissors,
- mounting base.
Selection of threads for weaving
Any rope is suitable for weaving macrame; the main thing is to decide on the product model and budget. Many cords, especially cored ones, are expensive.
Cords and threads available for needlework:
- Waxed cotton cord;
- Waxed thread;
- Floss threads;
- Silk threads;
- Clotheslines;
- Cord with core;
- Jute cord.
For beginners in mastering macrame weaving, waxed cotton cord is suitable as an economical option. This is an economical material made from cotton; there are no difficulties when weaving it.
Waxed cord is suitable for creating bracelets and amulets. An important feature is that soldering the ends over a fire is prohibited.
- Carpets, flower pots and other decorative items that serve a practical role in addition to decoration are made from jute thread. Before weaving, the jute is checked for quality by passing the thread between the fingers. If lint and small particles fall out, it means the material is of poor quality and it is not recommended to create with it.
- Baubles are woven from floss, and bright bracelets with ornaments are popular among teenagers. From clothesline, cord - rugs, flowerpots, various panels.
Step-by-step master class
Tip: thread consumption is calculated based on the height of the product. Multiply the length by four - this will be the required length of the material.
If the thread is used in two or four additions, then the length is multiplied by another two or four. For the final length, add one more height (for belay).
Step 1. Macrame for beginners for flowers is described in a detailed video. First make a loop for fastening. Place 8 threads together and secure with tape so they don’t fall apart (then remove the tape). Fold in half and make a knot, leaving a small loop on top.
Step 2. Divide the working threads into groups of 4 threads each. You will get 4 groups. From each group of threads weave a rope of square knots. You choose the length of the tourniquet yourself, approximately 8-12 cm.
Step 3. Make the base for the vase. Knit 4 strands in each group together. Crossing with adjacent threads, make a flat knot in two threads. There will be 4 nodes in total.
Step 4. Gather all the working threads into a bundle and tie to a length of 10 cm. Fasten at the end. The flowerpot is ready.
Souvenirs, toys. Macrame
Souvenir made using macrame technique
- a great gift for any occasion. A large number of different knots used in macrame weaving allows you to create original, memorable things that reflect the individuality of the master and, most importantly, help reveal the author’s attitude towards the person for whom the souvenir is intended. Each knot, tied by the hands of a master, carries a charge of positive emotions and good wishes.
- perform a motive of seven double
a bead is strung on the working threads, the working threads simply go around it;
Souvenirs made using the macrame technique have a very long history. Small wicker figures and trinkets have been knitted at all times. And in all countries, small wicker macrame souvenirs have their own characteristics and differ from each other. So,
The bright and colorful Costa Rican figurines depicting people and animals differ from Estonian ones, made of natural threads in natural gray-brown tones.
Gift souvenirs include original keychains for keys and mobile phones, small children's chest bags for schoolchildren (you can carry money for breakfast in them), exclusive bookmarks, ballpoint pens braided with macrame knots, lace stripes - laces for phones, cases for glasses , decorative overlay for a photo frame. In weaving macrame souvenirs, you can use various decorations - wooden or plastic beads, decorative tassels, pompoms, artificial flowers made from fabric, beads, threads, birch bark, unusually shaped buttons, beads, bugles, natural materials - acorns, chestnuts, sticks, pebbles .
A special place is occupied by such souvenirs,
like toys. They can be of various sizes: from the smallest decorative ones, whose place is only on a bookshelf, to large, “real” ones, which can become a child’s playmate. Moreover, small toys made using the macrame technique can not only represent an independent decorative element, but can also be used to make functional souvenirs. For example, a funny little turtle or an elegant snake will decorate a keychain or mobile phone.
The uniqueness of a hand-made souvenir is a guarantee that this gift will be highly appreciated.
Snake (see photo 7 on the inset)
For this souvenir toy you will need 3 m of 1 mm thick cord, two glass or plastic beads and
a small piece of red felt.
Two threads, each 1.5 m long, are pinned onto the pad. The middle ends (warp threads) should be 15 cm shorter than the working threads. Five to seven double flat knots are woven at the resulting four ends. A “berry” is formed from the resulting cord. This will be the head of the snake.
The body of the toy is knitted from the most common chain in macrame weaving - “snake”. For this souvenir, a double “snake” chain is made, since four threads are involved in the weaving. A double “snake” chain is often called a bead chain. This name comes from the fact that in the places where the threads are intertwined - the corners - small rounded nodules are formed, similar to balls of beads.
After weaving the head of the toy from double flat knots, the ends of the threads should be even. Now, when weaving a chain, the warp and working threads are used evenly.
After the body of the toy is woven, the threads are tied with a Hercules knot and the excess ends of the threads are cut off.
To decorate the head of the toy, you need to sew beads onto the head of the snake and sew or glue a forked tongue cut out of red felt.
Keychain amulet (see photo 8 on the insert). Macrame
To make this keychain you will need a thick silk or cotton thread about 2 m long, a key ring, a bead, and a cat's eye stone.
Four threads approximately 0.5 m long are attached directly to the metal ring of the future amulet, then two double flat knots are woven, and they are tightened quite tightly so that the weaving is located close to the ring.
- perform a motif of seven double knots;
attach a cat's eye stone.
The ends of the threads are secured with glue on the wrong side of the weave. To do this, it is better to choose “Superglue” (available in a 15 ml package).
Caterpillar (see photo 9 on the inset). Macrame
To weave this toy you will need 5 m of 1 mm thick cord and two glass or plastic beads.
Two threads, each 2.5 m long, are pinned onto the pad. The middle ends should be the same length as the caterpillar (in our case, 30 cm). Five double flat knots are woven at the resulting four ends. From the resulting cord
form a “berry” - this will be the head of the caterpillar.
To make the body, the end of the wire is secured to the head and woven to the central knotted threads. Two double flat knots are woven on these central knotted threads and wire. Then the wire is removed from the weaving (simply taken to the side).
A “berry” of five double knots is woven on four threads and tightened. Then the wire is returned to the weaving, and two fastening “Berries” knots are woven on two warp threads and wire. Then the wire is removed again.
In this way five more are woven
"berries". Then one knotted thread is cut out and two more “berries” are woven - the wire is returned to the weaving when two securing double knots are woven. When weaving the last “berry”, the knots are tightened as tightly as possible.
Cut out the second knotted thread and weave it on two working threads and wire.
a “snake” chain of four to five knots; The last knot is tightened tightly. The ends of the threads and wires are cut, the end of the wire is bent.
Then the resulting chain is bent, giving the toy the pose of a caterpillar lying on a leaf.
In order to decorate the caterpillar's head, you need to sew on beady eyes.
Turtle (see photo 10 on the inset). Macrame
To work, you will need six threads, each 1.5 m long. The toy is woven according to the following pattern.
First, the turtle's head is woven. Two threads are pinned onto the pillow in the middle and five double flat knots are woven at the resulting four ends. A “berry” is made from a woven cord using flat knots by pulling the knotted threads into the loops above the first knot. To secure the “berry”
you need to make a single flat knot underneath it. This “Berry” will be the head of the turtle.
To make the front legs, two threads are pinned onto the pillow in the middle. At the resulting four ends, two double flat knots are made (the two side threads will be the weaving threads, the two threads in the middle will be the warp threads). You need to make two such legs.
The shell is knitted with brids and woven from threads coming from the head and front legs of the turtle. Five brids are woven under each leg. Moreover, to obtain a convex shell, the two outer bridles are pulled tighter, then they become shorter than the three inner ones, and thanks to this, the surface of the shell will bend when weaving.
To connect to the rear legs, leave the leftmost thread on the left leg and the rightmost thread on the right leg free. From the remaining five threads (with two working threads on a base of three threads), a double flat knot is tied. Further
knit a diamond of five brids.
The transition to the hind legs is performed in the same way as the transition from the front legs to the shell. After a double flat knot of five threads is tied, two free threads from the legs are put into work: with all threads (six threads on each side) five brids are tied on the left and five brids on the right. Then the rightmost thread of the left leg and the leftmost thread of the right leg are excluded from the work - they will be used for knitting the tail. From the remaining threads, one double flat knot and one simple knot are tied (left or right, depending on which leg it is tied on). After this, the threads are cut.
The turtle's tail is formed by two strands woven from threads that were left especially for him.
After finishing the work, the excess ends of the threads are cut off.
If the product is woven from loose, crumbly, friable or fleecy material, then all cut ends must be
coat with PVA glue and fold to the wrong side.
Puppet (see photo 11 on the inset). Macrame
To make a puppet, you will need two wooden slats, threads of two colors, two buttons for the eyes and one for the nose, a few centimeters of strong, but not too thick fishing line.
The body, head and legs are made from pompoms. You will need four pompoms for the puppet: three (two legs and a head) of the same size, the pompom for the body is slightly larger. To make pompoms for the head and legs, cut out two circles with an outer diameter of 30 cm from thick cardboard; for the pompom for the body, two circles with a diameter of
40 cm. In the middle of each circle, cut out a hole with a diameter of 10 cm for the pompoms of the head and legs and 15 cm for the pompom of the body.
The circles are folded in pairs, and a fishing line is passed between the resulting “donuts” - this will be used to tighten the pompom. The “donuts”, folded together, with a fishing line laid between them, are wrapped with threads until the hole is completely closed. Then the threads are cut along the outer edge, for which one of the cutting surfaces of the scissors is inserted between the cardboard circles and the threads are cut in a circle. Gently tighten the fishing line, pulling the cut threads into a tight bundle. The cardboard circles are removed, after which the bundle of threads is tightly tightened and the line is secured with a Hercules knot.
The protruding threads (if any) of the finished pompom are trimmed. The pom pom can be held over steam to make the threads soft and the pom pom itself fluffy.
The neck and legs of the puppet are knitted from single flat knots with a “lock” on the left from the same threads from which
torso, head and paws.
Then eye buttons and a nose button are sewn onto the head pompom. The buttons can be covered with fabric that contrasts in color with the threads from which the puppet is made.
The pom-poms of the legs are connected to the legs, the legs are attached to the body, the body is connected to the head by the neck. The four elements of the toy: the body, two legs and the head are attached to wooden slats with loose threads. The slats themselves are fastened to each other crosswise.
Photo macrame for beginners
Simple bracelet patterns for beginners
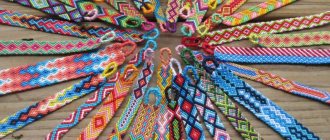
Beginners who are starting to weave macrame for the first time will find it useful to practice on thick threads or cords.
Materials for weaving macrame can be very diverse
You can weave such bracelets very quickly, and they look quite impressive. Experience in weaving using simple patterns of accessories with beads and openwork knots will help in working with more complex products in the future.
ALL 4 types of knots
Bracelet made of thick threads or strands
Let's look in more detail at the macrame weaving technique for beginners using patterns for weaving bracelets.
The more the thread is twisted, the better, as the pattern will come out clear and embossed.
The first option is a bracelet made of two thick cords of different colors. It does not require a fastener, since you can weave it yourself.
Let's get started:
- We fold one of the cords in half and lay it so that the ends point down. We lay the second cord across (horizontally) - this is the working cord. We thread the ends of the last lace from below through the warp loop and bring it forward.
- Tighten the knot, leaving a small loop that will become a clasp.
- We separate the ends of the working lace and braid them with the main cord so that we get a knot again. Tighten the cord.
- We separate the ends of the main thread and braid them with the working thread. We repeat the alternation of threads and weave to the desired length (try on the wrist).
- We tie a large knot at the end of the bracelet, gathering all the ends of the cords together. We tighten it so that it fits into the loop at the other end of the bracelet, acting as a clasp.
DIY cord bracelet
The second version of a simple macrame pattern is a bracelet in the form of a braid made of four threads. You will need a strand of thread, a flat fastener and two ribbons measuring 3x55 cm.
- Each ribbon needs to be sewn lengthwise into a tube into which a cord of thread is threaded. You will need a small pin to pull it through.
- We bend the resulting bundles in half, lay them with the free ends down and secure them.
- We intertwine the ends of the bundles with a pigtail, following the diagram. Try it on your wrist as you weave.
- We tie the ends together and attach the clasp. This bracelet looks very original if you make it voluminous enough.
Bracelet in the form of a pigtail
Openwork bracelet for beginners
To work, you will need 7 not very thick threads, folded in half. For convenience, it is better for beginners to choose 2 contrasting colors - three central threads (for example, purple) and 2 outer threads (for example, green). We fix them on a pencil or in any convenient way.
- Using green we make flat knots of 4 threads. We draw the far left one on top of the others, the far right one on top of the left one, then so that the two central ones remain on top, and again on top of the left one. We tighten it. We perform the same knot on the left side. We make 6 knots on both sides, alternating threads.
- Using purple threads we perform a Josephine knot. Divide 6 threads into 2 parts equally, lay the left flagellum in a loop on top of the right one (long piece on top). We place the right part above the left, first draw it from below, then from above relative to the left side. Tighten the knot slightly.
- We connect green bunches with purple. We arrange the threads in pairs in order. We knit 2 flat knots on the left and right. Then one simple knot on both sides.
- We repeat the pattern first the required number of times.
- At the end we gather all the threads together and tie them with another thread. We wrap the bundle with this thread, forming a tourniquet. We connect both ends of the bracelet and wrap it with thread again, securing it.
Popular articles Congratulations on the beginning of spring
Openwork bracelet
Simple bracelet patterns for beginners
Beginners who are starting to weave macrame for the first time will find it useful to practice on thick threads or cords.
Materials for weaving macrame can be very diverse
You can weave such bracelets very quickly, and they look quite impressive. Experience in weaving using simple patterns of accessories with beads and openwork knots will help in working with more complex products in the future.
ALL 4 types of knots
Bracelet made of thick threads or strands
Let's look in more detail at the macrame weaving technique for beginners using patterns for weaving bracelets.
The more the thread is twisted, the better, as the pattern will come out clear and embossed.
The first option is a bracelet made of two thick cords of different colors. It does not require a fastener, since you can weave it yourself.
Let's get started:
- We fold one of the cords in half and lay it so that the ends point down. We lay the second cord across (horizontally) - this is the working cord. We thread the ends of the last lace from below through the warp loop and bring it forward.
- Tighten the knot, leaving a small loop that will become a clasp.
- We separate the ends of the working lace and braid them with the main cord so that we get a knot again. Tighten the cord.
- We separate the ends of the main thread and braid them with the working thread. We repeat the alternation of threads and weave to the desired length (try on the wrist).
- We tie a large knot at the end of the bracelet, gathering all the ends of the cords together. We tighten it so that it fits into the loop at the other end of the bracelet, acting as a clasp.
DIY cord bracelet
The second version of a simple macrame pattern is a bracelet in the form of a braid made of four threads. You will need a strand of thread, a flat fastener and two ribbons measuring 3x55 cm.
- Each ribbon needs to be sewn lengthwise into a tube into which a cord of thread is threaded. You will need a small pin to pull it through.
- We bend the resulting bundles in half, lay them with the free ends down and secure them.
- We intertwine the ends of the bundles with a pigtail, following the diagram. Try it on your wrist as you weave.
- We tie the ends together and attach the clasp. This bracelet looks very original if you make it voluminous enough.
Bracelet in the form of a pigtail
Openwork bracelet for beginners
To work, you will need 7 not very thick threads, folded in half. For convenience, it is better for beginners to choose 2 contrasting colors - three central threads (for example, purple) and 2 outer threads (for example, green). We fix them on a pencil or in any convenient way.
- Using green we make flat knots of 4 threads. We draw the far left one on top of the others, the far right one on top of the left one, then so that the two central ones remain on top, and again on top of the left one. We tighten it. We perform the same knot on the left side. We make 6 knots on both sides, alternating threads.
- Using purple threads we perform a Josephine knot. Divide 6 threads into 2 parts equally, lay the left flagellum in a loop on top of the right one (long piece on top). We place the right part above the left, first draw it from below, then from above relative to the left side. Tighten the knot slightly.
- We connect green bunches with purple. We arrange the threads in pairs in order. We knit 2 flat knots on the left and right. Then one simple knot on both sides.
- We repeat the pattern first the required number of times.
- At the end we gather all the threads together and tie them with another thread. We wrap the bundle with this thread, forming a tourniquet. We connect both ends of the bracelet and wrap it with thread again, securing it.
Openwork bracelet
Macrame bracelets
Macrame bracelets for beginners, shamballa bracelet
Shambhala amulets bracelets are now quite in demand. What is Shambhala and why is it created? Not everyone knows that creating such a decoration is quite simple. Especially if you have a complete master class with step-by-step actions at hand. With its help, you can weave other macrame bracelets with beads: the patterns are very similar. Experiment with materials, fittings and knots to create your own unique amulet.
Weaving materials:
- Three meters of any cord. The main thing is not to use fluffy threads - they can slightly blur the impression of a good weave;
- beads with large holes: we pass two cords through the hole.
- A paper or pin clip and a soft work surface.
- Sharp scissors.
- Pliers.
DIY step-by-step master class
Let's take two pieces of cord of 60 centimeters and one of 1.8 meters. Let's leave an allowance of about twenty cm, attach two threads to the working surface using clips or pins. The long piece will be the working thread; we will place it under the base threads (ours are blue). Let's start weaving from either side. For example, open the work on the right. Pull the cords tightly and get the first half of a square knot. In order to create a second half, we will repeat all the steps, but on the second side. Tighten the entire square knot well.
We determine the number of such knots between the beads ourselves according to our taste, however, an odd number of them looks prettier.
We will remove the remaining tails of the laces using a needle: simply drag it inward through the final square knot. You may need pliers for this. Using sharp scissors, cut off the excess pieces of thread.
Do-it-yourself bracelets using macrame technology can be finished with a sliding clasp made using the same technology. In this case, you don’t even need auxiliary fittings, the fastening of which will not always be easy to understand.
We close our bracelet in a circle and secure it with small pieces of thread. Let's cut a piece of cord about thirty cm long from a skein and fold it under the threads of the bracelet (there are only 4 of them). We tie square knots until we get a lock of about 1.5 cm. We hide the ends of the thread inside the knots. Divide the “tails” in pairs and tie knots on each pair. You can also decorate them with beads, which prevent the ends from slipping out of the knot.
Crafts from palms: interesting applications and master classesModular origami dragon, Chinese dragon from modulesPaper plastic for beginners step by step: templates and diagrams DIY felt angels and patterns