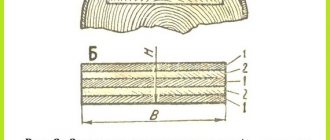
Types of thread
The carving is:
- Metric
- Inch
- Pipe inch
How they differ can be seen in the picture below; the only thing worth noting is that metric threads are mainly used.
Types of thread
There is also a difference between right and left threads.
Classification of leroks
Thread cutting tools are distinguished according to the following characteristics:
- According to the method of producing threads - machine or manual.
- According to the materials from which this equipment is made.
- According to the profile of the threaded part on the final product.
- According to the characteristics of the thread being cut: its diameter and pitch.
Tools for obtaining internal threads are often called taps, but this is incorrect - such equipment is called taps.
A thread cutting tool is always used in conjunction with a die holder - equipment where the thread-forming tool is secured. The appearance of such devices is determined by the design of the lectern. In particular, for manual thread cutting, die holders are equipped with a handle and three to four gougons that secure the blade, which are evenly distributed along the arc of the seating surface. When machine-forming threaded profiles, the die holders have the form of a flat prism.
To universalize the designs of die holders, tool companies that produce die holders make their outer surface the same for the adjacent group of threads (for example, M10 and M12). The taps, designed to produce threads with the same diameter but different thread pitches, are also unified in their seats.
The standard marking of the lerka includes in its designation a letter that determines the type of thread - inch (D) or metric (M). Rarely, lugs with left-handed threads are also used (for example, in the seats of devices for tying cargo cables and ropes, in heating radiators, etc.). Then the Latin letters LH are added to the designation of lerki.
For trenches that form threads on pipes, the letter G is added to the designation. Such trenches can have a conical profile of the thread-forming part, and are used to produce threaded parts on pipes, in particular, on bends, adapters, etc.
The parameters and characteristics of domestically produced lechers are regulated by the requirements of GOST 9740.
Pipe thread classification
The term “pipe” has a privileged position in the plumbing industry. This term is classified with an eye to a group of standards that define the criteria for connections of various elements of plumbing structures.
Pipe threads are widely used in plumbing and sewer systems, so the practice of threading, manually or automatically, is a frequently applied activity
For example, a pipe thread size is designated by a numerical value indicating the standard bore diameter of the pipe, but not the physical thread diameter.
In practice, pipe threads are used:
- cylindrical ( G/BSPP ),
- conical ( R/BSPT ),
- round for shut-off sanitary fittings ( Kr ),
- inch cylindrical (American standard NPSM ),
- inch cone (American standard NPT ).
A mechanic whose main work area is household work is recommended to take as a basis the conditional division of pipe threads into two main types:
- cylindrical ( G ),
- conical ( R ).
It is these two types that the home plumber most often encounters when servicing household plumbing equipment or laying water supply or heating pipes.
Pipe cutting is carried out in the following cases:
Tools for manual thread cutting
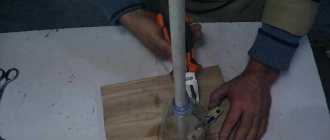
When cutting threads manually, the workpiece (rod, pipe) is stationary, and the tool itself rotates. In this case, there is no peripheral sliding speed, so the thread cutting tools practically do not heat up to high temperatures. To reduce mechanical wear of the thread-forming profile and reduce the effort, the area of the workpiece required for cutting is lubricated. If there are large differences between the diameter of the original workpiece and the diameter of the thread, it is also necessary to lubricate the inner surface of the hole.
It is believed that in order to form a full-fledged threaded profile, the diameter of the initial workpiece (for the most popular diameters) must correspond to the following values:
| Diameter of cut thread | M6 | M8 | M10 | M12 | M16 | M20 |
| Diameter of the original rod (or tubular blank), mm | 5,80…5,95 | 7,75…7,90 | 9,70…9,95 | 11,80…11,95 | 15,80…15,95 | 19,80…19,95 |
Note : The data given in the table can also be used to determine the diameter of the initial workpiece for subsequent thread shaping on machines with flat dies.
An important element for choosing the right lecher is the material from which it is made. The peculiarity of the thread cutting process - a gradual increase in force, with a sharp decrease towards the end of the process - determines the increased viscosity of the threading material, otherwise the thread profile will intensively chip. Therefore, the optimal choice would be levers made of alloy tool steel X12F1 or 9ХС, with a hardness of 59…61HRC. For cutting threads on heat-resistant and alloy steels, a tool made of high-speed steel grades R6M5 or R9K6, with a hardness of 60...63 HRC, is suitable. The price of such blades will be high, so their use is justified only for large volumes of production of threaded parts. For domestic purposes, it is quite acceptable to use lerks made from carbon tool steels U10 or U12.
Among the enterprises that produce such tooling, the highest ratings are those of Izhevsk, Chelyabinsk, Vladivostok, Samara, Bryansk, Nizhny Novgorod (Russia), Orsha, Minsk (Belarus), and Lvov (Ukraine). Foreign-made lechers from UFC (Italy) and CM Tools (Finland) have proven themselves to be excellent in operation.
Additional Threading Techniques
Regarding manual work, threads of only initial standard sizes . The larger the thread diameter is cut, the more force must be applied to the cutting tool.
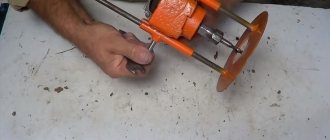
In the past, serial and mass production of metal products did not exclude manual labor in the manufacture of threaded surfaces. Today, threads are almost completely cut using specialized equipment. Thread-cutting and thread-rolling units have become widespread.
There are even compact machines that make it possible to cut threads by machine on site.
screw cutting machines do this job well . Of course, you can trust the creation of threaded surfaces to an ordinary lathe. When using machine turning equipment, dies and taps are often used for manual cutting. But threads, internal and external, can be made even with an ordinary turning tool.
Tools for machine thread forming
Unlike hand tools, when producing threads on specialized machines, dies perform a reciprocating movement, while the workpiece moves in a screw manner. Such lechers are divided into movable, which is fixed in the slide of the machine, and stationary, installed on its table.
The working area of the fixed ladders consists of three main parts:
- The intake, with the help of which the rod workpiece is captured;
- Profiling, where the thread rolling itself is carried out;
- Calibrating, in the area of which the basic parameters of the thread are calibrated and the product smoothly exits the thread formation zone.
This design eliminates sharp fluctuations in force, which are inevitable due to the operating characteristics of the equipment: high productivity (up to 400 rpm) and the presence of an idle stage, when the slide with the die holder returns to its original position after the next workpiece.
The movable die has a simpler design. Its receiving part in length is approximately 30...35% of the diameter of the original workpiece, while the rise of the profile to the main level of profiling occurs at an angle of 4...7 °, At the same time, the length of the movable lever is always greater: this eliminates accidental capture of the knurled workpiece during the reverse stroke of the slide .
Machine tools can be used to cut not only ordinary types of threads, but also special profiles, for example, for grease nipple heads, as well as threads for self-tapping screws. For this purpose, a special comb is made on the form-forming part of the lerk, in the grooves of which the necessary sharpening of the end of the fastener is formed.
In order to avoid cracks during long-term use of tools for machine thread shaping, their hardness should be slightly lower than manual ones - within 56...58 HRC.
Machine lerks are usually manufactured by the same companies that produce the thread rolling equipment itself. Tools listed are Italian (from the Sima and Sacma brands), Japanese (Sakamura) and Belgian-made (Malmedie). It is better to avoid commercially available tools made in China and Taiwan: although its price is much lower, the stability of its performance characteristics and mechanical properties are highly questionable.
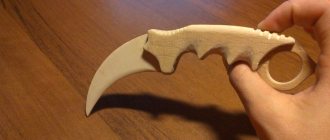
External thread cutting
An integral part of any threaded connection is the externally threaded component . It is he who screws into the hole with internal threads. Rotating bodies, that is, shafts, are equipped with an external threaded surface. This type of thread is typical for bolts, studs, lead screws, all kinds of couplings and adapters .
A special tool is used to cut external threads:
- Die
- Die holder
As is clear, the die is inserted into the die holder. The die fixed in the holder is placed on the tip of the chamfered shaft. Next, the die is pressed down and screwed onto the shaft.
The height of the dies depends on the diameter of the thread being cut. On average, a die has 8 helical grooves. If we consider dies for cutting metric threads, the industry offers dies from M3-M6 to M52. In addition to dies for cutting traditional metric threads, there are dies for pipe (inch) threads, which can be either cylindrical or conical.
A type of dies is lerka. The key difference between lerks and dies is the design. The lerka is presented as a one-piece product . The die can have a split or sliding design .
- Split dies have a cut on one side, which makes the threaded product springy . Split-type dies are typically used to renew clogged or stripped threaded surfaces .
Of course, the split die can also be used for direct thread cutting. But due to the spring design, the accuracy of the threaded surface will be far from ideal. As a rule, the first, so-called “roughing” pass is made with a split die.
- Sliding dies have a collapsible design. If in split dies the cut is made only on one side of the product, then in sliding analogues the die is cut into 2 equal parts.
Sliding type dies usually have a prismatic shape . To work with such dies, you should use a die with a clamping mechanism.
There are 6 standard die sizes.
Sliding dies are characterized by increased durability. Thanks to the collapsible design, the cutting edges can “play” under critical loads. This avoids the appearance of chips and cracks on the threaded grooves.
Of course, the collapsible design of the dies affects the accuracy of thread cutting. Usually, with the help of a collapsible prismatic die, it is possible to achieve 6-7 quality accuracy , while non-separable analogues provide the possibility of obtaining threads of 8-9 quality .
- Solid lerks are cast one-piece dies. The main advantage of the lehr is the ability to cut threads with a high degree of accuracy . The good quality of the resulting thread is due to the non-demountable rigid structure.
Regarding weak points, the lehrs have them. The high rigidity of the structure makes such dies susceptible to chips and cracks. The cut edges in lehrs often become chipped. Leathers are significantly inferior in durability to split and sliding analogues. When using a lehr, it is recommended to use plenty of lubricant . Cooling won't hurt either.
How is the operation performed and what is its essence?
The main task of the mechanic is to create a hole in the metal thickness with the subsequent formation of hollows from the inside. They need to be made so that the turns fit the bolt, stud or other fastener.
A threaded element may be needed in everyday life for the most durable connection of two parts. Here it is necessary to achieve maximum cleanliness - so that there are no shavings, deformations, or broken threads left. It is also very important to follow GOST standards for the size of the device. The diameter should match the screw that will go inside.
Many parameters are important - the type of material, its density, as well as condition, for example, temperature, the presence of corrosion. First you need to prepare the workpiece - remove excess dirt. Then you need to select the right tool, and only then begin metalworking in two or three stages - from roughing to finishing.
Several parameters matter:
- hole diameter;
- cutting depth;
- number of threads (these are entries, the most common is the presence of three cavities);
- pitch, that is, the distance between two furrows.
How internal threads are cut - general information
The device is called a tap. It can be of two varieties - manual and machine, in accordance with the methods of making furrows. The material that is processed is metal, but not only it. There are also lightweight models that cut into plastic or wood. The last option cannot be called the most common.
Factories use mechanized technology - metal drills make through holes (or a blind cavity), and after the blade, several turns are applied with a predetermined pitch. The advantage of this processing is high accuracy. Calculations are made using computer-aided design programs, then the data is entered into the control module - manually or using CNC. The second advantage is that skew of the spiral angle and errors are virtually impossible.
But at home and in small industries, a simpler, but less accurate procedure is often used - manually cutting internal threads with a tap. The work can be carried out on site; for this you need to buy the device itself and a drill to make a preliminary hole.
The tool resembles a herringbone shape due to the fact that the working surface is a ribbed blade. Structurally, the product is a rather complex configuration made of tool steel. This material is used because of its strength and ability to process most alloys, even cast iron. It is not very good to work only with hardened metal - it has internal stresses, therefore it is considered fragile and can crumble during the cutting process.
How to reliably seal a main thread with copper wire
Typically, fine threads are used for these purposes, but it is possible to ensure the tightness of a standard threaded connection if you use copper wire. To do this, remove the plastic insulation from the copper core using a stripper and cut off the required length.
We wind the copper wire around the bolt shaft directly under its head, making several turns.
Remove the resulting copper ring from the bolt and place it coaxially on the threaded hole.
We screw the bolt into the hole on top of the improvised copper ring, first with one hand, and then tighten it tightly with a wrench until it stops.
We check the quality of thread sealing by securely fixing the part with a bolt and a seal made of copper wire to the fitting of the high-pressure source.
We gradually increase the pressure and bring it to 110 psi or 750 kR, which is approximately equal to 7.5 kg/cm2.
We see that the threaded connection calmly holds this pressure, since the pressure gauge reading does not drop. We apply a soap solution to the bolted connection and once again make sure that the connection is tight, since no soap bubbles are visible.
This simple and quick way will help you make a tool that will come in handy more than once.
Types and areas of application of taps
According to the drive method, they are divided into:
- Manual - they have a square tail, which is inserted into the knob. There are two handles that make it convenient to turn the product. It is important not to allow distortion. This result can only be corrected by drilling and cutting a larger diameter.
- Machine - used on metal-cutting machines. They are firmly fixed in the holder, accurate, and do not allow deviations.
By cutting method:
- Universal. Their design can be called classic. A tool with a running gear (its length determines the depth of insertion of the screw later if the hole is not through), which is divided into sections. Each of them has certain geometric parameters - angle, direction, distance, step. There are usually three of them, each designed for rough metalworking, intermediate and finishing. Thus, you can achieve the most accurate result with one movement.
- Complete. The name speaks for itself. You will need a set of 3 taps, since the internal thread must be made with high precision. First, the coarsest tool is used, then a finer one, and finally - with grinding and sharpening of the smallest corners. Buying a set is more expensive, but the result is much higher quality.
By hole type:
- For through. They are distinguished by a long working part. It gradually expands, moving into the working area, which is responsible for precise cutting.
- For the deaf. On the cutting section, calibrating turns immediately begin. Therefore, it is very important to sharpen them or promptly change the set as they wear out.
According to the groove design:
- straight – I work well with soft alloys;
- screw, their working area is staggered, they can easily pass even through cast iron;
- shortened - removes chips well.
The shape of the product resembles a cone (full or truncated) or a cylinder. They also all differ in diameter.
Types of instruments
The appropriate tool is selected depending on the characteristics of the material being processed, the required productivity and other parameters. Using different types of taps, you can cut metric or inch internal threads with a cylindrical or conical profile.
According to the method of conducting the process, models are distinguished:
- Pass-through (universal) . Their working part consists of three zones. The first performs rough cutting, the second – intermediate, and the third – finishing.
- Complete . To perform a full range of work, several tools are used - for roughing, intermediate and finishing cutting. The sets consist of three taps, less often of two (for roughing and finishing). For processing particularly strong metals, kits with 5 tools are used.
The tool is made of two types: for processing holes manually or using metal-cutting equipment.
- Machine-manual . Has a square shank. Works complete with a holder with two handles - a knob.
- Machine . Installed in the chuck of metalworking machines of various types.
Taps of different designs are used for cutting threads in blind and through holes:
- For non-passable holes, use a complete tool without a conical tip. The work is usually done with a crank.
- In through holes, threads are made using taps with a conical tip. Most often these are varieties of universal type tools.
How to correctly determine the hole diameter?
Before cutting a thread, a hole is made, the diameter of which is determined according to standardized tables. If you prepare a hole whose cross-section is smaller than the recommended size, the tool will fail; if it is larger, the result will be of poor quality.
Correspondence table for metric threads and hole diameters for them
| Thread designation | Diameter, mm | Thread designation | Diameter, mm | Thread designation | Diameter, mm |
| M 2 | 1,6 | M 8 | 6,7 | M 22 | 19,4 |
| M 2.2 | 1,75 | M 9 | 7,7 | M 24 | 20,9 |
| M 2.5 | 2,05 | M 10 | 8,5 | M 27 | 23,9 |
| M 3 | 2,5 | M 11 | 9,5 | M 30 | 26,4 |
| M 3.5 | 2,9 | M 12 | 10,2 | M 33 | 29,4 |
| M 4 | 3,3 | M 14 | 12,0 | 31,9 | |
| M 5 | 4,2 | M 16 | 14,0 | M 39 | |
| M 6 | 5,0 | M 18 | 15,4 | M 42 | 37,4 |
| M 7 | 6,0 | M 20 | 17,4 | M 45 | 40,4 |
Correspondence table for inch threads and hole diameters for them
| Thread size, inches | Diameter, mm | Thread size, inches | Diameter, mm |
| 1/8 | 8,8 | 7/8 | 28,1 |
| 1/4 | 11,7 | 1 | 30,5 |
| 3/8 | 15,2 | 1 1/8 | 35,2 |
| 1/2 | 18,9 | 1 1/4 | 39,2 |
| 5/8 | 20,7 | 1 3/8 | 41,6 |
| 3/4 | 24,3 | 45,2 |
Selecting a workpiece for thread cutting
The diameter of the threading rod or hole is not equal to the nominal value of the finished product. When cutting external threads, select a rod having a diameter several hundredths of a millimeter smaller than the thickness of the finished product. This is due to the fact that when removing chips, the metal is partially squeezed out, completely filling the threaded profile of the die. For cutting internal threads, the hole is also made with a small allowance to the smaller side. The exact diameters of workpieces for cutting metric threads are specified in GOST 19257-73.
READ How to thread a pipe 3 4
If drills of the appropriate size are used to drill holes with an inaccurate diameter, then finding a rod suitable for cutting external threads is quite problematic. This problem can be solved by preliminary grinding of a rod of standard thickness. To do this, the product is clamped into a drill chuck and treated with sandpaper evenly along its entire length, periodically taking measurements with a caliper.
Stages of thread cutting with a machine-hand tap
Work order:
- The first step is marking in accordance with the drawings.
- According to the marks, punching is carried out with a sharply sharpened core.
- Drill with medium pressure at low speeds. The drill should be at right angles to the surface. Before starting work, the drill is lubricated. If the hole depth is large, then lubrication is carried out not only before starting, but also during operation. The depth of the blind hole should be slightly greater than the length being cut. If there is no reserve, the thread may be incomplete.
- The quality of the result can be improved by countersink processing, which reduces the taper and ensures parallelism of the side surfaces.
- The tap is secured in the driver, its tip is lubricated and inserted into the hole strictly at right angles to the surface. Make the first turn, lightly pressing the knob from above. After the first turn forward, make a half turn back to remove chips. Particular care is taken when using a multi-tool - it is fragile and easy to damage. It's easier to work with complete models.
How to restore a thread with a tap
Before restoring a thread with a tap, determine whether it is possible to increase its diameter or cut a new one in a different location. If yes, then the repair will take place very quickly.
Photo: tapping a thread
When working, observe the following basic rules.
Drill the hole strictly at a right angle
Use two new taps of the required diameter (for roughing and finishing).
Be careful when cutting threads. Avoid distortions and sudden movements.
It is advisable to cut the thread using a wrench. If you don't have one, take an adjustable wrench.
Remember to use lubricant and remove chips regularly.
Using Epoxy Glue
This method is not suitable for restoring and strengthening connections subject to high loads and vibrations. There is also no point in using epoxy glue if components and structures operate at high temperatures.
Photo: epoxy glue for thread restoration
If there is no need to ensure high connection reliability, proceed this way.
Welding the hole and then cutting a new thread
This method is rarely used due to the fact that the strength of the new thread obtained using this technology will be lower. This method is also chosen in the absence of special devices (screws and spiral inserts).
READ Chainsaw Wood Carving Lessons
This method of thread restoration includes the following steps.
Removing old threads by drilling.
Welding the hole. The choice of technologies depends on the materials of the parts.
How to thread a bolt without a tool.
To weld holes in steel products, electric arc or gas welding is used in protective environments.
When working with cast iron parts, gas or electric arc welding is used in a cold state or with general/local heating.
Electrodes (MNCh-1, OZCh-1, TsCh-1), cast iron rods with increased m silicon and other materials are used as additives.
Machining the hole flush with the base metal.
Note! When working with aluminum products, this method of thread restoration is usually not used. This is due to the fact that the metal actively absorbs gases during welding. Pores form in the deposited layers. With severe shrinkage, cracks appear.
How to cut external threads using a die
To cut external threads manually, a special tool is used - a die holder with dies of various diameters.
Die holder with dies for different diameters
In hard-to-reach places, for example near walls, a die holder with a ratchet is used.
Selection of dies
Nominal thread diameter is the diameter at the vertices of the thread triangles. The die cuts the metal, forming depressions and leaving the tops intact, thus both the rod and the die must be the same diameter. The diameter of the thread, for example, is M3 - this is “M” - metric thread, and the number is the nominal diameter of the thread in mm. Accordingly, to cut a thread on a 3 mm rod, we take an M3 die. Measurements of the rod are made with a caliper.
To make the die cut better into the rod, a chamfer is cut off from its end.
Principle of thread cutting with a die
To secure the workpiece you will need a vice. The workpiece is firmly fixed in a vice and lubricated with machine oil for easier movement of the die, reducing friction and tool wear.
When cutting threads with a die, you must avoid large accumulations of chips in the chip removal holes.
The die is installed on the end of the part perpendicularly. With slight pressure, they begin to rotate the die holder clockwise if the thread is right-handed, respectively, if it is left-handed, then counterclockwise.
Cut the thread as follows:
- First make 2-3 turns.
- Then half a turn back to remove chips.
- Lubricate after every 3-4 turns, using a syringe.
- Etc.
Ring gauge
Cutting a thread with a die with your own hands (video)
Tapping internal threads
Using a tap, cut the internal thread in the pre-drilled hole. The hole should be smaller by approximately the thread size (the thread size is indicated on the tap). Approximately as in the table:
Hole diameter for internal thread with tap
It is worth remembering that the drill will not give an absolutely accurate diameter; it will be larger by a few fractions of a mm. This is especially noticeable on diameters up to 3 mm. This should be taken into account and take a drill less than a tenth of a mm.
Just like with dies, there is a tap holder.
There are rough and finishing taps. Sometimes they cut first with a rough tap, then with a finishing tap, but mostly they use finishing taps straight away.
Manual cutting of internal threads with a tap (video)
The process is almost identical to thread cutting with a die. The tap is attached to the holder and installed perpendicular to the hole. The part with the hole must be securely fastened.
The tap and hole are lubricated and this is done periodically, after several turns. Just like with a die, you need to make 1-2 turns and 0.5 turns back to remove chips.
To check the accuracy of thread cutting, use a square, checking the verticality of the tap after several turns.
Features of the technology
When cutting internal threads with a tap, the following algorithm is used.
- In the place on the surface of the workpiece where the hole for threading will be drilled, it is necessary to form a recess for a more accurate entry of the drill, using a core and a regular hammer. The drill is fixed in the chuck of an electric drill or drilling machine, on which low rotation speeds of the tool are set. Before starting drilling, the cutting part of the drill must be treated with a lubricating compound: a lubricated tool enters more easily into the structure of the material being processed and creates less friction in the processing area. You can lubricate the drill with a piece of ordinary lard or grease, and when processing viscous materials, machine oil is used for these purposes.
- If it is necessary to cut threads in small parts, they should first be fixed using a bench vice. When starting drilling, the tool fixed in the equipment chuck must be positioned strictly perpendicular to the surface of the workpiece. You should lubricate the tap regularly and ensure that it does not warp and moves strictly in the given direction.
- At the entrance to the hole, as mentioned above, it is necessary to remove the chamfer, the depth of which should be 0.5–1 mm (depending on the diameter of the hole). For this purpose, you can use a larger diameter drill or countersink, installing them in the chuck of drilling equipment.
- The process of cutting internal threads begins with tap No. 1, which is the first to be installed in the driver. We should not forget about the lubricant, which must be applied to the tap for threading. The position of the tap relative to the hole being machined must be set at the very beginning of the work, since later, when the tool is already inside the hole, this will not be possible. When cutting a thread with a tap, you must adhere to the following rule: 2 turns of the tap are made in the direction of cutting the thread, 1 - against the direction. When the tap makes one revolution back, chips are thrown off its cutting part and the load on it is reduced. Thread cutting with a die is performed using a similar technique.
- After cutting the thread with tap No. 1, tool No. 2 is installed in the driver, and after it – No. 3. They are processed according to the method described above. When cutting threads with taps and dies, you need to feel when the tool begins to rotate with force. As soon as such a moment occurs, you should turn the knob in the opposite direction to throw the chips off the cutting part of the tool.
The harder the material being processed, the more abundantly the tap must be lubricated during the thread cutting process.
Before making internal threads with a tap or cutting threads with a die on external surfaces, you should thoroughly study these procedures and strictly follow the rules for their implementation. Only in this case can you count on the result satisfying you with its quality and accuracy.
How to restore a thread with a tap while maintaining its diameter and location
If you need to restore the thread while maintaining its diameter, use one of the following methods.
How to cut external threads?
To make external threads at home, use the die described above. So how to properly cut a thread with a die at home? Here is a detailed description of this process.
A round metal rod is clamped well in a vice in a vertical position; its diameter should correspond to the diameter of the intended thread. At the end of the workpiece, a special file is used to remove the chamfer so that the tool can fit in, and the workpiece is heavily lubricated with machine oil, which will make threading easier.
The most suitable die is installed in a special driver, and is gradually put on the end of the workpiece. Screwing onto the workpiece is in progress, carefully without distortion. When making a right-hand thread, usually after one or one and a half turns in a clockwise direction, the die will need to be turned in the opposite direction by half a turn. And in this way they make carvings along the entire length.
Basic cutting methods
You can cut threads on pipes in one of two ways:
- automatic - on machines, power tools;
- manually - using hand tools.
For living conditions, of course, manual technology is more relevant. Cutting threads on water pipes or other pipes by hand is often done using a die.
Solid dies for pipe threads, made of strong alloy steel, are available with a body diameter of up to 65 mm. Dies with a body diameter of up to 120 mm are available for metric threads. On the body of metric products there is a symbol “M”
A die is a simple device for cutting threads on pipes at home. The same tool is successfully used on industrial machines.
The device looks like a disk with several axial holes drilled along its inner diameter. The edges of these holes form several incisors (usually 8-10). The material for the dies is alloy steel or other hard alloys.
There are several types of such devices:
- solid;
- spring-loaded (split);
- clamp (sliding).
According to the design, the die is produced in the form of a circle, square, hexagon, or prism. The most common are disc (round) instruments. They are used for threading water pipes up to a diameter of 36 mm.
For ease of working with dies, use:
- simple knobs with locking screws - hand tools;
- threading chucks on lathes.
Cutting threads (metric, conical) of the best quality on pipes manually or on machines is provided by solid dies.
However, this type of tool, due to the rigidity of its own design, has its negative sides. The cutters wear out quickly.
A spring-loaded thread cutting tool is distinguished by the presence of a cut in the area of one of the axial holes. The presence of a cut reduces the load on the cutters, but at the same time the degree of rigidity required to achieve high cutting quality is reduced.
Spring-loaded (split) dies have a less rigid design, which makes it possible to cut threads on pipes and at the same time change the thread diameter in the range of 0.1-0.3 mm.
Such devices are characterized by increased wear resistance of the cutters, but do not provide high accuracy and cleanliness of thread cutting.
Sliding dies consist of two working parts. They are designed for installation in a fastening module - a clamp.
Fastening in the clamp is carried out by a mechanism consisting of a cracker and an adjusting screw. The screw adjusts the diameter size for thread cutting. Usually the die is equipped with a set of dies for several different diameters.
Method #1 - making pipe threads with dies
The process of creating a thread on a pipe with a die or die requires the mechanic to perform some preliminary actions:
- The surface of the pipe in the cutting area must be thoroughly cleaned.
- The end part of the pipe should be processed with a file (make an entrance chamfer).
- Apply lubricant to the surface to be treated to reduce resistance.
If possible, it is advisable to secure the pipe vertically, for example, in a bench vice, leaving free access to the upper part - the cutting area. The fastening force must be correctly calculated so as not to deform the pipe body.
Then take a pre-prepared driver with a roughing die (No. 1) of the required diameter and suitable thread characteristics.
An example of cutting a thread on a water pipe using a hand wrench. A die is inserted into the working cylinder of the driver and secured with two (four) bolts located opposite each other
The tool is held horizontally - perpendicular to the end area of the pipe. Place the roughing die onto the chamfer of the edge using the internal hole. Light pressure and successive short turns of 25-30° make the initial cut.
This work should be done carefully, slowly, constantly monitoring the right angle between the horizon of the ram and the vertical of the pipe.
Using this technique, the first two or three threads are carefully cut. Usually, after cutting the first two or three threads, the tool is firmly in its working position. Further, the right angle can no longer be controlled.
But the technology of cutting with short (without particularly strong traction) circular movements should be maintained until the end of the cut. It is recommended to periodically add lubricant at the cutting point.
After the first pass, twist the device and then repeat one or two more times with a finishing die (No. 2).
Method #2 - clump cutting technique
The die is a variation of the same die for cutting threads, including on pipes. A distinctive feature of the die is the ability to adjust the cutters.
A set of clamps for different sizes of pipe threads. Each of these devices is equipped with screws for fastening blocks with cutters. These screws can additionally change the thread diameter within small limits
There are clamps for manual use, as well as similar devices with an electric drive.
Option #1 - cutting with a hand clamp . Manual cutting of pipes is usually done with a clamp, which is installed in a ratchet holder. This holder makes the work of cutting pipe threads convenient and less complicated.
Of course, depending on the conditions of plumbing work, you can use other types of hand holders. For example, a standard locking knob with two handles.
The principle of creating a thread with a die is almost the same as the method of working with traditional dies:
- Clean the working surface of the pipe and make sure there are no defects.
- Sand the cut area until it has a distinct metallic sheen.
- Process the outer working part of the end edge at an angle of 45-60º (chamfer).
- Lubricate the prepared surface with technical petroleum jelly.
- Secure the pipe in a mechanical vice or hold it with a gas wrench.
After these procedures, the cutting tool (blank) is placed with the internal hole on the pipe chamfer and, with moderate, uniform pressure, they begin to rotate it with short reciprocating movements.
A convenient tool for working with a clamp is the so-called “ratchet” - a lever with idle reverse. Using such a hand tool, it is easy to cut threads on a pipe under different installation or repair conditions.
If a ratchet clamp is used as a holder, only forward cutting is carried out. It should be noted that the ratchet clamp is convenient to use when working in cramped conditions.
For example, when it is necessary to process a pipe laid in close proximity to a wall.
Option #2 - cutting with an electric clamp . Along with hand tools, electrically driven devices are widely used. The obvious advantage for the mechanic is a significant reduction in labor intensity.
But on the other hand, not all electric machines are capable of performing work in cramped conditions. In addition, when working with hand tools, it is possible to obtain a better result.
To obtain a similar result from electrical sockets, extensive experience with this tool is required.
Equipment for the clamp, supplemented with an electric drive. A modern, effective tool that significantly reduces the physical load of a mechanic. True, electric sockets are more often used in the professional sphere than in everyday life
Working with an electric clamp:
- Preparation of the pipe surface in the cutting area - cleaning, chamfering, lubrication.
- Fastening the pipe with devices capable of providing rigid fixation.
- Fixation at the starting point of the die holder with the clamp included in the kit.
- Checking the stroke and direction of rotation of the die.
- Cutting the first two or three turns in the jog mode.
Next, pipe threads are cut automatically. The cutting length is considered optimal when the upper edge of the die cutting heads reaches the leading edge of the pipe.
At this point, the operation of the device is stopped, the reverse rotation function is turned on, and the bug is twisted from the pipe with a push feed. Be sure to periodically moisten the cut area with oil throughout the process.
Method #3 - using lathes
Large-scale construction and repair work, as a rule, excludes the use of hand tools. Here, lathes are usually used to process the pipes accordingly.
Threading functions are supported by many universal lathes.
Lathes are used to produce threaded parts on pipes of different diameters. You can make threads of any configuration on a lathe
Using the machines, both internal and external pipe threads are made efficiently and easily. The pneumatic (or mechanical) fastening module of the lathe ensures high-quality reliable fastening of the pipe and precise supply of the workpiece to the cutter.
To perform thread-cutting functions, different types of cutters are used:
- rod,
- lamellar,
- intercalary
Work on lathes is carried out by specialists trained in this field and having the appropriate qualifications. Without experience and professional skills, trying to cut threads with your own hands on a machine is not recommended.
For home craftsmen who decide to take up plumbing and carve metal workpieces, the following tips will help them in their work:
How to cut threads
Thread cutting is quite simple, but requires special care when working and a precise sequence of actions. The choice of cutting method will determine the list of tools used and the features of preparing the part for processing.
You will need a technical reference book with data on the sizes of the tools used. The thread pitch can be found on the tap used.
Preparing for thread cutting
Cut the thread only after completing the preparatory work:
- in the directory they look for the necessary information on the diameters of cutting tools for further selection;
- collect the tools needed for work;
- use a core to mark the location of the hole for the internal thread, then drill it with a drill;
- for external cutting, prepare a workpiece of the required diameter on a milling machine and cut a chamfer;
- clean the surface of the workpiece from dirt and oil stains, then apply lubricant to it and the tool.
Thread cutting tool
Work order
Only after the preparatory work should you start processing the workpiece, since otherwise it will not be possible to cut the thread correctly. Step by step cutting is done like this:
- It is necessary to firmly fix the workpiece in a vice to prevent rotational or translational movements deviating from the original position.
- Depending on the type of thread, chamfer (external) or drill a through or blind hole using a drill. Drills with sharpening angles are used, depending on the hardness of the material, but not more than 1400.
- The hole needs to be chamfered with a countersink. The depth should be in the range of 0.5-1 mm, selected based on the dimensions of the part and the thread diameter.
- Cutting is performed with a tap or die. The cutting part must be lubricated.
- Cleaning the surface from chips using brushes.
When cutting, you need to sequentially use tools numbered 1 to 3, included in the kit. To increase the speed of work, it is not allowed to use large numbers without using the previous ones. The last number is used to form the finishing turns, without which the screw may jam when screwed in.
Preparatory stage
To ensure that the work of obtaining threads does not cause many difficulties, careful preparation should be made for such a technological operation. All methods used related to cutting internal threads assume that a hole of the required diameter has already been obtained in advance. You can obtain the standard thread size when creating a hole according to the correspondence table. For example, for an M10 thread, a hole with a diameter of 8.5 mm is created.
There is often a situation where it is necessary to obtain a thread of a non-standard size. In this case, the required hole diameter is calculated using a universal formula. Calculations are carried out as follows:
The required hole diameter when using an M5X0.75 tap can be determined as follows: 5−0.75=5.25 mm.
The easiest way to carry out the work is when you need to get a standard thread, since all the necessary information can be taken from various tables of regulatory documentation.
To get a quality hole, you need to choose the right drill. When drilling, it is recommended to use equipment that prevents runout during operation. When choosing a drill, it is worth remembering that it must have high-quality sharpening. Experts recommend selecting the sharpening angle depending on the hardness of the material being processed. As the hardness increases, the recommended sharpening angle also increases, but it should not exceed 140 degrees.