When unscrewing from the base, the light bulb may burst. In some cases, the base may remain inside and be difficult to remove.
This may be due to oxidation and rust in the inside of the cartridge, due to manufacturing defects, sudden voltage surges, poor quality products and other reasons.
You can remove the stuck part from the chandelier using several proven methods, using which even a person without experience can remove the base.
It is important to follow safety precautions when working and turn off the electricity, otherwise there is a risk of electric shock.
Top 6 most effective ways
Before removing the base from the light bulb, you need to decide on the technique. If the lamp breaks, use 6 main methods to remove it. Each of them has its own advantages and disadvantages; the choice of the appropriate one is determined by the skills, convenience of the user and the availability of appropriate tools in the house.
Important! Before removing a broken light bulb from a chandelier, be sure to turn off the power in the room.
For illumination, it is better to use a flashlight placed on your forehead. If the light bulb is removed from a table lamp or sconce, simply unplug it. If there are several machines installed in the apartment, you can turn off the power to a specific room and bring an extension cord from another with the lamp on.
Pliers or needle nose pliers
You can unscrew the burst part using pliers (pliers, thin-nosed pliers). The tool is selected taking into account ease of use; it is desirable that it be equipped with insulating handles. The following algorithm must be performed:
- carefully remove any remaining glass;
- grab the base body with pliers;
- start unscrewing the part;
- If you can’t reach the base, you can bend its side walls inward and start unscrewing it.
The method requires special care in execution. During operation, you need to hold the lampshade so that it does not fall off. The base may become deformed; the main thing is to ensure that the cartridge is not damaged. If you can’t pull out the element with pliers, you can take thin-nose pliers, place them inside the base and push the ends into the side walls. The part is unscrewed counterclockwise.
Scissors
If the lamp bursts, it can be removed using scissors. The technique is similar to the method of removing with thin-nose pliers. The scissors must be placed in the center of the base, straightened so that the blades rest against the edges of the component. Then you need to unscrew the base counterclockwise.
Plastic bottle
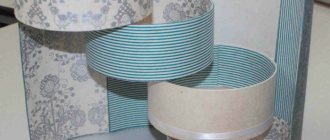
If you don’t have a special tool at home, you can separate the glass flask using a bottle. This is one of the simplest, most convenient and safest methods. The diameter of the bottle neck is sized to fit the common e27 base.
Features of unscrewing a light bulb from a suspended ceiling
When a light bulb in a suspended ceiling stops producing light, it needs to be replaced. But the design features complicate the task a little; you even have to completely disassemble the lamp.
Depending on the installed lamp, replacement occurs as follows:
- Filament elements. It’s not difficult to deal with, you need to turn off the machine, unscrew the old light bulb and screw in a new one in its place.
- Halogen and LED. In such a situation, the task becomes more difficult. As with any electrical work, first de-energize the room. Then the protective cover and ring are removed from the lamp. If the light bulb is too tight in the socket, it may be slightly loosened.
Removing the protective glass.
Advice! When working with halogen lamps, it is better to use a cloth or gloves, because oily skin secretions have a bad effect on the operation of the device.
There are suspended ceilings where a continuous device is installed, in which the light bulb and the lamp are components of one structure. They do not provide for the replacement of one of the elements; they will have to be changed all together.
What to do if the light bulb is stuck in the socket
When gluing the base and the cartridge, you will have to unscrew the entire product. When the lamp gets stuck, you can break the glass bulb and use the methods described above. It is important that the fragments do not scatter throughout the house. To do this, before breaking, you need to place a container under the lamp. You also need to ensure that the cartridge is not damaged, otherwise it will not be usable.
You can use WD-40 or KONTAKT spray to remove the light source from a removed chandelier. This method is not applicable to a lamp mounted on the ceiling due to its danger.
Solution options
There are several ways to unscrew a light bulb if it has burst, and each of them is good in its own way. The main thing that needs to be done first is to turn off the power to the damaged chandelier or other lighting device.
Ideally, of course, if the electrical wiring was installed with several inputs, then it is possible to turn off the power from the circuit breaker to only part of the room, leaving yourself the opportunity to connect a portable lamp in the next room. If this is not possible, then you will have to turn off the power to the entire apartment and illuminate it with a flashlight or cell phone when removing the broken light bulb. If there is a central tube left in the cartridge in addition to the base, it is carefully broken.
When the power is turned off, you should not rely on the switch of a broken lighting fixture - it may be powered during installation incorrectly and interrupt the neutral wire rather than the phase wire.
Well, then let’s look at the following options with which you can decide how to unscrew a broken light bulb from the socket.
Pliers
Unscrewing the base using pliers After carefully removing the remaining fragments, you need to pick up the edge of the base with pliers (without grabbing the cartridge) and begin to rotate it counterclockwise. If the metal base has become stuck or stuck due to rust, it would not hurt to first spray the stuck surface with cologne or toilet water so that the liquid gets between the base and the cartridge, and give it a little time to soak. Another acceptable option is to stick the pliers in and open them, after which you can try to unscrew the part.
Disassembly
This option is not feasible with new ceramics. It can be used if the cartridge is made of carbolite, because it will be collapsible. How to unscrew the cartridge? It is not difficult. You need to carefully, holding the base with one hand, unscrew the cylinder, dividing it in two. The “skirt” with the base stuck in it will remain in your hands. Here, no longer under the ceiling, you can safely unscrew the base of the light bulb using any of the suggested methods.
Plastic bottle
This option requires caution, because hot plastic that gets on the skin is a very painful thing. So, the neck of a soda bottle is heated over an open fire to the melting point, after which it is inserted inside the metal base
You need to wait a little until the plastic cools down, after which you can turn the light bulb out of the socket. The fact is that the heated plastic sticks inside the base of the light bulb, penetrating into irregularities, with the help of which it fixes the base. At the same time, heating the base burns off some of the oxidation and rust.
Unscrewing the base using a plastic bottle
https://youtube.com/watch?v=eSuJ4Dfw7gg
Champagne cork
Similarly, you can use a wine or champagne cork. Its edges need to be slightly sharpened by chamfering, and then driven into the stuck base of the light bulb. Slowly, using a gentle unscrewing motion, try to unscrew the base and pull it out. Any metal base of any lamp with a screw base is unscrewed exclusively counterclockwise - this must be remembered so as not to waste energy and time.
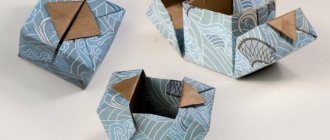
Potato
Probably the most interesting and unusual method of all presented. It can be used if there are fragments of the bulb sticking out of the base. The potato must be cut into two parts, take one of them in your hand and, as it were, “plant” the cut part on the protruding pieces of glass. Then simply unscrew the base from the socket.
Unscrewing the base using a regular potato
How to prevent the problem
To prevent such a situation when you need to select a method for removing the base, it is recommended to comply with the following requirements:
- install only lamps of suitable power in the socket;
- secure the light bulb tightly into the socket, but do not press it all the way;
- You can first coat the thread with graphite;
- do not buy cheap products from unknown manufacturers;
- work with gloves so that no greasy marks remain on the lamp;
- Monitor voltage surges in the apartment, install additional stabilizers if necessary.
Following these simple rules will help prevent your light bulb from breaking or exploding.
Causes of damage
Any electrical appliance must be operated with the utmost caution. But not in every case this is ensured 100%
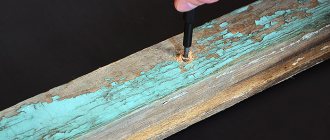
So why do light bulbs burst? There may be several reasons:
- Manufacturing defect. Violations can be made both on the flask itself and in the design of the base.
- Increased voltage in the network. Incandescent lamps can operate above the standard voltage, for example up to 230 V. But large surges can cause damage. This is especially true if deviations are regular.
- Problems in the contact part of the cartridge or in the switch. Often accompanied by extraneous sounds and flickering.
- Violation of the integrity of wire connections, violations made during wiring installation.
- Network overload with electrical appliances consuming a lot of electricity.
- Increased vibrations and mechanical damage.
- Operation in conditions of high humidity or temperature changes.
The result of such phenomena can be the situation shown in the photo, when a light bulb bursts.
There is a problem: where to start?
Any problem with the electrical wiring system in the house is dangerous and fraught with consequences. After all, the matter may not end with damage to one lighting fixture.
Therefore, if light bulbs burn out and explode regularly, then it is advisable to seek help from specialists or test the wiring yourself. Provided you have the appropriate skills and experience.
If a light bulb breaks, you must follow safety rules. The most important thing is to turn off the power automatically, take your time and don’t panic. After all, even with a broken bulb, you can remove the base from the cartridge. There are many ways to do this. But personal safety must be ensured.
The question often arises of how to unscrew the socket if a light bulb bursts. Solving the problem is not fraught with any particular difficulties - all necessary actions are carried out independently. The only thing is that all your actions must be careful. After all, in the process of manipulation you can easily damage the cartridge.
Well, be sure to take care of the source of emergency lighting. After all, working in the dark is not very convenient, and even dangerous. Therefore, a bright flashlight will greatly help you when replacing a light bulb.
How to unscrew a lamp with minimal effort
If a light bulb burns out or explodes, what is the first thing to do? If the lamp is intact, it is necessary to turn off the power to the chandelier and allow the lamp to cool. For greater safety and to avoid damage, wrap the flask with a soft, non-slip cloth and carefully begin to unscrew it. Do not use excessive force, as the flask can easily burst.
Let's look at the best ways to unscrew a socket and a broken light bulb. At the very beginning, you need to use pliers to break off the fragments of the flask to eliminate the possibility of injury. Then, using pliers with narrow and elongated jaws, clamp the edge of the base and slowly begin to unscrew.
There is no need to rush, as there is a high risk of damaging the cartridge. If you do not make sudden movements, the manipulation will be successful and the burst lamp will be removed.
You can do it differently. The pliers should be inserted into the base and opened, pressing the jaws against the inner surface. After this, with a little effort, begin to twist it in the desired direction.
There are several other ways to properly unscrew the base with your own hands. You can take a regular plastic bottle with a small neck. The neck must be heated so that it begins to melt. After this, it should be placed in the cartridge and allowed to cool, secured to the base. Gently rotating the bottle, we begin to unscrew the base.
There is another simple method that does not require special equipment. After all, it’s enough to find a medium or large-sized potato. It is cut into two parts. Take one half and carefully insert it into the base. Firmly held fragments of the bulb or the edge of the base penetrate inside the potato. After the lamp body is fixed, you can begin to unscrew it.
Instead of potatoes, you can use a bar of soap. To begin with, the block should be slightly softened at the surface so that the body penetrates into it more easily. Well, then carry out the manipulations similarly to the previous method.
A burst lamp is not a big problem if the situation is handled competently, in compliance with safety rules and our recommendations. You can choose any method that will avoid injuries and damage. But do not forget to turn off the power to the lamp in advance.
Don't forget about safety
Precaution is the most important step when working with electrical equipment. The following safety conditions must be observed:
- First of all, before carrying out work, you should turn off the power to the apartment. This is done by turning off a special toggle switch in the electrical panel.
- All work must be carried out with rubber gloves.
- Tools used for twisting must have wooden handles or be wrapped in electrical tape.
- It is advisable to first check the presence of voltage with a special tester. If the test result is positive and the indicator on the thin screwdriver lights up, you should call a technician, as this is caused by problems with the wiring.
- You need to collect all the pieces from the light bulb or put a bag on it before breaking it. Additionally, it is recommended to cover the floor with newspapers or film.
- Once the cartridge is removed, it must be cleaned and inspected for damage. If the device is not damaged, it can be installed back into the chandelier.
- After work, it is important to properly dispose of incandescent or halogen lamps. They consist of materials that are recycled or disposed of separately from other waste. LED lamps are disposed of along with normal household waste.
By following the instructions, you can independently remove the broken light bulb from the socket without any problems.
Disassembling the LED lamp
LED lamps are disassembled for repair purposes. To do this, you do not need to have extensive knowledge in the field of electronics. First of all, check the voltage supply to the contacts of the socket into which the lamp is screwed. If there is power, but it does not light up, then the problem is in the lamp. A simple way to check is to screw a working lamp into the socket. To test the circuit, the type of lamp is not important.
Structure of an LED lamp
- frame;
- base;
- light diffuser;
- LED block;
- driver.
The housing does not require tightness and the presence of a gaseous environment inside, although models that are completely similar in appearance to incandescent lamps have now become popular.
The lamp bulb is made of glass or plastic. At the top there is a plastic light diffuser.
The sockets used are the same as for incandescent lamps: E27 and E14. Foreign models have an E26 base and are often designed for a voltage of 110 V.
The block consists of several groups of LEDs, which are soldered onto textolite or aluminum boards. Each lamp is connected in series.
Drivers are power supplies that convert the input voltage to the optimal voltage for groups of LEDs. Transformer power supply circuits are common. Drivers can be built into the case or implemented as a separate unit.
Damage detection
The light-diffusing dome is arranged on latches, which can be unhooked to gain access to the interior. It can be attached to the body with screws that must be unscrewed.
LED lamp disassembled
After disassembly, the lamp power circuit is checked for external damage. If no burnt parts are found, they are checked using a multimeter.
Burnout can be seen on the LEDs. In this case, they must be replaced. The remaining parts are also called, and the faulty ones are replaced. It is recommended to replace the current-limiting capacitor with another one whose operating voltage is 400 V. If it is designed for 220 V, it may fail. When it is not possible to find a suitable LED, a 0.25 W resistor is connected instead, and the value depends on the power of the lamp.
Assembling the LED lamp is done in the reverse order.
Measures to prevent such troubles
The first thing to note is that you should not install lamps that exceed the limit of the possible power of the socket or lamp so that they do not burst. The fact is that the more current a lighting device consumes and the brighter it shines, the more heat is generated during its operation. And this can lead to the situation described above.
Of course, the lamp must be screwed tightly into the socket, but still, during installation, you need to find such a tightening point so that you can then unscrew it. There is no point in pulling the lamp as far as you can. You can also pre-coat the base threads with graphite.
There is no need to leave greasy stains on the glass; it is advisable to carry out the work with gloves. In addition, your hands will be more protected if the lamp breaks.
You should purchase lamps only in trusted stores and do not chase after cheap goods, which are most often illiquid, i.e., should not have gone on sale at all.
By following simple rules, you can be sure that even if such a nuisance happens, you can easily get rid of it.
Plastic bottle
If you don't have any tools at hand, you can resort to using existing tools. The procedure is as follows:
- Take out the rest of the glass, they will interfere.
- Take a plastic bottle. The volume doesn't matter: all packages are the same.
- Remove the cap and heat the spout until the plastic melts. This can be done with a lighter or candle.
- We insert the neck into the socket and wait for the plastic to cool.
- Get the base.
Twist a plastic bottle
You should be careful when handling hot plastic because if it gets on your skin, the burn will be very serious. The flooring also needs to be protected by at least placing paper on it. There is minimal risk of electric shock when using this method. You can find advice that there is no need to de-energize the device. This is not true: any actions must be performed with the device turned off.
Using pliers
Regardless of which approach is chosen to remove a broken light bulb, first of all you should worry about the safety of the procedure itself. To do this, immediately after the accident you need to turn off the circuit breaker installed in the room’s power line. Only after this can you proceed directly to removing the base.
Disassembly without removing the cartridge
The simplest approach to solving the problem is to use ordinary pliers, which are included in the tool kit in any apartment.
The procedure in this case looks like this:
- First, the working jaws of the pliers grab the edge of the base, after which you should try to rotate it counterclockwise.
- If this cannot be done immediately, you need to slightly pry the metal rim with a screwdriver with a thin blade.
- When you try again, carefully twist the base in the right direction until it is completely free (photo below).
At the end of the work, all that remains is to pick up the fallen glass chips and screw in a new light bulb.
With cartridge disassembly
This method of removing the base is suitable only for old-type collapsible products produced in the USSR (they are called carbolite).
After the voltage has been “relieved” from the room, they proceed to unscrewing the cartridge along with the damaged base. Since it is most often difficult to turn out, you can lightly tap its body with the handle of a screwdriver (but not too hard so as not to split it).
After removing the cartridge, they proceed to its complete disassembly, ending with one of the parts with a broken base being freed. In this state, it will be quite easy to unscrew the damaged rim using pliers. Finally, all that remains is to assemble the cartridge and install it in its original place.