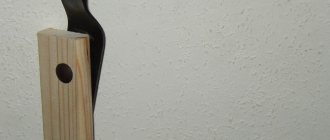
Original jewelry stand
Two sleeves, two pieces of cardboard, two sushi chopsticks, scissors and decorative yarn are all you need. They do this:
- cut out the bottom for both bushings from cardboard;
- the blanks are wrapped with yarn;
- the bottom is glued, hiding the ends of the yarn in the seams;
- sticks are wrapped in yarn;
- onto the edge (along the top) of the first sleeve, fix one end of the sticks with hot glue, placing them horizontally with a distance of up to 2 cm;
- The second sleeve is glued onto the sticks, stepping back a couple of millimeters from the edge of the first.
It turns out to be a double stand. The decor can be anything - leather, fabric. If the sticks protrude beyond the edges of the second sleeve, they are trimmed and sanded, but you can leave them that way. You can make a multi-tiered stand, placing the sticks on different sides of the sleeve so that the entire structure does not lose balance. In this case, they take one large (lower) bushing, and make all the others of a smaller diameter.
Tall box (organizer)
Several reels of the same diameter are glued along the edge.
It is better to take reels from the same manufacturer so that the edges match perfectly. Then sand the surface of the resulting bushing. From a piece of thick cardboard, cut two circles along the diameter of the reel. One circle is the bottom, the second is the lid. Glue the bottom to the finished sleeve, glue the lid to a single reel. Now they make an insert strip on the lid. To make it, take a reel of tape, cut it across, and cut the length of the tape up to 5 mm wide. The tape is folded so that it lies along the inner circumference of the lid with a protrusion of 0.5 cm beyond the edges. This creates an insert strip that will hold the lid. The tape is glued along the inner plane of the lid. All that remains is to decorate the entire jar with any fabric or film - an excellent organizer for small items is ready.
The popular bookmaker has launched a mobile application for Android, you can follow the link absolutely free and without registration.
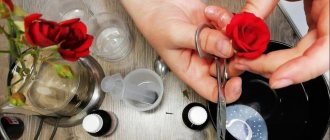
Materials for work
To make decorative tape with your own hands, you will need a simple set of tools: double-sided adhesive tape of the desired width and scissors.
The following can be used as a decorative layer:
- lace of small width (preferably synthetic);
- printout on ordinary office paper;
- sheets of colored thin cardboard;
- wrapping paper;
- long strips of fabric (it is better to take cotton with a polka dot, checkered or striped pattern, such material will fray less along the edges and will not spoil the look of the finished tape);
- napkin with a pattern (decoupage or ordinary);
- foil for creativity (food grade will not work, as it is too thin and not flexible).
Christmas decorations
A satin ribbon is wrapped around the cylinder, attached to double-sided tape. Each skein should overlap, so the tape will not fray.
Cut out your favorite pictures from New Year's cards. Then they are placed on cardboard and the second part is cut out. Glue together. The picture can be pasted inside or outside: whichever you prefer.
For decoration, narrow tinsel is used, which is attached to the edges of the reels. And a short strip is cut from it, by which the product can be hung.
Decorative adhesive tapes
They come on a basis made of fabric, paper, film with various color patterns, regular and openwork, with or without glitter.
Colored translucent adhesive tapes
Just like the regular clear tapes we used to call tape, colored adhesive tapes come in different widths. More often they are sold individually, less often - in sets of several pieces.
They come in a dispenser. In this case, the dispenser is a plastic device for quickly and conveniently unwinding adhesive tape.
Colored glitter foil adhesive tapes
Shiny adhesive tapes with a holographic effect look especially impressive in crafts.
Examples of how my daughter and I used glitter tape in creativity:
- covered pens made by hand from paper,
- decorated a homemade crown for dolls,
- made a goldfish from a Kinder Surprise container,
- made other flat and three-dimensional Christmas tree decorations,
- Halloween lantern made from waste material,
- cards, applique, bookmarks and much more.
My daughter and I made an applique with koi fish (Japanese carp) and water lilies using leftover scraps of shiny adhesive tape. Just like flower leaves for a postcard. My daughter made the greeting card three-dimensional: inside the card there is a paper step on which an applique with a bush of flowers is glued.
Where to buy decorative adhesive tapes (scotch tape)
Decorative adhesive tapes can be purchased in office supply stores, bookstores, children's art departments, or ordered online.
At the time of writing this article, we only had regular transparent tape and colored translucent ones in our stores. I ordered openwork, patterned and holographic ribbons from online stores.
Flower pot
An impressive flowerpot is also made from several bushings. They are glued along the edges, complemented with a bottom and the decor is carefully chosen. Film is best suited, take thick cellophane, lay it out along the inner plane so that there are no holes or seams, and let the ends out. The external finishing is also made of moisture-resistant material. Fix the decor on the bottom surface. And so that the glue is not visible, an old CD is glued on top.
Unusual and practical ways to use an ordinary toothpick for useful purposes around the house
The flowerpot is ready. It is supplemented with a magnet or decorative cord. In the first case, the flowerpot stays perfectly on the refrigerator, in the second - on a wall hook. The height of the walls can be any. To make the flowerpot last longer, place the flower inside in an airtight container, for example, a plastic cup.
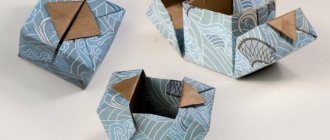
Box made from tape reels: master class with photos and video in photos
Category: Repairing a box made from a tape reel: master class with photos and video in photographs.
There are many ways to make boxes on the Internet. They can be made from wood, cardboard, beads, plywood.
But this is too hackneyed, so in this article we will try to make a box from a material that is a little unusual for the average person - from a reel of adhesive tape. This method is very simple and interesting.
Therefore, let's quickly look at the process of creating a box from a reel of adhesive tape.
Simple and clear
Making this type of box is very quick and simple, as you will see after reading this master class.
First of all, we draw a couple of circles on thick cardboard. Then you need to cut out four circles from scrap paper.
One pair of circles will serve as the bottom, and the second will serve as the lid.
We cut out a couple of long rectangles on scrap paper, the length of which is equal to the size of the outer and inner circumference of the tape reel. It is also worth making a small margin for height. You can make small cuts along the entire length of the strip.
You need to glue the scrap paper onto the tape reel on the inside, then on the front. It is best to make a box using a reel of double-sided tape.
Take one circle of white scrap paper and glue it onto one piece that was intended for the bottom. Then you need to glue the bottom to the tape reel. The cloves that remain as an allowance for height should be glued to the bottom from the outside. It is worth gluing a circle of beautiful multi-colored paper to the top.
Now it’s time to make a lid for our box. In this article we will provide you with two ideas.
Interesting ideas
Take a circle of corrugated cardboard and glue paper circles to it on both sides. One of them should be cut with a small margin. Do it as shown in the photo.
Next, you need to cut out the circumference of the lid, the height of which is equal to a couple of cm. Any of the edges must be processed with a hole punch or cut out yourself. Place the circle on the box and glue a paper strip to it.
Thanks to this method, the lid will fit tightly to the main body of the box.
For this method, the first step is to cut a strip from the reel, the height of which is 0.5 cm. It is this strip that will serve as the basis for the lid. You need to glue beautiful decorative cardboard to the top and on the sides. You can glue lace on the side parts.
Decorating the product
In this article we offer you examples of materials that can be used to decorate the resulting box.
For example, paper. You can make flowers or applique from this material.
- The second material for decoration can be beads and beads.
- You can also use any type of fabric to decorate boxes made from tape reels.
- Another material for decoration can be satin or other types of ribbons.
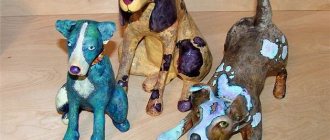
- You can also decorate the box with twine, three-dimensional figures of various animals, flowers, polymer clay figures, or metal pendants.
- Video on the topic of the article
Other design ideas
Our master class explains in detail how to decorate a bobbin using paper and a shaped hole punch. However, there are still many different interesting finishing options. Here are some ideas for inspiration.
- Instead of scrap paper, you can use the decoupage technique. To do this, you will first have to cover the sides with acrylic primer, and then glue a napkin or decoupage card (this master class describes the decoupage technique in more detail).
- You can decorate the box using kebab skewers or toothpicks, and tint the edges with a semi-dry sponge with acrylic paint or stamp pads for scrap.
- There is another interesting idea for those who like to work with fabric - to make a soft fabric box with a padding polyester layer. Here is a good video tutorial on working with fabric.
How to make decorative tape?
The work process consists of five steps that must be repeated for each desired decorative layer:
- Prepare the material for the decorative layer. Fabric and lace need to be ironed. If there are folds on the wrapping paper, it is also better to iron them. Separate the two bottom layers from the napkin, leaving only the one on which the design is applied.
- Unwind the required amount of tape.
- Apply decorative material to the adhesive side and smooth it out carefully.
- Cut to desired length.
- Repeat the steps as many times as necessary.
When making decorative tape from foil and wrapping paper, it is better to apply the adhesive side of the tape to the material itself, and not vice versa. This will help avoid wrinkles and air bubbles.
Printouts for decorative tape are best done on a laser printer. Such designs will be more durable and will not spread if water gets on the tape. To give such a tape durability, you can cover the decorative layer with finishing glue. It is also advisable to do this with a tape made from a napkin and thin cardboard.
Special finishing glue is replaced with ordinary transparent office tape, which is glued on top of decorative tape.
Stickers for children's clothing
You can make stickers from thermal paper for children's clothing. There is material on sale for dark (thick, has a white backing, which increases the risk of incomplete transfer of the design) and light (transparent, so the image will turn out without a background, but it is still better to cut out the design along the contour, since a transparent background is sometimes noticeable). The range includes paper for inkjet and laser printers.
Before making stickers, you need to choose a suitable image. The design must have a dark outline, otherwise it will not be visible on clothing. If you want to make an inscription on a T-shirt, then the letters need to be turned in a mirror direction before applying.
After preparing the image, it needs to be transferred to thermal paper. It is first recommended to print the picture on plain paper to evaluate the result (its color, size, location and side of the sheet).
After printing the design, you can begin applying the image to clothing. In this case, it is recommended to put cardboard inside the T-shirt so that the image is transferred only to the desired surface.