Heart gift box
What do you need
- Sample;
- White paper;
- scissors;
- pencil;
- thick paper;
- glue gun.
How to do
Print the template on plain white paper. Cut and fold along the lines. On a narrow part you need to make a horizontal cut along the line indicated by the arrow.
Frame: Sarah Johnson – Pugdemonium / YouTube
Trace the templates onto construction paper and cut out. You will need two hearts and two stripes of each type. Follow the fold lines with scissors, without cutting through the paper, and fold it.
Frame: Sarah Johnson – Pugdemonium / YouTube
On all four long pieces, make many vertical cuts before the fold. Glue the wider pieces to the smaller heart so that the cuts are on the back side. Details are shown in the video.
Frame: Sarah Johnson – Pugdemonium / YouTube
To get the box lid, make the same vertical cuts on the narrow parts. Glue these parts to another heart so that the cuts are on the inside. Close the box with the resulting lid.
Frame: Sarah Johnson – Pugdemonium / YouTube
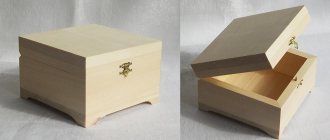
How to make a jewelry box from cardboard?
It is very convenient to store jewelry, costume jewelry and watches in a cardboard box. You can buy it or make it yourself, decorating it to your liking. If desired, you can make one or several sections inside the box.
Hexagon shaped
In package form
Simple rectangular
Polygonal gift box
What do you need
- Thick paper;
- compass;
- ruler;
- pencil;
- scissors;
- glue;
- bow.
How to do
Draw two circles with a diameter of 5 cm on paper. Without changing the pitch of the compass, make six marks on the circles at an equal distance from each other. Connect these marks with straight lines inside each circle.
Draw lines on the outside of each corner as shown in the video. For one figure they should be 4 cm long, and for the other - 2 cm. Connect these lines so that you get six rectangles. To the right of each of them, draw a small detail with a beveled top.
Cut out the shapes along the lines. Using scissors, draw along the sides of the polygon inside the circle and along the line of the piece with the beveled top. Bend the shapes along the marked lines and glue each of them. Place a lid on the box and decorate it with a bow.
For such a craft, you can make a voluminous lid. It looks very original. By the way, the box itself in this video is made using a different, more intricate technique:
Heart shaped box
For such stylish packaging you will need very thick paper or even cardboard. To make the contours of the heart perfectly smooth and symmetrical, make a marking of two circles. For the side wall, you need several straight pieces so that they are long enough to cover the circumference of the heart.
The width of the side walls is at your discretion, but be sure to leave indentations-tabs to glue the wall to the bottom. And to hide the gluing and seal the bottom, you can cut out another heart a couple of millimeters smaller. Glue the lid in the shape of the same heart onto two ribbons so that it can be folded back.
Decorate all interior surfaces with wrapping paper, fabric, or just colored sheets. All that remains is to decorate the box with lace, artificial flowers, beads and other details. Use paints or stencils, but it is better to avoid decorations that are too heavy so that the paper does not deform.
Photo: businessclass.com.ua
How to weave a bracelet from rubber bands: 8 best patterns (video)
Square gift box
What do you need
- Scissors;
- thick paper;
- ruler;
- pencil;
- glue;
- bow.
How to do
Cut out a square measuring 20 × 20 cm from paper. Draw two vertical and two horizontal lines on it, stepping back 5 cm from each edge. In the middle you will get another square.
Use scissors to follow the marked lines and make grooves without cutting through the paper. Bend it along these indentations. Cut along short lines, bend the resulting parts and glue them together as shown in the video.
Cut out a square measuring 16 × 16 cm from paper. Draw two horizontal and vertical lines on it, 3 cm away from the edges. Then cut, bend and glue in exactly the same way as the previous piece. Place the lid on the box and glue a bow on top.
Instead of a regular lid, you can make two triangles that fit completely onto the box:
How to make a round cardboard box: diagram, template
A round cardboard box is a very beautiful and practical product that will always find its use. Having decorated it to your liking, you can store jewelry and jewelry, sewing and embroidery kits, cosmetics, clippings and much more inside.
Making a round cardboard box is a little more difficult than, for example, a square one. However, it is quite possible to “figure it out” with your own hands, without spending a lot of money on materials. Use thick cardboard and follow the template provided exactly; you can only change the size, but not the shape of the parts.
How to make a round cardboard box, templates:
Round Cardboard Box Template No. 1
What parts does a round cardboard box consist of: template No. 2
In what order should the parts of a round box be glued together: template No. 3
Round cardboard box with handle: finished product
Pyramid gift box
What do you need
- Scissors;
- thick paper;
- ruler;
- pencil;
- plate or disk;
- hole puncher;
- yarn or ribbon.
How to do
Cut out a square from paper. Using four lines, divide it into nine parts. Make a mark in the center of each side of the large square. Inside the squares adjacent to the marks, draw triangles as shown in the video.
Place a plate or disk on the sides of the triangle and trace. Cut out the shape along the marked lines. You should end up with something like a flower.
Bend the figure along all straight lines and connect the pyramid. Make holes in the tops of the triangles, thread yarn or ribbon through and tie.
Such a pyramid can also be made using the origami technique:
How to make a box from colored cardboard?
In a modern creativity store you will find a huge selection of cardboard:
- Kraft cardboard (solid sand-colored material)
- Colored cardboard
- Velvet cardboard
- Holographic cardboard
- Glitter Cardboard
- Cardboard with prints, drawings and inscriptions
- Textured cardboard and much more
IMPORTANT: All this variety of choice allows you to create cardboard boxes of incredible beauty and use them for any purpose.
Cardboard for creativity
Gift box clamshell
What do you need
- Pencil;
- disk;
- thick paper;
- ruler;
- scissors;
- ribbon.
How to do
Trace the disc on paper. Draw two perpendicular lines through the center of the resulting circle. Place the disk so that its edges touch the beginning of the lines at the top right and trace. Divide the new circle in the same way as the first.
In each part, trace the disc as shown in the video. Then deepen the lines.
Cut out the piece along the outer contours and bend along the deepened lines. Place the gift inside, fold the box and tie it with a ribbon.
Do we decorate cardboard boxes with our own hands?
Decorating a homemade box depends only on how original and great your imagination is. The box should also be decorated based on the occasion (a holiday, for example, or the decor in the room).
How and with what you can decorate any cardboard box:
- Lace and fabric
- Satin ribbons
- Scoop and burlap
- Stickers and stickers
- Buttons and other accessories
- Sequins and stones
- Colored paper
- Kraft paper
- Drawings and inscriptions
Gift box with flip lid
What do you need
- Ruler;
- pencil;
- thick paper;
- scissors;
- glue.
How to do
Draw two lines on the two narrow sides of the sheet at a distance of 1.5–2 cm from the edge and fold the paper along these lines. Bend and straighten the sheet as shown in the video. You will get two folds in the middle.
Draw lines on the long sides of the sheet at the same distance. For clarity, draw the bends made in the middle. Make cuts down to long horizontal lines. Glue the paper together as shown in the video.
The hinged lid can be made from a separate sheet:
Simple packing paper box
This box consists of two parts - a base and a lid, so you can take two different sheets of paper. Cut out a square of the required size, draw diagonals, bend one of the corners to the center, and again. Turn the corner and repeat the same for the other sides - you will fold according to this marking.
Make cuts on both sides of the workpiece, one section short of the middle. Fold the corners towards the center, lift the sides and fold the edges to the sides. Fold it inside, glue the remaining protruding parts - and your workpiece will have a neat not only external, but also internal side. Using the same principle, fold the second part and assemble the box.
Photo: podelunchik.ru
Gift box-chest
What do you need
- Sample;
- thick paper;
- scissors;
- stationery knife;
- glue.
How to do
Print the template, cut along the solid lines and cut along the bottom dotted lines. Fold the shape along the remaining dotted lines. Glue it together as shown in the video. Connect the top pieces and thread them through the holes to close the chest.
You can leave the box as is or cover it in the middle with paper of a different color and decorate it with a bow.
How to make a cardboard box with a lid: master class
A box is the easiest way to pack or hide something. The box can serve as an excellent means of storing things: jewelry, cards, small items and cosmetics. Of course, modern stores will provide you with a lot of options for boxes: large, small, curly, square, with lids, decorated and simple cardboard.
It is much more pleasant to create something with your own hands and decorate it the way you would like it and the way the product itself will correspond to the style of the holiday, room, or occasion. You can make a craft from absolutely any cardboard. The material can be purchased at a craft store (you will find a large selection of cardboard colors and textures), or you can use the kind in which household appliances are often packaged (refrigerators, for example, or washing machines).
For work you will need:
- Cardboard (as much as needed for your preferred size product).
- Hot glue (you can, of course, use any other glue, but hot glue is preferable due to its quick drying and strong bonding of the material).
- Template (with the help of it you can understand exactly how you should cut, bend and glue the material).
- Scissors and pencil - for marking and cutting. This is necessary to ensure that your product looks neat and aesthetically pleasing.
IMPORTANT: There are two main types of cardboard boxes with lids. One assumes the presence of a lid that covers the top of the box, the other - a lid that folds back, but is part of the box.
Flip lid box template
Box with lid template
How to make a box with lid step by step:
- Prepare all the supplies, print the template for the box on a printer or draw it in the exact proportions on cardboard.
- Cut out two elements from cardboard
- Start folding the dotted lines and gluing them carefully.
- Press the edges firmly to hold the material together.
- Let the product dry a little
- After drying, you can decorate the box to your liking.
Gift box-bag
What do you need
- Thick paper;
- ruler;
- pencil;
- scissors;
- disk;
- glue;
- yarn or ribbon.
How to do
Fold the wide side of the sheet, moving 5 cm from the edge. Fold the resulting strip and cut off the remaining paper along the edge. Bend it back once.
Make one mark at the top and bottom, stepping back 5 cm from the narrow edge. Fold the edge along these marks, then fold the entire piece like an accordion.
Unfold the paper completely and make cuts along one wide edge of the sheet to a horizontal line. Cut off the narrow part, folded into an accordion, at the top and bottom. It should remain in the middle.
On the other wide side, mark the middle of the resulting squares with a pencil. Take a disk or some other round object and connect the center marked points of the squares with the corners opposite.
Fold the paper along semicircular lines. Glue the box together as shown in the video. Punch holes at the top, thread yarn or ribbon through them and tighten the bag.
Filler for handmade gift packaging
If you don't have sisal or any other ready-made filler, make it yourself. It is enough to cut tissue paper (tishya) into small “noodles” and crumple it.
Fluff the slices with your fingers, it’s not difficult, the paper will acquire the desired volume under your hands. Remember not to make the straw look straight. In the photo you see a cut of golden paper in silence. One sheet produces a large amount of cutting, enough for a dozen boxes.
Fill the box with slices, put your gift in it and proceed to wrapping it in cellophane if the box is without a lid.
Gift bag with bow
What do you need
- Paper;
- glue;
- ribbon.
How to do
Fold the piece of paper in half crosswise so that a mark appears in the top center for clarity. Fold both sides of the sheet to this mark, slightly overlapping one another, and glue them together.
Fold and glue the bottom of the bag as shown in the video. Fold the long sides over so that the bottom touches the seam at the bottom of the bag. Open the bag and fold it again along the side lines so that it is straighter and more beautiful.
Place the gift inside and fold the top of the package into an accordion shape. Press it in the middle and straighten the edges of the resulting bow. Tie the bag with a ribbon.
If it is more convenient for you to make boxes using ready-made templates, use the website templatemaker.nl. There are many boxes of different shapes collected there. Moreover, their parameters can be calculated automatically. Promo You will find even more interesting ideas for New Year's gifts on the marketplace of the Multibonus loyalty program for VTB Bank clients. There are more than 240 thousand products for every taste: books, gadgets, household appliances, certificates from popular stores and much more. Connect the loyalty program to your bank card in VTB Online and select the appropriate option for accumulating rewards. Now “Multibonus” is holding a holiday sale with discounts of up to 50% on products of popular brands, and for purchases from program partners in the “Accumulate” section you can get cashback of up to 30%. If there are not enough bonus rewards, just pay extra for the order in rubles. Find gifts for loved ones
How to make a cardboard box for candy?
Boxes of chocolates don’t have to be bought in a store; you never know exactly what will be inside. It’s always nicer to make a box with your own hands, fill it with candy to your liking and give it to a loved one. This will not only be a “delicious” gift, but also very original and special.
Box with handles: template
Box with a butterfly: template
Triangle box: pattern
Method No. 1: Square origami box
See also...
✅ How to make a paper airplane: instructions, photos, videos
✅ Simple tattoos on the leg: 50+ photos
✅ Instagram secrets and tricks that will help promote your publication
✅ How to make a swan out of paper: step by step
Beautiful and easy to make - this is how the first homemade box should be. This is exactly how it will turn out if you do it according to these simple instructions. In this case, the origami style is used.
To make the box you will need:
- Colored or wrapping paper for gifts;
- Scissors;
- Ruler;
- Pencil;
- Decorations optional - satin, velvet or lace ribbon, voluminous applique, flower bud.
How to make a box:
To make gift wrapping easy, step-by-step instructions with photos . In order to make a beautiful box, you need to take care of creating the lid and the main part in the same style. The top can be presentable, bright or playful. The bottom can be made from plain paper of a suitable color.
- You should start by creating a lid for the box. You will need square paper for this. The sizes can be anything - depending on the author’s idea. In this case, the square will be 21.5x21.5 cm. You need to draw a square of paper diagonally to make a cross, as in the photo below.
- The bottom corner must be bent so that it lies at the central point of intersection of the drawn lines. You can navigate by the photo. Then you need to bend the resulting fold again, but this time so that its edge exactly coincides with the drawn strip. The folds must be smoothed out well so that they are imprinted on the paper. You can use the body of a pencil. After this, we bend the square back, keeping on the paper the folds necessary for further work.
- We repeat these steps for the three remaining corners, resulting in a finished square with a grid of folds we need. After this, we cut two side parts on both sides, which now look like houses.
- We do the next step according to the photographs: we fold the lid of the future box.
- After this, you can begin to make the base of the box. To create it, you will need a square of paper 3 mm smaller than the previous one. In our case - 21.2x21.2 cm. The bottom is folded in the same way as the lid. The result is a beautiful box that can be decorated with ribbon, applique, or flower.
- The inner ends can be glued on the inside with double tape.
We learned how to make a box out of paper, but there are also more reliable materials for such an important product as gift wrapping.
For clarity, you can watch a video where the box is also made in origami style: