Lightweight all-terrain vehicles with huge cameras are able to overcome severe off-road conditions that other types of off-road vehicles cannot traverse. Self-made vehicles of this type are simple, since they do not have a complex technical base, which is why they have won the recognition of most home craftsmen. Such equipment is especially in demand by residents of rural areas, where precipitation greatly reduces the quality of roads, as well as by lovers of hunting, fishing and extreme recreation.
Types of homemade all-terrain vehicles
Depending on the type of design and chassis, the following types of homemade all-terrain vehicles differ:
- Swamp boats. They have a simple design and are relatively cheap to manufacture. They are equipped with an outboard motor and allow you to move around shallow bodies of water.
- A caterpillar swamp vehicle allows you to drive through overgrown bodies of water, but it is quite complex and expensive to manufacture, as it requires the attachment of a special type of tracks.
- An all-terrain vehicle with low-pressure tires is the simplest and most promising type of swamp vehicle, the performance of which depends on the design and reliability of the tires.
Some homemade products later become serial models. This happened with Alexei Garagashyan’s all-terrain vehicle called “Sherp,” which is now known all over the world.
Types of homemade all-terrain vehicles with low pressure tires
Homemade all-terrain vehicles on low-pressure tires, having the same principle of off-road movement, may differ in type of design. There are the following main types of vehicles of this type:
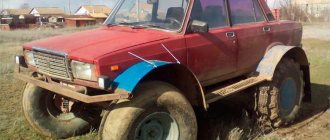
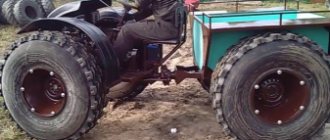
1. All-wheel drive caracat . In its design, it uses transmission and chassis elements from outdated types of passenger cars. It has all-wheel drive, a transfer case, and the adapted boat hull in its lower part and the tightness add buoyancy to the all-terrain vehicle. Designed to overcome swamps and swamps, it is capable of delivering cargo and people to areas inaccessible to ordinary SUVs.
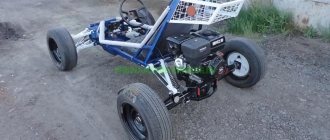
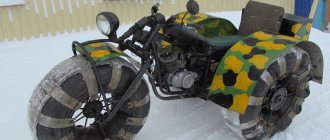
2. Tricycle on low pressure tires . It has a very simple design and can be made by almost any car enthusiast in a garage. The IZH Planet 3 motorcycle is often taken as the basis for such an all-terrain vehicle, due to its endurance and unpretentiousness.
3. Homemade karakat with an SZD motorized stroller engine . Its peculiarity is that the engine is located not under the frame or gas tank, but under the seat or in the rear of the all-terrain vehicle’s frame. Chassis parts are traditionally taken from cars, and elements of motorcycles are used in the front part. Pipes, channels and angles are used to make the frame.
4. All-terrain vehicles with low-pressure tires based on cars or ATVs . They are manufactured using ready-made main units by reworking the transmission and chassis, as well as equipping them with low-pressure tires.
DIY tracked all-terrain vehicle (30 photos)
All-terrain vehicle on caterpillar tracks, built with his own hands by homemade worker Mikhail.
We invite you to watch the step-by-step assembly of a homemade all-terrain vehicle and familiarize yourself with the design. Before starting work, Mikhail made calculations on the speed of the all-terrain vehicle in each gear. The maximum speed according to calculations will be almost 30 km/h. The construction was carried out without any drawings; the frame was welded from a square pipe.
Next stage: making tracks.
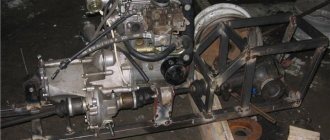
The body will be waterproof and scalded with sheet metal. In the front part there is a rear axle from a VAZ and drive stars for the tracks.
The all-terrain vehicle is equipped with an internal combustion engine and a Lada transmission.
Disc brakes will be installed on the axle shaft of the bridge.
The all-terrain vehicle will turn by braking one of the tracks.
The all-terrain vehicle's rollers are made from VAZ wheels.
We installed a windshield, welded a frame from a profile pipe and welded the body with sheet metal.
This is how the tracked all-terrain vehicle turned out, made with his own hands, by Mikhail from the city of Vyshny Volochek, Tver region.
Video: ride on a tracked all-terrain vehicle.
Another video: an all-terrain vehicle on the water.
How to make an all-terrain vehicle on low-pressure tires?
Work on manufacturing an all-terrain vehicle begins with drawing up an action plan, the full implementation of which means achieving the desired result. The following tips will help you save time and money:
- Availability of free time, allowing you to regularly carry out work on assembling the all-terrain vehicle. If it is absent, it is better not to start at all.
- Budget planning. Creating an all-terrain vehicle yourself allows you to save on purchasing a production model, but in order to eliminate unnecessary expenses, you need to make all the calculations and buy the necessary components and parts, and also leave a certain amount for unforeseen expenses or breakdowns.
- Developing a plan. If you have experience in developing vehicles or the inclinations of a design engineer, it is possible to independently create a drawing of an all-terrain vehicle. In the absence of such, they use other people’s experience and ready-made drawings, of which there are a sufficient number on the Internet.
DIY low pressure tires
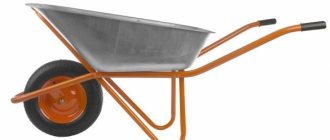
Tires of this type visually resemble huge pillows that support the entire structure. The degree of grip in such wheels allows the vehicle to be passable on any off-road terrain. Depending on the design features, such tires are divided into the following types:
- Arched. They are 5 times larger in size compared to a standard wheel, and have a thickness of up to 700 mm. The pressure in them is like in a regular ball - 0.05 MPa. Installed exclusively on the drive drive.
- Wide-profile. They are distinguished by an oval design and pressure up to 2 times lower than standard. Most often used in lifting vehicles.
- Toroidal. They are manufactured in tube and tubeless versions and are highly popular among car enthusiasts.
- Pneumatic rollers , having lugs to improve cross-country ability, and ribs to increase rigidity, giving the entire structure stability and strength.
The cost of factory-made low-pressure tires may be unaffordable for many car enthusiasts. But for your own all-terrain vehicle, it is quite possible to make such a wheel yourself. The work is performed in the following order:
Factory all-terrain vehicles with Lifan engine
Snow and swamp-going vehicles with the Lifan engine are mass-produced in factories, mostly all-terrain vehicles on tracks. These all-terrain vehicles are notable for the fact that their design does not use original components. Parts and components for assembly were borrowed from the VAZ 2108 and other domestic cars. Maintenance and operation of factory models do not require the establishment of service workshops - in the event of a breakdown, spare parts can be purchased at an auto store, and the vulcanization of the pneumatic rollers can be done independently.
In the basic configuration, factory snowmobiles with a Zhiguli gearbox and axle are available to a buyer of average income, but the installation of attachments that are not included in the base price (winch, roll cage, canvas awning, trunk, halogen lights) makes the price of a production machine high.
Choosing an engine for an all-terrain vehicle
Most often, the following types of engines are used as a power unit for self-manufacturing an all-terrain vehicle:
- Motorcycle.
- ZAZ car.
- Motoblock.
- Domestic cars.
The presence of a specific engine in an all-terrain vehicle does not make a fundamental difference. It is more important to take into account such a feature as ensuring its sufficient cooling , since the vehicle is operated all year round in different temperature conditions and at low speeds. The ZAZ engine is excellent for this, as it can withstand temperature changes well. All-terrain vehicles running on motoblock power units have also proven themselves to be the best.
Another main criterion for choosing an engine for a future homemade product is its power .
The power reserve must be sufficient so that an all-terrain vehicle on low-pressure tires can get out of mud, water, or deep snow.
By choosing a unit with a power reserve, you get better performance, prevent overheating and create conditions for the longest service life.
Features of the all-terrain vehicle chassis
The chassis of all-terrain vehicles on low-pressure tires is made in the form of an independent suspension to give the all-terrain vehicle better cross-country ability, increase the comfort of driving the vehicle and make riding easier for the driver and passengers. This type of design has a main drawback - the complexity of manufacturing.
To create it, pipes, angles and channels made of durable alloy steel are used, creating a strong base that can last for several years without breaking. The frame is made both solid and articulated. The latter has a high working potential, but the complexity of its manufacture makes it quite rare in home-made designs.
Sequence of self-assembly of an all-terrain vehicle
Assembling an all-terrain vehicle on low-pressure tires includes the following steps:
1. Selecting the type of all-terrain vehicle and the base on which the units and parts will be mounted. For this, frames of cars or motorcycles are used, as well as home-made structures developed on their own or borrowed from someone else’s drawings.
2. Manufacturing and assembly of suspension with rear axle. For this, the optimal solution is an independent design , and although much more time will be spent on its creation, the end result will be an all-terrain vehicle with higher cross-country ability and ride comfort.
3. Installation of wheels. Performed after completion of work on the rear axle and suspension. Metal hubs are used to mount the cameras. Properly manufactured or selected low-pressure wheels will provide the all-terrain vehicle with increased driving safety and good handling.
4. Engine installation. Particular attention is paid to the correct design of the cooling system.
5. Installation of additional systems. Includes connecting the brake system, exhaust gas communications, clutch and electrical equipment. At this stage, the body of the all-terrain vehicle and lighting fixtures are installed.
6. Completion of work and implementation of a trial test, which shows the performance of components and systems. If there are problems or points that need to be improved, the shortcomings are eliminated, after which the all-terrain vehicle is ready for use.
Homemade tracked all-terrain vehicle "Khoma": assembly photo, test video
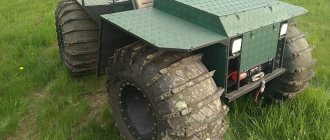
The author of the homemade product built himself the simplest tracked all-terrain vehicle for fishing trips and mushroom picking in the forest, the body of the all-terrain vehicle is a boat, and it weighs only 300 kg.
Technical characteristics of the tracked all-terrain vehicle:
- Front-wheel drive (one drive axle).
- Turning - differential activation.
- Boat hull.
- Track width – 450 mm.
- Center distance – 1180mm.
- Belt clutch.
- The width of the boat is 700 mm.
- The height of the boat is 570 mm.
- The length of the all-terrain vehicle is 2000 mm.
- Width - 1760 mm.
- Maximum speed is 30 km/h.
Video testing a homemade all-terrain vehicle
Dear friends and visitors to the “ Samodelkin Friend ” website, today we will look at the drawings and stages of assembling the suspension of the all-terrain vehicle PVM from spare parts from Domestic cars... First, I cut off the stocking of the classic bridge and welded on the support plates. Then I assembled two internal grenades from the components of the Samara car as in the drawings and mounted the bearings of the rear axle shafts of the classics, fixing them with a retaining ring. I welded seating rings for bearings onto the stocking support plates and centered them with the gearbox installed. The front plate of the stocking was heated to allow the gearbox to be installed in any position. Next, the levers are as in the drawings, the Samara front hubs, the strut mount is cut off and end switches are welded under the upper ball joints from the classics, alignment, or rather adjustment of the position using the selection method on tacks. Next, according to the photographs, the rear struts with Samara springs are used as shock absorbers, the upper point is the mounting point on the body using the fitting method. The FDA can be removed entirely for convenience. To attach the steering rods, we weld suitable ends onto the hub housings.
Tools
- welding machine
- grinder (angle grinder)
- drill
- set of wrenches
- burner
- hammer
Drawings and step-by-step process for assembling the all-terrain vehicle suspension with your own hands.
If you have any questions, ask and write comments. All the best