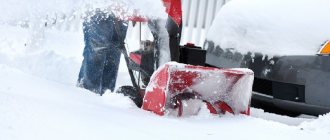
In the Far North with harsh weather, building a reliable shelter becomes the key to survival. Various huts and dugouts that save people under normal conditions turn out to be incapacitated. In severe frost and snowstorms, a lost hunter can take refuge in a snow house, which is often used by Eskimos if they are caught in a snowstorm on the way.
General information
The harsh climate of the Far North forced the Eskimos to build shelters for themselves and their families. That snow was chosen as the material. Such dwellings have amazing properties - they protect residents from strong winds and low temperatures. If you light a candle inside, you can easily warm yourself up. Surprisingly, such a snow hut does not melt, but only melts slightly, and besides, it transmits light perfectly. This type of house is called an igloo.
The ice dwelling of the Eskimos can have several rooms at once, which are connected by a long passage. When building such housing, you must adhere to the basic rules:
- You can dig snow with any available tool: a knife, saw, shovel and even a food bowl;
- It is not recommended to build a large building - the smaller it is, the warmer it will be;
- cracks that form during construction are covered with wet snow;
- during construction, it is better to take off your outer clothing so as not to sweat and subsequently get sick;
- The inside of the dwelling must be covered with waterproof bedding so that the skins on which the Eskimos sleep do not get wet.
You can look for a large snowdrift in the area and dig an ice shelter in it. You can make the entrance a little lower, and then dig a small corridor - this will strengthen the structure. The diameter of such a structure should vary from 3 to 5 meters. The low entrance to the hut is made so that the warm air that rises upward does not evaporate, but remains in the room, and heavy carbon dioxide, on the contrary, sinks and goes outside.
As for lighting, it is, in principle, not needed - the light penetrates through the wall of the house. Although, if desired, you can build a window and install ice as glass. The floor and walls must be covered with animal skins - this will additionally insulate the structure. At the end of construction, you can light a candle or fat lamp. The house is ready.
First row
Before we start laying the first row, we make markings. To do this, we hammer in a kingpin in the center of the area we have compacted and tie a piece of cord or clothesline to it, on which we set a distance of 1.05 m. We mark the latter with a knot.
Now, using this “compass”, we draw a circle on the site with a diameter of 2100 mm - this will be the outer boundary of the snow wall.
On the inside of the circle, strictly along its perimeter, we build a snow wall exactly one block high. All bricks in the masonry should be heaped inward at approximately 17°; more precisely, we control the angle of inclination using our measuring rope. Since the igloo has the shape of a regular hemisphere, the measured 1.05 m will not only be the radius of the Eskimo dwelling, but also the distance from the center of the site to any point on the snowy facade.
When the perimeter is laid out and the blocks are fitted to each other from the formed snow ring, you need to cut out the screw with a hacksaw.
It is this spiral shape of the first row that is the main secret of the northern builders, which Europeans have been unraveling for centuries. Laying along serpentine lines is the only option to get a third support point for the “brick” and not fall.
Thus, each block rests not only on the row below it, but also on the side edge behind the standing wall element.
Useful tips
An Eskimo can make an igloo out of snow in one hour - build a reliable and strong dome-shaped structure that even a bear cannot destroy. It will be quite difficult for an inexperienced traveler to build such a dwelling. There are several tips to help you cope with this task:
- it is necessary to start construction during the day, when it is light; doing this at night is strictly prohibited, as destruction may occur;
- the entrance to the building should not be located in the direction where the wind blows;
- When spending the night, you should definitely take a shovel or other tool so that in the morning you can dig out the entrance from the snow;
- do not build a house whose diameter is more than 5 m, otherwise the stability of the structure will decrease;
- during construction work, you need to carefully outline the circle;
- It is necessary to observe safety when lighting an open fire inside the needle, as you can be poisoned by carbon monoxide;
- It is forbidden to sleep if there is a threat of freezing.
If someone from the group feels unwell in the ice hut, for example, vomiting, dizziness or watery eyes, it is necessary to immediately leave the building , extinguish all heat-producing devices in it and ventilate the house. There have been cases of carbon monoxide poisoning. This happens especially often in a dream.
Preparing to build an igloo
Let's start by finding a suitable location. You'll be lucky if there's a suitable slope. This will reduce the amount of work because the walls will be shorter. This is especially useful if the house needs to be built in the forest before sunset.
Regarding the choice of location, you need to follow 2 more rules:
- Freestanding hillocks should be avoided. Often these are piles of boulders or logs hidden under the snow. This will only waste your time.
- Check each hump with a ski pole or any long snag. The surface under the snow should be dense and motionless.
Now we are looking for material for blocks. It should not be loose, again to save time. It only seems voluminous, in reality there are many voids in it and it will take too much to form the material.
Again, it’s easy to check the density - press it with a stick and if it’s difficult to move, it suits us. By the way, for construction we will need snowdrifts of at least 60 centimeters.
Sometimes there is simply no dense snow and you have to build an igloo from what you have. Snow will need to be thrown on top and compacted with boots until it is compacted to the desired state.
It's time to draw a circle in the snow. To do this, we determine the middle and draw a circle with the heel of the shoe. It is important to make it as round as possible. An irregular shape will be unstable; after all, the shape of the dome was chosen for a reason.
The diameter should be such that you can lie comfortably, but not more than 3 meters. Without precision, it will collapse under its own weight.
We cut out blocks inside the circle and take them out. We will build a snow house from the center outwards.
Now we need a snow saw. If you don't have one, you'll have to use a regular stick. First, cut a long trench in the center. You need to cut it in such a way that one of the ends rests directly on the outlined circle. At the intersection further we will make an entrance. If you are building on a slope, then it should go from top to bottom.
This completes the preparatory work. Now we will look at how to build snow buildings.
Step by step construction
A more reliable structure is obtained from dense snow. Whole blocks are cut out of it using a hacksaw, which outwardly resemble foam. These elements are used to build a snow yurt. They need to be cut only from the side of the snowdrift from which the wind blows. Such products are much stronger, their weight is approximately 10 kg.
Next, you should choose a place for the house, draw a circle with a diameter of 3 m on the surface, mark the entrance hole and begin construction. The process looks like this:
- An igloo hut is built from snow or ice blocks, which must be laid in a spiral, moving exclusively from right to left. To do this, you need to cut two blocks diagonally in the first row, and then start laying the second row.
- Next, you should tilt the blocks in each row so that a spherical shape of the building is formed. As a result, there should be a small hole left in the upper part that needs to be sealed from the inside. To do this, you need to insert a wedge-shaped piece of ice into it. The height of the building should be approximately 2 m so that you can stand up to your full height.
- After this, all cracks should be sealed with wet snow. This must also be done from inside the building.
- The entrance tunnel needs to be dug from the outside. You can also make a hatch in the wall, but then it is imperative to lay out a corridor of snow blocks. The external entrance to the tunnel should have a height of 1.5 m.
- To strengthen the structure, you should light a candle or lamp, wait until the house melts, and then put it out. It will undergo icing and become much stronger. Now you can move in.
In winter, a snow hut can last up to 5 months if the temperature outside is sub-zero. Inside the yurt, the temperature with a burning candle can be up to +16 degrees, and with the lamp on up to +20.
If the ceiling begins to thaw, it is necessary to scrape off a 15-centimeter layer of snow from the outside so that the hut cools down a little and the ceiling stops dripping. If, on the contrary, the house does not retain heat, and frost forms on the dome, then you should throw a little snow on the dome.
Construction of walls and domes
We cut out blocks inside the trench. Typically their size should be 90x38x20. We cut it with a regular snow saw or machete. We just need to lay out the bottom row as shown in the picture. By the way, a snow house for children can be made faster from a pre-prepared form, which is made from boards, plywood or ready-made boxes. At the joint, it is advisable to level them using a knife or saw so that the fit is maximum.
You also need to make a bevel. The entire bottom ring does not need to be level. In the right snow house it goes up a little. This is necessary so that subsequent rows are folded in a spiral with a narrowing upward, which forms a dome.
Each subsequent tier should be closer to the center. To do this, we reduce the blocks slightly in size on each subsequent ring. We make the bevel not steep, but neat. A sharp transition will collapse the walls before construction is completed. Any gaps that will form are simply filled with snow. We trim the corners of the blocks inside and outside to reduce weight.
After we succeeded in building the igloo, all that remained was to build the upper tier, that is, we needed to prepare the roof. It can be done the same way, but incorrect installation can cause the house to collapse. Here you need to achieve the tightest possible fit with the knife.
At the end there will be a hole in the middle. We push the last block onto the roof and cut it along the contour with a knife so that it fits into the walls.
Master class “Dwelling of the peoples of the North. Igloo"
An igloo is a typical Eskimo residence. This type of building is a building that has a dome shape. Igloos are usually built from ice blocks or wind-compacted snow blocks.
What we need:
Colored cardboard (cool colors) for background
Markers or colored pencils
First you need to draw the outline of the NEEDLE and the door on a sheet of cardboard
Cut a sheet of white paper into strips approximately 1 cm wide.
Cut the strips into rectangles (ice bricks)
We glue the bricks along the contour, then throughout the entire home.
Now let's get to the Eskimo. Cut carefully along the contour.
And glue it onto cardboard. Near the igloo.
Glue white fluffy snow (cotton wool)
Now, if desired, we add details: footprints in the snow, sun, smoke, ice hole...
Our application is ready.
But this is the kind of work my students got.
I would be glad if someone liked it and found it useful!
Thank you for attention!
Publications on the topic:
Didactic board and demonstration game with elements of the ethnoculture of the peoples of Buryatia “Dwelling” Didactic board and demonstration game with elements of the ethnoculture of the peoples of Buryatia (using the example of Buryat, Russian, Evenki, Semeisk,.
How we celebrated the holiday of the peoples of the North “Crow Day” In the kindergarten “Ogonyok” in Novy Urengoy in the group “Bell” we celebrated the national holiday of the peoples of the North “Crow Day”, which we had prepared.
Card index of outdoor games of the peoples of the North “Beware of the Hunter” Goal: development of speed, reaction speed, endurance, coordination of movements The game is played at any time of the year, quantity.
Summary of direct educational activities in the senior group “Dwelling of the Peoples of the Southern Urals” Objectives: • To give an idea of the national dwellings of the Bashkirs and Russians at different times (antiquity - antiquity - our time). • Contribute.
KVN “Traditions and life of the peoples of the North” Topic: My native land. Goal: Systematize knowledge about the history of the native land, about the life of the Khanty and Mansi peoples, their traditions and way of life, to consolidate.
Presentation within the framework of the project activity “Ornamental art of the peoples of the North” “Ornamental art of the peoples of the North” A characteristic feature of the culture of the Khanty peoples is that they pay attention to the application of ornaments.
Presentation “Life and Life of the Peoples of the North” I watched a lot of presentations on the North, but not all are suitable for our region. When the “World of Taimyr” week was held in the garden, the final event.
Presentation of the project “Games and toys of the indigenous peoples of the North” In order for a child to become truly inquisitive and strive to acquire new knowledge on his own, and not under coercion, it is extremely important.
Project “Traditions and Life of the Peoples of the North” Project “Culture and Life of the Peoples of the Khanty and Mansi” Compiled by: Rostovtseva Nina Vasilievna G. Urai, 2017 Relevance of the topic: Earth.
Scenario of the ethnic festival of the peoples of the North for the middle group Scenario of the ethnic festival Participants: children of the middle group. Equipment: audio recordings, tambourine for the shaman, cones, three-dimensional portrait for.
Facade finishing
When the walls are laid out and the entrance is equipped, we trim the sharp corners with a saw and seal the masonry joints with loose snow. That's all.
You can trust nature itself to complete the façade finishing with an igloo. The very first snowstorm will turn our building into a cozy and warm snow house in which you can wait out almost any frost.
Don't be lazy, build a real Eskimo house out of snow - the children will thank you.
Source
First row
Before we start laying the first row, we make markings. To do this, we hammer in a kingpin in the center of the area we have compacted and tie a piece of cord or clothesline to it, on which we set a distance of 1.05 m. We mark the latter with a knot.
Now, using this “compass”, we draw a circle on the site with a diameter of 2100 mm - this will be the outer boundary of the snow wall.
On the inside of the circle, strictly along its perimeter, we build a snow wall exactly one block high. All bricks in the masonry should be heaped inward at approximately 17°; more precisely, we control the angle of inclination using our measuring rope. Since the igloo has the shape of a regular hemisphere, the measured 1.05 m will not only be the radius of the Eskimo dwelling, but also the distance from the center of the site to any point on the snowy facade.
When the perimeter is laid out and the blocks are fitted to each other from the formed snow ring, you need to cut out the screw with a hacksaw.
It is this spiral shape of the first row that is the main secret of the northern builders, which Europeans have been unraveling for centuries. Laying along serpentine lines is the only option to get a third support point for the “brick” and not fall.
Thus, each block rests not only on the row below it, but also on the side edge behind the standing wall element.
Further masonry. Keystone
Important! Since the mason is inside a closed loop, a helper is needed for further work. It is he who must supply the snow blocks.
There is nothing complicated about the spiral masonry itself; you just need to follow a few basic points.
Tilt angle
We control the angle of inclination as before using a piece of rope tied to the king pin. Only such a measure will allow us to build the right dome.
End trimming
For denser masonry, we cut the ends of the snow bricks at one angle.
The direction of the cut of the right edge of the block is set by the already familiar lacing.
We file down the left end, focusing on the already finished cut of the previous element. Sawing is done with an ordinary saw.
Keystone
The keystone is more difficult to trim. You need to work from the inside, focusing only on the finished working planes of already laid blocks.
Facade finishing
When the walls are laid out and the entrance is equipped, we trim the sharp corners with a saw and seal the masonry joints with loose snow. That's all.
You can trust nature itself to complete the façade finishing with an igloo. The very first snowstorm will turn our building into a cozy and warm snow house in which you can wait out almost any frost.
Don't be lazy, build a real Eskimo house out of snow - the children will thank you.
Source
Igloo: house made of snow
The igloo is built from bricks made from compressed snow. Ideally, the shape of the building should be round, since the area of a spherical hut can reduce heat loss. In addition, this form gives strength to the structure, despite the fragile “building material”. If the igloo is built in deep snow, the entrance to it is dug in the ground, and if the depth of the snow cover is shallow, a small corridor is attached to the hut, which protects the building from wind penetration inside. Warming inside such a home occurs with the help of a candle. The walls will melt a little, but not melt, forming a thin ice crust from the inside. The walls of the needle are capable of transmitting light and water vapor.
How to make an igloo out of snow with your own hands: material
Making bricks from snow depends on its structure. If the crust is hard and durable, use a saw (you can use a shovel or a hacksaw) to cut out blocks slightly smaller than standard gas silicate bricks. Usually the dimensions are 60x40x15, but for the bottom row you need to make larger blocks for stability. Wet snow is difficult to cut, but it is sticky, and you can stick bricks. In order to mark the shape, you need to use a rectangular blank made from any available material. You can do this manually, choosing the size by eye. Bricks from loose snow are difficult to make without a blank, since it will crumble. The snow is placed inside the mold, compacted and moistened. After removing the mold, the blocks will harden in the cold. Thus, you need to make the required number of blocks depending on the size of the igloo. You need to cut blocks from a snowdrift on the side from which the wind blows. But still, the best snow for building a snow shelter is considered to be dry snow with a density of 0.25-0.30, which has a uniform structure. Snow with a denser structure has greater thermal conductivity, weak adhesion and fragility (at low temperatures).