Butterfly applique
Applique is an excellent option for making a children's butterfly craft. Working on such a craft will help your child develop his creative potential, as well as train attentiveness, perseverance and dexterity. For this craft you will need cardboard, colored paper, glue and scissors.
You can draw a butterfly yourself or download a butterfly template for a craft from the Internet. The butterfly design should be applied to colored paper, then cut out and decorated with sparkles or patterns. The resulting butterfly should be glued onto cardboard and cut out along the contour.
Mask
For a matinee or carnival, a butterfly mask or headband would be perfect.
Option one.
A very beautiful craft is made from a Venetian eye mask, which will be the basis of our product.
On top of it we attach an openwork butterfly in a contrasting color. For a child, we take measurements from the middle of the nose to the temple. To find out the correct horizontal size, outline the contours for the eyes. Cut out two parts. One is the main one.
We glue an openwork mask onto the cardboard, or decorate it ourselves with a colored appliqué.
We make holes for attaching ties.
Second option.
Cut a strip from cardboard. We measure the circumference of the head. We glue the headband according to the measurements and fasten our craft on it like a crown, or glue several pieces in the shape of a wreath.
You can depict a copy of a real exotic insect, or you can show your imagination.
A “magic wand” with a butterfly attached to the end is also suitable for a children’s party.
Origami butterfly
A beautiful butterfly craft in origami style can be simply folded from paper. To do this, you will need a square sheet of paper (you can use regular or special origami paper).
Manufacturing stages:
- The paper must be folded diagonally.
- Then the sheet of paper should be turned clockwise and folded diagonally again.
- The workpiece must be unrolled again.
- As a result, the square paper should have creases diagonally from one side to the other.
- The top of the paper should be lowered to the bottom, aligning the corners evenly.
- The workpiece should be unfolded again, and, turning the sheet of paper, do the same actions.
- The flat edges of the workpiece should be inserted into the middle.
- Use scissors to twist the two bottom corners.
- The top rounded corners should be folded towards the middle.
- The craft should be turned upside down, and then the lower triangle should be bent back. The result should be a small triangle at the top of the butterfly.
- The butterfly's wings need to be folded together.
How to Sew a Bow Tie in 10 Easy Steps
In this master class, I want to share with you my technique for making such a stylish accessory as a bow tie. It will take you very little time and you will be very pleased with the result of this wonderful tie. We will not sew a classic self-knitted butterfly, but a so-called “lazy” one, which is easy to use (you don’t need to carefully tie it), and at the same time it looks no worse than a self-knitted one, but on the contrary, many people like it precisely because of their correct neat forms.
So, let's begin!
To make a bow tie we will need:
- a piece of fabric 24*13 cm (I use suiting fabric, you need to choose something similar: not too thick or thin, and it is desirable that the fabric does not stretch practically, you can take the simplest gabardine);
- a piece of fabric 4*7 cm for the jumper;
— dublerin is also 24*13 cm, as the main part (it’s not in the photo, you don’t have to use it if the fabric is thick enough to keep its shape);
— elastic band 50 cm, width 12 cm;
- adjuster and hook for a bra 12-13 cm (the width of these parts depends on the width of the braid);
- scissors, chalk, pins, ruler or measuring tape.
Step 1
We cut out the parts: main and small. First of all, we need to glue the main part with doubler tape so that it can keep its shape in the future. If your fabric is already thick enough, you don’t need to glue it.
Step 2
Fold the main part in half lengthwise, wrong side out, and stitch it, retreating 4-5 mm from the edge. For convenience, I pin it with pins.
Step 3
Next, turn the part inside out and iron it so that the seam is in the middle, as shown in the photo.
Step 4
The next step is to fold the ironed part in half with the seam facing out and stitch it, retreating 5 mm from the edge.
Step 5
Let's take up the iron again. The part needs to be turned out so that the seam is inside and placed in the middle, then ironed. The photo on the left shows the stitched part. On the right - turned inside out and ironed. The main part is ready.
Step 6
We take a small part, the future jumper. Fold lengthwise, with the right side of the fabric facing out and stitch, retreating 3mm from the edge.
Step 7
Iron the small part so that the seam is in the middle. The photo below shows how it should turn out.
Step 8
We fold the jumper in half, with the seam facing out, and stitch it, as shown in the photo. The distance from the edge depends on your fabric. The thinner it is, the greater the indentation. Then we turn out the jumper.
Step 9
We take the main part, form folds and push it through the jumper.
This is what you should end up with:
Step 10
Making a strap. To do this, take an elastic band and thread it through the jumper. Next, we first insert it into the regulator, then pass it through the hook, and then again into the regulator from the reverse side and sew the tip. I tried to photograph it as clearly as possible. And at the other end of the tape we simply make a loop, it can be seen in the photo on the right.
And now our bow tie with an adjustable strap is ready!
I really hope that you liked my master class and found it useful! I will answer all additional questions about tailoring!
Good luck to everyone, thank you for your attention!
Accordion paper butterfly
This craft can be used to decorate walls or furniture. It’s very quick to make such a butterfly, and it will look very creative. Manufacturing process:
- The paper should be folded in half and cut. One part of the workpiece should again be folded in half horizontally.
- Fold the four edges of the rectangle, folding the craft to form a zigzag.
- The resulting zigzag paper should be tied with a thread in the middle, so as to create butterfly wings.
- Fold the second part of the paper in a zigzag pattern to form the body of a butterfly, and then glue the wings to it.
- If desired, you can attach a thread to the finished butterfly to use it as a hanging decoration.
Multilayer volumetric
When making multilayer volumetric butterflies, several pieces of the same shape are cut out (size and color may vary). They are stacked one on top of the other, the “bodies” are glued together, and the wings are bent at different angles. This is how these butterflies turn out to be more voluminous.
Examples of multi-layer paper butterflies
You can make a combination of openwork and contour butterflies. Take paper of contrasting colors or find the same color, but different shades. Make them into butterflies of the same shape. Only some will be with openwork, others - without. Arrange them by placing a fragment without a pattern underneath. This produces an interesting effect.
You can combine it like this
There is a technique that allows you to immediately cut out three-dimensional butterflies from paper. You will need two rectangles of paper - a larger one (for large wings) and a smaller one. We fold them diagonally once, then a second time. The result is two triangles of different sizes. Now we bend the paper inward from two opposite sides so that we get a triangle like in the third photo (with the newspaper).
Volumetric paper butterflies for decoration
Draw wings on the resulting triangles. In larger ones, the openwork can be located only along the edge, in smaller ones - over the entire area. We cut out the blanks and put them one inside the other and glue them together. On top we glue a separately cut out “body” with antennae. Due to the fact that the paper is folded and the wings are double, the products have a larger volume.
Butterfly using quilling technique
This technique involves making crafts from strips of paper. You can cut the paper yourself or buy ready-made strips in the store. Butterflies in the quilling style can be made either flat or voluminous; this craft will not take much time and is suitable for small children.
Manufacturing stages:
- A strip of paper should be rolled into an oval, forming the body of a butterfly.
- Another strip of paper should be twisted into a tight circle, which will act as the butterfly's head.
- The butterfly's head must be attached to the body with glue.
- Then you should make a wing template by making 2 large ovals and 2 smaller ovals from cardboard.
- You need to glue twisted multi-colored strips of paper onto the template, which will serve as decoration.
- The finished wings should be glued to the body of the butterfly.
- You can twist antennae from thin strips of paper and then glue them to the butterfly's head.
Twisting method
Let's make unusual butterflies using the quilling technique. Quilling is the art of making three-dimensional compositions from thin strips of paper. A little more difficult to perform, but worth it.
An exciting creative activity. Draw a sketch of a butterfly on the desired blank and fill the drawing with spirals. The paper leaves are twisted into spirals and secured with glue to the base.
They can be used to decorate an envelope for money, a postcard, or a frame.
Volumetric butterfly
To make this craft you will need a toilet paper roll, scissors, glue and colored paper. Draw wings on colored paper and decorate them as you wish. The pattern of the wings should be cut along the contour.
The sleeve should be painted with paint in any bright color and antennae made of paper or wire should be attached. The wings should be glued to the body of the butterfly. The finished butterfly can be decorated with beads or sparkles.
Applications
You can also make a butterfly out of paper using applique. This craft can become a summer card, table decor or a picture on the wall. For this you will need materials:
- Thick cardboard base
- Baguette frame
- Paper of different textures
- Scissors, pencils, glue
- Paints
- Ropes, thread, sisal, rhinestones
Operating procedure:
- Think over and discuss the concept of the picture with the children. Discuss the central element - the butterfly.
- Cut out the butterfly parts from paper. Decorate the wings of the butterfly.
- Using scissors and a ruler, make the folds of the wings in the center. Bend the wings with the blunt end of the scissors.
- Cut out the body and face of the butterfly. Decorate them.
- Based on this, draw a background and prepare other parts of the applique: sun, flowers, clouds.
- Glue the wings and body to the base. Decorate with additional elements: sisal, beads, crumpled paper.
The postcard or painting is ready.
Plasticine butterfly
Even a small child can make such a craft. Several pieces of brightly colored plasticine should be kneaded, and then the oblong body of a butterfly should be sculpted.
It is better to make the wings from two different colors of plasticine - the upper part of the wings should be large and brighter, the lower part of the wings should be made smaller and darker. Then you should sculpt the head and small mustache. All elements need to be brought together.
For babies
Fold a red sheet of colored paper in half, draw two large drops of different sizes with a pencil, these are wings. On another sheet, blue, circle 5 kopecks 2 times and 10 kopecks 3 times, this is the head and decoration for the wings.
Cut all this out and fold it using glue on the platform. From the pieces of remaining paper after cutting, pick up and form antennae.
Polymer clay butterfly
It is important to know how to make a butterfly craft from polymer clay. This is an interesting and time-consuming job, the result of which can exceed all expectations, the main thing is to do everything consistently and accurately.
Manufacturing stages:
- On paper you should draw a blank of wings (a total of 4 wings are needed).
- A small piece of clay should be mixed with a bright dye, then rolled out into a layer and a cut-out paper blank of wings attached to it.
- Using the template, you need to cut out the wings from clay using a knife.
- Place the wing on the embossed surface to give it texture.
- A thin wire should be glued to the wing and sent to dry on an uneven surface to form a bend.
- The remaining clay should be mixed with black paint and the body, head and antennae of the butterfly should be sculpted from it.
- Dried parts of the craft should be painted again.
- After all the pieces have dried, you need to assemble the butterfly using super glue.
Butterfly costume for girls (2 master classes)
1:502 1:507
A butterfly is a beautiful, graceful creature with luxurious bright wings, the personification of everything fabulous and beautiful. It’s no wonder that many girls want to dress in a butterfly costume on New Year’s holidays!
1:895
How to make a butterfly costume for a girl with your own hands? What does that require? A little material, time and desire. As a result, you will get a bright and elegant butterfly costume for a girl, turn your little one into a real prom queen!
1:1329 1:1334
Rummage through your bins; you will probably need various headbands, beads, rags, scraps of leather and fur, cardboard, paper and other materials. Making a butterfly costume for a girl is very fun and interesting. Involve all family members in this activity = everyone can be assigned to do something that is within their power. And then creating a costume will not only bring joy to your little one, but will also unite and unite your entire family!
1:2087
The whole process will not take much of your time and will not require serious financial expenses. Let's look at some options for creating a butterfly costume!
1:295 1:300
What's the most important thing about a butterfly costume? Wings of course!
1:405 1:410
They can be done in a variety of ways:
1:493 1:498
1. You can make a frame for the wings from wire, onto which you can stretch any light fabric.
A symmetrical pattern is applied to both wings using watercolor or aniline paints. The wings are attached to the wrist and neck area.
1:933 1:938 2:1442 2:1447
3:1951 3:4 4:508 4:513 5:1017 5:1022
2. You can make wings from fabric appliqués
(preferably from felt, which does not fray), sewn or glued to the main pattern
5:1263 5:1268 6:1772 6:4 7:508 7:513
3. You can sew wings from silk or organza, decorating with braid, tinsel or decorative line
7:691 7:696 8:1200 8:1205 9:1709 9:4
10:508 10:513
4. You can make wings from cardboard,
which is either painted with paints or decorated with fabric applique, tinsel, braid, etc.
10:749 10:754 11:1258 11:1263 12:1767 12:4
13:508 13:513
14:1017 14:1022 14:1027 14:1141 15:1645 15:4 16:508 16:513 17:1017 17:1022 18:1526 18:4
19:508 19:513 20:1017 20:1022 21:1526 21:4 21:9 22:513 22:518 23:1022 23:1027 23:1032 24:1536 24:4 25:508 25:513
26:1017 26:1022 27:1526 27:4 27:93 28:597 28:602
To make these cute butterfly wings, you will need the following materials:
28:769
- fabric (in our case it is black);
- scraps of fabric of different colors (to create a unique pattern on the wings of a butterfly);
- rubber;
- scissors, needles and threads.
Manufacturing:
29:1630 29:4
30:508 30:513
First make a template of future wings on paper.
30:623
Cut it out and, applying it to a piece of fabric, make the fabric base of the butterfly wings.
30:778 30:783 31:1287 31:1292
It is best to use fabrics that do not require edge processing, such as felt, for making a suit.
31:1492 31:1497 32:2001 32:4 33:508 33:513
Now you can use pieces of flaps of other colors to sew or glue to the base, thereby creating amazingly beautiful designs.
33:773 33:778 34:1282 34:1287 35:1791 35:4 36:508 36:513
An elastic band must be sewn to the inside of the butterfly's wings, with which the wings will be held on the child's back. The elastic band should be sewn on like the straps of a backpack.
36:855 36:860 37:1364 37:1369 38:1873 38:4 39:508 39:513
Sew rubber band rings to the tips of the wings, into which the child can thread his fingers and easily control the wings.
39:749 39:754 40:1258 40:1263 41:1767 41:4
If you want to make the butterfly's wings more rigid, then use sheets of thick cardboard that you drape under the butterfly's wings.
41:279 41:284
42:788 42:793
43:1297 43:1302 44:1806 44:4 45:508 45:513 46:1017 46:1022
Be sure to complement the butterfly image with makeup and hairstyle (butterfly horns).
46:1160 46:1165 47:1669 47:4 48:508 48:513
In such a fabulously beautiful outfit, your girl will be irresistible and happy!
48:656 48:661 48:766 48:773 48:778 48:874 48:881 48:886 48:893
Butterfly using kanzashi technique
To make this craft you will need 2 satin ribbons of 5 cm and 2 of the same ribbons of 10 cm, threads, glue, beads and lace.
Manufacturing stages:
- From large pieces of satin it is necessary to form a triangle, while the edges must be bent inward.
- The triangle needs to be folded in half and secured with a clamp, so that you get a sharp petal.
- Round petals should be made from small pieces.
- The sharp and round parts of the wings should be sewn together.
- From large beads you should make the body of a butterfly and glue the finished wings to it.
- The finished butterfly can be glued to cardboard covered with fabric.
Corrugated paper
It is easier to work with corrugated paper and butterflies for decoration are more airy and light, since the paper is translucent. We select suitable colors, take threads, scissors, glue. Nothing more is required. We cut out rectangles of approximately 7*10 cm from paper.
Everything you need to make decorative butterflies from corrugated paper
We sew the resulting rectangles in the middle with a needle and thread, tighten them, and make a couple of turns with the thread. It turns out something resembling a bow. We fold it in half, straighten the paper with our fingers, trying to leave as few folds as possible - we form wings.
Manufacturing process
When the result satisfies you, take scissors and cut off a strip of a few millimeters from that edge - into antennae. On the rest of the part we form a patterned edge reminiscent of a butterfly wing.
Simply and easily
We twist the antennae strips with our fingers into thin tubes. Now they definitely resemble antennae. We unfold the wings and finally straighten them. The result was light butterflies.
Butterfly made of threads
A simple craft that even a small child can do. The butterfly should be drawn on a sheet of paper and then covered with cling film. Multi-colored threads must be dipped in glue and placed one by one on cling film within the contour of the drawn butterfly. After the threads dry, you should glue beads to them, which will serve as the body of the butterfly.
Origami
It is known that the art of origami is suitable for people of any age. Develops attentiveness, accuracy, perseverance.
The technique fascinates by transforming a sheet of paper into an artistic image and makes your imagination work. There are many patterns for folding butterflies. There are the simplest ones, even a child can handle them, and there are more difficult ones for the “advanced”.
Let's consider the middle option so that everyone will be interested. You can see how this is done step by step in the video. Yes, it’s also useful: you’ll get an original bookmark for the book. Are we watching?
Butterfly made of colored paper
A butterfly craft made from colored paper can also look quite interesting. This craft is performed with preschool children. You should cut out wings, a body, a head and antennae from pieces of paper of different colors.
All elements need to be glued together. On the inside of the butterfly you can make a small envelope for a card with wishes. This craft will serve as a postcard.
Openwork
The situation is a little more complicated with openwork butterflies. They are made from paper or cardboard. It is important to have a good sharp knife and a template with lines marked on it along which you will need to cut out the excess paper. It’s worth saying right away that this is painstaking work.
For those who are good with a knife and have a steady hand Stencil for cutting out openwork butterflies from paper Patterns of butterflies with openwork wings - an option of medium complexity You can use thick paper or thin cardboard Not the most difficult option, but it will look great The second half is symmetrical Delicate work
This cutting template looks more like a butterfly. Patterns for cutting out paper butterflies.
The process is the same as described above: prepare a template, then cut out the required number of elements from it. The peculiarity is that they first cut out and remove small fragments, and then cut out an outline from a piece of paper. With this sequence of actions, there is less chance of breaking thin jumpers, and it’s easier to work this way.
How to make an openwork butterfly from paper - the process in pictures
You need to work with a knife with a thin and sharp blade. It’s better not on the table, but by placing something quite hard on it - maybe a piece of plywood, chipboard, plastic, etc. But you need to understand that there will be grooves and cuts on the surface, so it will be problematic to use this piece for any other purposes.
Butterflies from two patterns
This is a simple version of a three-dimensional craft that is perfect for children. To make a butterfly you will need double-sided colored paper, old newspaper, glue and scissors.
Draw a butterfly template on colored paper and then cut it out along the contour. The finished colored butterfly should be attached to newsprint and outlined with a simple pencil, slightly going beyond the outline. Then you should cut out the butterfly from the newspaper.
Butterflies made of colored and newsprint paper should be bent in the middle, and then using a pencil, smoothly bend the wings down. The small butterfly should be glued to the large one so that the wings remain free. The “upper” wings should be slightly raised to make the craft more voluminous.
What are they made from?
Butterflies on walls are made from different materials, sometimes even exotic. The spring appearance of the resulting decor depends on this choice. While you have no experience and you don’t really imagine the end result, you can make several different decorative butterflies for testing. They can be attached to the location of the planned decor. This will make it easier to evaluate the effect and choose the most suitable option.
You can transform your room with very little money.
Paper
Butterflies for decoration from paper are the easiest and cheapest to make. There are several different techniques. If the product is flat and is glued entirely to the wall/panel, only the front surface is important. If a three-dimensional composition is intended, the paper should be double-sided - both sides should be colored, because the white “wrong side” often spoils the impression.
From ordinary double-sided colored paper
Instead of regular colored paper, you can use corrugated paper. The effect will be different - it is lighter, airier, translucent, with its help it is easy to make the decor with butterflies three-dimensional.
Butterflies for decoration made from corrugated paper are airy and light
You can make butterflies from an old magazine, newspaper, postcards, colored napkins, wallpaper of a suitable color, or any other printed material.
Even from an old magazine it turns out very well
As you can see, there are a lot of options just from paper. If you consider that they can still be slightly tinted, combined, made multi-layered, it is clear that there is huge scope for imagination...
Cardboard
Cardboard is not very dense. It's more like a very thick paper. It is also colored and double-sided. It is often used to create voluminous decor - you can easily bend the wings relative to the body. This material even holds its shape better. Just remember that you can’t make corrugated wings - the material is too hard to make a small fold.
Patterns look clearer on cardboard
It is also easier to make openwork butterflies from cardboard. Having a sufficiently sharp knife, cut out the “extra” leaving only the partitions. Such decorations require perseverance, great patience and accuracy.
Make a template, according to which you can then make winged insects of the same size
Cardboard is also used to make templates for “mass” production of identical butterflies. With the help of such stencils you can make insects of the same type and size and spend a minimum of time on it.
Textile
Having a template, you can make butterflies for wall decoration or a fabric chandelier lampshade. The fabric will need to be given additional rigidity, but the rest of the process is not much different: the outline is applied, cut out, decorated if necessary, and mounted on the wall.
The simplest version of fabric butterflies
It is more difficult to work with fabric, although very interesting decorative crafts are obtained. This is an option for more advanced decorators and needle or sewing machine skills. With their help you can recreate the veins on the wings.
Exotic materials
Old vinyl records will also be an excellent raw material for making butterfly decor. Since vinyl is hard, you will have to heat it in the oven to cut a butterfly out of it. And in order not to spoil the baking sheet, you need to cover it with foil.
Butterflies for decor from vinyl records
An outline is applied to the vinyl using chalk, the record is placed in a preheated oven, as soon as it begins to soften, it is taken out and quickly cut along the outline with scissors. Often the “workpiece” has to be heated several times. After cutting, heat it one last time and give it the desired shape.
Beer cans or any other relatively soft sheet metal also make excellent flying beauties. First you need to cut off the bottom and lid and level the piece of tin. Then, using an awl, transfer the contours from the template to the sheet metal, connect them with a marker and cut along the resulting contour.
Even beer cans can be used for “butterfly” wall decor.
You can decorate the back - the shiny part. To do this, you will need markers or felt-tip pens; you can try decorating with nail polish. The painted beauties are given the desired shape. One caveat: the edges are very sharp, you need to work carefully, otherwise cuts cannot be avoided.
Butterfly made of gelatinized fabric
Gelatin should be dissolved in water and allowed to brew for half an hour. The resulting solution should be soaked into the fabric and allowed to dry thoroughly.
Transfer the butterfly stencil to the finished fabric and cut it along the contour. Then you should bend the fabric with a hot knife so that you get the natural curve of the butterfly wing.
It is necessary to make veins on the butterfly's wings and antennae from thin wire. The body of the butterfly can be made from wire or beads. All elements of the craft must be assembled using silicone glue.
Making crafts is an interesting and entertaining activity that will be especially useful for young children. If your own imagination is not enough, you can gain inspiration by looking at photos of butterfly crafts on the Internet. Finished works will give the interior a special charm and individuality, without additional costs for decoration.
Butterflies with wings of different shapes
But such a craft turns out to be voluminous and it is not at all complicated. We do it without any glue at all.
The work is suitable even for children to develop fine motor skills.
Two circles of different diameters are the upper and lower wings. We carefully fold each circle like an accordion. We place our blanks horizontally relative to each other.
We fasten with wire. From wire we make antennae and a body. The body and antennae can be wrapped in a strip of paper, or a strip of paper can be twisted into a barrel and placed on a wire.
Using an accordion, you can fold two squares of different sizes, two rhombuses, a circle and a square, depending on the shape of the wings you want to get.
Such models, large, small, medium, are suitable for decorating anything: garlands, curtains, arches.
Photo crafts butterfly
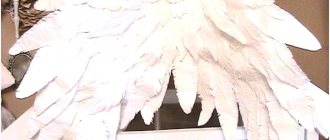
Making decorative feathers at home
Before you watch the master class with step-by-step photos, which will tell you how to make feather jewelry, familiarize yourself with how they can be modified.
There are several ways of such transformation. Try bending this piece to decorate your hat with.
Take a pen and look at it. In the middle you will see a rod. Then pay attention to which points you need to gradually press in order to bend this accessory.
Begin to carefully shape this element into the desired shape.
Then all that remains is to sew the feather on a hat or decorate another item of clothing with it. If you wish, make a spiral out of it. To do this, you need to carefully cut along the edge to separate entire strands of hair.
Another way to change a part and see what you can do with a feather. Just wrap it around a curling iron and see the effect you get.
And if you cut off these hairs, which are called barbs, then you will give the feather a completely different shape. Look at the diagram to make the task easier.
Now, following it, begin to modify this element so that it turns out to be so original.
If this element is too fluffy at the bottom, you can remove these hairs. Then the feather will be on a beautiful long stem, it will look more noble.
Here's how to make a feather with your own hands so that it gets such an interesting shape. You can remove the excess from the bottom, make the top part so that it looks like a point.
When you make the feather, all you have to do is glue or sew it onto the lady's hat, then it will have a noble appearance.
You can use not only a whole feather, but also part of it, which is located on the beards of the leading edge of the terry feather. Such an element is called a biotome. If you tie the top part with a knot, and then the next one, you will get such a beautiful accessory.
Make several similar feathers, after which you can also decorate the hat with them.
Biot can also be wrapped around a curling iron and then used to decorate an item of women’s clothing.
Feathers can not only be trimmed, but also painted. Then you get such masterpieces. This is how you can make a pen painterly.
If you paint a nib and attach a pen to it, you get this writing instrument that would make a great gift.