- 15456
- 29-03-2018
- Author: Mysekret Team
- 1
Paper boxes are a great way to decorate gifts with your own hands, create original packaging for storing household items, and also a great opportunity to bring creative impulses to life.
A big plus is that you can start training on plain paper or unnecessary thick cardboard, after which you can move on to making beautiful boxes from special paper.
To make your own gift box neat and attractive, it would be a good idea to take the advice of professionals and follow the step-by-step instructions with photographs and diagrams that can be found in our material.
Origami paper box
The first box should be easy to make and have a great appearance. Therefore, let's start making a regular square origami paper box.
For the creative process we will need:
- paper that is used for wrapping gifts (in the absence of such material, you can use regular colored paper);
- scissors;
- ruler and simple pencil;
- decoration elements of the finished product, if you want to decorate the craft.
Having collected the entire list of materials and tools, you can begin manufacturing. We will describe below how to make a simple paper box.
First you need to select the same material for the lid and base of the product. After all, the craft must be made in the same style.
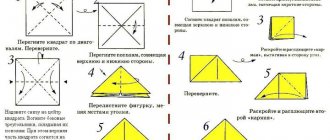
Step-by-step instructions for making a square box:
- Making a box begins with creating a lid. Therefore, you need to take paper and cut a square out of it. The dimensions of the square can be very different, that is, they depend on the manufacturer’s idea. Next, draw diagonal lines on the square using a pencil and a ruler (you should get a cross).
- Bend the bottom corner. It is necessary to bend so that the angle lies exactly to the marked section in the center. Fold, fold one more time. It should line up exactly with the line in the center. It is recommended to iron all folds well so that they are visually visible on the paper. After ironing, the craft bends back to its original shape.
- Using a similar pattern, we bend the remaining corners of the square. The result should be a square with visually visible bend lines. Now you need to make cuts on both sides and fold the parts into the shape of a lid for the box.
We figured out how to make a lid for a box out of paper, now we move on to making the box itself.
Manufacturing proceeds as follows:
- It is necessary to cut a square from the selected material, but in this case it should be 3 mm smaller than the square cut for the lid. Manufacturing begins with constructing the bottom of the craft. The bottom folds in the same way as the lid.
- After bending and assembling the box, you need to decorate it. For this purpose, ribbon, appliques and flowers are often used. After decorating, all that remains is to glue the inner ends with double-sided tape.
And so, we figured out how to make a box out of paper in a simple origami way. But there are many other manufacturing options that have a more attractive appearance. These boxes will be discussed further below.
DIY Magic Box
A surprise box (Magic Box) is a unique gift that is suitable for all holidays. Birthday, New Year, Valentine's Day, March 8, February 23, wedding, teacher's day and other celebrations... The main gift is a surprise - it can be candy, a flash drive, money, a photo and anything else that you want to put in a box. However, the design of the box itself evokes joyful emotions and emphasizes the theme of the celebration. In this article we will look at how to make a surprise box with your own hands.
Small box
You will need: thick white paper, pink scrap paper, pencil, scissors, ruler, non-writing pen, moment glue, distress ink, decorative elements - lace, shabby ribbon, stickers, flowers, berries and a surprise gift of your choice .
Master Class
- Box size 7 cm: make a cross of 5 squares, the sides of which are 7 cm.
- Draw the folds with a non-writing pen and lift the squares up, forming a box.
- Cut 4 6.8cm squares from scrap paper.
- Tint the edges of the squares with ink and glue lace onto each square.
- Cover the front side of the box with squares.
- Prepare 4 6.8 cm squares from other scrap paper.
- Tint the edges of the squares, decorate with stickers and cover the inner walls of the box.
- Make the lid in this way: prepare a square with a side of 10.1 cm.
Draw out the sides of the lid 7.1 cm and the height of the lid - 1.5 cm, then cut it out as shown in the image. - Draw the folds with a non-writing pen, fold and glue the lid.
- Cut out the parts for the lid from scrap paper of the following sizes: ends of the lid - 6.9x1.3 cm; three squares - 6.9 cm.
- Shade the parts and set them aside.
- Prepare a square and 2 pieces of shabby ribbon, glue the ribbons to the back of the square, then glue it to the bottom of the box and tie a bow.
- Cover the lid of the box with scrap paper parts.
- Decorate the lid to your liking and place the surprise inside the box.
The small box is ready!
Box with a secret
You will need: thick white A4 paper, scrapbooking paper, glue, ruler, scissors, 4 paper clips, crochet hook or non-writing pen, decorative elements - twine, pendant, figurines...
Master Class
- Prepare a square of thick white paper measuring 18x18 cm. The size of the box will be 6 cm.
- Draw the workpiece into 9 squares of the same size using a hook and a ruler.
- Cut the corner squares to create a cross.
- Lift the squares up to form a box.
- Prepare 10 squares of scrap paper measuring 5.8 cm.
- Cover the outside and inside of the box with squares.
- Make the lid this way: cut out a square of thick paper measuring 8.2 cm and 2 squares of scrap paper of the same size.
- Step back 1 cm from the edges of the square and make a crease (draw lines with a crochet hook).
- Make diagonal cuts at the corners, then cut the cut pieces in half as shown in the image.
- Fold and glue the corners, then secure with paper clips and wait until dry.
- Make a small bundle of paper, tie it with twine and attach it to the bottom of the box, also don’t forget to put or write a secret.
- Decorate the box to your taste by attaching various decorative elements.
The box with the secret is ready! I recommend watching this video!
New Year's surprise box
You will need: a scoring board, fantasy knives, scissors, a ruler, moment glue “Crystal”, PVA glue, scrapbooking paper, watercolor paper, acrylic plastic, Raffaello sweets, decorative elements - a snowman, a pom-pom and other decorations...
Master Class
- Prepare a sheet of white scrap paper measuring 21x26 cm. The size of the finished box is 5x10x4 cm.
- Make a scoring (draw lines with a non-writing object) along a side equal to 21 cm at a distance of 4;4;5;4;4; and on the side 26 cm – 4;4;10;4;4;
- Cut off the excess and assemble the box.
- Make the lid of the box in this way: take watercolor paper, make a crease by adding 1 mm to each side - 5.1; 4.1; 5.1; 4.1; + 2 cm for gluing (see photo).
- Cover the outside with scrap paper, glue it and try it on the box.
- Glue a strip of acrylic plastic to the back of the snowman and wait until it dries.
- Glue the snowman by the strip to the inside of the box and wait until it dries.
- Decorate the box to your liking, glue on a pompom and place the candies inside the box.
The New Year's surprise box is ready!
Men's box
You will need: black cardboard, gray leatherette, scrap paper, hat elastic and black eyelets, ruler, creasing tool (not a writing pen, crochet hook), chipboard (cardboard cutouts for decoration), sewing machine, black threads, glue, decorative an inscription, a gift set - a bottle of alcohol, a screwdriver, a pack of cigarettes, a morning-after pill or other...
Master Class
- Cut a rectangle from black cardboard for a box measuring 37x27 cm. Box height - 8 cm, bottom length - 23 cm, width - 13 cm.
- Cut a rectangle from cardboard for the lid measuring 27.2x17.2 cm. Height of the lid is 3 cm, length is 23.2 cm, width is 13.2 cm.
- Cut out the corners (8x8 cm squares) from a large rectangle.
- Punch and bend along the marked lines.
- Punch the lid of the box as shown in the image.
- Cut triangles near the corners of the lid and fold along the marked lines.
- Measure each side of the box and lid, then prepare pieces of leatherette according to the resulting dimensions.
Prepare parts from scrap paper in the same way, just make them slightly smaller than the leatherette parts. - Sew the leatherette and scrap paper parts together.
- Sew one of the rectangles to the front side of the lid.
- Glue one rectangle to the bottom of the box.
- Install the eyelets and attach the elastic as shown in the image.
- Cover the inside of the box with rectangles of scrap paper.
- Install holders from grommets and elastic bands for other gift elements.
- Glue the lid of the box and cover the outside of the box and lid with stitched rectangles.
- Fill and decorate the box with lettering and a chipboard.
The men's box is ready! I recommend watching this video!
Box with photos
You will need: a cutting mat, a stationery knife, scissors, glue, a ruler, a pencil, a crochet hook for creasing, scrapbooking paper, distress ink for tinting the edges, 8x9 photographs, decorative elements - ribbons, pom-poms, figurines...
Master Class
- The size of the finished box is 10x10x10cm.
- Prepare 3 squares of thick paper measuring 30x30cm, 29x29cm and 28x28cm.
- Make a crease by dividing each sheet into 9 squares. For the first sheet, step back 10cm from the edge; for the second 9.6 cm; and for the third 9.3 cm.
- Trim the corner squares of each sheet to create crosses.
- Cover the blanks with scrap paper, round and tint the edges.
- Glue three pieces together in the center.
- Make the lid this way: take a square of scrap paper measuring 20.3cm; retreat 2.5 cm 2 times on each side, make a crease as shown in the image, then make cuts along the dotted lines and assemble the lid.
- Glue the photos and assemble the box.
- Decorate the box to your liking and tie with ribbon.
The box with photos is ready!
Box with a surprise
You will need: 3 A3 sheets, black pastel paper measuring 50x65 cm, scrapbooking paper of 2 types (red and with flowers), Moment Crystal glue, pencil, ruler, red satin ribbon, mug, 4 candy bars.
Master Class
- Take an A3 sheet of paper and draw out the diagram of the box.
- Take another A3 sheet and redraw the side edges of the box.
- Take the third A3 sheet and redraw the diagram of the box lid.
- Cut out the parts from 3 sheets.
- Glue the side edges of the box.
- Fold the edge of the lid 2 times inside.
- Secure with glue.
- Cover the sides of the box with black pastel paper.
- Cut out a blank from black paper according to the lid pattern.
- Cover the lid with black pastel paper.
- Cut out 4 rectangles measuring 15x16 cm from black pastel paper.
- Cut 4 rectangles measuring 13 x 14 cm from red scrapbooking paper.
- Cover the inside of the box with black rectangles.
- Place a piece of red ribbon in each direction.
- Glue the red rectangles to the inside of the box on top of the ribbons.
- Cut out a 15x16cm rectangle from floral scrapbooking paper.
- Glue it onto the center base of the box.
- Cut a 13 x 164 cm rectangle from floral scrapbooking paper and glue to the lid.
- Place 4 bars on the sides and tie with ribbons.
- Place the mug in the center, lift the edges and close the lid.
- Decorate the lid with ribbon and tie a bow.
The surprise box is ready! I recommend watching the video master class!
Magic Box Ideas
Loading…
Source: https://svoimirukamy.com/magic-box-svoimi-rukami.html
Rectangular box
If you need to present a gift of a large size, then you should not purchase ready-made packaging. It will be much more pleasant for a person if the gift is in a homemade box, which will be in one original copy, compared to all the usual gift packaging.
The production of a rectangular box is carried out:
- from cardboard;
- from double-sided tape or glue;
- for production you will need scissors;
- pencil and ruler;
- various decorations that you like and are suitable for decorating the finished product.
Having collected the necessary materials and tools, we begin manufacturing. The manufacturing process begins with selecting and cutting out a template.
If it is not possible to print a template, you can draw and cut it directly on the selected cardboard. In this case, it is advisable to maintain dimensions and proportions.
The process of constructing a rectangular box:
Rectangular box
- We draw lines on the cardboard in accordance with the drawing in the photo and cut it out along the contour. Next you need to bend all the edges along the dotted lines. Since cardboard is a dense material that is difficult to bend, it is recommended to use something with a sharp edge for bending. This could be a pencil, a screwdriver, or even a nail file.
- After all the folds are made, and the shape of the box is obtained, in the places where the edges should be glued, apply glue or glue double-sided tape. Then we connect all the parts into a single structure.
- And so the box is ready, if a gift is to be given in it, then it needs to be decorated. To do this, you can use any decorating material you like.
The whole box is ready, you can put a gift in it and present it.
Complex models
The proposed MK will help you make different origami boxes for gifts. As a rule, a beautiful colored box with a lid looks especially attractive in this light. They can be of different shapes - from the classic rectangular to the shape of a heart. Compared to assembling simple classic models, folding them is somewhat more difficult, but with some skill, even a beginner can get a beautiful packaging box assembled with their own hands:
You can watch the video on how to make an original accordion box from modules.
A paper gift box is usually made from several squares. Each square is used to form one of the sides of the package, and then they are connected to each other, like modular figures.
Following the detailed schematic instructions, first you can try to make an ordinary rectangular box using this principle. It is made from 8 paper squares (it is better that they are colored on both sides): 4 squares for the base and 4 for the lid.
Packaging of any shape can be made using this principle. For example, an octagonal origami box also consists of 8 squares, but folding is somewhat more difficult than a rectangular one:
Using origami, you can decorate your gift in an original way. Beautiful gift wrapping, decorated with a rose, is also assembled from several parts. To understand how this rose is made, it is recommended to watch the video.
Round box
We've figured out the simple shapes of the boxes, now we'll tell you how to make a round box out of paper.
To make it you need to have:
- corrugated packaging cardboard;
- ruler;
- a simple pencil;
- a non-writing pen or similar object with a sharp edge;
- glue or double-sided tape;
- decoration elements.
Having collected the material, we begin production. The manufacturing process is performed as follows:
Round box preparatory stage
- We cut 4 circles from corrugated cardboard packaging, and 2 of them should have a smaller size;
- the circles are cut out, now you need to cut out 4 strips according to the size of the circles, one should be wide and the other narrow and preferably with a margin of length;
- glue the circles together; final stage
- take smaller glued circles (for the base) and glue a strip to them, so the base is ready;
- Now we use the same principle to make a lid from large circles.
Origami box with lid
The good thing about a cube box is that it consists of one piece and there is no need to assemble the lid separately. It’s also very easy to vary sizes because it’s based on regular squares and rectangles. You can make the tabs for the lid a little longer so that it does not open on its own. The main thing is to glue all the corner joints well along the entire length and press them until they set.
Photo: mycrafts.com
Photo: burdastyle.ru
How to make a paper rocket: 10 step-by-step diagrams
Cake box
Cake box
As you have seen, paper can be used to make not only boxes of simple shapes, but also gift boxes of original and more attractive shapes. We made a round gift box. Now we’ll tell you how to make a paper box in the shape of a cake.
It is much easier to make such a box using a template. For work you will need:
- thick paper or cardboard;
- glue;
- scissors;
- pencils;
- ruler;
- optional decoration.
The edges of the lid can be either wavy or straight, the color of the material is chosen according to the manufacturer’s preference. The size is also chosen by the manufacturer himself, but please note that the base of the box should be 3 mm smaller than the lid. To make a box of this type beautiful, it is recommended to first make the craft from plain paper, and then start making it from thick material.
Cake box making process:
Scheme for a cake box
- take the template and transfer it to the selected material;
- after transfer, cut out the blanks;
- along the dotted lines, since the material is of high density and is difficult to bend, use a credit card or a ruler for ironing;
- glue the bottom and top of the product at the joints.
The entire box is ready, you can decorate it if desired or necessary. Why are ribbons, beads, flowers and appliqués often used?
Cute bonbonnieres
Bonbonnieres are a special type of boxes. Bonbon in French means candy, and the name of the boxes comes from the word “candy bowl”. It is the bonbonnieres with candies or sweet dragees that the newlyweds give to their guests at the wedding - in response to congratulations. Ordering a bonbonniere to be made for each guest is not a cheap pleasure. But it won’t be difficult for the bride and her bridesmaids to make bonbonnieres in the style and tone of the wedding.
One of the simplest options
Elegant.
They resemble a box or a small chest. Just a little more difficult than the first ones. We make slits in them with a stationery knife, holes, if we want to pull in a ribbon or lace, with a hole punch.
Unusual and tasty.
As a rule, bonbonnieres are located on a special separate table and often on a dish or tray. You can beautifully play with this situation and make bonbonnieres in the form of pieces of cake. And you need to place them together, as if it were a paper cake.
First, we draw a large circle (the plane of the cake) and divide it into sectors in order to know the parameters of our pieces. Then, according to the dimensions, we draw a diagram of the development of the piece. We make the required number of developments, cut them out and glue them together. You can decorate before gluing, or after - it all depends on the idea of your decor.
This is what the undecorated cake should look like:
And here are the finished decorated cakes with bomboniere pieces:
Christmas tree box
New Year is considered a holiday where everyone gives gifts to each other. To beautifully present a holiday gift to friends or relatives, many people buy New Year's packaging. But why spend money on this if you can make a box in the shape of a Christmas tree yourself. This craft will be exclusive and anyone will like it. We will now tell you in detail how to make a paper box in the shape of a Christmas tree.
To create such a holiday box you need to prepare:
- green paper, but double-sided colored cardboard is better;
- hole pliers;
- Christmas tree template;
- square and ruler;
- scissors;
- pencil eraser;
- pencil;
- office glue.
To decorate the finished craft, you can use beads, rhinestones and other decorative elements at your discretion. Beads can imitate New Year's balls, rhinestones will act as New Year's lanterns. If you're lucky, you might be able to find a small star for the top in the craft department. The Christmas tree will become elegant and festive. By the way, you can involve a child in making it; he will be interested in it.
Manufacturing is carried out in this way:
Christmas tree box (Step 1)
- using a ready-made template, it must be transferred to green cardboard, but in such a way that there are ears on the sides, which are necessary for the symmetry of the craft;
- the bottom of the outlined template is the bottom of the box; (Step 2)
- turn the paper over and pass the template again to get the same pattern, it is advisable to use a square and a ruler;
- after that, cut out the pattern with scissors;
- erase the pencil;
- Glue the joints of the Christmas tree. (Step 3)
The Christmas tree is ready, all that remains is to decorate it and give it as a gift.
Heart shaped box
You can give such a box to your other half on a significant holiday for lovers. There are several manufacturing options, but it is more logical to try with the simplest ones. For the first one you will need a ready-made drawing.
Formation of paper product:
- Cut out the layout.
- Fold along the dotted lines.
- Secure the edges of the strip with arcs.
- The box is ready.
But there is one problem - attaching a large strip and bases - hearts. You can use glue, stationery tape (multi-colored), a needle and colored thread (suitable only for sewing dense materials), or you can add a layer of line with spikes that would hold the structure, as will be done in the second option.
The next model is an openwork heart with tight fasteners, how to make it:
- Draw an openwork or simple (at your discretion) heart and cut it out.
- Prepare a rectangular strip, the width of which is the height of the future box. Form “spikes” on one side. This strip should be enough for the whole heart. Cut out.
- Bend the “spikes” into one straight line, as can be seen in the figure.
- Glue them to the base (heart). If it is of a regular shape, then you can not deviate from the edge, but if it is curly, then it is better to leave a small distance.
- The box is ready.
You can also make a heart-shaped lid for it. It is enough to take a base slightly larger than the previous one, and a strip of a smaller width, literally 2-3 times. If you plan to put something edible there, then simply cover it with cling film and tie it on the sides with a beautiful ribbon or ribbon.
Special Occasion Box
Why did we call this box the “Special Occasion Box”? The fact is that her appearance is like a diamond. Just think about how nice it is to present a gift in the form of a tie to a man using such packaging material.
Special Occasion Box
Before making such a paper box, prepare:
- scissors;
- paper of any shade;
- sewing needle;
- ruler;
- glue;
- double-sided tape.
Let's get started:
- The first thing we need to do is print out the template. This is not necessary, you can simply redraw it. We will need two templates, one large, one smaller. You need to draw a template or print it directly on the paper from which the box will be made.
- Cut out the template using scissors. We place a map or ruler close to the resulting lines and carefully draw along them with a needle. You can use a special running tool.
- We need this running process in order to assemble the diamond into one whole during the manufacturing process. Please note that each line needs to be processed.
- Let's start assembling the structure. This step can be performed in several ways. You can treat the edges of the workpiece with glue and glue the first part of the figure; instead of glue, you can use tape.
- After gluing, iron the pressed lines again. The box is almost ready.
The interior design of the box depends on what kind of gift it will contain. If this is a ring, preferably on the bottom, put a layer of padding polyester and seal the remaining part. Our special occasion packaging is ready!
Fruit slices
The NataliDoma DIY channel presents a video that shows the process of making colorful cardboard boxes for candies. They look like pieces of watermelon and orange slices. The video tutorial will appeal to those who do not like obvious explanations from presenters - the process is simply demonstrated in detail. To work you will need colored cardboard, scissors, paper for making a template, a ruler, a pen and glue. If you make several crafts, you can fasten them with tape. The result is original packaging for a small surprise gift for any occasion.
Sunboy Box
Let's consider another option for making a box using the Sunboy technique. In the original version, this packaging was used as a container for sweets. Today, various pleasant little things are stored in this box.
For manufacturing we need a square sheet.
Manufacturing process:
- First, let's start creating a “pancake” (base). We fold the paper, then bend and unfold all the corners to class=”aligncenter” width=”1024″ height=”680″[/img] Sunboy box diagram
- Once again bend the shape into a triangle. We bend the right side and turn the workpiece over.
- Now you need to make a valley fold. This fold is called so because the fold is drawn away from the person. Then fold the triangle again. The fold in this case should protrude to the top.
- Without changing the position, straighten the workpiece and bend the side from right to left. Expand the layer on top. We repeat the steps indicated above, but on the other side. In this case, the side on the left should bend to the right.
- Fold all sides towards the center. We bend the top layer, making sure that the angles between the sides are 90 degrees.
If the instructions seemed complicated to you, use the visual instructions megamaster.info, you will see that everything is not so complicated.
Paper selection
Usually, square sheets of paper are used to work in origami technique. For simple figures, plain paper with a density of 70-90 g per 1 square meter is quite suitable. m. This is paper similar to that used in office equipment. A denser one is not very suitable, since the folds on it hold their shape less well. Very beautiful boxes are obtained if you use double-sided colored paper: it is quite thick, but the folds are well preserved and do not diverge. In addition, the inside of such a product will also be colored.
How to make a Carrot box
In this master class we will show you how to make carrots. But this is not an ordinary carrot :) Candies, sweets, toys, cosmetics, jewelry and other small gifts can easily fit into the middle of such a craft. Let's quickly start making it.
So, to make such a paper carrot, you will need:
Tools and materials:
- Scissors
- Hole puncher
- Printer (if possible)
- Thick orange paper
- Thick green threads
- Green fabric (felt will do)
- Transparent glue
Instructions:
1. On thick orange paper, print or hand-draw the carrot template we provided. The box template comes in two sizes.
Small carrot box template:
Large Carrot Box Template:
2. Cut out the resulting paper blank with scissors.
3. Fold the box template along the marked dotted lines.
4. Glue the gift box template together.
5. Make a hole in the upper parts of the workpiece with a hole punch.
6. Take a green cloth and cut out about five leaves. Tie them to green strings, and pull the strings through the hole at the top of the craft. Alternatively, you can also cut out an additional piece of green paper, write your wishes on it and attach it to the box.
Your original carrot box is ready. These gift boxes are great to make with your children. Place sweets together in the middle of a carrot and encourage your child to give the craft to their best friend.
Using these templates you can make not only a carrot box, but also gift boxes, invitations to a wedding or other celebration:
How to make a Lego box
A beautiful and original Lego gift box will make the gift you have prepared even more colorful. Today we will tell you how to make such packaging at home.
So, to make Lego gift boxes, you will need:
Tools:
- Ruler
- Pencil
- Scissors or utility knife
- Printer (if possible)
- Colored loose cardboard or colored printing paper
- Glue
- Scotch
- Carbon paper (optional)
How to make a Lego box: instructions
1. Print or hand-draw the template for the future box below. If you want your gift boxes to be more dense, then transfer the printed blank onto cardboard using carbon paper.
Lego box template:
2. Using scissors or a stationery knife, cut out the workpiece.
3. Fold the box template along the dotted lines.
Helpful advice:
To make the folds even, use a ruler. Apply it to the fold and bend the part you need exactly along the ruler.
4. Glue the two outer parts of the box, and simply fold the rest inward.
5. Cut out circles of the same size (several pieces per protruding part), and glue them on top of each other on the top of the Lego.
6. Open the side cover of the package and place the gift. The bottom cover on the opposite side can be sealed with tape or glue. This will prevent the gift from possibly falling out.
That's all, the original Lego surprise box is ready!
Of course, you can experiment with its size, although small Lego gift boxes are easier to make. For a larger box you will need a large sheet of cardboard, but it is not always easy to find. Be that as it may, now you know how to effectively wrap a children's gift.
How to decorate
How to decorate this origami? A surprise box must be decorated. To do this, you need to use your imagination. Using twine, you can decorate the cover of a souvenir by securing the material around its perimeter. Figures can be made from polymer clay. They should be glued to the lid of the box.
You should cut a square out of a sheet of paper and roll it into a tube, and then wrap it with twine. Attach a money holder to the bottom of the box. The gift is ready. The outside can be decorated with 3D appliques, such as flowers and butterflies. You should write your wishes inside on each side of the box.
You can decorate such a gift with a photo of the birthday boy. What to put in such a box? In such a gift you can put money, neatly folded and tied with a ribbon, a certificate from a salon or cosmetic store, and all kinds of jewelry.
Gift boxes in the shape of a flower “Bud”
Who among us doesn't like surprises? In this master class we will look at another option for gift boxes that you can make yourself without any special skills. As a result, you will get such an exclusive copy of gift packaging - a kind of box with a surprise.
To make such a box in the shape of a flower, we will need:
Tools materials:
- Printer
- Pencil
- Ruler
- Scissors
- Gift paper
- Foam sponge
- Stamp pad or colored ink
Instructions:
1. Print on paper or draw by hand our suggested box template.
2. Cut out the box template.
3. Using a ruler, bend the cut petal edges along the dotted lines towards the center.
4. Turn the paper box template over to the front side. Using a foam sponge or stamping pad, tint it around the edges.
5. Place the gift inside and gather the petals of the flower box at the top.
That's all. Your surprise gift box is ready. These gift boxes are suitable for almost any celebration.
Features of the decor of wallpaper boxes
A variety of finishing options allows you to maintain the interior of the room in the same style. For decoration, different types of wallpaper are used: non-woven, paper, vinyl. Combinations of patterns and ornaments, selected in a single color scheme, give excellent results.
Advantages of wallpapering boxes:
- available materials;
- you can get by with leftover wallpaper after renovation; there is no need to buy it specifically;
- supports the texture of the walls and the interior of the room;
- attractive appearance;
- simple work, accessible even to a schoolchild;
- The work process is simple and fast.
Where to apply
Shoe boxes are widely used for storing small items.
Decorated organizers displayed on open shelves attract attention and give the interior additional charm.
Organizers store:
- Kids toys;
- costume jewelry;
- cosmetics;
- stationery;
- textile products;
- shoes;
- magazine selections;
- tools;
- household chemicals.
Large capacious containers allow you to store large toys. Shoe cabinets - hold puzzles, construction sets, puzzles.
Textile products such as towels, underwear, socks, shoes are placed in small cardboard boxes covered with wallpaper. The organizer is divided into segments to make it convenient to pull items out of it.
Small cardboard boxes are suitable for storing women's accessories, sewing supplies, materials for needlework and creativity. It is ideal to place jewelry in them.
Advice! For convenient arrangement of skin care products, the boxes can be divided into sections.
Organizers can store various accessories for:
- decoupage: napkins, glue, varnish, brushes;
- drawings: album, pencils, markers, paints and brushes;
- kitchen cleaning: sponges, scrapers, cleaning agent and detergent;
- washing things: bleaches, rinse aids, soap, powder;
- disinfection of the bathroom: for cleaning the toilet, rags, gloves, etc.
Advice! To store chargers, a box is built in which the carrier and power supplies are placed. Plugs are inserted into sockets, and cords are threaded into pre-prepared holes, this will help maintain order.
The holes are reinforced with plastic rings
Manufacturing process
The box template will allow you to make a beautiful gift for your loved one much faster. To make it, you need to cut out a square from colored cardboard, the sides of which are 27 centimeters. After this, it is worth dividing it into 9 zones. These will be neat squares with sides of 9 centimeters. The corner parts should be cut off. After this, it is recommended to bend the workpiece along the lines using a regular ruler.
On the second sheet of A3 red cardboard, draw a square with sides of 21 centimeters. It also needs to be divided into 9 parts. The squares in this case will have sides whose length is 7 centimeters. The corner parts should be removed and everything should be folded along the lines.
It is worth making another blank from the third sheet of red cardboard. On it you need to draw a square with sides of 18 centimeters, and then divide it into 9 squares with sides of 6 centimeters. After this, it’s worth making another preparation. The initial square should be drawn with sides of 15 centimeters. You need to do all the manipulations with it, as with the previous blanks.
How to make a box in the form of a bag
Each of us loves to both receive and give gifts. But it is not always easy to choose suitable packaging for them. In this master class we want to show you how you can make bright gift boxes and bags from paper. Such a beautiful bag-bag, or, as it is also called, a bag-box, will be a wonderful addition to a small gift.
To create paper bags you will need:
Tools and materials:
- Scissors
- Printer
- A4 paper
- Double sided tape
- Satin ribbon for decoration (optional)
Helpful advice:
Choose a thick paper to use, such as drafting paper, card stock, watercolor paper, or photo paper. The density should be from 140 to 280 g.
Instructions:
1. Copy and print the gift boxes you like.
Helpful advice:
For this step, it is most convenient to use the Word program, since you can always adjust the dimensions in it. These color templates should fit on A4 paper.
How to make a Heart box
Such a heart-shaped box will not leave anyone indifferent, because it speaks for you about your feelings.
Let's take a closer look at how to make a “Heart” gift box with your own hands. We will need:
Tools:
- Scissors or utility knife
- Ruler
Materials:
- Colored cardboard
- Glue
How to make a box - a heart: instructions
1. Print the box template on colored cardstock and cut it out
Box - heart (template)
2. Fold the box template along the lines. A flat ruler will be a good helper for this.
3. Apply glue to the edges of the workpiece and glue the box, first leaving an open part so that you can put a gift inside and close it
The heart-shaped gift box is ready!