Simple airplane made of A4 paper
Take a sheet of A4 paper - regular thin printer paper will do. Mark the central vertical and bend the upper corners towards it to create a “house”. Bend the corners towards the center again - now larger, so that they reach almost to the bottom. Fold the figure in half and bend the wings of the airplane along the line where the corners meet.
Photo: rci76.ru
Airplane with a beak
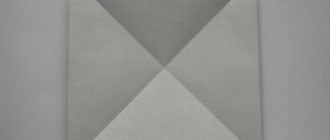
Unfold a sheet of A4 paper horizontally and mark the middle. Bend the corners to the center once, and then a second time - you will get the same blank as for the simplest airplane. Fold the shape in half so that the sharp tip protrudes slightly beyond the straight base.
Bend the corners of the trapezoid again so that their straight sides meet exactly in the middle. Fold the figure in half with the flat side inward, bend the head-beak down and spread the wings to the sides. If you color this airplane, it can easily turn into a bird of prey.
Photo: dnevnikmastera.ru
Children's plane
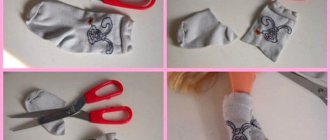
You will need: cocktail tube, colored paper, scissors, tape with a pattern.
Master Class
- Cut 2 strips of colored paper.
- Shorten one of the strips slightly.
- Connect the ends of each strip and secure with tape. You should have 2 circles.
- Attach the circles with tape on different sides of the cocktail straw as shown in the image.
- Send the structure into flight.
A children's airplane made from paper and a cocktail tube is ready!
Wide paper plane
Place the A4 paper with the wide side facing you and mark the central horizontal line. On one side, mark both quarters, and bend the other in half vertically. Raise the lower right corner up to the first marking line.
Lower the upper right corner so that they neatly meet diagonally with the lower part. Bend the sharp nose towards the center and wrap the protruding tip of the upper wing around it to secure it. Fold the piece in half, unfold the wings of the plane and, if desired, paint them with spectacular stripes.
Photo: pinterest.at
8 best schemes for how to make a box out of paper
Swallow plane
Take a rectangular sheet of paper, unfold its wide part towards you and fold the diagonal of the conditional square on one of the sides. Fold the second corner so that the base coincides with the base of the future triangle. Fold the top of the triangle down in the middle and turn it up again after about a centimeter. Fold the figure in half with the even part facing inward and spread the “swallow” wings.
Photo: c-deco.ru
Airplane with a reinforced nose
The advantage of such a paper plane is that it does not have a sharp nose, which instantly crumples at the first collision with a wall. Unfold the A4 sheet vertically and fold the top corners towards the center to create a “house”. Fold the “house” in half with the top of the triangle pointing straight towards the base.
Fold the upper corners of the rectangle down, but slightly at an angle: there should be a distance of 1-2 cm at the top, but the edges converge at the bottom. Press these edges with the corner of the top of the “house” and iron this fold well. Fold the figure in half and bend the airplane's wings at an angle from nose to tail.
Photo: novamett.ru
Basic rules for modeling
Paper airplanes are not just a toy for children.
In Japan, there is a separate direction of origami for folding various types of airplanes from paper - arogami. World championships in flying paper crafts are held annually. Even a special set of rules for modeling airplanes has been developed.
You can assemble a toy from any piece of paper. But it is worth considering:
- The thicker the paper, the better the plane will stay in the air.
- It is best to make an airplane from an A4 sheet of paper.
- The toy is assembled using the origami technique without the use of improvised materials: glue, paper clips, tape.
- In order for the craft to stay well in the air, it is necessary to maintain symmetry.
- The shape of the toy largely plays a role in the flight range.
- Long, narrow models with short wings fly further and better than large, wide crafts.
Airplane with "ears"
This airplane is almost no different from a regular airplane in terms of complexity and structure, but it looks more interesting. Turn a sheet of A4 paper with the narrow side facing you and fold the upper corners into a “house”. Turn the workpiece over to the reverse side and fold the corners towards the middle again. This is precisely the main difference from the standard pattern, where both bends are made in a row on one side.
Straighten the upper part of the narrow triangle into a diamond, as in the diagram, and fold it in half downwards. Bend the corner back like a “ladder”, fold the figure in half and form wide wings with a slight slope. Such an airplane looks interesting from colored paper due to the color transition in the nose.
Photo: redbull.com
How to make a paper rocket: 10 step-by-step diagrams
Place to work
Naturally, for such work it is necessary to have a suitable place. However, it is worth noting that size in this case is not critical.
A light single-engine aircraft, for example, can be built in a basement, trailer, shipping container, etc. A great place would be a double garage. In many cases, even a one-person garage is enough, but this is provided that a separate place is planned where finished aircraft components such as wings and other parts can be stored. When considering how to build an airplane yourself, many believe that a city hangar, for example, is a suitable place. In fact, this is far from the case. Firstly, few people live close enough to such a building. Secondly, airplane hangars are places where there is often a lack of light. In summer, it is much hotter in such buildings than even outside, and in winter, on the contrary, it is colder than outside.
Another important note from specialists and those who have already dealt with the question of how to make a flying airplane is the arrangement of the workplace. It is recommended to spend money on purchasing all the necessary things that will make work more convenient and comfortable. You can take care of a simple climate control system, get a workplace that will suit your height, lay rubber carpets on the floor, etc. High-quality, complete lighting of the entire workplace plays an important role. All this will require spending a certain amount of material resources, but when working on such a serious project they will more than pay for themselves. In other words, we can say that everything you need should always be at hand, then construction will be much easier.
Fighter aircraft
Turn a rectangular sheet of A4 paper with the narrow side towards you, place the upper corners towards the center, and then again. Fold the figure in half so that the top of the triangle touches the base of the sheet. Turn the hexagonal blank over and fold the corners towards the center again - you get a heptagon.
Bend the top of the workpiece down so that it lies on the same straight line with the bases of the corners. Straighten up the narrow long nose that remains on the back side of the figure. Fold the paper fighter in half and fold the wings in straight parallel lines.
Photo: keywordsbasket.com
Origami airplane
You will need: a white sheet of A4 paper.
Master Class
- Pay attention to the symbols in the image: the blue line shows where the fold needs to be made, the green arrow shows the direction, and the red dot indicates the place where the paper will end up after folding.
- Fold a piece of paper in half lengthwise, then unfold it.
- Fold the top corners towards the center.
- Fold the top folded part down.
- Fold the top corners into the center.
- Raise the center corners up, then lower their halves.
- Pay attention to image 7 and check that everything matches your plane.
- Fold the center corner up.
- Fold the plane in half lengthwise.
- Form the wings of the airplane as shown in the photo instructions.
The origami airplane is ready!
Airplane with curved wings
This airplane resembles the previous one, but the shape of the wings is slightly different. Turn a sheet of A4 paper towards you with the wide side and fold the corners towards the middle once, and then a second time. Fold the workpiece in half so that the narrow apex of the triangle protrudes a couple of millimeters beyond the base.
Turn the hexagon over with the flat side up and fold the corners towards the center again - you get a heptagon. Fold the top down and turn the lower narrow nose to the same side, as in the diagram. Fold the piece in half, unfold the wings, and then bend the edges on them 90 degrees upward.
Photo: mld-mobile.ru
Space fighter
Making a paper fighter in the spirit of your favorite space saga is not at all difficult, but there is an interesting feature. Turn the A4 sheet with the narrow side towards you and roll the top part into a “roll”, as in the diagram. And only then bend the upper corners to make the usual “house”.
Turn the piece over with the flat side facing you, fold it in half and place it up inside the edges of the triangles on both sides. Turn the figure over onto a wide base, bend the upper part from corner to corner and fold the lower right corner inward. Lower the bases of the wings down 90 degrees, and then lift the edges back up another 90.
Photo: labirint.ru
How to weave a bracelet from rubber bands: 8 best patterns (video)
creative airplane
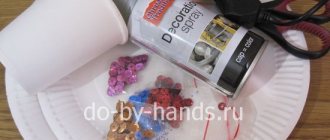
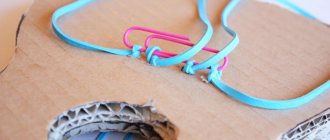
You will need: a large cardboard box, pieces of cardboard, a sharp knife, scissors, a ruler, a pencil, a plastic bottle, red spray paint, round foam rubber, tape, a black marker.
Master Class
- Draw 2 rectangles on the surface of the box, then cut them.
- Cut 2 rectangles in the same way on the other side of the box.
- Cut 3 holes in the back of the box for the tail of the plane: one hole vertically in the center, and two horizontally on the sides.
- Prepare cardboard rectangles and insert them into the tail holes.
- Cut holes horizontally on the sides of the plane for the wings.
- Prepare 2 cardboard rectangles and insert them into the side holes as wings.
- Cut a circle from the foam rubber and attach it with tape to the airplane wing as landing gear. Attach the second circle to the other wing in the same way.
- Draw 2 airplane controls on cardboard, decorate them with a marker and cut them out.
- Tape the steering wheels to the boxes as shown in the image.
- Make a screw from cardboard and a plastic bottle.
- Cut a round hole at the front of the plane and attach the screw.
- Disassemble the plane into parts.
- Spray paint the plane and all its parts.
- Wait for it to dry and assemble the plane.
The creative plane is ready! Children will really like this toy. I recommend watching this video!
HOW TO MAKE A MILITARY PLANE SU-35 FIGHTER WITH MISSILES FROM A4 PAPER GIFT FOR FEBRUARY 23, 2022 Watch this video on YouTube
Crane plane
Place the A4 paper with the narrow side facing you and fold the top corners towards the middle. Fold the “house” in half and unfold the part with the fold upward, and turn the triangular top inward to form a kind of beak. At the same time, bend the edge of the “beak” to the side and lift the wing up to get a figure like in the diagram.
Turn the workpiece over and do the same on the other side so that all the lines match. There will be an inner corner in the square part that needs to be straightened downwards and outwards. Raise your neck and form the head of a crane from a narrow triangular part, and form the wings with a “ladder” down and up.
Photo: labirint.ru
What materials and tools are needed
For this craft you will need a minimum set of tools and materials. For a variety of designs, glue, plasticine, paints or pencils can be useful. The most important thing is to prepare paper or cardboard; there are models made of thin cardboard. You will need colored or white A4 paper.
The tools you will need are a stationery knife or scissors, a ruler, and a simple pencil. With such a small set, you can start creating all kinds of models of flying airplanes.