What leaves are roses made from?
For an autumn bouquet, it is recommended to choose wide, not hard leaves:
- maple;
- linden;
- birch;
- viburnum;
- chokeberry;
- poplars.
In this case, the foliage should be intact, without obvious damage, and not dry. The material must be malleable and easily take a new shape. The leaves must be aesthetically beautiful: the same or similar color shade, so the color scheme of the bouquet must be thought out in advance.
Procurement of natural material
How to make a rose from leaves so that it lasts for more than one day - prepare the material correctly:
- wash the leaves;
- place on a towel;
- Dry a little to drain off excess water.
The main thing is not to dry out the foliage. Otherwise, it will break and become deformed when creating a rose.
What are standard roses?
A rose on a trunk is the implementation of an old idea, successfully implemented in different cultures. They were first received at the end of the 18th century. Standard varieties also include currants, gooseberries, raspberries, lilacs, and various ornamental and fruit trees. They are formed according to one principle, which we will now talk about.
The standard rose consists of two parts:
- base-rootstock;
- scion part in the form of a varietal rose.
As you already understand, to obtain standard roses you need to be vaccinated. But don't let this scare you. We wrote in detail about grafting roses here, and in general about grafting trees and shrubs here. Their principles and rules are similar for different crops. Therefore, if you have grafted something at least once in your life, creating a rose on a standard will not be difficult for you.
If you have only heard about vaccinations, having never tried anything like this, it will be a little more difficult for you (after all, your first experience...). But in this case, there is absolutely nothing to be afraid of. Trust the experience of the author of this article - when you really want it, you take it and do it. Imagining the future result and being inspired by the opportunity to create beauty with your own hands, you intuitively do everything right.
Standard roses can have different crowns:
- regular (in the form of a bowl or ball);
- weeping (with branches hanging down).
They are created by grafting various types of roses onto rose hips:
- hybrid tea;
- ground cover;
- curly.
Weeping forms are obtained by grafting climbing varieties. Their branches naturally fall down, without requiring additional work (unlike ordinary trees, which are forcibly given this shape - we wrote about this here...).
In terms of height, standard roses can belong to one of four groups:
- to miniature - the shortest of the trunks, also called dwarf (40-50 cm);
- to semi-standard ones - they represent an average height option (60-70-80 cm);
- for standard ones - tall standard forms (100-110 cm);
- to weeping ones - the highest of the standard forms, which are also called cascading (120-170 cm).
Each group involves grafting a certain type of rose. Thus, dwarf varieties can be obtained by taking miniature and small ground cover varieties for grafting. Semi-standard - selecting representatives of the floribunda or patio group. Standard - using hybrid tea varieties, and weeping - climbing or ground cover roses.
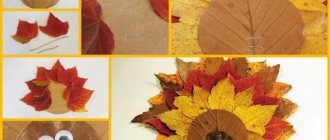
From maple leaves
For roses, it is better to choose large maple leaves; too small ones will not work. Within one bouquet, the color scheme of the buds may differ, but for one rose it is recommended to select leaves of the same tone.
Step-by-step instruction:
- Creation of the core. The first sheet is folded horizontally in half, leaving the front side on the outside. They roll it up tightly and hold it tightly with their fingers, but do not fix it with anything yet.
How to make a rose from maple leaves step by step - Creating petals. Place the whole sheet face down on the resulting core. Bend it horizontally so that the stamen is 1–1.5 cm below the bend, and iron it well. The remaining protrusion is also bent, but not smoothed. The side parts of the maple leaf are wrapped around the core, as if wrapping it in a blanket. The remaining edges are pinched at the base.
- Creation of the second petal. Take another leaf and do all the same steps, but place this petal on the opposite side. Fix the petals with a thread at the base.
- Creating a bud. Add the required number of maple leaves until the bud size is sufficient. The main thing is not to forget to fasten the petals of the future rose with a thread at the base so that the entire bud is strong and does not fall apart.
- The number of buds determines the size of the bouquet. When all the buds are ready, they can be tied with a beautiful ribbon or decorated with maple leaves.
The shape of the wedge leaf allows you to form a flower in another way:
- the core is made as in the previous version;
- take the sheet and bend its central part inside the wrong side;
- wrap the core with this sheet so that the edge of the previous sheet falls in the middle of the next one;
- continue to form the bud until it reaches the desired size;
- The base of the flower is fixed with thread.
From chokeberry leaves
Chokeberry leaves turn red and brown in autumn, making them suitable for creating bright bouquets. On average, one bud takes 19 leaves, but it is better to have a small supply of them. In addition to the leaves themselves, you will also need a small twig (twig) from the same tree.
How to create a rose from chokeberry leaves:
- Core twisting. Take a small twig and wrap it with a leaf, with the front side facing inward. The base of the core is held with your fingers.
- Creating petals. Take the second leaf and bend it around the stamen, then take the next leaf, gradually forming a bud. The front side of the leaves faces the core.
- Creating a bud. When the flower has reached the desired size, its base is fastened with thread or wire. The rose petals are folded back, fluffing the resulting flower.
- The branches located at the base of the core allow you to form a bouquet that can be placed in any convenient container.
From birch leaves
Birch leaves, both in shape and structure, are well suited for creating roses. For one bud you will need to collect 7-8 leaves of large, medium and small sizes. The color scheme of the material should match, while the soft yellow leaves will allow you to create original tea-colored roses.
Flower making technology:
- The sharp tip is cut off, giving the leaf a rounded shape.
- Several leaves (4–5) are folded so that one slightly covers the other. Roll them up into a roll - the stamen of a flower.
- First small, then medium, then large birch leaves are placed in a circle around the core, with the front side inward, thus forming a bud.
- To make the composition strong, the base of the bud is periodically fixed with thread.
- Finally, the edges of the petals are folded back, which gives the flower a more finished and natural look.
- Decorate the rose with any green leaves.
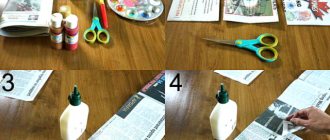
Go
For production you will need materials:
- block 5050150 (1 pc.);
- board 10015450 (2 pcs.);
- carpenter's glue 50 g;
- steel wire (0.5) 150 mm;
- sandpaper;
- paint (you can use any: nitro, watercolor, oil, polyester, polystyrene, polyurethane).
Tool:
- cutter;
- jigsaw (school one is enough);
- hacksaw (can be used for metal);
- bullet gun (you can make it homemade).
1) Cut out a flower bud from a block. To do this, we round the block, not necessarily perfectly. Measure 55 mm on the block. this will be a bud, hold the workpiece by the rest. Next you need to cut out the shape of the bud. Then, draw three petals (enough) and cut out according to the drawing. It remains to show how the petals curled up inside the flower. To do this, you need to cut the end of the block. We drill a small hole in the base for the stem. Sand the workpiece, the flower is ready.
2) The stem can be made from glazing bead. I cut the stem out of a piece of wood using a jigsaw. At the same time, it is better to bend it a little for a more natural look. Afterwards, it needs to be planed with a cutter, giving it a round shape. The stem can also be sanded and can be glued into the bud.
3) Draw leaves on the board so that the length of the cutting is 1.5-2 times longer than you need. All sizes are arbitrary, so see for yourself. So that all the details look harmonious. Next, we cut out the leaves and cut them with a cutter. We also sand it.
4) Now the leaves need to be carefully glued to the stem. You can use a clothespin for this. The glue is the same. Cut the leaf cuttings to length so that the product looks realistic.
5) On the second board we draw the outline of the stand. You can draw anything, the main thing is that you can cut it out later. Of course, we sand it and, having smeared the stem with glue, we attach the flower to the stand with small glass nails. Before hammering in the nails, you need to bite off the caps with pliers and drill the stem at the attachment points so that the nails do not split it.
6) There are a great many painting options, I’ll tell you how I do it. And if you don’t like it, you can find others on the Internet. To begin with, I paint the bud with red, opaque, nitro paint. Stem with leaves stained (stained oak or larch). I leave the stand in a natural color. Contrast “emphasizes” the appearance of the product. After the paint and stain have dried, I sand the surfaces with fine sandpaper (automotive, waterproof, number 800, 1000, 1200). Now you need to prime the entire product (nitrovarnish (transparent) or XB).
After drying, sand again (number 1200, 1500, 2000). The final coating can be done with the same varnish. I use oil varnish. The surface is glossy. It really takes a day to dry.
Well, your work of art is ready. This flower will never wither, and if you correctly attach some kind of flavoring to it, it will also be fragrant. Bye.
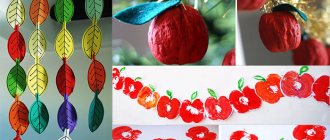
From leaves of different trees
When autumn has just begun and there is not much yellowed foliage yet, a flower can be made from leaves of different tree species.
To create the composition “Rose in a Pot” you will need the following materials:
- bright, beautiful, preferably large leaves (loach, maple, aspen or any other) - 15–20 pcs.;
- green maple leaves - 2 smaller, 3-4 larger;
- juice straw (medium size);
- a twig (twig) with leaves in diameter slightly smaller than the juice tube (the tube should fit over it);
- elastic bands for weaving;
- Double-sided tape;
- PVA;
- Polish for hair;
- rose pot;
- plasticine or modeling mass (for fixing the rose);
- earth or ground pine cones.
Step-by-step master class:
- Place the tube on the future stem and measure the size so that the bud holds well and does not dangle on the branch.
- Take two leaves, cut off the uneven edges to make petals, and wrap them around the tube with the front side facing out. Tuck the edges so that the hole from the tube is not visible.
- To form the petals, cut off the remaining leaves and apply them to the core with the front side inward, so that when you bend the leaf, its beautiful part is visible. The edges of future petals are folded.
- Each leaf is secured with an elastic band for weaving. Form a bud of the desired size.
- Place the tube with the finished bud on the twig; if the flower does not sit tightly, then PVA can be poured into the tube.
- A receptacle is made from green maple leaves. A larger leaf, leaving the upper teeth, is cut in a semicircle along the bottom. The receptacle is attached to the base of the bud with the teeth facing upward and secured with an elastic band. A strip with a gradual narrowing is cut out of another sheet, attached to tape, and then the flower is wrapped, hiding the elastic band and the uneven protruding edges of the receptacle.
- Fix the finished rose in any beautiful pot, fixing it with plasticine or modeling mass. Decorate the top of the pot with earth or ground pine cones.
- Carefully treat the rose and stem with hairspray, which will allow it to retain its original appearance.
Types of plywood
The characteristics and properties of plywood depend on the type of wood used to make it.
Different types of plywood may have different service life, cost, moisture resistance class, and number of layers.
Plywood can be regular or laminated, with or without defects.
There is structural plywood, plywood for industrial production, for construction, for making furniture, for packaging.
Based on the raw material, plywood is divided into coniferous and hardwood.
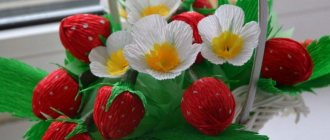
Making bouquets from natural materials
The resulting buds can be arranged into beautiful bouquets:
- Maple roses are decorated with large leaves of the same tree, and the color scheme can be very variegated and differ from the color of the buds. To make the leaves even and beautiful, they are ironed, placed between sheets of paper. The prepared leaves are carefully wrapped around the maple buds and secured at the base with a thread. You can decorate the place of fixation with adhesive or rag tape of a suitable shade.
- The flower arrangement will look good in a “vase” made of natural material. For this, half a pumpkin, previously peeled and dried, or a basket woven from newspaper tubes is suitable. You can supplement the composition with bunches of rowan berries, cones, and leaves of other trees.
- If you attach stable cuttings from twigs (branches) to the buds and wrap them with adhesive or rag tape of a suitable color, then such a bouquet can be placed in an ordinary tall vase, decorating it with sprigs of asparagus, bergrass or gypsophila.
How to keep a bouquet of leaves attractive
How to make a rose from leaves is described in detail in the master classes. One more question remains: how to preserve the freshness of the bouquet, because natural material dries quickly and loses its shape.
Experts share the following recommendations:
- pre-soak the foliage in a solution of water and glycerin in a ratio of 2:1;
- lubricate the finished buds with any vegetable oil, and you can add a drop of your favorite essential oil;
- treat the flowers with acrylic or any other construction varnish; you can use gold or silver spray paint;
- Spray the flower arrangement generously with hairspray.
You can also create roses from autumn leaves. This bouquet will help decorate the interior of your home or a themed party. The main thing is to choose the right material, choose the execution technique and turn on your limitless imagination.
Article design: Vladimir the Great
Materials and tools
Working with plywood involves the use of a large number of tools and materials. It is better to take care of purchasing them in advance. During creative work, nothing should distract from what you love.
Even more instructions will be provided by the handicraft portal: https://podelunchik.ru.
We will need:
Note!
Craft letter - TOP 120 photo reviews of craft letter. Simple diagrams + step-by-step DIY instructionsCrafts made from nut shells: the best step-by-step master classes on creating DIY crafts with photo examples of finished works
Mushroom craft - reviews of ready-made DIY crafts + step-by-step instructions and diagrams for children (180 photos)
- Jigsaw;
- Electric drill;
- Drills of different thicknesses;
- Stationery for drawing up drawings - ruler, pencil;
- Drawings and stencils;
- Scissors;
- Glue;
- Vise;
- Miter box;
- Grinder machine;
- Various files;
- Awl;
- Burnout device;
- Fastening fittings;
- Varnish;
- Dye;
- Decorative elements.