Main types of handles for 19 l bottles
The following options are known on the market:
Handles made of polymer/plastic materials. This is a compact handle specifically for transporting standard-shaped 19-liter bottles. The product fits comfortably in the palm of your hand and has grooves that allow your fingers to rest comfortably. And the special bend allows you to significantly reduce the load on the hand.
The rubber handle, made of rubberized plastic, is also designed to be used as a carrying device for 19-liter bottles. Its design ensures a strong fixation on the neck of the container, preventing the container from falling, even when filled to the top with water. The bend of the handle is made according to the general scheme, as in the model described above.
The shape of rubber-based holders can be curved or flat. The superiority of rubberized handles for plastic bottles over polymer ones is obvious - increased tenacity, lack of slipping. This gives significant benefits at elevated temperatures, when your hands get wet from sweat, as well as at low temperatures, when the plastic slips when gripping in the cold. Also, on the plastic bottle itself, rubber-based holders are fixed tightly and do not move.
Materials and tools
Wrapping a knife handle with paracord does not require any special knowledge or tools, and the materials will be affordable for everyone. So, for work you will need:
- knife;
- paracord cord;
- scissors;
- lighter;
- scotch;
- insulating tape
- vice.
How to choose paracord
To answer this question correctly, you should remember why paracord is used these days. First of all, it is a strong and lightweight rope. Secondly, due to its design features, it is used not only in this capacity, dissolving the base. Thirdly, many useful and fashionable things are woven from paracord, since its range of color shades is very diverse.
What does it mean to “choose correctly”? This means a product that can be used in many ways. And for each of them it will be the most suitable. The most popular products these days are the products of the American company ″Rothco″. It is labeled as “550 Paracord” and is considered a kind of standard. Needless to say, there are many more counterfeits of it than high-quality products. So the places to purchase it need to be chosen with no less care.
550 Paracord.
As a cord it is very durable. After all, it can withstand a weight of about 250 kg. Although it is not used in mountaineering, it is excellent as a passive insurance for all types of tourism. The shell is made of 32 intertwined nylon threads. It contains 7 cords woven from nylon. Each has three threads.
Those who are eager to purchase Chinese paracord should take into account that most Asians use polypropylene instead of nylon, and the core laces are woven from only two threads. Therefore, such paracord can withstand, at best, no more than 165 kg (or even less).
Homemade rope handle for a plastic bottle
In the future you get lots of DIY projects from them) ************************************** ********************** Welcome to my channel Roman Ursu where you can learn how to make hand made crafts, New Year crafts, presents, toys, Halloween scares. The main thing is that you can make it at home and with one's own hands. Are you interested in handiwork, crafts or you just have nothing to do, don't you? If yes, you are on the right channel. Here you can find lots of crafts, hand made items. The main thing is that they are made of materials at hand and they are low cost. **************************************** ********** The main channel: youtube.com/user/romanursu My second channel: youtube.com/user/romanurs… Vkontakte community: vk.com/club59870517 Odnoklassniki.ru community: odnoklassniki.ru/ romanursu
Popular articles Origami paper bow: step-by-step instructions with video and diagramAttention! Be careful and don't try this at home. The isn't responsible for your actions and the video is for entertaining purpose, but not for teaching purposes and is not call for an action! ATTENTION!!! — my channel is for decent people only. I will BAN users for swear words, both in shortened and disguised, insults and trolling!!!
Creation sequence
The idea is to make 2 outer bottom corner brackets that match the width of the box and attach them to a rope for lifting from a better position.
Step 1: Convert Aluminum to Bracket. This piece was originally from an old gutter and was 44cm long, so my husband cut it into 2 pieces, sawed it and rounded the edges. First, he made slits in the corners so the rope could catch and remain stable during the climb.
Step 2: Cut out the handles. My husband made handles from a 10 cm long plastic tube.
I made a bevel on the inside so that the rope would not fray.
Step 3: Twist the rope. The husband made a large ring of two handles, chose an arbitrary length of rope, but approximately so that the handles were at knee level when the person was ready to climb.
Step 4: Fold the corners so that the lace fits into place. The husband took a piece of round iron and bent it with pliers and a hammer. When he used the rope in the modified channel, it did not slide easily.
Step 5: Lacing at the corners. The husband pulled the rope through the corner of the first stirrup. He added a handle and then tied the other side. I brought the end to the second corner bracket and repeated. Make sure they are aligned correctly so that their sides are facing each other.
Phase 6: Ascent and Observation. For some reason, the smaller, heavier box was harder to balance with this version. He compensated by wrapping rope around the top corner of the box. These pieces were 22 cm long. I think it would have been better if they were wider.
Water coolers.
Water coolers are modern specialized devices that combine functions such as heating and cooling of clean artesian water, which is packaged in containers. It should be noted that the coolers are quite compact in size and do not take up much space even in small office or residential premises. A classic cooler looks like this: a bottle of water is installed on top of the equipment; in most cases, this is a container equal to 19 liters, which can very quickly be changed to a new bottle.
Unlike a cooler, a pump is a classic pumping device that can be used to pump water from large containers. Today, pumps come in two different types: electrical and mechanical. Mechanical pumps operate under human influence, such as hand pressure. If we talk about electric pumps, they can operate from an electrical network and from AA batteries.
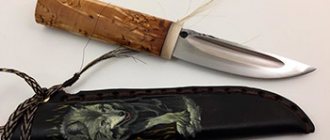
Weaving pattern and process
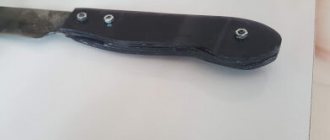
There are many ways to wrap a knife handle with paracord. The most popular and not difficult is the criss-cross winding technique. It is performed as follows:
- Measure and cut a piece of cord. It should be four to five times longer than the handle. The excess can be cut off after coiling. Place the handle in the middle of the cut piece.
- The next step is to wrap the left end. It needs to be wrapped around the top of the handle and passed under the right end. In the process, directing it downwards away from the blade. Both edges should form a pellet across the handle.
- Let's take the second ending, which we haven't done anything with yet. And we pull it into the loop from the back. We pull it out from the left side. This edge must be pulled from the back of the loop, the one that is under the handle. Through its base we pull it through the top. This step will lock the loop into place. We pull on both edges of the cord, so the handle is grabbed. After this, the right and left edges will change places.
- Take the right end and bend it over the handle below the place where the previous loop was created. We pass the right edge under the left, pulling it from below and pulling it out from above. This results in a loose loop. Now the intersection point is on the left side.
- Next, you should wrap the left edge behind the handle. It should be taken and passed under the handle of the blade.
- We take in our hand the end that we operated on in the last step and pass it into the loop on the right side of the handle. We insert its edge from bottom to top. Tighten the cord. The ends should switch places again.
- At each step we mirror the previous movement. When tightening the loop on the right, we exactly repeat the movements on the left.
- This should continue along the entire handle until you reach the end of the handle. Try to make the criss-cross loops as tight as possible.
- The final step is to pass both ends of the cord through the hole on the edge of the knife handle. To complete the winding, tie the edges with a knot at the side of the hole.
- Both ends of the paracord are tied into a strong knot. The resulting loop at the end of the process will be put on your hand.
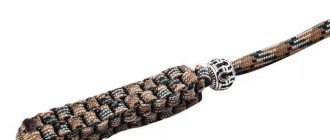
Various options for weaving paracord.
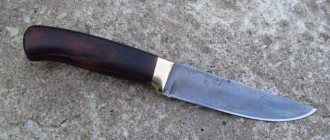
knife handle made from a plastic bottle
How to make a rope from a regular plastic bottle
Summer is a season of rest. Many of us will go to the dacha, some will organize a picnic. In such places, a strong rope is often needed to secure something or hang it to dry. But there may not be a rope at hand. There is no reason to be upset, since a strong rope can be made from an ordinary plastic bottle, which will definitely be present on the table.
Popular articles Rose from simple motifs
Watch how to make a rope from a plastic bottle in the video:
So, in order to make the process of making a rope easier and less labor-intensive in the future, you can first take care of the machine that will be used to make the rope in the future.
In order to make our own machine for making rope from a plastic bottle, we will need a wooden block that can be lightly sanded on one side, creating something like a handle for greater ease of use.
The first step is to make a gap on the top of the block using a metal hacksaw and clean it with sandpaper.
Get ready to weave
Wrap the cutting edge of the blade with electrical tape to prevent cutting yourself. Thread the cords into the hole from which you start weaving a couple of centimeters. Now we need to think. No matter which side you run the cords on, they will leave a protrusion on it, so I always leave it on the inside of the handle. The inside is where your fingers fit into the handle, not your palm. If you do this, the knife will fit more comfortably in your hand. In my opinion, there is logic in this. So, after threading the ends of the cord through the top hole, glue the ends to the metal of the handle. Then they will lie more evenly and will not interfere during weaving. Just don't glue your fingers together.
What do handles look like for 19 l bottles?
Initially, for ease of delivery and consumption, a universal 19 liter bottle was developed. Then the need arose to create a holder that was most optimally suited for carrying containers
At first glance, it may seem that this handle is not such an important device. However, it is in simplicity that the genius of the invention lies.
I must say that now it is difficult to imagine transporting a bottle without a handle. This simple device makes carrying containers much easier. Therefore, purchasing a handle for a 19 liter bottle is a very smart decision.
Firstly, the use of removable handles makes the process of carrying 19 l bottles incredibly easy and convenient
Finally, the compact and easy-to-grip design makes it difficult to move even large quantities of 19-liter containers, with or without water.
To watch online, click on the video ⤵
Is it inconvenient to carry large boxes?|How to make a handleRead more
Luggage straps for transporting boxes of iMacRead more
Securing the load with part of a solid rope Marine practice at homeRead more
How to assemble cardboard boxes for movingRead more
How to make a handle for a bottle with your own handsRead more
Daughter's Cinema (Rope handles for PET bottles) Rope handlesMore details
How easy it is to hang a Flowerpot or move a Jar. Life hack. Read more
CARRYING CARGO VIDEO INSTRUCTION/ STRAP HANDLE VIDEO TUTORIALMore
Bottle knot, Bottle sling, Bottle knotRead more
Handle for carrying 18.9 l bottles - manufacturingRead more
A MIRACLE HANDLE FOR CARRYING PACKAGES AND MORE. More details
How to rope a cylindrical objectRead more
How to tie a box with twineRead more
How to tie tightly with rope. Unit for household useMore details
7 KNOTS THAT WILL MAKE LIFE EASIER.Read more
DIY rope bucket handleRead more
A brilliant invention - a handle for carrying a bicycle. More details
Bottle handle | Amphora knot a simple wayRead more
Source
Where to buy handles for carrying 19 l plastic bottles
engages in supplies to Russia of coolers, pumps and related equipment designed for bottling water from bottles of various sizes. All equipment is supplied under the “ECOCENTER” brand.
We provide the best price-quality ratio of equipment, and also offer our partners excellent service and flexible terms of cooperation.
Popular articles Macrame bracelet weaving patterns
You can see the attractiveness of collaboration by comparing our prices with similar equipment from other suppliers.
All our equipment meets the standards established in Russia and has quality certificates. We deliver dispensers to our customers, as well as all the necessary spare parts and components in the shortest possible time.
We make legs, handles and dividers for the drawers of the box
In this master class, I will tell you and show you how, without the use of machines and professional equipment, without hand-held electric tools, literally “on your knees,” you can change the appearance of the box and its internal contents.
Specifically, I will make legs, linings, edging on the body, handles and dividers for the drawers of the box
All by hand! Real handmade!
This work does not require a workshop and, as I wrote above, any special tools.
A small sheet of chipboard (cabinet shelf) is used as a working surface.
To work you will need a box, as well as the following materials and tools:
When I started this work, I had absolutely no idea what the end result would be.
I'll start with what's needed:
The square, knives, glue, pencil and eraser lie on a small piece of PVC plastic, from which I will make dividers into drawers.
In the photo above there is black PVC plastic - a square piece and several strips.
Of course you need a box