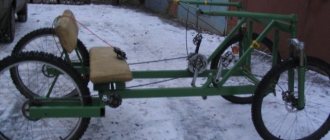
DIY bicycle - a collection of master classes using various materials
Indoor plants help make your home or apartment more comfortable and fill your home with fresh, clean air. Home flowers can create not only an aesthetic appearance, but also give a feeling of summer all year round. With their green foliage and bright, beautiful flowers, plants lift your spirits and fill the space with a fresh aroma. Many species not only purify the air and release oxygen, but also maintain the level of humidity in the room.
In order for the plants to fit harmoniously into the interior of the room (office) and not experience discomfort during active growth or flowering, it is worth considering not only the place where the flower pots will be located, but also their design. On sale you can find a huge variety of interesting options for flower pots. Manufacturers have taken care of a diverse range of these products: designs and colors can be chosen to suit every taste!
Interesting to know! The term "pot" means "hidden pot". Very often, owners plant indoor plants in ordinary, unsightly containers. For the plants themselves, it is best to select clay pots with holes at the bottom so that excess water can flow out when watered abundantly. But decorative flowerpots, inside of which the pot with the planted plant is placed directly, help to add aesthetics and the ability to harmoniously fit house plants into the interior of the room. There is no bottom hole in the flower pot, so the moisture released from the flower pot will not leak out and stain the surface on which the flower is located.
Let's make a decorative flowerpot-bicycle from twine and aromatic coffee beans
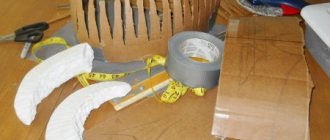
For work we will need:
Using a compass, you need to draw circles on cardboard, as shown in the photo below, and cut them out using scissors.
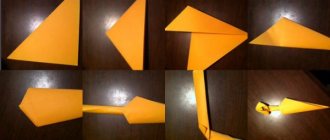
Then these blanks must be wrapped with twine. In the cocktail tube, you need to trim off the excess, leaving about two centimeters from the bend on both sides. You need four of these blanks to make one bicycle wheel. Next, each tube needs to be tightly wrapped with twine. Now you can assemble the wheels, as shown in the photo below.
Then you need to take two tubes, stretch one, and cut off the top of the other and connect them as in the photo below. Two such blanks need to be wrapped with twine.
The steering wheel must be created by cutting off the upper part of the tube, leaving two centimeters before the bend and three after it. Wrap them with twine.
The next blank for the steering wheel is an eleven-centimeter long tube wrapped with twine.
The wheel should be decorated with coffee beans. It is necessary to insert two blanks into the front wheel and secure them with polymer glue. You need to insert a straight tube between the rear wheels and secure it with glue. A piece of tube must be inserted between the upper ones. And wrap the place where they are attached with twine. The role of a flowerpot here will be played by an empty jar. You can decorate according to your taste.
Cutting templates
Cutting templates are often used to create appliques. They are printed and transferred to colored paper. You can also decorate them yourself. Children love this activity; you can use the templates to create a coloring book. The photo below shows the cutting templates.
Sweeps
Reamers are used in the kirigami technique. They are first printed on paper, then all the details are carefully cut out with a stationery knife. Glue everything together to create a three-dimensional figure. The photo below shows examples of work.
An origami bicycle in the form of a toy will delight a boy. Making crafts with your own hands will bring a lot of joy to your child, and will also help develop imagination and creativity. Toys are often used for room decoration and greeting cards for various occasions.
How to make a bicycle
How to make a bicycle out of paper? Beginners in needlework are advised to follow a simplified pattern. It is advisable to prepare all the necessary materials in advance so as not to be distracted from work.
Required materials and tools
A bike for children is made using the following items:
- scissors;
- printed templates;
- paper;
- cardboard;
- glue;
- scissors;
- wire;
- a simple pencil;
- a roll of toilet paper and wide tape;
- ruler;
- corrugated paper;
- markers;
- colored paper;
- dye.
Everything you need can be found at home, especially if children live in it. Such toys are often made during creativity lessons in elementary grades.
Assembling a three-dimensional model from origami modules with step-by-step photos
Modular origami seems complicated at first glance, but if you figure it out, a bicycle from modules can be assembled in 30-40 minutes. You must first prepare the details. For one model you will need:
- 223 yellow modules;
- 62 brown;
- 169 white.
After preparing the parts, assembly begins in stages:
- Make the first 2 rows of 24 yellow modules.
- The third row alternates between brown and yellow.
- Shift the pattern in any direction and repeat 3 more alternating rows.
- Another 24 yellow modules are put on.
- The eighth row is made yellow, but turned inside out. The parts are put on with the long side inward.
- Yellow modules are used to assemble a handle. Place the parts opposite each other until they close together.
- Assemble the front wheel by placing the white modules on top of each other until they form a circle.
- For the spokes, use 4 white and 8 yellow elements, assemble them in the form of a cross, then insert them inside the wheel.
- For the rear wheels, spokes are made from 7 white and 7 yellow modules in the shape of stars.
- Glue the spokes to the rear wheels with glue.
- The cocktail tube is covered with white paper and placed on the edges of the wheel.
- A basket is glued in the middle.
- The steering wheel is assembled from two parts, which consist of 7 yellow modules, and they are fastened together.
- In the middle, at the junction, a white module is inserted, 2 more white parts are put on it, bending them at an angle.
- The front wheel is glued to the bottom, the rear part is connected to the rear wheels.
For the modular origami technique, it is better to use ordinary office sheets to make the craft look more delicate.
The photo below shows a detailed diagram for making a bicycle from modules.
Origami with a simple diagram
To work, you will need a roll of toilet paper and wide tape, scissors, glue and paper, and wire. Step-by-step instruction:
- Two identical circles, at least 1 cm wide, are cut from the toilet sleeve.
- Cut one circle 1 cm wide from the tape sleeve.
- Wire is used to make spokes for a wheel and insert it inside.
- Cover all parts with white paper.
- A wooden skewer is covered with paper, small wheels are put on the sides, and fixed with glue.
- The wire is cut in half at the top and bottom and covered with paper.
- The parts are connected with wire to form a frame, and they are also covered with paper.
- Roses are made from corrugated paper, a basket is formed from cardboard and painted. Flowers are glued inside.
The frame and steering wheel can be decorated with rhinestones and beads. The photo below shows a detailed diagram for making a paper bicycle using scrap materials.
Applications for children
The bicycle applique is made from colored paper. Choose a white background sheet. Cut out 2 identical circles from blue paper, 3 stripes and one month from green paper, three long ovals from red paper, and 2 months of different sizes from yellow paper. Connect all the parts on the sheet, as in the photo below.
Christmas tree made from candies
Well, what a New Year - even without a Christmas tree! You can make a sweet New Year's beauty from candies and tinsel with your children. The technology is quite simple, so this universal gift will not take much of your time and effort.
For creativity we will need:
- candies,
- New Year's tinsel,
- shiny corrugated paper,
- thick cardboard,
- stapler,
- glue gun,
- newspaper.
We start work from the base of our future Christmas tree. To do this, take a thick sheet of cardboard and roll it into a cone. We secure the ends at the bottom with staples using a stapler, and apply glue along the joint. We align the bottom of the craft so that the cone stands firmly and does not wobble - this will determine how stable our Christmas tree will be.
Before sealing the bottom of the cone, stuff newspaper inside very tightly. This is required to give the craft stability. The process will be greatly facilitated by using a ready-made foam cone, which can be purchased at craft stores. We insert a small piece of wire into the top of the cone. It will be needed at the very end of the process to secure the tinsel.
We cut the corrugated paper into strips (5*60 centimeters) and begin to gradually glue the cone in a spiral. This must be done so that if a gap appears between the tinsel, the Christmas tree will still look elegant.
Using a glue gun, we carefully begin to glue the tinsel (7-10 centimeters each), slowly. Tinsel and candies need to be selected in such a way that they match the color scheme. After the first tier of tinsel is glued, we begin to glue the candies. Typically, no more than 4 pieces are required on the lower tier. It is very important that they are located opposite each other to maintain stability. And then we alternate a row of tinsel (glue it tightly) and a row of sweets, which we place in a checkerboard pattern relative to the previous sweets.
As you approach the top of the cone, you need to gradually reduce the number of candies in the rows. At the very end of the wire we fix the tinsel either by wrapping it around the wire or by placing it on glue. The top can be decorated with a Christmas ball or a bow. With such an original gift you can take a great photo to remember the holiday!
As you can see, nothing special is required to create gifts from candy. The main materials needed for creativity are wrapped confectionery products, beautiful paper, glue, decorative ornaments, as well as imagination, taste and originality of execution.
The idea of giving candy gifts is very exclusive and at the same time easy to implement. Such a gift makes it clear how dear you are to the person to whom you are presenting the result of your own creative master class. After all, the gifts that are dearest to the heart are those made with your own hands!
Original do-it-yourself decorative bicycle
To make a bicycle, we will need several cardboard blanks, toothpicks, a piece of thread, a small wooden stick, glue, and scissors.
First we will make a cardboard basket. The first part is the bottom, to which we glue cardboard strips.
We weave the basket itself from the glued strips.
And this is what should happen:
Then, in the same way, only without weaving, we make 3 wheels.
We take a wooden stick, thread, two cardboard strips and make a fork for a bicycle.
Glue all the resulting parts together. And this is what should happen:
We make a bicycle handlebar from cardboard and thread. You can also decorate it with some figured detail. In this case, a wooden flower.
Our bike is ready. Now you can use the bike basket as you wish