To give a newly knitted item a finished look, you need to carefully tie its edge. At the same time, the knitted fabric will stop curling, since its edges will become rigid, and the old item will take on a completely new look. This fairly simple job can be done in various ways.
We bring to your attention video tutorials that tell you how to properly tie the edges of knitted items in various ways. They are not difficult to master, and soon you will be able to give your work the beautiful look that it acquires after binding.
Very simple edge binding, quite understandable for beginners. The first row is knitted with single crochets, in the second and third rows a French mesh is formed, and on the fourth row fans are made, consisting of eight double crochets. This row turns out to be the most beautiful. The result is an edging with a pattern made up of semicircular elements, the basis of which is connected fans.
For any fabric, it is enough to knit the first initial row, and then you can form the pattern. It makes a good edging for robe collars. It is simply sewn to the base material.
Edge binding “Rachy step”
The edge tied in this way becomes smooth and dense, reminiscent of a pigtail. This method is used to tie the armholes and necklines, the edges of the sides of knitted clothes created by knitting or crocheting. This seam is used to strengthen the edges of pockets and scarves. The method got its name because it is formed not in the usual direction from right to left, but on the contrary, as if moving backwards.
You can use the same thread for tying that was used to knit the item itself, but this thread can be taken in a different color: colored edging looks neat on any knitted item, decorating its overall design with an unexpected frame.
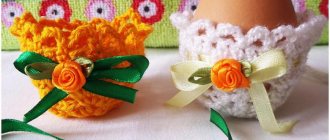
Trimming the edges with pompoms
This beautiful trim consists of small pom poms, each of which is attached to the edge of the material with two posts. The result is a zigzag pattern, with a neat pompom at the top of each zigzag. The pattern looks very beautiful and formal. It can be used to decorate large items such as knitted blankets, shawls or pillows.
The use of pom poms creates a design that complements and highlights the knitted pattern that was used on the base item. Despite all the apparent complexity of the pattern, it is created very simply and is quite accessible even to beginners.
Openwork inserts for dresses
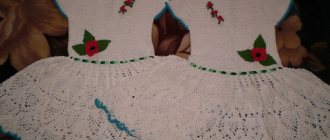
The dress with an openwork insert on the back looks chic! And this beauty is available to knitters who own the fillet technique. In principle, the craftswoman can say that I combine different patterns and techniques in my work, not just fillet. Yes, imagination knows no bounds here!
The shape of the inserts can be different - oval, triangular, square, etc.
We offer you some schemes to work with.
Edge binding "Beads"
This method of tying the edges of knitted items is extremely simple, but looks impressive. From four single crochets a small bead is formed, dense and neat. A whole row of such beads, located close to one another, can decorate tightly knitted items, but they can also be suitable for patterned blankets or shawls.
The binding is not necessarily done along a straight edge; you can also tie patterned surfaces and even wavy edges. The resulting voluminous edge binding looks very beautiful if it is made in a different color, contrasting to the color of the main knitting thread.
Pattern schemes for children's products
How to crochet children's clothes depends on their purpose. If we are talking about a small baptism blanket that will not be used for long, while the child is still very young, then you can choose a wide lace finish.
For clothes that are intended for slightly older children, a denser openwork crocheting of the edges of the products with diagrams and descriptions is suitable. This is explained by the children's interest in holes and holes in the canvas, where they can stick their fingers. Because of such treatment, the lace will quickly deteriorate: all the work of the needlewoman will go down the drain.
It is better to tie children's clothes with a narrow border of 2-3 cm, as in the photo below. Such drawings are not too difficult to perform; even a beginner can handle them.
Simple models of children's dresses with knitting patterns here.
Beautiful and simple harness
If you want to not only strengthen the edges of a knitted item with a binding, but also decorate them with an interesting pattern, try this knitting option. Simple columns are used to form their interweaving, resulting in a pattern with arches and openings repeated in two tiers.
Despite the complexity of the pattern, it is quite simple to obtain it - you just need not to get confused in the alternation of loops and in the arrangement of repeating columns. The pattern can be based on a completely arbitrary type of knitted loops; you can use it to edge any knitted item, regardless of whether it was crocheted or knitted. It will still turn out beautiful.
"Sink" edge
Five single crochets crocheted in the same stitch form a neat little shell, with the loops making up the edge and the stitches making fan-shaped waves, just like on a real shell. This is a simple and interesting way to crochet the edge of a product, giving the edge of any knitted item an interesting look.
It is especially impressive if the shells are knitted from a thread of a different color than the main product; the resulting contrasting pattern perfectly frames any knitting. Even if the product is obtained by the simplest knitting method, its edging in a similar way gives it an interesting and unusual look.
Christening dress
We will need:
- yarn containing 90% acrylic, 10% metallic, 100g per 400m, white – 200g;
- hook No.1;
- fabric, satin, white for the skirt;
- satin ribbon;
- buttons – 3 pcs.;
- beads for decoration.
Patterns
We carry out according to the schemes in forward/reverse rows.
Description
Openwork back
We perform a chain of 74 VP plus 3 VP lifts and work according to scheme No.1. Having knitted 4cm, to decorate the armholes we close 5p on both sides. Next we knit straight to a height of 15cm. We close the loops.
Openwork front
We perform a chain of 74 VP plus 3 VP lifts and work according to scheme No.1. Having knitted 4cm, we divide the fabric into two parts. We finish each front shelf separately. We design the armholes similarly to the back.
We continue knitting with straight fabric up to 10cm. To design a rollout on the right shelf, close 8p along its left side. and then decrease by 1 p four times. in every even r. At the level of 15cm we close all stitches. On the left shelf we design the rollout in a mirror manner.
Sleeve
We make a chain of 62 chains plus 3 chains and knit straight/reverse rows according to cx. No1. At the level of 11 cm, for expansion, we increase 1 stitch on both sides four times. in every 2nd r. At the level of 13 cm, to decorate the okat, close 5 stitches on both sides. At the level of 14cm, close the stitches. We knit the second sleeve in the same way.
Assembly
Sew the front and back on the sides and shoulders. We sew in the sleeves and sew seams on them. Along the bottom of the openwork blouse and the edge of the sleeves we knit a border along cx. No2. We tie the roll out in a circle with 2 r. RLS. At the same time, we make 3 buttonholes on the right half of the front. After this, we tie the edge of the neck with a border along cx. No2. Make a skirt out of fabric and sew it with the top part of the dress. Decorate the dress with beads. To decorate the skirt, knit the border according to cx. No2 112cm long and sew it along the edge of the hem.
Decorate the skirt, sleeves and openwork top with roses made from satin ribbon. Stretch a satin ribbon along the edge of the neckline, the bottom of the sleeves and the openwork top. Tie bows. The dress is ready!
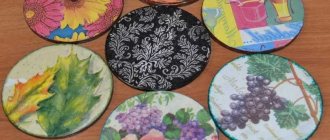
Binding the edges of napkins
Crochet edges for napkins or handkerchiefs are offered in several options. Napkins can be any kind, linen or silk; depending on the thickness of the fabric, the thickness of the thread used for edging is also selected. It is quite possible to use spool thread number 20-30 to match the napkin or in a contrasting color.
The scarf is cut from fabric strictly in the direction of the threads. One thread is pulled out one centimeter from each edge, and using the resulting grooves we begin to make a binding. A chain of loops is created along the edge of the napkin, which become the basis of the pattern created from threads.
Tablecloth with square fabric inserts
Tablecloth size: 90cm by 80cm.
We will need:
- yarn, 96% cotton, 4% polyester, 50g per 252m, white – 300g;
- hook No.1;
- fabric, squares 20cm by 20cm, white – 4 pieces.
Patterns
Knitted sections are made using the fillet technique according to the pattern.
We start every day. 3 VP lifts, replacing the 1st StSN, and complete 1 additional. post in the VP of the rise of the previous river.
Density: 17 squares per 16 rows correspond to 10cm by 10cm.
Crochet a tablecloth combined with fabric according to a pattern with a description
The first stage of work is tying square flaps. To do this, we perform from the 1st r. on the 12th r. schemes 1.
At the second stage, we tie the perimeter, starting from the 13th p. diagrams 1. Let's take a closer look at all the details of the process.
We need to mark 54 holes along each side of the square, for a total of 212 around the perimeter. We count the corners for each side.
We tie the perimeter of the stbn, making 54 stb on each side, and make an additional stb in the corners. The total is 220 StBN.
Next we knit a fillet pattern in the round according to cx. 1. It shows one side of a square without a corner. for 1st r. schemes for 56 StBN of the original river. (A) we perform, evenly distributing, 35 dc: 21 dc in every 2nd stitch of the base and 14 dc in each st of the base. We knit the corners according to diagram 2.
We knit empty corner cells in 1 row. diagram 2. For filled squares in the rows marked with arrows in cx. 1 we knit the 2nd r. diagrams 2.
Having completed 12 p., set aside the part and similarly tie the remaining squares. We sew the details.
We tie the tablecloth around the perimeter in a circle, knitting from the 13th p. diagram. The center of the side of the tablecloth is indicated in c. double arrow. After the 23rd We proceed to knitting each element in separate forward/reverse rows.
On repeat B we knit a row of picots above the empty squares. At the same time, we knit 2 SC into each cell (replace the 1st SC with one VP), and above the SC of the previous r. knit a picot - 4 ch, 1 dc back to the 1st ch.
Stretch the finished product, slightly moisten and dry.
Edge tying with caterpillar
By periodically turning the knitting over and using the instructions for creating the pattern, we get a fairly thick cord along the edge of the knitted item, resembling a caterpillar in appearance. A method is also proposed for knitting such a pattern without turning over the entire work, with intercepting the hook, which is convenient if you are knitting an oversized shawl or blanket that is inconvenient to turn over.
It describes in detail how to get a “caterpillar” on indirect, rounded knitting edges, both convex and concave. In this way, sleeves, collars, the bottom edge of the product and even the edges of hats are tied. The result is a very decorative pattern.
Description of shawls from the center
The easiest way to expand a knitted fabric is from the center. There are a lot of such descriptions today, they are accessible even to beginners. The formation of the expansion comes from the beginning of work - a closed ring. From it, the shawl gradually increases in size along the center line and symmetrically along the edges.
Most popular schemes are developed precisely on this principle of forming a triangular product.
Small border from one row
A small pattern is knitted from half-stitches, fastened on every third stitch of the row, and two loops are skipped. The result is an edging of repeating small semicircles, following one after another. This border can also be knitted in the round; detailed instructions are also given for this.
A large border will not come in handy for every item, but I still want to somehow improve the appearance. In this case, a small border is ideal, which can be knitted from the same thread as the item itself, or from yarn of a contrasting color. It is quite possible to decorate even a patterned knitted item with such a border.
Video lesson:
Border patterns
We offer a master class on knitting borders. In every third loop of the item being tied, a set of stitches is made, which forms small neat semicircles. The result is a simple, but very pretty edging with a pattern of small semicircles.
This pattern can border both continuous and patterned knitting, and organize the edges of blankets and shawls, sweaters and cardigans. It will add elegance and airiness to any pattern of the main fabric, harmonizing perfectly with any basic knitting pattern. The border has a wave width of three loops, is not too conspicuous and serves as a modest decoration.