Today we have a short tutorial that will help you “charge” your photos using lightning drawn in Photoshop. In this tutorial we will add lightning to this creepy cemetery. We will create it ourselves without tricks using ready-made photographs.
This is a popular method of creating lightning. I've seen many tutorials that promise to teach you something, but end up being just using a stock image. Personally, I find this approach disappointing. As with most PhotoshopCAFE tutorials, I'll teach you how to create everything yourself. Each lightning bolt will be unique and personal! I have a written lesson and video. Video tutorials are good to see how things are done. Bookmark this page so you can quickly return to it. I've made many step-by-step video tutorials for PhotoshopCAFE, making it easy to learn. Even if you've watched the video, scroll down to the end of the lesson. They usually publish alternative ways to create an effect, ideas or tips for its implementation.
When Halloween approaches, everyone wants to make their images a little darker. This cemetery photo is spooky on its own, but realistic lighting finishes the scene perfectly. In today's tutorial we will learn how to create lightning bolts from scratch.
Types and markings
To quickly repair or install a zipper puller on clothes at home, you need to know the type of zipper itself. Its species difference depends on the variety of the product.
Typically, tractor zippers are used for the manufacture of large backpacks, bags and tents, metal zippers are used for jeans and jackets, and twisted or hidden types are used for sportswear, trousers and women's skirts, easily hidden in the fold of the fabric. In addition, different types of sliders will be used depending on the type of zipper.
Zipper sliders can be classified according to:
- designs;
- number;
- type of lightning;
- labeling.
Based on the design, runners can be haberdashery, automatic or semi-automatic. Haberdashery accessories marked NL are most often used in the manufacture of bags, wallets and backpacks.
This type of locks is characterized by easy movement and a convenient slider for their movement. The two-lock pattern is used in tents and sleeping bags, the reversible pattern is used in reversible jackets and vests.
Automatic locks are usually marked AL and have a lock to protect the zipper from unintentional opening. Semi-automatic sliders are marked PL and are used in shoe zippers and outerwear zippers. They have a tight action and a short slider.
To put a zipper slider on, you need to know the size of its links. It is written on the back of the zipper and has standard numbers: 3, 5, 6, 7, 8, 10. This number indicates the millimeter width of the zipper links in the fastened position, which can be measured using a regular ruler.
When replacing the pawl, you first need to pay attention to the type of zipper.
Based on its type, runners are divided into 3 main types:
- tractor;
- metal;
- spiral.
Runners with a tractor head have a semicircular shape at the base, those with a metal head have a triangular shape, and those with a spiral head have an oval shape on the bottom side.
Sometimes manufacturers mark the sliders with different letters indicating the type of lock and zipper. For example, A is a permanent zipper, L is a permanent zipper with one lock, H is a permanent zipper with two locks, B is a detachable zipper with one lock, C is a detachable zipper with two locks.
Usually the most common are haberdashery locks, which are easily distinguished by their type. Automatic products have beautiful sliders and are used in outerwear, while semi-automatic products are used in shoes.
How to put on a zipper puller using a fork
If the slider on some item of clothing has failed, then before taking it to the workshop for repair, you can try to fix this defect yourself.
You can put the zipper slider on using a fork.
If there is no plug on the zipper and the lock has simply fallen off, you can put it back using a fork.
- First you need to fix the fork on the plane, and then put the upper part of the slider on its 2nd and 3rd teeth.
- After this, you need to thread both parts of the zipper into the grooves of the slider. As a result, the sides of the zipper should connect, and the kitchen appliance can be removed.
Life hacks: how to extend the life of a zipper and quickly fix the slider
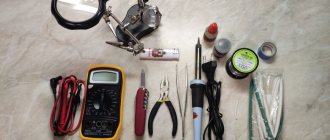
One of the reasons why lightning gets stuck is the temperature difference in the house. To avoid this defect, it must be lubricated with candle wax. Another reason for damage to the fastener may be its teeth falling out or breaking. In this case, you can try replacing them with artificial ones.
In a plastic zipper, a thick fishing line, wound several times, is inserted into the gap. Then several knots are made at the end, which are burned with a lighter and crimped using pliers approximately in the shape of the teeth of the fastener.
This method will not be able to extend the life of the zipper for a long time, but it will postpone a visit to the repair shop for a while.
The process of repairing the teeth of a metal zipper occurs by inserting identical teeth from other fasteners in their place. To do this, you need to use pliers and a small screwdriver to carefully loosen the required number of links on the old zipper, and then move them to the empty space of the new fastener, squeezing them tightly, but not tightly, with pliers.
Of course, there are few people who want to spend their time repairing clothes in this way, but if the item is leather and expensive, then this option is quite acceptable.
It happens that over time, the teeth of the zipper slightly move in different directions, and they begin to interfere with the passage of the slider. Then you need to open the lock and place it on a hard surface, then tap the links lightly with a hammer. This should return them to working position. However, this option only applies to metal clasps.
In a situation where the key fob on the slider has broken and it has become inconvenient to open and close the zipper, there are two options for getting out of this situation. In the first option, a small ring, reminiscent in principle and shape of a key ring, can come to the rescue. It is inserted into the upper part of the runner, and any keychain can easily be put on it.
In the second option, a small cut is made in the keychain. Its sides are unclenched and inserted into the upper part of the pawl, and then returned back.
If the zipper diverges, but the teeth remain intact and unharmed, the cause of the breakdown lies in the slider itself. To do this, take pliers and, with the clasp closed, gently press the slider along the sides on both sides. Now you can put the slider on the zipper without fear, because this operation will help bring the teeth closer together and they will not separate.