How to make a skirt out of paper
Paper is a very, very fertile material for any creativity.
For example, origami or quilling, applique and more. In our modern world of fashion, items of clothing are sewn not only from different fabrics, but also from materials that are completely unusual for clothing production, such as plastic or the same paper. Such clothes are perfect for a Halloween party or some other themed celebration. For example, a creative and not unreasonable idea would be to make yourself or your child a skirt out of paper or newspapers. Moreover, it is possible to do it yourself. In addition, the new outfit you create will not pollute the environment. How to make a paper skirt
What do you need to make a paper skirt?
You will need about a dozen old newspapers and a simple pencil, as well as a measuring tape, scissors, Velcro and various sewing accessories such as a needle, thread and sewing machine.
To ensure that the skirt is more or less tight and does not break during the first fitting, it is best to work with newspapers folded in half.
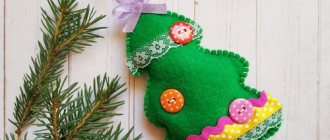
Rhinestones and beads
Not every master will have them. But, if you regularly do handicrafts, this accessories will be useful for many products. They can complement an angel's dress, or decorate the bottom of a tutu.
You can depict a girl standing on one leg, or flying in a weightless jump. Outstretched arms will add grace. There are a lot of ideas on how to make a ballerina snowflake. The main thing is the desire to create.
Making a dress
The most effective way to make a skirt is with pleating. To make it pleated, you need to make folds along the entire length of the newspapers, departing from their edges by about one and a half centimeters. The width of each fold can vary, ranging from two to three centimeters. This is at your own discretion. Folds should be smoothed out by hand or with a cold iron. Next you should press firmly. The skirt will be made from at least three or four newspapers. To ensure that the pleating of your skirt does not accidentally come apart, you will need to specially sew a line along the waist line. All four parts of the paper skirt are sewn together. If you need to wear your paper outfit not once, but several times, then it is advisable to sew all the seams not once but twice. However, when sewing a second time, step back from the previous seam by about one or two centimeters. This will make the product more wearable. You can decorate a paper skirt in a variety of ways. Paper flowers or origami crafts are suitable for this. It is also possible to add paper accessories to it, such as a handbag or hat. Then the image will look not only stylish, but also harmonious.
Paper dress
Wall panel
An unusual three-dimensional applique will add some zest to the interior of a little princess’s room. Tenderness, lightness, sweetness – this is what this work is associated with. To make it you will need: black ballerina templates.
For the snowflake skirt we will use fabric - organza or satin ribbon. Black self-adhesive film. It is better to use thick cardboard as a base. In our case, the composition will consist of three separate parts.
First you need to paint the base in the chosen color. Pastel shades are better. Goes well with black - pink tint. All the girls especially like him.
We select samples of torsos. They should have three different poses. Different positions of the arms and legs will create a single picture.
The skirt is a bright accent of the entire panel. Having chosen the appropriate fabric, cut the piece to size. On one side we quilt the assembly.
In order for it to keep its shape, it can be starched first. You can increase the number of layers.
Glue the ballet dress to the body. Decorate with beads and rhinestones. You can add a flower to your hair bun. You can put a ribbon in your wrist, like a rhythmic gymnast.
We connect the body with the base. A dancing woman is a miniature character; you should not make the silhouette of a ballerina too large. Refined lines are suitable for cutting.
Thin wrists and neck will show all the lightness of the dancer. By beautifully arranging the entire composition, you can bring royal chic to the children's room.What else creates a New Year's atmosphere, no matter how decorated the Christmas tree, homemade creations floating in the air. With a slight movement of the hands, even the drab interior turns into a fairyland.
How pleasing to the eye are the magical motifs on the windows. They can be plain, multi-colored, and even voluminous. A single masterpiece made from several small components looks especially beautiful.
At such moments, you feel the approach of a Christmas miracle. It is better to hang them in a spacious room. A paper ballerina will spin smoothly.
Cutting templates can be easily found on any website. The creative process is a good way to relax and enjoy time with your loved ones. Belief in magic lives in every person.
Crepe paper skirt
Needlewomen who use different techniques for their creativity are constantly in search of some new, creative ideas. And therefore they have long been aware of the main uses of crepe paper. Flowers, bouquets of sweets and huge fluffy balls are successfully created from it. Some particularly skilled craftswomen make jewelry and paintings from it; in their hands, this material has become truly universal. In addition, the technique of making various things, based on assembling flowers, can also be used to create a fluffy, paper skirt. It is from the numerous buds that it will be possible to make paper clothes and accessories for them.
Crepe paper skirt
We decorate rooms with ballerina snowflakes
It is not at all necessary to limit yourself to any one way of making crafts in the form of ballerinas for the upcoming holidays. You and your child can glue an applique and put it on the school table; the garlands will look great on a New Year’s tree or hung around the perimeter of the apartment.
You can place the doll figurines on the coffee table, and hide the most beautiful ones behind glass in the sideboard. And you can tie the cards with beautiful satin ribbons and place them in a prominent place for your loved ones so that they can notice them and appreciate your attention and care.
Also see: DIY New Year's crafts for kindergarten or school: the most interesting, original ideas
Crepe paper
Crepe paper is an unusually pliable, but at the same time delicate material; it holds its shape well, giving the products some lightness. For a fluffy, airy skirt you will need to prepare quite a lot of details that look like flower petals. They can be made in various shapes, elongated and twisted, or bent. The elements are fastened together with a glue gun. It is ideal to sit them on a fabric corset. True, first you need to come up with a skirt model and develop its sketch. A skirt strewn with paper roses will look especially impressive. Making them is not at all difficult. Newspaper or any paper is suitable for this.
Crepe paper
The paper skirt can be made for either a doll or a person. This is an excellent, creative solution for holidays and carnivals. The process of creating it is not particularly difficult.
Origami skirt DIY paper costumes Making a dress from paper
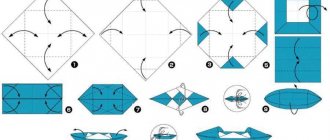
Modeling Lesson: Origami Skirt
Origami is the art of paper folding. This is not the first year that designers have been using this ancient technique in fashion collections. Today we will design a skirt using this technique. What's good about this model? Firstly, it is suitable for both thin girls and not so thin ones. Adds fullness to the hips, emphasizes the waist, and creates an hourglass silhouette. In addition, it is original, feminine and does not hinder the movements of the legs.
1. Take your measurements, enter the data on the website and print out the pattern of a standard straight skirt (photo 1).
2. Cut out the pattern from paper. We take more paper or newspapers for further construction.
3. Leave the back panel of the skirt unchanged.
4. We work with the front panel. We draw a line from the dart to the point where our fold will begin to form, as shown in photo 2. (In fact, the fold can be formed from the middle of the thigh, but now we are considering the basic option, the design of which will allow you to improvise using the origami technique).
5. Cut the paper pattern along the intended line (photo 2)
6. We move the parts apart, as shown in photo 3, forming a fold. The depth of our fold is 10 cm, which means that the width of the extension will be 20 cm. In both directions.
7. We draw. Cut it out. We cut it. We sew.
For this model you can use any fabric. You can decorate the skirt with a bow, as in this case, as well as buttons, decorative fasteners, or whatever you like. You can also experiment with the depth of the folds, offsetting one from the center, etc. Good luck!
How to make a Hawaiian skirt with your own hands
If your vacation is still far away, but you already want an active holiday and bright impressions, throw a Hawaiian party with your own hands. After discussing with friends or relatives invited to the party the decoration of the room, the music that will be played at the party, themed games, entertainment and treats for guests, start making costumes. By making them yourself in the company of friends, you can create unique images, have a good time and get in the mood for the holidays.
Master class No. 1
To make such a decoration, first, print out a template of a ballerina figurine. There are three options presented here: Scheme 1, Scheme 2 and Scheme 3.
Make a pack according to this scheme:
Cut out one of the figures to serve as your base. Then fold a sheet of paper as shown in the picture, transfer the snowflake template onto it and cut out the future pack. All snowflakes have a hole in the middle. All you have to do is insert a paper ballerina into it, and your doll is ready!
Vytynanka ballerina - template for cutting
You can decorate a Christmas tree or home before the New Year or Christmas not only with snowflakes, snowmen and Santa Clauses. Animals, birds and figurines depicting deer, sleighs, and fairy-tale characters are used as decorations. A figurine of a ballerina made using the weaving technique will also look original. For cutting, it is recommended to use a sharp office cutter; scissors will not work, because they cannot make thin or complex cuts.
The “Ballerina” vytynanka will definitely have an openwork tutu-skirt, which will make the figure more airy and voluminous.
Choose a template, print it, attach it to a material you can cut on. It is better to take a rubberized mat or board. The work begins with cutting out the internal details of the openwork skirt. At the very end, the outline is cut out.
There is no additional need to draw facial features. If you plan to hang the product, you need to attach a loop.
The outline for cutting should be clean, without black paint around the edges. To do this, you need to set the printer to the “minimum toner consumption” mode.
Step by step lesson #2
If you want to spice up the decoration a little, try using a suitable photograph or drawn image of a real ballerina as the base:
Print two mirror copies of the same picture (you can rotate it 180 degrees around the vertical axis using almost any graphics editor). Cut and glue them together so that the finished figure is double-sided. We used this vintage image (clicking on the image will open the photo in full size, which you can use in your work):
While the base dries, cut out two identical rectangles from thick paper. Fold them like an accordion, then bend the resulting workpiece in half:
Glue the edges of the paper to each other on the inside of the folded accordion. When opened, the resulting “fans” should completely cover the hem of the drawn ballerina. Now you need to glue the blanks to the figure. Slightly unscrew the outer edges of the accordion and give the pack a curved shape. Apply a little glue to the edges and press them to the edges of the base. Glue the second “fan” on the other side of the figure.
To give the pack even more volume, you can attach another thin tissue paper on top of the first skirt:
To make a pendant, poke a small hole in the top of the figurine and thread gold or silver thread through it.
Ballerina made from napkins
And finally, the most unusual lesson! If you have a piece of thin wire and a napkin on hand, you can make a model like this:
To begin, twist the wire into a basic silhouette of a man with his arms raised.
Next, divide a regular table napkin into layers (usually there are 2 or 3). If there was a bright design on the front side, use this layer for something else, it will not work for our project.
Set aside a few intact layers of paper and tear the rest into strips about 3cm wide. It is very important to do this by hand and not with scissors. Take the wire “skeleton” and start wrapping it with strips of paper. As the paper covers the figure, apply colorless office glue diluted with water over it.
By wrapping several additional layers of paper around the upper part of the body, make a slight thickening to make the figure of the toy ballerina more reminiscent of a human. After the figures are completely dry, you can start dressing.
DIY newspaper dress: step-by-step master class with photos
In the modern world it is rare to find something amazing. This also applies to dresses made of paper. Paper outfits are popular among both famous fashion designers and ordinary people. After all, a paper dress can be worn to a variety of events, be it a costume party, Halloween or a themed competition. Newspaper is an inexpensive material that can be found in almost any home; you won’t need to spend a lot of money to buy fabric for a suit. Showing your talent and imagination, you can make a dress from newspapers with your own hands. This will not be difficult if you do the work step by step. And if you approach the work with soul and great desire, you can create a real work of art!
The first paper dress appeared in the 60s, and manufacturers presented it not as a fancy dress, but as everyday wear. The focus was on cheapness and availability. During use, the dress could be altered using scissors or thrown away if it got dirty. However, this idea did not spread, although South American fashionistas really liked it. Paper outfits began to be used exclusively for environmental events or as fancy dress costumes.
Simple outfit analysis
Let's look at several options for making a dress from newspaper in the master classes below.
Option one
To work you will need:
- newspapers;
- scissors;
- measuring tape, ruler;
- needle and thread;
- a simple pencil;
- belt.
- To begin, unroll two sheets of newspaper, place them together and make a tight accordion. In total you need to make four such blanks. Then mark the waist line on the resulting accordions and sew on a sewing machine. Put a belt on the resulting top.
- Cut the top of the top into a semicircle shape. Straps can be made by folding sheets of newspaper like an accordion, without unfolding them, and sewing them to the top.
- Make the skirt by stitching single sheets of newspaper. To make the skirt more interesting, make the folds of the desired width.
- To make the skirt fuller, sew a peplum to it. You can make it by cutting a sheet of newspaper horizontally in half and folding it like an accordion.
Second option
To work you will need:
- Cut strips of newspaper 12 cm wide. Fold them horizontally 4 times. Make a neckline out of them, to do this, sew one strip to the shoulders of the dress and form a V-shaped neckline.
- To create a corset, you need to prepare a solution. Pour water into a container, add salt and PVA glue. Cut long strips, treat with mortar and glue around the body. There is no need to touch part of the back so that in the future you can change the size of the corset using a lace. Then let the top dry completely, then make holes in the back and thread a lace or satin ribbon through them.
- Continue gluing strips to fit the shape of the dress.
To create a voluminous outfit, you can make several layers. To get a fluffy skirt, the newspaper can be folded like an accordion, then straightened and glued to the product.
Show your imagination and create an extraordinary outfit!
Third option
- newspaper;
- scissors;
- threads, needle;
- stapler;
- bra.
- To create the top of the product, cut double newspaper. Put on a bra and sew newspaper to it. Wrap it around your body to create a corset. Make the cut you want.
The basis of the outfit can be made not only from newspaper, but also from fabric, garbage bags and magazines.
- In order to create a skirt, you will need a lot of bags. Roll the newspaper into a cone shape and secure the corner with a stapler. Connect the resulting bags together on the base to make a skirt, as in the photo.
- To make a large collar you will also need paper. Place several newspapers on top of each other and cut a circle out of them. Inside the circle, make a hole slightly larger than the diameter of the neck. Make a cut from the center to the edge of the circle. Attach bags between sheets of newspaper, like on a skirt, to make the collar voluminous. Sew both parts of the collar to the bra cups.
- The image can be complemented with flowers made of paper, nails made of newspapers, whatever your imagination allows.
This extravagant outfit is perfect for a theme party or Halloween.
From newspaper you can make not only dresses for women and girls, but also fancy dress costumes for boys. You can make a robot or dinosaur costume out of cardboard.
A cowboy costume will also look very original. And without a doubt, the child will receive a prize for the best outfit.
You can also use a variety of paper to make accessories for costumes, for example, pirate hats, a dagger, flowers, crowns, horns, etc.
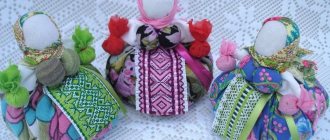
The cutest ballerinas and fabric princesses in bookmarks 23
The world of dolls became a discovery for Neonila Dovgan. The process of creating rag dolls gives the craftswoman great pleasure. The process begins with choosing a plot and character, and then with choosing scraps of material and buttons. A fun activity from start to finish.
Blanks for angels
1
How to make a Tilda Doll, master class from Textil-KUKLA
So, we need:
- Fabric for the doll's body. Since the body is sewn from two shades of fabric at once, you need to think about the doll’s clothes in advance. I took one regular white cotton fabric and tinted it with tea (calico also produces a good body). The second fabric was very thin cotton, which I glued to the non-woven fabric for greater strength.
- Fabric for clothing – colored cotton.
- Cotton lace for finishing the doll's skirt and lace for finishing the doll's blouse and legs.
- Hollow fiber for stuffing a doll's body.
- “Iris” threads for embroidering a doll’s face (black and pink).
- Yarn for the hair – I used acrylic, but the main thing is the correct color of the yarn. Our doll will be blonde.
- Satin ribbon for finishing the doll's clothes and hairstyle.
- Sewing supplies - needles, scissors, thread, pencil, masking tape, felting needles, sewing machine.
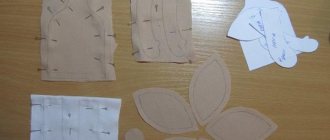
Doll patterns:
body and handle
leg
- We sew two fabrics for the body together. We fold the canvas in half, pin the patterns with safety pins and trace them with chalk or a simple pencil.
2. We make a line along the lines of our patterns.
3.Cut out the parts, making allowances from 3 to 5 mm.
4. We turn our arms, legs and body inside out.
5.This is what I got.
6. We stuff the body with holofiber. When you stuff the legs, don’t forget that the doll’s knees should bend. To do this, I first stuff the leg up to the knee, then thread a thick needle and continue stuffing further. We do not stuff the legs to the very end; we leave them 3-4 cm empty at the top. This is so that the doll can sit.
7.After you take out the needle in this place, you will need to make a stitch with a “Forward needle” stitch back and forth.
8. This is how we got the blank.
9. Using safety pins, we chop off the legs with the body of the doll and sew them with a “Forward with a needle” seam. I do it back and forth.
10. Now our doll can sit.
11. Carefully sew the arms to the doll’s body using a hidden seam.
Now the doll has both arms and legs!
12.Sew a skirt. Let's make a pattern.
13. We decorate the bottom of the skirt with cotton lace and sew down the side sections.
14. This is the skirt we got. We tighten the top of the skirt with a thread and sew it to the doll’s body.
15. We decorate the waistband of the skirt with a satin ribbon, which we sew to the body of the kula using beads. We tie it with a bow at the back.
We decorate the sleeve and bust of the doll with lace.
16. We begin to do the doll’s hair. We cut the hair to the length we need and glue it with masking tape.
17.18.Fold our hair in half.
19.Draw a line in the middle along which we will fasten all the hair.
20.Make a line.
21.This is what we got.
22.Tear off the masking tape. We do this very carefully.
23.Our wig needs to be felted to the head with a felting needle.
24.Make the doll a face. To do this, we outline with a pencil where our eyes will be.
25.I embroider the eyes with black Iris thread. The knot from the thread remains on the back of the head, then we also roll the hair along the contour of the head, then the knots will not be visible.
26.I embroidered the eyes, and again fastened the thread to the back of the doll’s head.
We make the mouth in the same way.
27. We do the doll’s hair. We weave satin ribbons into the braids, you can make tails, or one tail at the back.
28.The braids were braided and rolled to the head. So our hairstyle is ready.
29.The main thing is not to forget to decorate the doll’s boots or pantaloons with lace.
You can also make shoes or make small decorations on the legs.
30. This is how Natasha turned out.
These dolls still need to be dressed up:
1
Aug 12, 2016Galinka
delaemrukami.info