What will you need for a volumetric applique?
- Green cardboard;
- Colored paper red, black, yellow, white;
- Scissors, glue stick, ruler, pencil, compass, moving eyes.
As always, the compass remains inactive; improvised objects with a round bottom are usually used. This time I used a cup.
If you don’t have ready-made eyes, you can make them from black and white paper. Cut out a white circle and a small black one and glue them together. It's funny when black pupils look slyly to the side or squint.
DIY ladybugs for the garden: master classes with photos and videos in photos
DIY ladybugs for the garden are a real decoration for any homestead. Every experienced gardener strives to make his garden especially cozy and beautiful. To diversify your summer cottage, you need to decorate it with original crafts, which with their brightness will lift your spirits every time. One of the simplest and cutest crafts is a ladybug. It’s not for nothing that these insects are called “God’s”; according to legend, they bring happiness and great joy to the house. In addition, this wonderful creation can be made from almost any material. Ladybugs can be made from ribbons, plastic spoons, felt, and even salt dough!
These wonderful master classes for beginners will tell you how to make ladybugs for the garden.
From paper
The simplest craft option is a cow made of paper or cardboard. To do this, you just need to fold red paper using the origami technique and draw eyes with spots. You can also glue a ladybug from several parts of different colors.
You can decorate trees and bushes in your dacha with these crafts:
Country tomato sandwiches
You can have a delicious and original snack in the garden thanks to sandwiches made from cherry tomatoes and olives. Tomatoes will do for the body; heads, points and antennae can be made from black olives. The sandwich can have any filling.
From beads
These cute ladybugs made from beads, which can be made in this master class, will not leave avid lovers of needlework indifferent. You won’t get a large figure, but even these very small cows can decorate your garden by gluing them to tree leaves. The weaving pattern looks like this:
Photos of finished beaded cows:
From plastic spoons
This wonderful craft from plastic spoons can be made with children. For each such cow you will need three spoons. Paint two red and draw black dots on them; they will be wings. And paint one spoon, which will become the body, black. Glue all three spoons together. All that remains is to add a head - made of buttons, clay or a button.
The finished craft looks like this:
From a construction helmet
Ladybugs made from helmets can be used to decorate a flower alley in the garden or courtyard. A helmet is the main material when working on a product. A black marker is useful for drawing dots and faces. Draw spots, eyes and wings on the helmet - that’s it, the figurine is ready for the garden!
From clay and stones
Cows made from polymer clay are very easy to make. It is enough to mold the figures in the shape of an oval and paint them with paints.
Ladybugs made from stones and sea pebbles will make your garden look bright and homey. The craft is done simply - paint the stone red, paint the wings with black paint, not forgetting the antennae and eyes. Such ladybugs can also be drawn on a large stone.
Such a cow using the kanzashi technique can not only be placed in the garden, it can also be placed on the nightstand in the bedroom or kitchen.
Video on the topic of the article
The videos below will help you get even more ideas for new products:
Cucumber snake
This cute snake can be not only a craft, but also a cute vegetable appetizer on the holiday table. It’s not easy to make, but very simple! Take a couple of cucumbers of approximately the same diameter. Carefully peel one of them. Cut the cucumber into slices of equal thickness.
(Click on photo to enlarge)
If you want your snake to bend (and you probably will), cut a few cucumber slices at an angle. Then create a snake by simply placing the slices next to each other. The “head” and “tail” (the first and last pieces) can be carefully secured with a vegetable skewer. The “table” version of the craft can be sprinkled with vegetable oil and balsamic vinegar. For the tongue, use a vegetable peeler to cut a thin petal from the carrot.
(Click on photo to enlarge)
Cut the forked tip and insert it into the slot on the “snake head”. For a more sophisticated and dangerous look, several cucumber slices of the body can also be wrapped in carrot slices. Two stars are stuck in as eyes.
(Click on photo to enlarge)
Concrete ladybug: DIY mosaic
A similar way to make a ladybug, but this time we will use artificial stone and multi-colored tiles. Making a ladybug out of concrete is very simple. We will need cement, which can be bought at any hardware store, an old basin or bowl - a mold for crafts, polyethylene and red and black tiles or something from which we can make a mosaic. This is what we get:
Mosaic: concrete ladybug master class
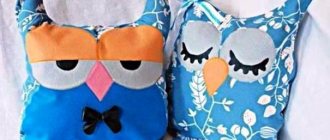
Soft pillow
- fabric or thin felt in red and black colors;
- cotton fabric;
- filler (holofiber);
- zipper;
- threads;
- scissors;
- sewing machine or needle.
- First, we select a pattern or draw it ourselves. Usually this is the base (belly) - 1 part, the head - 2 parts, the wing - 2 parts and black spots - 5-7 parts. For a pillow, you don’t have to make legs, unlike a toy. Patterns may look like this:
- Cut out all the necessary parts. In our example there is also a black stripe 2.5-3 cm wide.
- To make the pillow taller and more fluffy, and even at the edges, we make clips (4-5 pieces) at the same distance on the wings and head on the wrong side.
- Sew black circles onto the red wings. Divide one large circle in half.
- We sew the wings together using a black strip so that a 5 mm strip is visible in the middle.
- We connect all parts of the ladybug's body: we sew the wings to the head, and then to the base. We sew a zipper on one side.
- Using the principle of wings with clips, we sew a white base pillow from cotton fabric and stuff it with filling.
- Turn the cover inside out and insert the pillow into it.
Ladybugs taking off?
And now some tips on how to make flying ladybugs. Try using spoons to make wings. Regular disposable plastic spoons are stuck into the concrete at an angle. The takeoff simulation will be quite good. Steel spoons can also be used, but they are more suitable for steel crafts. For a welder, such work will be simple. Fans of working with metal can give you a lot of other ideas for making ladybugs: welded crafts, embossing sheet metal, wire products and much more.
The largest and most original ladybug is made from plastic drink bottles.
Take colorless bottles and fill them with tinted sand. Watercolor paint, gouache or other available dye can be used as a pigment. Filled bottles are turned upside down and placed on a convex surface so that only the bottoms of the bottles protrude above the ground. It will look interesting and bright. But for a small area it is better not to make such a large and bright decoration. As an alternative - a flowerbed in the shape of a ladybug.
We sew a book for little why
You can make educational books for children with your own hands from different fabrics, but it is always better to use thick felt as a basis. But for decorative elements it would be good to use materials of different textures. This technique will help you learn to distinguish the properties of different objects, which is very important in the early development of a child.
For example, you can cut wings for a butterfly from lace, and the body from fleece. You will learn more about how to properly design the pages of a book and attach parts in the photo tutorial. If you are ready, then let's begin.
Ladybug made of felt - how to sew as a gift for a child?
Everyone loves ladybugs. These small bright bugs with black dots on their backs can be seen not only in the forest or meadow, but also in city flower beds. Usually children treat these bugs with care and, having caught them, always release them into the sky, saying a familiar rhyme. You can also put ladybugs made of felt in the children's room. Children will love these decorative elements in the room.
To make a ladybug we will need the following materials:
- - felt in red, black and dark green colors;
- - thick felt of light green color;
- - padding polyester;
- - threads of black, red and green colors;
- - pencil and paper;
- - scissors and needle.
The procedure for making a ladybug
1. Let's make a ladybug pattern from paper. Let's redraw the following details onto paper from the screen:
- - upper body;
- - lower part of the body;
- - front part of the body;
- - back of the body;
- - mustache;
- - speck;
- - large sheet detail;
- - small detail of the sheet.
2. Now you need to cut out the details of the ladybug from felt. First, let's cut out the upper part of the ladybug's body from red felt. To do this, place the upper part of the body on red felt, outline and cut it out.
3. Take black felt, place the lower part of the ladybug’s body on it, trace it and cut it out. In order for the outline to be visible on black felt, the part must be outlined with chalk or a piece of soap. We will also cut out eight small circles from black felt.
4. We will also cut out the front and back parts of the body from black felt.
5. Let’s also cut out the antennae from black felt.
6. To cut out a large piece of the sheet, we will need thick felt of light green color.
7. To cut out a small part of the sheet, take dark green felt.
8. Take the upper part of the body, cut out of red felt, symmetrically place small black circles cut from black felt on it, and sew them with black threads using small basting stitches.
9. At the bottom we will attach the front part of the body, cut from black felt, to the red part and sew it with red threads. After this, we will attach the back part of the body to the red part and also sew it with red threads.
10. Take the lower part of the body, cut out of black felt, and sew the upper part of the body to it. We will sew it on with red threads, slightly pulling the upper part of the body along the edge. We will leave a hole in the head area.
11. Fill the body of the ladybug with padding polyester.
12. Use black thread to sew up the hole on the ladybug’s head.
13. This is what the ladybug’s body looks like from the underside.
14. Turn the ladybug over with the red side up and use black thread to embroider a line separating the wings. We will embroider using a stem stitch.
15. We will also sew on the antennae part with black threads.
16. Take a large leaf piece cut from light green felt, put a smaller leaf piece cut from dark green felt on top and sew it with green thread along the edge. The sheet for the ladybug is ready.
17. Place the ladybug figurine on the prepared sheet and sew it with small hidden stitches.
The decorative ladybug on a green leaf is ready. The ladybug can be placed on a crib, mounted on a wall, or placed on a shelf. If you sew a wide ribbon to the sheet, then the cow can be used as a curtain tie in a child's room. Also, this ladybug figurine can be used by handicraft lovers as a pincushion.
We sew a textile cow
2022 is approaching - the year of the Ox according to the eastern horoscope. This is how the textile Cow-Burenka was created.
I wanted the toy to be simple, the sewing of which is accessible even to those just beginning their journey in patchwork, and at the same time funny and positive. So - let's go.
1 photo. In the photo there are patterns of all the parts of the toy; the actual dimensions are indicated on the parts of the body and the upper part of the muzzle. Display the photo in real size, copy the detail. Details are given without seam allowances.
Master class on making ladybugs for decorating a summer area
Natalia Chernikova
Master class on making ladybugs for decorating a summer area
You can make ladybugs . They are perfect for decorating a kindergarten area in the summer , as well as for organizing games for the development of speech breathing.
To work you need:
• Red and black gouache, brush
For work we need 3 disposable spoons.
Using scissors, cut off the handles of the spoons, leaving about 1-2 cm. You can break them off. They are fragile and break easily.
Use scissors to trim the edges.
From the obtained parts we construct the body of a ladybug . The bottom part will serve as the body, and the 2 parts on top will serve as wings.
Using Moment glue, smear the body on the top left and apply the wing, pressing.
We also spread the body on the top right and apply the second wing.
From a ball of thread we cut a thread approximately 20-25 cm long. The color of the thread can be any.
Using Moment glue, glue the end of the thread at the top of the wings in the middle.
Let's take a decorative stone. And with the help of a glue gun we will glue it in the place where we glued the thread.
This will be the ladybug's .
Paint both wings red using gouache.
Let's color the head black.
Let's color the body that looks out from under the wings also black.
Apply black dots to the right wing. There can be any number of them. Our ladybug has 3 of them .
We apply black dots symmetrically on the left wing.
Turn the ladybug over and paint its body black.
Paint the inside of the wings red.
The decorative stone turned out to be heavy. He outweighs the torso. To avoid this defect, the idea came to make the ladybug's from a lighter material.
To do this, you need to take a bottle of detergent.
We cut off the moving part from the cork that allows you to open the detergent.
Just as in the case of a decorative pebble, use a glue gun to glue the part to the body of the ladybug .
Pincushion-sofa
For work we will need the following tools and materials:
- a sheet of thick cardboard;
- glue gun;
- scissors;
- thick fabric with small patterns;
- scraps of fleece and padding polyester.
How to make a sofa pincushion: step-by-step master class
Stage one
First, we draw a simple template for the front of the sofa.
Next, we transfer the template to thick cardboard and finish drawing the back. In total we will have five parts.
We begin the work with parts No. 1 and No. 2 (we are making the base of the needle bed, all other blanks will be useful to us at the finishing stage).
Along the length of the templates, we cut out rectangular blanks from foam board, the width of which is equal to the width of the seat. We make something like a sandwich out of rectangles and glue it to the sofa blanks. For gluing we use a hot glue gun. You should not use Moment glue - it deforms the foam board from the inside.
Glue the sides of the sofa - pieces of a tube, stick or pencil.
Stage two
We cut out two strips of cardboard, the width of which is equal to the width of the handles, and the length should be sufficient to form a strong frame of the sides. At a distance of 4.3 cm, we bend the cardboard along the line, above it we wind the cardboard onto a pencil, giving it the same shape as the armrests on the sofa. We glue the cardboard and leave a small margin on the sofa seat.
We do the same with the second side panel and armrest.
We cut out rectangles from a piece of fleece, the size of which is slightly larger than the armrests, and glue them, aligning and cutting off the excess as we go.
Now you need to cut two rectangular blanks from the fabric according to the size of the side armrests with a margin of 1-2 cm on all sides. On one side we make notches, on the second we make them as we work and glue them.
This is how we attach the fabric to the back and front:
Stage three
Now we use part No. 4: we apply it to the sofa and carefully check whether its size is suitable, if necessary, we increase or decrease the part in the right places. The main thing at this stage is to use part No. 4 to hide all the sloppy places.
As soon as the part is perfectly in place, we cut out a rectangle from the colorful fabric with a margin for hemming according to the dimensions of this workpiece.
Having folded the fabric, we glue it only on the sides; we glue the top and bottom parts directly to the sofa itself.
Next, part No. 5 will be used. We try it on and, if necessary, modify it.
Stage four
For the seat backing we will need three layers of fairly thick synthetic padding: we cut out three blanks that will be equal to the back. No need to make allowances!
From a piece of fleece, cut out a small rectangle with a large margin and form a “sandwich” by gluing it together. It is extremely important that the glue does not get inside, only on the cardboard parts!
Let's try on the back. Everything is fine? Great, then let's continue!
We cut out a piece of fabric and glue it to the cushion below, and this entire structure to the sofa. We glue the sides and top of the fabric to the sofa, going behind the back, like this:
We do the same with the seat.
Stage five
We're at the finish line! We work with blank No. 3 - we hide all the flaws on the back. We try on the workpiece and level it.
Now we cut out the fabric according to the fitted blank, taking into account seam allowances, and glue it on top and sides, and at the bottom we glue it directly to the sofa. We attach the finished backrest to the back of the sofa.
We process the bottom of the sofa in exactly the same way. All that remains is to add a little decor at your discretion: lace, ribbons, buttons...
That's it, ready! Pages: 1 2 3
Let's assemble a three-dimensional applique from colored paper quickly and easily
Let's take a closer look at the technique of making a three-dimensional ladybug from colored paper. This craft is suitable for making by children in the middle group of kindergarten.
You will need:
1) Colored paper;
2) Scissors;
3) Glue;
4) Pencil and felt-tip pen.
Manufacturing stages:
1) Cut out two red circles and one black from colored paper. And another smaller dark circle. We make a leaf out of green paper and glue it to the base.
2) Then we attach a small black circle to the green leaf, which is the head of a ladybug. Glue a large black circle on top with an overlap.
3) Fold the red circles in half. These are the wings of the future beetle.
4) Glue the wings on top of the body in one half. We draw black spots on them with a felt-tip pen.
5) Attach the eyes to the ladybug, add antennae and legs.
A very frequent guest on children's clothing in the form of appliques are ladybugs, both in fabric and crocheted. In fact, there is nothing complicated in doing this craft, you just need to follow the diagram, one of many of which is presented below.
You can also make a ladybug from fabric, such as felt. This material is pleasant in its softness and convenient in that it does not require processing.
The manufacturing procedure is simple. You need to find an image of a ladybug and prepare stencils with all the parts. Then attach the templates to pieces of felt of the corresponding colors and cut out the parts. Sew the head onto the base, then the body with spots. Lastly, the antennae, eyes and paws are made. They can be glued or embroidered directly onto the base.
About the benefits of educational fabric books for children
Fabric books are often called quiet books, because while the baby is busy “reading,” there is peace and quiet at home.
Such a book can captivate the baby for quite a long time, which the mother can devote to herself or to homework.
Such books, unlike cardboard or paper ones, can be crushed, twisted, chewed, wet - absolutely nothing will happen to them. If necessary, they can be washed and ironed, and the book will serve for a long time.
To sew books, they use various fabrics, such as fur, felt, or various fillings, for example, cereals, rustling candy wrappers, and bells. This promotes the development of the baby's tactile sensations.
Thanks to many details, such as lacing, linden, zippers, buttons, buttons and others, the fabric book promotes the development of fine motor skills and teaches the child to be independent. In the future, the baby will be able to easily button a jacket, shirt, tie a knot, etc.
The content of the book can be free, when each page does not repeat the theme of the previous one, or thematic.
With the help of this wonderful educational toy, you can teach your little ones colors, counting, letters, seasons, the concepts of “day-night”, “big-small”, geometric shapes and much more. Here everything will depend only on your imagination.
You can take this sensory book with you anywhere, and the child will be busy with useful activities when it is necessary to behave calmly.