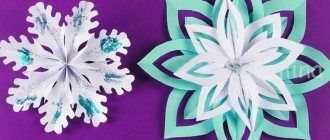
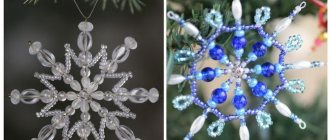
DIY voluminous paper snowflakes
Snowflakes are a neutral theme that suits everyone. Volumetric paper snowflakes are wonderful craft ideas for children and adults. Elegant and beautiful voluminous paper snowflakes can be used to decorate windows, ceilings, walls and anything else to create a festive New Year's interior. Making a voluminous paper snowflake with your own hands is of course a little more difficult than a regular snowflake, but there are plenty of opportunities to add patterns and unusual details. The patterns can be covered in glitter, painted or left plain. In the real world, there are no two identical snowflakes and, although you have probably already seen thousands of photographs from hundreds of master classes, perhaps in this article you will find new voluminous paper snowflakes that are suitable for your New Year's decor. Here are voluminous paper snowflakes with cutting templates , step-by-step photos and master classes, giant paper snowflakes , quilling snowflakes with amazing patterns. Many paper quilling snowflake are great for winter holidays, special events and Christmas decorations - they always look great. Look through the entire selection of interesting projects and you will definitely find your inspiration.
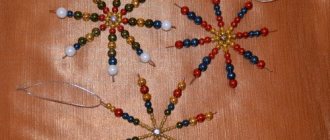
Snowflakes using quilling technique
Want to learn how to make giant snowflakes using the quilling technique ? Cut the colored paper into long strips 2.5 cm wide. Roll into a tight coil. Allow to unwind a bit and glue into a folded circle shape using Elmer's glue. Secure with a paperclip for a few minutes until the glue dries. Make a lot of reels. Shape several coils into a teardrop shape by pinching one side.
Make it in the shape of an eye (like an oval, but pointed at both ends), pinching the circle on opposite sides. These will be the basic shapes. There are other, more complex ways to shape paper for quilling, but these three basic ones will allow you to make many beautiful snowflakes. Make the blanks different using only these shapes. Just twist with different densities, then some will be larger, others smaller.
Cut the strips in half to create very small circles (especially towards the outer edges of the snowflake for a “soft” look). Once you've created a few spiral shapes, start experimenting with arranging them in different ways until you find a design you like. Glue the spools together with school glue. But don't apply too much or it will run off and stick the snowflake to your work surface! It doesn't take much to create a strong connection. Usually start with six pieces of the same shape, glued in a circle, this is the center of the snowflake, and then add the outer shapes. In principle, you could use hot glue for snowflakes of this scale, although this is uncommon for quilling projects (tiny snowflakes would use more hot glue than paper). But it definitely works in this case and can really speed up the process if you make quite a few of these big pieces.
One of the nicest things about these snowflakes is that the lacy shadows they create are just as beautiful as the snowflakes themselves.
Photo source: tomkatstudio.blogspot.com/2010/12/tutorial-giant-quilled-snowflakes-from.html
Beautiful snowflake
You will need: 2 square sheets of blue paper, scissors, glue stick, pencil, rhinestone.
Master Class
- Fold the square sheet diagonally.
- Fold twice more.
- Draw 3 lines along which the cuts will go. Do not cut all the way through at the fold as this is the center of the snowflake.
- Cut along the lines.
- Make triangular slits at the bottom of the workpiece.
- Unfold the workpiece.
- Fold and glue the middle stripes of each ray in the center.
- Make the second blank in the same way.
- Glue the blanks together so that the rays are staggered.
- Glue a rhinestone to the center.
A beautiful three-dimensional paper snowflake is ready! I recommend watching this video!
Volumetric paper SNOWFLAKE ❄ Crafts for the New Year
Volumetric snowflake made of component parts
You will need: 6 square sheets of paper, scissors, glue.
Master Class
- Take a sheet of paper and fold it diagonally, then in half.
- Make 3 cuts and unfold the workpiece.
- Glue the ends of the smallest strips, then glue the others through one strip on each side.
- Connect the remaining strips on the other side in the same way.
- Repeat this process with the remaining sheets, then assemble a snowflake by gluing 6 blanks together.
The snowflake from its component parts is ready! I recommend watching this video!
How to make a BIG NEW YEAR SNOWFLAKE
Geometric snowflake
You will need: 2 sheets of colored paper, scissors, glue stick.
Master Class
- Cut each sheet into 3 equal parts.
- Take one piece and fold it in half.
- Make 4 cuts: 2 short and 2 long.
- Distribute the center stripes on opposite sides.
- Repeat this process with all the pieces.
- Glue the blanks together, alternating colors with each other to form a snowflake.
Geometric snowflake is ready! I recommend watching this video!
Crafts for the New Year: Geometric Snowflake
I recommend watching this video!
Snowflake with angels - a gift for Christmas
Following the New Year comes an important holiday - Christmas. Every child will want to prepare a gift for their loved ones, and an adult will help them. A snowflake with angels is a good idea for a holiday craft.
Apply the drawing using a template. It is very difficult to cut, so it is better to choose thinner paper. Very carefully and carefully straighten the snowflake. It is well suited for window decoration.
Step-by-step instructions for making an accordion snowflake
Another worthy decoration for the New Year's interior. Many ways have already been invented to model them, I want to try something new for myself.
Materials for work:
- squares of paper measuring 8-10 cm in one, two or more shades - 14 pcs.;
- scissors;
- foamiran or cabochons – 2 pcs.;
- glue;
- ruler.
How to do:
The more squares you use, the more magnificent the accordion you will get. Choose any number of shades. Take 14 blanks.
Make 2 parallel folds in each square and glue the ends together to create a tunnel. All double stripes must be the same width. Use a ruler. Fold and glue the ends of all 14 pieces.
Make an additional 2 parallel bends in the resulting tunnels. If you have a narrow ruler, you can place it in the center and bend the sides in each strip. Do the same with all stripes.
Press the folded side strips inward in each piece. Spread the paper and press along the entire length with your fingers along the folded lines. Next, smooth out the resulting fragments. They will become the basis for the rays of the snowflake.
In the first ray, use scissors to cut off one side, sharpening the corner. Also cut the sides into triangles. Using the first ray as a template, prepare all the other fragments.
While the carved strips will still be squeezed on the sides. Apply a thin thread of glue along one side of the beam.
Place the second beam on top, clearly aligning the parts in length and width, and all cut holes and outer corners must also match. Collect a stack of all the rays, coating each subsequent one with glue.
Apply glue to the last ray. Insert your index fingers into the first and last tunnels. Spread the snowflake around the circumference, gluing the edges. Mask the center with foamiran rounds on both sides or some cabochons.
Simple option
This turned out to be the easiest and fastest way to make a beautiful snowflake. And now I’ll show you everything step by step.
First you need to understand how to fold paper according to a pattern. I used regular white office sheets on which I printed special templates. Like these ones.
Choose, click on the photos and download them to your computer. I have prepared the most interesting ones for you.
Did you print it out? Now you need to put everything together correctly. Look at the photo and repeat.
The main thing here is not to get confused: first we fold it into a triangle so that the drawing “looks” at us. Fold along the marked stripes. Next, fold it into a triangle again.
And now we die one part of the corner of the workpiece and then the other, as in the photo. It should be so that the cutting template is the only place for cutting.
Carefully cut out everything marked in dark color with scissors.
Now let’s straighten it out... And, voila, what a beauty!
Once you learn how to fold paper using these easy patterns, you can easily use more complex patterns for snowflakes.
For small family members, we will choose the easiest voluminous snowflakes to make.
We were taught this method in labor lessons. We cut paper of different colors into strips 1.5-2 cm wide and of different lengths. We fasten the two opposite ends.
It all depends on how to arrange such details so that our snowflakes turn out to be different in shape.
Original snowflake
You will need: 2 sheets of yellow A4 paper, scissors, a simple pencil, white thread, glue stick.
Master Class
- Take a sheet of paper and fold it into an accordion.
- Mark the center with a pencil.
- Draw 3 triangles on each side, round the edges and cut out.
- Do the same functions with the second sheet.
- Tie 2 accordions together.
- Spread the accordions to form a circle.
- Glue the 4 parts together.
The original volumetric paper snowflake is ready! I recommend watching this video!
DIY VOLUME SNOWFLAKE made of paper Master class
creative snowflake
You will need: sheets of paper, circle template, glue, pencil, thread, needle, ruler.
Master Class
- Cut out 8 identical circles from paper.
- Divide the circle into 8 equal parts and make cuts.
- Twist each part of the circle into a cone using a pencil, securing with glue.
- Repeat this process with the remaining pieces.
- Thread the pieces onto a thread and a needle, fasten and form a ball.
The creative snowflake is ready! I recommend watching this video!
Origami, paper ball. Origami, ball out of paper.
Volumetric snowflake “Snow Queen”
White, flawless and beautiful. Regular office paper will do.
From one sheet of A4 we make a square: we bend it into a triangle, and cut off a strip from the bottom. We cut the second sheet in half, and also make squares from the halves.
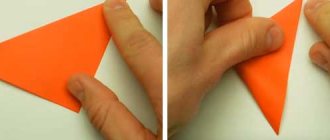
First we work with the square. We fold it into a triangle, bend it again and again.
On the side opposite the fold, cut strips.
We'll do the same with smaller squares. Divide a strip cut from a large square into two squares. From them we get the same blanks.
Now in the center of the large snowflake we glue a smaller snowflake, and attach the smallest one to it. We do the same on the other side of the workpiece. "The Snow Queen" is ready!
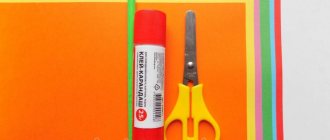
Tools and material for New Year's snowflakes
Depending on the chosen material for work, we will need:
- stencil or diagram,
- ruler,
- marker,
- pencil,
- paper clips,
- awl and thread,
- scissors,
- stationery knife,
- glue.
Don't forget about safety rules. If you have chosen PVA or an even stronger composition such as Moment glue, then the process must take place under the continuous supervision of an adult. The same applies to scissors - these should be stationery scissors specifically designed for children's creativity.
The richest list of modern materials opens up rich opportunities for creativity:
- colored paper for creativity,
- paper napkins,
- cardboard,
- foil,
- Styrofoam,
- foamiran,
- natural material,
- CDs.
A thinner pattern means a more graceful snowflake
The more lines on the workpiece, the thinner they are, the more amazing the snowflake turns out. But this is already more difficult work. Start this activity when the child is ready for it. This requires both perseverance and already developed skills. Such a design is difficult to apply, but even more difficult to carefully cut it out. But what happens in the end if everything was successful! This is already a work of art. Only nature can create more graceful snowflakes.